Installing a paving stone patio yourself is completely doable over a weekend or two, and the result is a surface that lasts decades when built right. If you want a step-by-step walkthrough, follow this guide on how to install a paver patio from start to finish. The basic process is: plan and measure, excavate, compact a gravel base (4–6 inches), screed 1 inch of bedding sand, lay your pavers in your chosen pattern, cut the borders to fit, lock in edge restraints, sweep in polymeric joint sand, and compact everything one final time. If you want a step-by-step walkthrough, follow these guidelines for how to install resin patio pavers from planning through the final joint sand plan and measure. Get those layers right and the rest takes care of itself.
How to Install a Paving Stone Patio: Step-by-Step DIY Guide

Planning and Measuring Your Patio Area
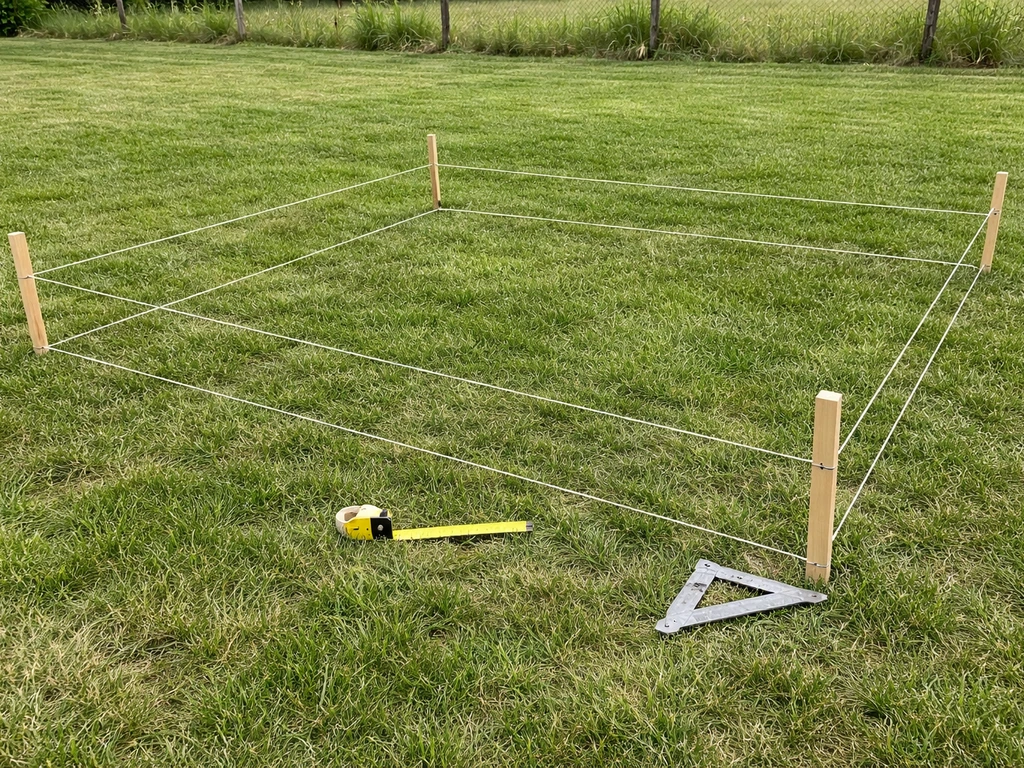
Start by marking out the patio footprint with stakes and string line. Measure the length and width, then multiply to get your square footage. Add 5–10% to that number when ordering pavers to account for cuts and breakage. For an irregular or curved design, break the shape into rectangles, calculate each, and add them together.
Before you dig, think about drainage. The finished patio surface needs to slope away from your house blank" rel="noopener noreferrer">at 1/4 inch per foot. That means blank" rel="noopener noreferrer">a 12-foot-wide patio should drop 3 inches from the house edge to the outer edge. This slope carries water away from your foundation and prevents pooling. Mark this grade into your string lines now so you're building toward it from the start, not correcting it at the end.
Also check for underground utilities before digging. Call 811 (in the US) and they'll mark lines for free. It takes a couple of days and it's non-negotiable.
Figuring Out How Much Material You Need
Once you have square footage, use it to estimate everything. For a 200-square-foot patio with a 4-inch gravel base: you'll need roughly 2.5 cubic yards of compacted gravel, about 0.6 cubic yards of coarse concrete sand for bedding, plus pavers to cover your square footage (plus that 5–10% buffer). Most paver calculators on supplier websites will do this math for you if you plug in your dimensions.
Tools and Materials Checklist
Getting everything on-site before you start saves a lot of frustration. Here's what you'll realistically need for a standard paving stone patio:
- Pavers (concrete, natural stone, or your chosen type), plus 5–10% extra
- Crushed gravel or compactable base aggregate (4–6 inches worth after compaction)
- Coarse concrete sand for bedding (not mason sand or stone dust)
- Polymeric jointing sand
- Plastic or aluminum edge restraints rated for interlocking pavers
- Galvanized spikes or pins for edge restraints (10-inch length typical)
- Geotextile landscape fabric (recommended if your soil is clay or consistently wet)
- Plate compactor (rent from any home improvement store)
- Hand tamper (for edges and tight spots the plate compactor can't reach)
- Long screed board or 2x4, plus metal screed rails or pipes
- Rubber mallet
- Level and line level
- Measuring tape and chalk line
- Stakes and string line
- Flat spade and round-point shovel
- Wheelbarrow
- Broom (push broom and stiff bristle broom)
- Garden hose with spray nozzle
- Safety glasses, work gloves, and knee pads
- Masonry wet saw or angle grinder with diamond blade for cuts
The plate compactor is the one tool people most often try to skip. Don't. Renting one for the day costs around $75–$100 and it's the difference between a patio that stays flat for 20 years and one that sinks and shifts within a season or two.
Site Prep: Excavation, Grading, and Drainage
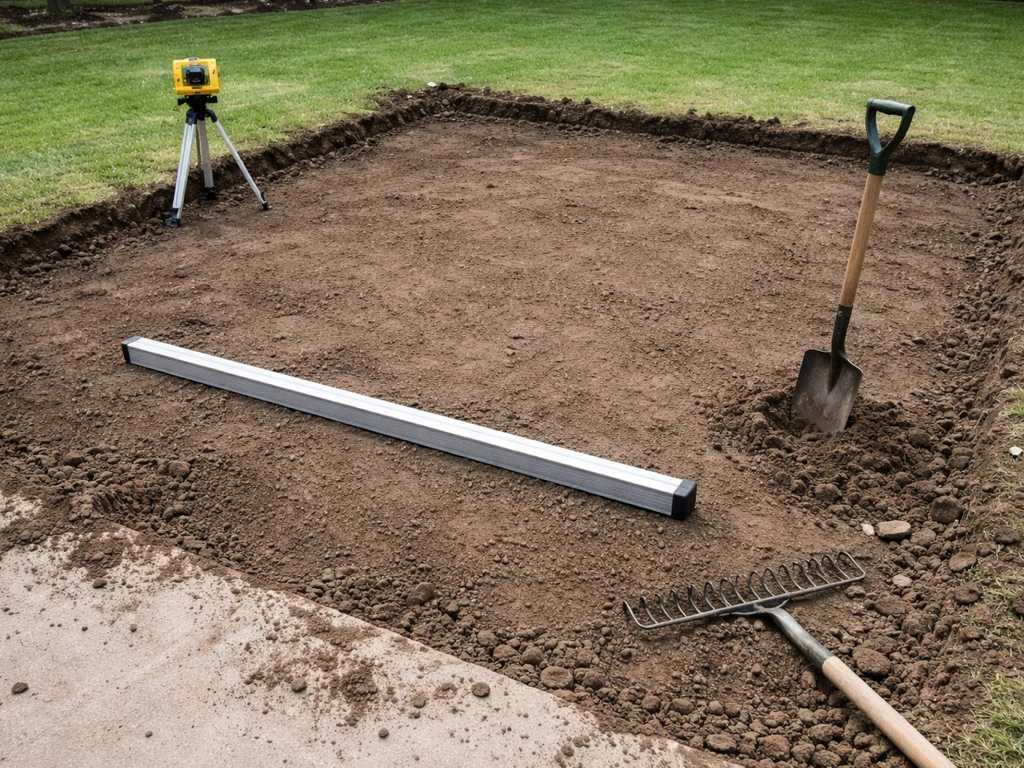
Remove all grass, sod, and vegetation from the patio area. Sod cutters (also rentable) make this much faster than hand digging. Get every root and weed out, because anything organic left in the base will decompose and create voids under your pavers.
Now calculate your total excavation depth. Add up: your paver thickness (typically 2.375 inches for standard concrete pavers, but measure yours) + 1 inch of bedding sand + your gravel base depth (4 inches minimum for a patio, 6 inches if you have soft or clay soil). A typical patio excavation ends up at 7–9 inches below your desired finished surface. Set your string lines at the finished paver height with the required slope built in, then dig to the correct depth below those strings.
Once you've excavated, compact the native soil subgrade with your plate compactor. If the soil is soft, clay-heavy, or stays wet for long periods, lay a layer of geotextile fabric directly on the compacted subgrade before adding your gravel. The fabric prevents the gravel from migrating down into the soil and maintains the integrity of your base over time, which matters a lot through freeze-thaw cycles.
For drainage, the slope you built into your string lines does most of the work. Make sure there's a clear path for water to run off the outer edge of the patio. A drainage plan for your paver patio helps direct water away from the house and reduces the risk of sinking or pooling over time clear path for water to run off. If you're installing pavers against the house, pay extra attention here: the slope away from the foundation is critical, not optional. If you want the joints, edge details, and drainage to work properly where the patio meets your foundation, follow a dedicated guide on how to install patio pavers against the house. A separate guide on installing patio pavers against the house covers the specific considerations for that scenario.
Laying Over Concrete or Existing Hard Surfaces
If you're installing pavers over an existing concrete slab, the process changes significantly. You skip most of the excavation, but you need to check that the concrete is structurally sound with no major cracks or heaving. You also need to verify that adding paver thickness on top of the slab won't create a tripping hazard at doorways or create drainage issues. In this case, the concrete slab acts as your base and you typically use a thin mortar or sand-set bed directly on it. The drainage slope is whatever the slab already has, so check it before committing.
Building the Base Layers and Screeding the Sand
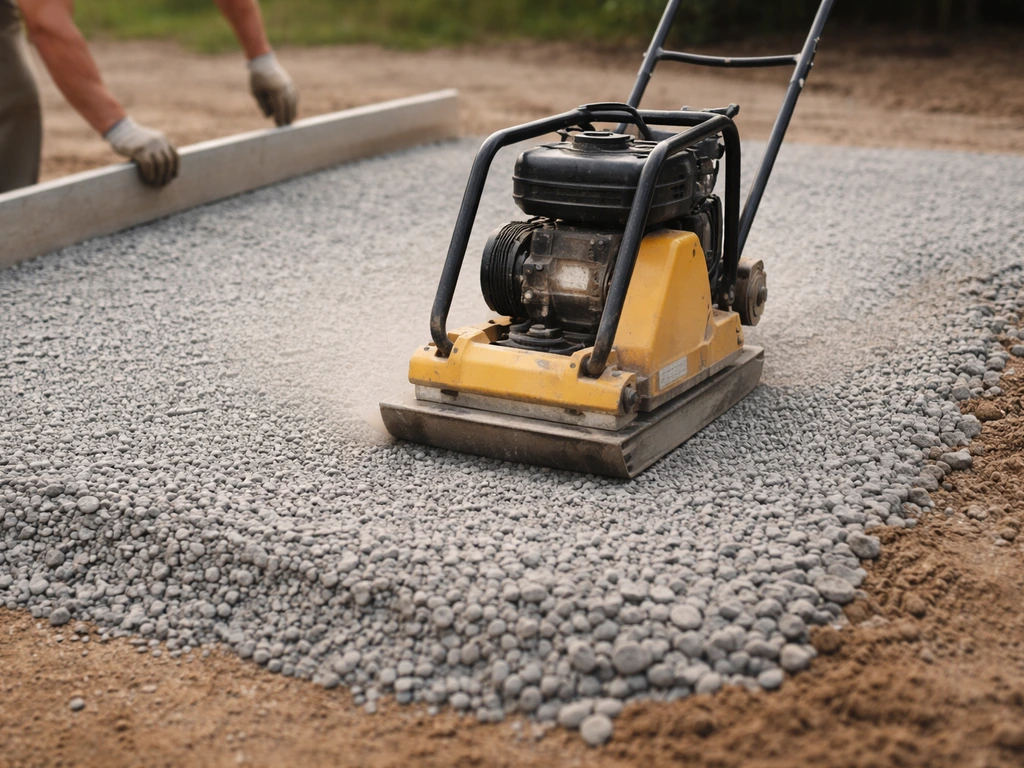
Add your crushed gravel base in lifts, not all at once. Pour 2–3 inches of gravel, spread it evenly, and compact it thoroughly with the plate compactor before adding the next lift. Compacting in layers (rather than dumping 6 inches in and running the compactor once) is what actually creates a stable, load-bearing base. After compaction, the gravel should feel like it's not going anywhere when you step on it.
Once your gravel base is compacted to the correct depth and slope, it's time to screed the bedding sand. Use coarse concrete sand, specifically. Avoid mason sand, stone dust, or any sand with a high percentage of fine particles. Fine-particle sands compress unevenly and can wash out. Set your screed rails (metal pipes or conduit work perfectly) on top of the gravel at the correct height so that after screeding you end up with exactly 1 inch of sand. Pull your screed board across the rails to create a perfectly flat, uniform surface. Do not walk on the screeded sand after this point.
The 1-inch sand bed is doing a precise job: it gives pavers a firm, even cushion and allows them to be tapped into final position. Any thicker and the surface becomes unstable. Any thinner and you lose the ability to make small height adjustments.
Laying the Pavers: Layout, Patterns, and Edging
Start laying pavers from a straight, fixed edge, which is usually the house or a defined border. Work outward and across, never stepping on laid pavers if you can help it, and never disturbing the screeded sand bed. Place pavers gently, letting them rest on the sand without pressing or twisting. Use a rubber mallet to tap each paver level and flush with its neighbors.
Choosing a Pattern
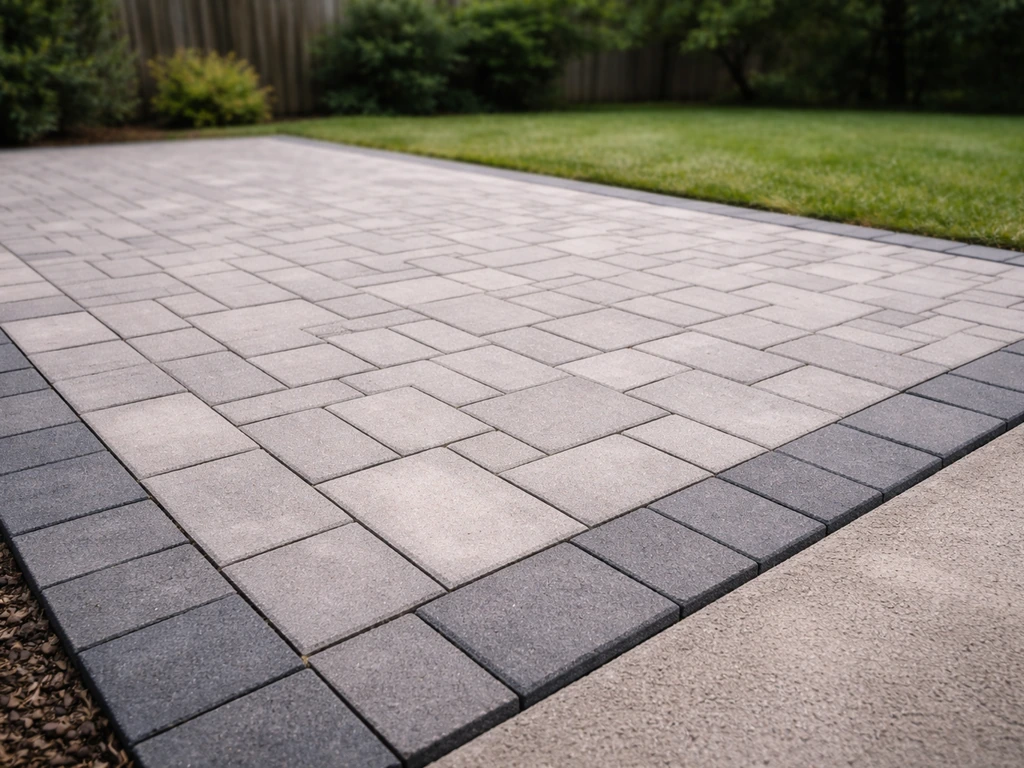
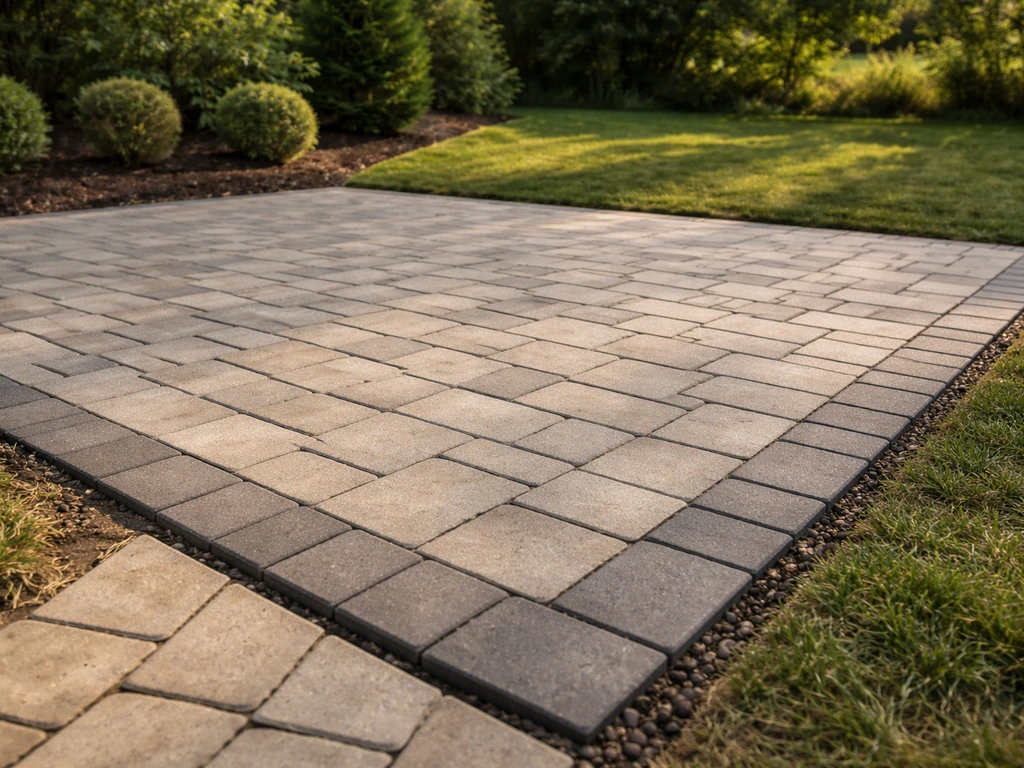
For a square or rectangular patio using uniform pavers, the most common patterns are running bond (offset rows, like brickwork), herringbone (pavers set at 45 degrees, excellent structural interlock), and stack bond (grid pattern, the simplest to lay but the least strong structurally). For DIYers doing a backyard patio, running bond is the sweet spot: easy to manage, visually appealing, and structurally sound. Herringbone requires more cuts at borders but provides excellent stability, which is why it's often recommended for driveways and high-traffic areas.
For square patio pavers of a single size, a simple grid or stack bond is clean and modern-looking and makes measuring and cutting much more predictable. If you're mixing paver sizes (a common and attractive approach), plan your pattern on paper first and do a dry-lay test on a flat surface before committing.
Installing Edge Restraints
Edge restraints go in before or alongside laying, depending on your layout. Install them on the compacted gravel base along all open edges of the patio (edges not against a wall or structure). Use plastic or aluminum restraints rated specifically for interlocking pavers, not flat landscape edging, which is not strong enough to hold pavers under load. Secure the restraints with 10-inch galvanized spikes driven every 8–10 inches. This spacing is important: too far apart and the restraint will flex over time, allowing pavers to creep outward and joints to open up.
Cutting, Fitting, and Finishing the Border
Once your full pavers are laid, you'll have gaps along the edges where pavers need to be cut to fit. Measure each space individually (they vary slightly) and mark the cut line on the paver with a pencil or chalk using a straight edge. For clean, accurate cuts on concrete or natural stone pavers, a wet masonry saw is the right tool. It cuts cleanly, keeps dust down, and handles curves and angles much better than a cold chisel. If you're only making a handful of straight cuts, an angle grinder with a diamond blade also works. Lowe's specifically recommends a tabletop wet saw when you're making a significant volume of cuts.
For border rows and irregular areas (like cutting around a fire pit base or a curved garden bed), mark the cut line by placing the full paver directly over the gap, tracing the line, then cutting. For curves, a series of straight cuts that approximate the curve works well, especially if you'll have a border edge cap covering the line.
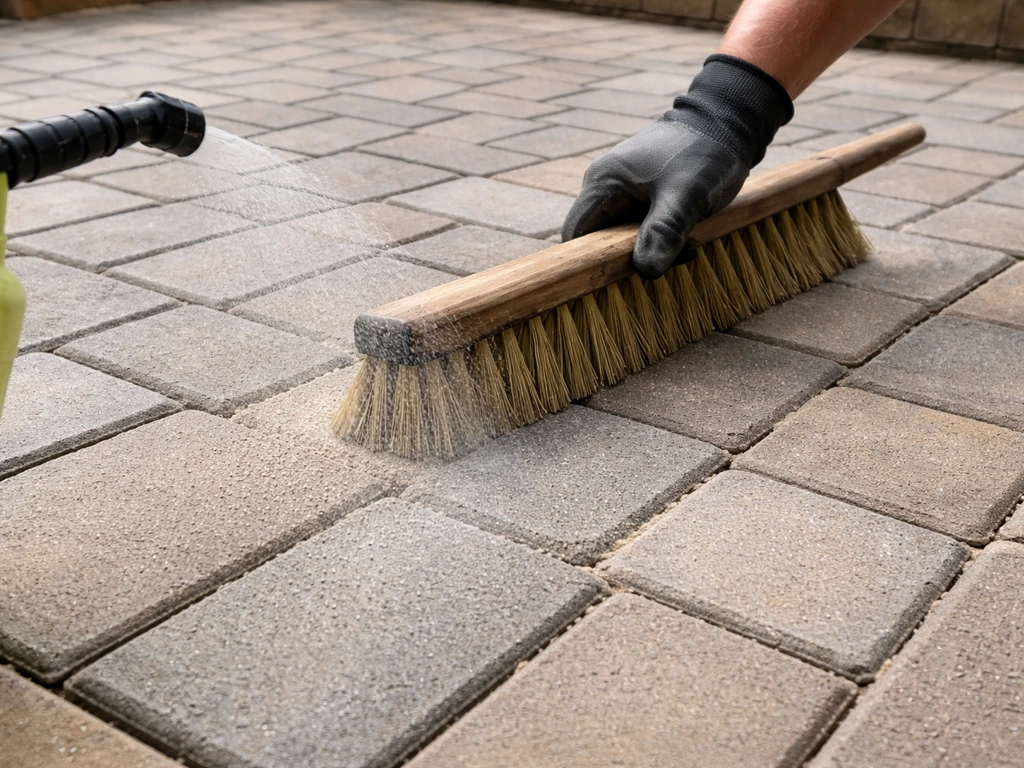
After all pavers are placed and cuts are fitted, go over the entire surface with the plate compactor to set the pavers firmly into the bedding sand. Make at least two passes in different directions. The sand will rise slightly into the joints as you compact, which is exactly what you want.
Special Cases and Common DIY Mistakes
Laying Over Grass or Uneven Ground
Never lay pavers directly over grass or sod. Even if it looks fine at first, the organic material underneath will decompose, causing pavers to sink unevenly. Always excavate and remove all vegetation first. For uneven ground, take your time on the gravel base and use the compactor to level it as much as possible before screeding your sand. The sand bed can compensate for very minor variations (a few millimeters), but it is not designed to fix a poorly graded base.
Plastic and Rubber Pavers
Plastic or rubber interlocking pavers (sometimes called permeable or grid-style pavers) are a different installation scenario from concrete or stone pavers. If you want to make a patio with rubber pavers, use the product's recommended base and drainage approach so the surface stays level and stable over time. They often sit on a compacted gravel base without a sand bed, and many are designed specifically to allow water infiltration. If you're working with permeable paver systems, the base prep principles are similar but the surface drainage approach is different. For a complete walkthrough, see how to install permeable paver patio and follow the product-specific steps for the base and drainage permeable paver systems. Always follow the specific manufacturer instructions for these products, as installation varies by brand.
Mistakes That Ruin Patios
- Skipping or under-compacting the gravel base (the single most common cause of paver failure)
- Using the wrong sand: mason sand or stone dust instead of coarse concrete sand for bedding
- Using flat landscape edging instead of proper paver edge restraints
- Not building in the 1/4-inch-per-foot slope from the start, then trying to fix it with the sand layer
- Walking on the screeded sand before laying pavers, which destroys the flat surface
- Setting spikes too far apart on edge restraints, allowing pavers to shift over time
- Skipping the final plate compactor pass after all pavers are laid
- Filling joints with regular sand, which washes out and invites weeds
When the Ground Just Won't Cooperate
If your soil is extremely soft, clay-heavy, or you're building over a consistently wet area, 4 inches of gravel base may not be enough. Go to 6 inches and use geotextile fabric at the base. In extreme cases (standing water, very poor drainage), consider consulting with a landscaper before investing the full build, because a drainage solution may need to go in first. A paver patio drainage system installed correctly will keep the surface performing well for decades; one installed over a chronic water problem won't last regardless of how well you lay the pavers.
Sealing, Maintenance, and Making It Last
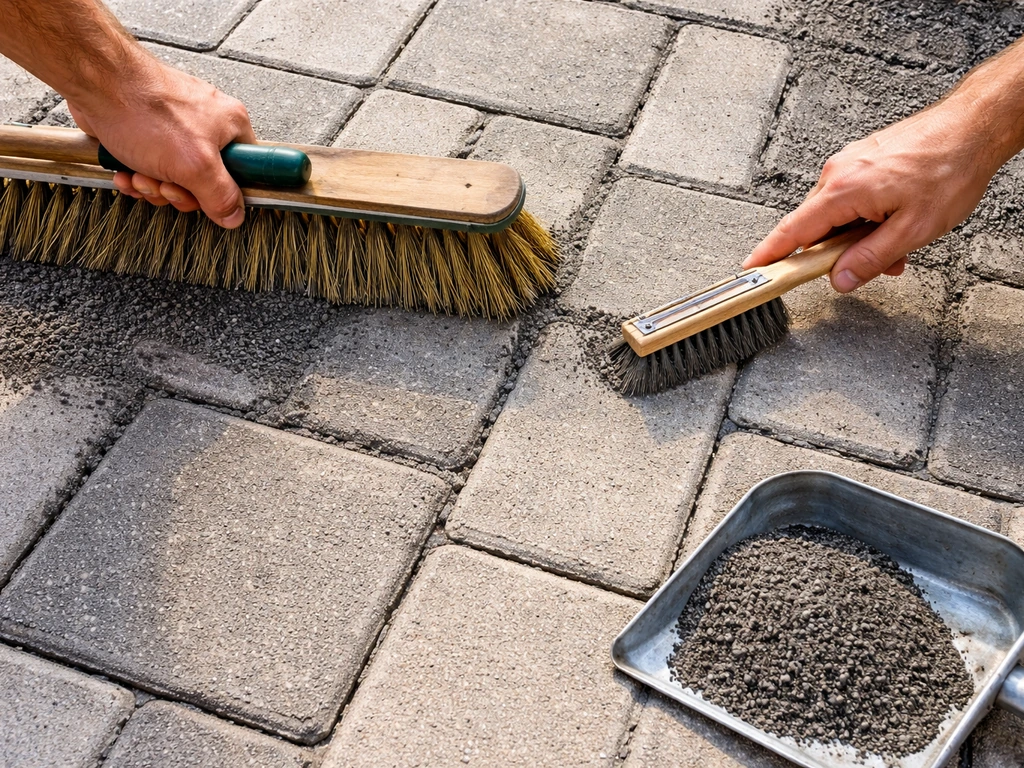
Polymeric Joint Sand: The Finishing Step That Holds Everything Together
After the final compaction, sweep polymeric jointing sand into all the paver joints. Pour it over the surface and use a stiff broom to work it into every joint. Then blow or sweep off all excess sand from the paver faces completely before the next step. Joints need to be at least 1/4 inch wide (ideally 3/16 to 1/4 inch) for the polymeric sand to work properly. Fill joints to about 1/8 inch below the top of the paver (or just below the chamfered edge if your pavers have one). Do not overfill.
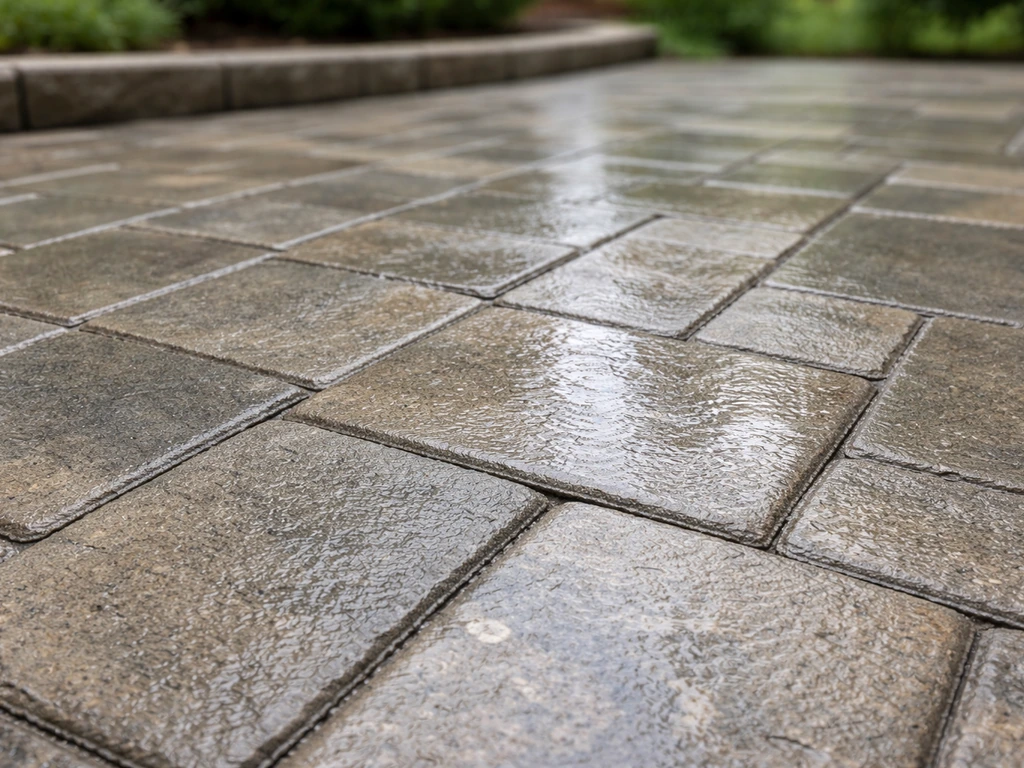
Activate the polymeric sand by misting it gently with a garden hose on the shower setting. You're looking to dampen the entire surface without flooding it or washing sand out of the joints. Let it cure according to the product instructions (usually 24 hours minimum before foot traffic). Polymeric sand resists erosion, weeds, and insects, which is a big upgrade from regular sand. QUIKRETE and Techniseal both make reliable versions.
To Seal or Not to Seal
Sealing is optional but worth it for most concrete paver patios. A penetrating or film-forming sealer protects against stains, enhances color, and can help lock joint sand in place. Wait at least 60–90 days after installation before sealing, which gives the polymeric sand time to fully cure and any efflorescence (white mineral deposits that sometimes appear on new pavers) to work its way out. Clean the surface thoroughly before applying sealer. After that, plan to reseal every 3–5 years depending on your climate and traffic.
Ongoing Maintenance
Interlocking paver patios are genuinely low-maintenance when built correctly, but they're not zero-maintenance. Do a visual inspection in spring and fall. Check that joint sand is still intact and refill any sections that have washed out or settled. Look for any pavers that have shifted or settled unevenly. The good news: individual pavers can be pulled up and releveled without disturbing the rest of the patio, which is a huge advantage over poured concrete. Keep the surface clear of organic debris in fall to prevent staining and weed seeds settling into joints.
| Maintenance Task | Frequency | Notes |
|---|---|---|
| Visual inspection for settled or shifted pavers | Spring and fall | Re-level individual pavers as needed |
| Refill joint sand | As needed (typically every 1–3 years) | Use polymeric sand to match original installation |
| Surface cleaning | Annually or as needed | Mild detergent and water; pressure washing on low setting |
| Reseal (if sealed) | Every 3–5 years | Clean and let dry completely before applying new coat |
| Weed removal from joints | As needed through growing season | Polymeric sand greatly reduces but doesn't eliminate weeds |
Done right, a paving stone patio is one of the best investments you can make in your backyard. The build takes effort, but every step has a clear purpose and the skills carry over to other projects. Take your time on the base, get your slope right, and don't skip the polymeric sand. Everything else is just putting pieces together.
FAQ
Can I install a paving stone patio directly on concrete without excavation?
Yes, but only if the existing slab is structurally sound (no heaving, major cracking, or areas that pump when pressed). Verify the slab’s drainage slope first, and plan for the added height at doorways so you do not create a tripping step. In many cases you will use a thin sand-set or mortar bed appropriate for pavers, and you should still use edge restraints to keep the perimeter from spreading.
What’s the minimum gravel base thickness I can get away with?
For most yards, 4 inches is the stated minimum, but 6 inches is safer on soft, clay-heavy, or seasonally wet soil. If you see standing water or the area stays damp for long periods, increase the base and include geotextile, because sinking usually starts when the base is underbuilt rather than when the pavers are laid wrong.
How do I figure out the right slope if my patio is not a straight rectangle?
Use your string lines to build the slope to the correct drop relative to the house edge, but for irregular shapes you still want a consistent outward direction. Break the footprint into sections, assign each section the same slope rate (1/4 inch per foot), and check that the lowest points end at an open drainage path, not into a planter or sealed area.
Is geotextile fabric always necessary under pavers?
Not always, but it is a good idea when the subgrade is clay-heavy, stays wet, or has fine material that can migrate into the gravel. The goal is to stop gravel from sinking into soil and to keep the base stable through freeze-thaw cycles. If your soil is already well-draining and stable, you may be able to skip it, but it should not replace proper compaction.
How wet should the bedding sand be when I screed it?
Screed it dry or near-dry so it stays workable but does not turn into a paste. The bedding layer should be uniform and firm under the paver, and you want to avoid overcompacting the sand before the pavers are set. Also, once screeded, do not step on it because footprints create low spots that telegraph through the finished surface.
What joint width should I target for polymeric sand?
Keep joints at least 1/4 inch wide (3/16 to 1/4 inch is typically ideal). If joints are too tight, polymeric sand cannot bind and lock in properly, and you are more likely to see washout or weed growth. If your pavers have a different edge profile, follow the product’s guidance for the chamfer and joint depth.
How do I avoid washing polymeric sand out of the joints during misting?
Use a fine shower setting and mist lightly enough to dampen the surface without creating visible puddling or sand movement. Work gently across the patio rather than blasting one area, and stop if you notice sand loosening from the joints onto the paver faces. After activation, do not hose-rinse the surface.
When is it safe to walk or place furniture on the new patio?
Wait at least 24 hours for curing before foot traffic, and longer if the temperature is cool or humidity is high. If you plan to move heavy items or park something on it, give the joint sand more time than minimum curing. If the polymeric sand is not fully cured, you can loosen joints when you sweep or disturb the top layer.
Should I seal right away, or can I skip sealing entirely?
Sealing is optional, but if you do it, wait 60 to 90 days so the joints can fully cure and any efflorescence has a chance to dissipate. If you skip sealing, you will still get performance as long as the installation and polymeric joints are correct, but you may see faster staining and more frequent joint-sand maintenance depending on your climate and usage.
Why do some pavers shift even when the base looks solid?
Common causes include insufficient compaction of the gravel in lifts, missing or weak edge restraints, or restraints installed with poor spacing. If restraints are too flexible, the patio can creep outward over time and open joints. Also confirm your slope and drainage path, because repeated pooling can soften the base and lead to movement.
What’s the cleanest way to cut around curved borders or fixtures?
For curves, you can approximate with straight cuts and cover the gaps with a border cap if your design allows it. Another approach is to dry-lay pavers and mark each gap individually so the border row does not accumulate errors. For wet masonry cutting, a wet saw keeps cuts accurate and reduces dust, but plan for extra time because curved layouts often require many small adjustments.
Can I install permeable or rubber interlocking pavers using the same base steps as concrete pavers?
The general base-prep principles are similar, but the surface drainage approach and recommended layers can differ by product. Rubber and permeable grid systems often require their specific base spec (and sometimes different jointing or thickness). Always follow the manufacturer’s layer design so water infiltration and stability work together as intended.
What should I do if my patio settles after the first season?
First, inspect the joints and edge restraints, because settlement is often a symptom of base movement or joint sand loss. If only a few pavers have sunken spots, you may be able to lift and relevel those pavers without disturbing the whole patio, then reset bedding sand and recompact. If you see widespread unevenness or signs of pooling, the issue is usually drainage or base thickness and may require more involved correction.
Step-by-step DIY guide to install a paver patio: layout, base prep, drainage, set pavers, cut fit, edges, and sealing.
Step-by-step DIY guide to apply polymeric sand between patio pavers, prep joints, spread, fill, and activate without haz
Learn how to seal a paver patio step by step: clean, choose penetrating or wet-look sealer, apply, cure, and maintain.