You can absolutely install a paver patio yourself, and if you follow the right sequence, it will look great and last for decades. The key is getting the base right, maintaining consistent slope for drainage, and finishing the edges properly. Skip any of those three things and you'll be pulling up pavers within a few years. Nail them, and you'll have a patio that holds up through freeze-thaw cycles, heavy foot traffic, and years of weather without so much as a wobble.
Patio Pavers Do It Yourself: Step-by-Step Guide

Felix Rowe
29 Apr 2026
Choosing the Right Pavers and Layout
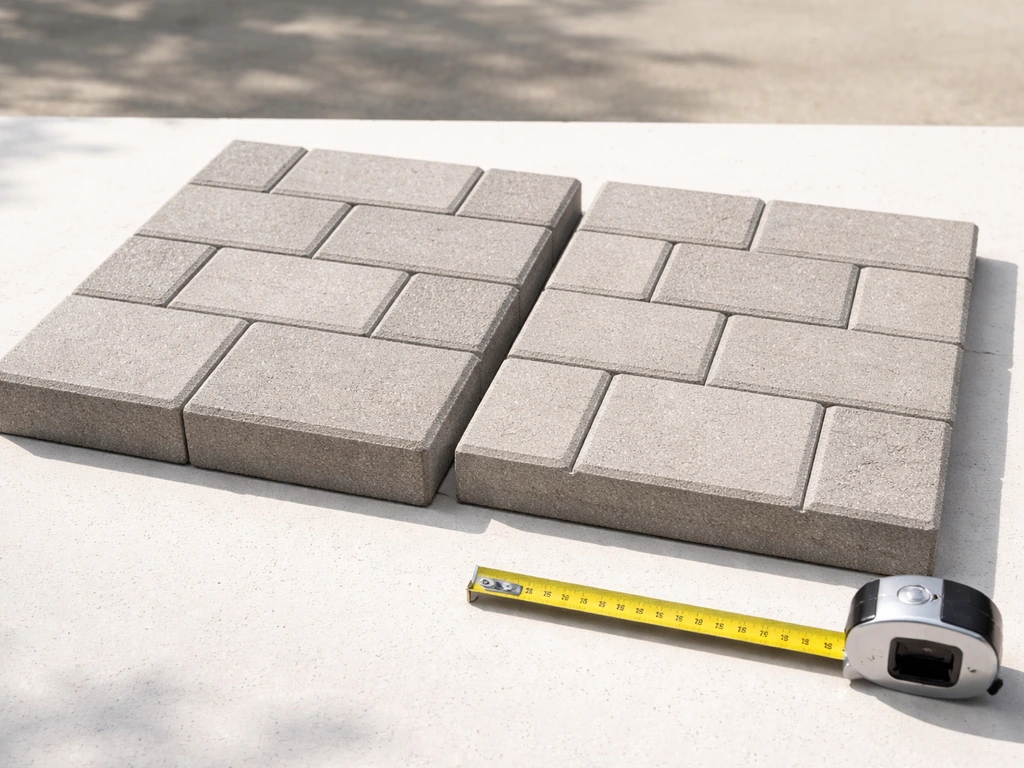
Before you buy a single paver, you need to match thickness to use. For a standard backyard patio with foot traffic only, 60mm or 80mm pavers work well. At 80mm, you're also covered if the occasional vehicle ever rolls onto the edge. Manufacturers like Techo-Bloc and Unilock publish application charts that map thickness to use categories (pedestrian, light-duty vehicular, heavy-duty vehicular), and it's worth spending five minutes with those charts. For most DIY patios, an 80mm concrete paver hits the sweet spot between cost and durability. Look for pavers with a minimum compressive strength of around 8,000 psi and water absorption below 5%, both of which are important if you live somewhere with hard winters.
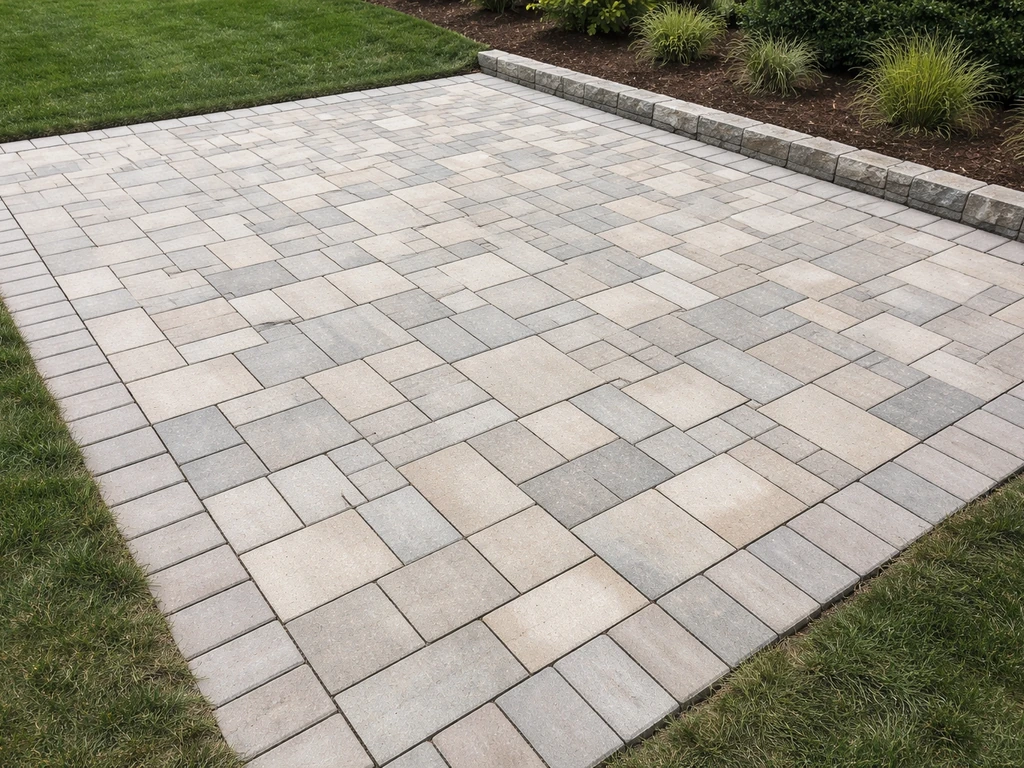
For the pattern, the most forgiving choice for a first-time installer is a running bond (like brickwork). It's easy to keep aligned, wastes very little material on cuts, and looks clean. Herringbone (45 or 90 degrees) is stronger under traffic and handles lateral shifting better, but it demands more cuts, especially at the border. A basketweave is simple but requires very consistent paver sizing. If you want a more design-forward look with contrasting borders or mixed sizes, sites with dedicated paver patio ideas can give you a visual head start before you commit.
| Pattern | Difficulty | Cut Volume | Best For |
|---|---|---|---|
| Running Bond | Easy | Low | Rectangular patios, beginners |
| 90° Herringbone | Moderate | High (border cuts) | High-traffic areas, more visual interest |
| 45° Herringbone | Harder | Very High | Experienced DIYers wanting a premium look |
| Basketweave | Easy | Low | Simple square layouts with uniform pavers |
| Random/Flagstone-style | Moderate | Moderate | Natural-look patios with irregular stones |
Pick a paver color and texture that suits your house exterior and yard. Tumbled pavers hide minor imperfections and look more relaxed. Smooth or slate-finish pavers show precision work (and any mistakes) more clearly. If you're going to use polymeric sand in the joints, be aware that heavily textured pavers with deep grooves can trap polymer particles on the surface, making cleanup tricky.
Planning and Measuring (Including Site Constraints)
Measure your planned patio area carefully and add about 10% to your paver order to account for cuts and any breakage. Sketch the layout on paper first, orienting the pattern so that the most visible edges have full pavers and the cuts land at the back or along a house wall.
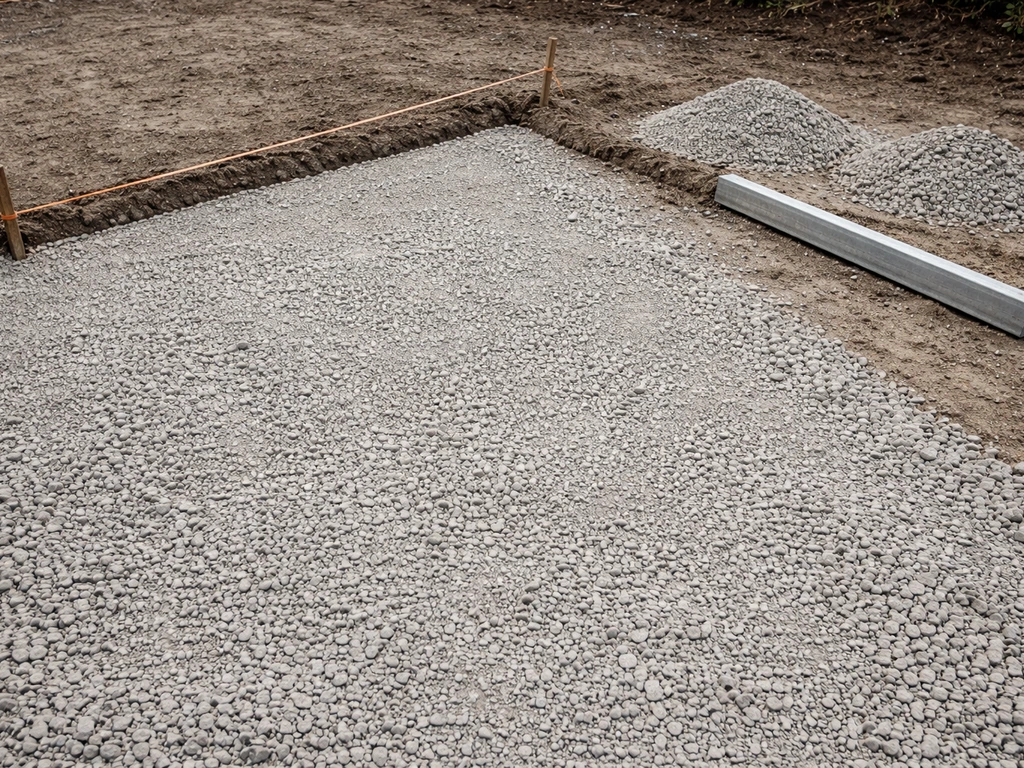
The critical number in your planning is total excavation depth. Use this formula: Total Excavation = Granular Base + Bedding Course + Paver Thickness, then subtract about 1/4 inch (6.5mm) because the bedding sand will compact slightly under the pavers. For a typical patio, that works out to: 6 inches of compacted gravel base + 1 inch of bedding sand + paver thickness (say, 3.15 inches for 80mm pavers) minus the 1/4-inch compaction factor. You're digging roughly 10 inches deep in most cases, sometimes up to 12 inches if your soil is soft or clay-heavy.
Mark out the patio perimeter with stakes and mason's string. Run the strings tight and check for square using the 3-4-5 triangle method: measure 3 feet along one string, 4 feet along the perpendicular string, and the diagonal between those two points should be exactly 5 feet. If it's not, adjust until it is. Plan your drainage slope into the string lines from the start: you want the patio surface to drop 3/16 of an inch per foot (about 5mm per 300mm) away from the house or toward a planned drainage point. That might not sound like much, but it's enough to prevent pooling.
- Call 811 (USA) before digging to have underground utilities marked
- Note any tree roots, downspout locations, or existing structures that will affect your layout
- Identify where water currently drains in your yard and plan your slope to match or improve it
- Check local codes for any permit requirements for patios above a certain size
- Account for where string lines will anchor if one side of the patio abuts a wall or fence
Site Prep and Base Construction
This is where most DIY patio failures start. A weak or improperly sloped base means sunken pavers, puddles, and shifting edges no matter how carefully you lay the pavers themselves. Budget more time here than you think you need.
Starting Over Grass or Bare Soil
Strip off all grass, roots, and organic material. Organic matter decomposes and causes settlement, so you need it completely out. Excavate to your calculated depth, keeping the bottom of the excavation as level as possible. If your soil is clay-heavy (meaning it holds water and gets slippery when wet), lay a layer of geotextile landscape fabric over the subgrade before adding your gravel. This prevents the clay from migrating up into your base over time, which would eventually destabilize everything. Skip the fabric if you have sandy, well-draining soil.
Fill the excavation with compactable gravel (often sold as Class II base, road base, or crusher run). Add it in 2 to 3-inch lifts, compacting each lift with a plate compactor before adding the next. Techo-Bloc recommends a minimum of 6 to 8 inches of compacted stone base for patios. Don't try to compact 6 inches all at once: it won't compact evenly and you'll end up with a soft layer underneath. Rent a plate compactor for this job. A hand tamper is too slow and too inconsistent for anything larger than a small step or border.
Laying Over Existing Concrete
If you have a structurally sound concrete slab underneath, you can lay pavers directly on top using a mortar-set or thin-set method, or you can bed them in a 1-inch sand layer over the concrete. The concrete essentially becomes your base, which saves a lot of excavation work. Check the slab carefully first: any major cracks, heaving, or drainage issues in the concrete will show up in your finished paver surface eventually. Small cracks are usually fine. Large cracks or sections that have shifted mean you should address the concrete first, or consider a different approach.
Dealing With Uneven or Sloped Ground
Sloped yards require more excavation on the high side and potentially a retaining edge or step detail on the low side. Work to your string lines, not to the existing ground. The string lines define your finished surface, and you adjust your base depth accordingly. On a severe slope, you may need to build up the low side with more base material rather than just cutting down the high side. Always compact fill material in lifts: never just dump gravel and expect it to stay put.
The Bedding Layer
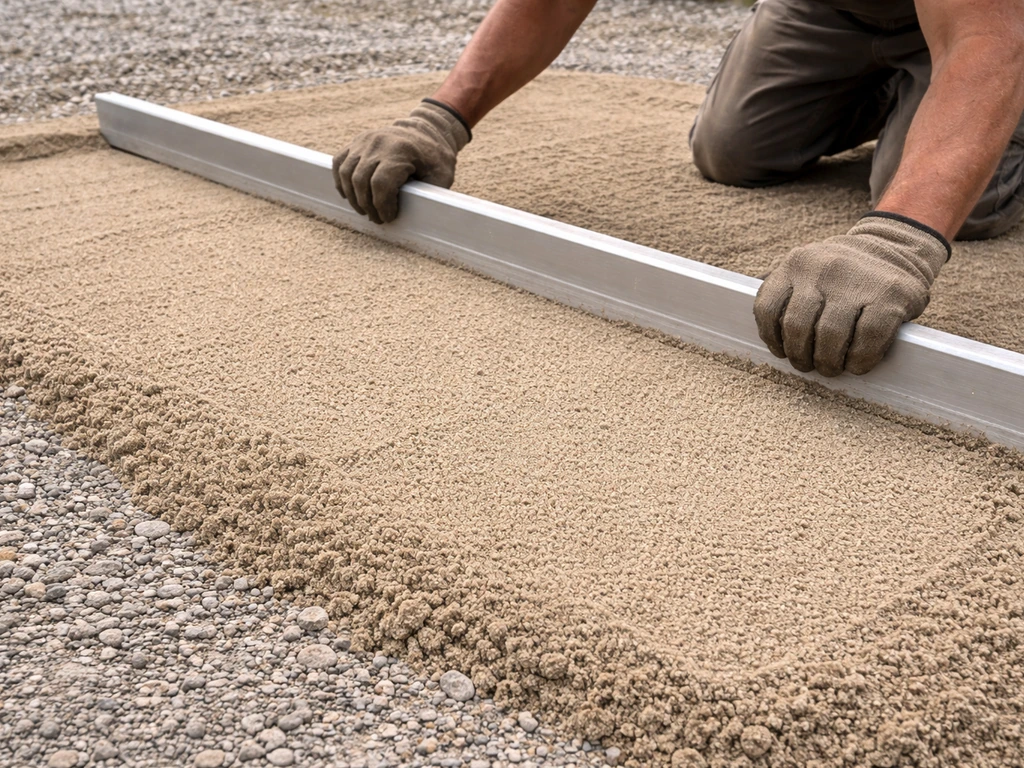
Once your gravel base is fully compacted and at the right elevation, screed a 1-inch layer of coarse washed concrete sand (not stone dust, not fine play sand) over the top. Stone dust holds moisture, stays compacted after it's wet, and doesn't allow proper consolidation under the paver. Washed concrete sand is the right material here. Set two parallel screed rails or pipes at your desired height, pour sand between them, and drag a straight 2x4 across them to create a perfectly flat 1-inch layer. Do not walk on the screeded sand before laying pavers. If you step on it, re-screed that area.
Laying Pavers and Keeping Lines Level
Start laying from a fixed, straight edge, usually the house wall or a chalk line you've snapped on the screeded sand. Work outward from that starting edge. Set each paver gently down without sliding it, which would displace sand beneath it. Butt pavers tightly together with consistent joint spacing (typically 1/16 to 1/8 inch for concrete pavers). Don't press pavers down by hand: just set them and let the final compaction step seat them properly.
Use your string lines as a constant reference for both height and alignment. Every few rows, lay a long level or straightedge across the surface to check that things haven't drifted. If a paver sits high, pull it up, remove a small amount of sand, and reset it. If it sits low, add a little sand and reset. The goal is a surface that's consistently flat across each row and consistently sloped in the direction you planned for drainage. Cambridge Pavers' installation guidelines suggest a side-to-side slope allowance of about blank" rel="noopener noreferrer">1 inch drop per 8 feet for runoff, which aligns well with the 3/16-inch-per-foot target.
Work in sections, keeping unused screeded sand covered with plywood so you can walk on it without disturbing it. Lay out full sections of pavers, then move your screeding setup forward. This is the most meditative part of the whole project: once you get into a rhythm, it goes faster than you expect.
Cutting Techniques and Edge Details
You will need to cut pavers at the perimeter, around obstacles, and anywhere the pattern meets an irregular edge. For straight cuts on concrete pavers, a diamond-blade circular saw or angle grinder works well for occasional cuts. For a full patio project, rent a wet-cut paver saw (also called a masonry saw or table saw with a diamond blade). It's faster, cleaner, and much safer than trying to do everything with a handheld grinder. Dry cutting creates a lot of silica dust, so wear an N95 respirator at minimum, or use a wet saw to keep dust down.
Measure each cut piece individually rather than assuming they're all the same. Small variations in your layout can mean that the last paver in a row needs a slightly different cut than the one three rows back. Mark cuts with a pencil or chalk, double-check before cutting, and always cut away from your body.
Edge Restraints
Edge restraints are what keep your patio from slowly spreading outward over time. They're plastic or aluminum strips that go around the perimeter of your patio, pinned to the compacted base. Without them, lateral forces from foot traffic and freeze-thaw expansion will gradually push your border pavers outward and create gaps. Install restraints after your pavers are laid but before final compaction. Secure them with 8 to 10-inch spikes driven through the restraint at a slight angle into the compacted base, spacing spikes every 8 to 12 inches. For patios near vehicles or driveways, go closer to 8 inches apart. Backfill the outside edge of the restraint with soil or gravel after it's pinned.
A decorative border row in a contrasting paver color or size also helps visually define the edges and gives you a clean line to work your field pavers toward. Run the border first, set your edge restraints against it, then fill in the field pavers. This approach is a bit more advanced but produces a much more finished-looking result.
Finishing: Compaction, Joint Sand, Sealing, and Curing
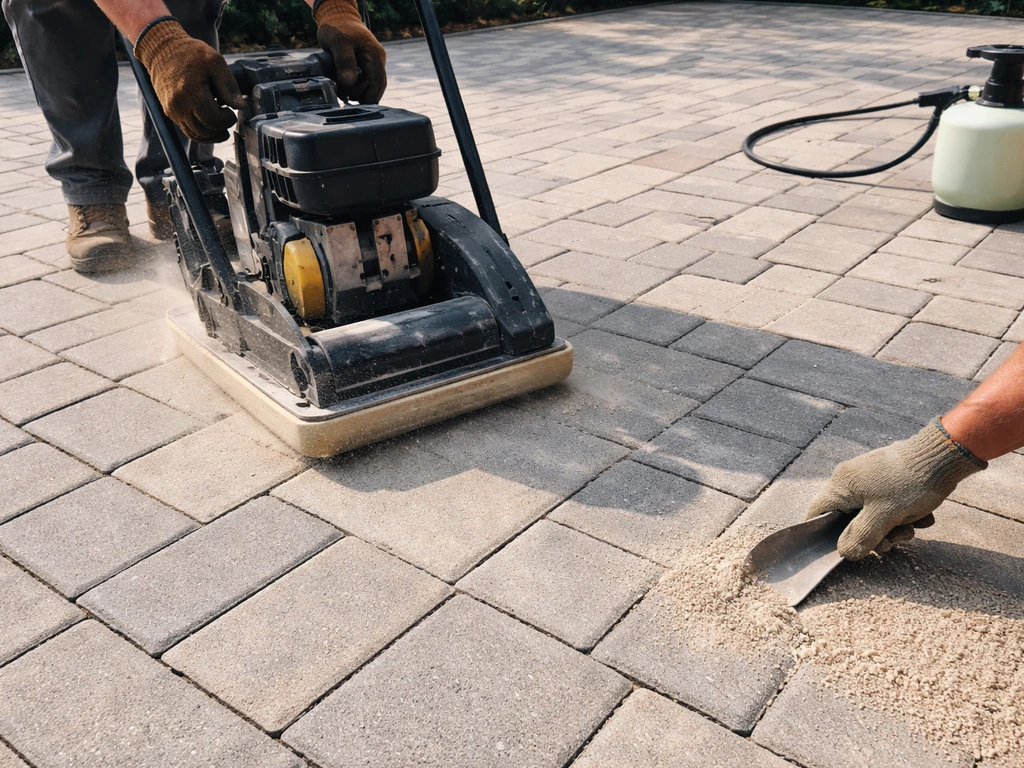
Once all pavers are laid and edge restraints are in place, run the plate compactor over the entire surface. Use a rubber or poly pad on the bottom of the compactor to avoid scratching the pavers (most rentals have these available). Make two or three passes in different directions. This seating step is what locks the pavers into the bedding sand and ensures a firm, stable surface.
After compaction, spread polymeric jointing sand over the surface and sweep it into the joints with a stiff broom. Make sure every joint is packed full from top to bottom, not just filled at the surface. Make several passes in different directions. Once the joints are filled, run the compactor over the surface again (lightly, one pass) to help vibrate the sand deeper into the joints. Blow or sweep off any excess sand from the paver surfaces before activating the polymers. Then mist the entire surface with water according to the polymeric sand manufacturer's instructions. The water activates the binding agents that harden the sand and lock it in place. Polymeric sand is highly recommended because it inhibits weed and grass growth in joints and resists washout much better than plain sand. Just note that for heavily textured pavers with deep surface grooves, standard polymeric sand can leave a haze: check the sand product's compatibility with your paver texture before buying.
Sealing is optional but extends the life of your patio, enhances color, and adds another layer of protection against staining and freeze-thaw damage. Wait at least 3 months after installation before applying sealer. This wait time allows natural efflorescence (a white mineral salt residue that often appears on new concrete pavers) to dissipate. If you seal over it, you trap the salts and the discoloration becomes permanent. When you're ready to seal, make sure the pavers are completely dry (at least 24 hours of dry weather beforehand) and apply the sealer on a day when rain isn't forecast for at least 48 hours to allow proper curing.
Troubleshooting, Maintenance, and What to Realistically Expect
Common Problems and Fixes
| Problem | Most Likely Cause | Fix |
|---|---|---|
| Sunken or rocking pavers | Insufficient base compaction or thin bedding layer | Pull up affected pavers, add and re-screed sand, reset and compact |
| Pavers shifting outward | Missing or inadequate edge restraints | Add or re-pin edge restraints, reset border pavers |
| Puddles forming on surface | Inadequate slope or reverse slope toward house | Reset affected section with corrected slope; may require lifting and re-screeding |
| Weeds growing in joints | Plain sand in joints, or joints not fully filled | Remove weeds, refill joints with polymeric sand, compact and activate |
| White haze on paver surface | Efflorescence from new concrete pavers | Wait for it to weather off naturally; use efflorescence cleaner if persistent |
| Gaps appearing between pavers | Joint sand washing out or not fully packed | Refill joints with polymeric sand, re-compact and re-activate |
Ongoing Maintenance
Once your patio is established, maintenance is genuinely low. Sweep or blow off debris regularly so organic material doesn't decompose in the joints. Re-apply joint sand every few years if you notice gaps forming, especially after a heavy rain season. If you sealed the patio, re-seal every 3 to 5 years depending on sun exposure and traffic. Avoid using metal shovels directly on the paver surface in winter: use a plastic shovel or a rubber-edged pusher. Standard de-icing salts can be used on quality concrete pavers (products engineered to meet freeze-thaw standards handle them well), but avoid calcium chloride on colored or specialty pavers unless the manufacturer specifically approves it.
Realistic Time and Cost
A 200 to 300 square foot patio is a solid first DIY project. If you’re wondering how to do patio pavers yourself, a realistic plan and the right base are what make the project go smoothly first DIY project. If you are planning a do it yourself paver patio installation, start with a realistic budget and timeline so you can focus on getting the base, slope, and edges right. Realistically, expect to spend two full weekends on it: one for excavation, base prep, and compaction, and one for laying pavers, cutting, edge work, and finishing. If you want the full step-by-step walkthrough, follow this backyard paver patio guide so you can build it all by yourself how to build a backyard paver patio all by yourself. If you've done it before, you can move faster, but don't try to rush the base work. Material costs (pavers, gravel, sand, edge restraints, polymeric sand, sealer) for that size typically run between $800 and $2,500 depending on your paver choice and region. Equipment rental (plate compactor, wet saw, possibly a sod cutter) adds another $150 to $300 for a weekend. Hiring a contractor for the same job often runs $3,000 to $8,000 or more, so the savings are real.
The most important thing to remember is that paver installation is a skill that improves with each project. Your first patio will almost certainly have at least one section you wish you'd done differently, and that's fine. The system is forgiving: individual pavers can be pulled up and reset without affecting the rest. If you want to go deeper on specific scenarios like building around a fire pit, handling a severe slope, or creating raised sections, those are all variations on the same foundational skills you're building here. Get the base right, slope it correctly, edge it properly, and fill those joints, and you'll have a patio you're genuinely proud of. If you want more do it yourself patio paver ideas, look for layouts that match your space and your skill level before you commit to a full purchase.
FAQ
Can I do patio pavers do it yourself over an existing patio or slab?
If your ground is already compacted and mostly stable, you can sometimes skip excavation for a shallow “re-surface” only if the existing surface is firm, level enough to meet drainage goals, and has no failing base or organic material underneath. If you see rocking pavers, sinking spots, or any soft areas, treat it as a full base repair and re-lay rather than building on top, because new pavers will mirror the old movement.
What happens if I use the wrong thickness for patio pavers do it yourself?
Use a 3 to 4 inch thick concrete paver only if it is rated for your intended load category and you still build the full compacted base and correct bedding sand thickness. Going thinner than recommended reduces resistance to freeze-thaw expansion and traffic loads, and even a perfectly flat install can fail at the edges first where stresses are highest.
How do I choose a paver pattern for a first-time patio pavers do it yourself job?
Running bond is usually the best choice because it hides small cutting mistakes, but your layout should also prioritize “full pavers” along the most visible edges. A simple decision aid is to mark the patio width, subtract the border allowance, then test a pattern on paper to ensure the starting and ending rows do not force awkward slivers that are too narrow to cut cleanly.
How can I confirm my drainage slope is correct for patio pavers do it yourself?
Aim for consistent slope across the entire field, not just at the perimeter. If the patio meets a doorway or garage, keep the surface slightly lower than the threshold or away from it to prevent water from running back toward the house, and double-check the slope after you compact the base since compaction can change elevations.
Will polymeric sand haze or staining be an issue with textured patio pavers do it yourself?
Polymeric sand and cut grooves can create haze, especially with darker or textured pavers. Before you commit, do a small test area by sweeping the sand in, misting, and letting it cure, then inspect after it dries fully. If haze appears, use a compatible polymeric sand marketed for your paver texture or consider a different jointing approach.
What are the common mistakes when setting polymeric sand for patio pavers do it yourself?
After sweeping out excess sand, mist lightly in multiple passes, then do not flood the surface. Too much water too quickly can make the polymeric binder clump or wash partially out of joints, leaving weak spots that can re-open during the next rain.
Should I joint right away during patio pavers do it yourself, or wait?
Do not start jointing until the pavers are fully seated and the base has been compacted correctly. If you notice uneven joints forming while you lay pavers, fix it immediately by adjusting sand under specific units, not by relying on thicker joints, because polymeric sand requires joints that are filled to near consistent depth.
Is it okay to skip renting a plate compactor for patio pavers do it yourself?
If you do not have room for a plate compactor, you can sometimes hand-tamp small areas, but the results are usually inconsistent, and the bedding sand will behave differently in under-compacted zones. For DIY patios, it is usually worth renting the compactor and using 2 to 3 inch lifts so the base densifies evenly.
Where do edge restraints matter most for patio pavers do it yourself?
Edge restraints are most critical anywhere lateral forces exist, like along stairs, near driveways, or on patios with heavy traffic. If you can see the border pavers flex or shift under foot, add or upgrade restraints and re-check base height at the perimeter, because missing edge control is one of the fastest paths to spreading gaps.
Can I seal patio pavers do it yourself immediately after polymeric sand cures?
You can seal if you want stain protection and easier cleaning, but sealing is not required for stability. However, you should not seal newly installed pavers sooner than the recommended cure window because trapped efflorescence can permanently discolor the surface. Also confirm the sealer is compatible with polymeric joints, since some sealers alter joint behavior or sheen.
What’s the best way to handle winter ice and de-icing on patio pavers do it yourself?
For de-icing, prioritize pavers that are rated for freeze-thaw and follow the manufacturer’s approved de-icer guidance. Avoid aggressive scraping tools directly on pavers, use plastic or rubber-edged tools, and if you must use salt, prevent repeated over-salting of the same joints since corrosion of nearby metal items and localized joint breakdown can occur.
Next Articles
How to Use Quikrete Patio Paver Jointing Sand: Guide & Tips
How to use Quikrete Patio Paver Jointing Sand: step-by-step application, tools, timing, coverage, and care.

How to Use Patio Paver Sand: Step by Step DIY Guide
Step-by-step guide to apply patio paver sand correctly: prep base, set pavers, fill joints, compact, and troubleshoot is

How to Install Patio Pavers in Sand: Step-by-Step
DIY step-by-step how to install patio pavers in sand, from excavation and base prep to leveling, cutting, joint sand and