You can build a beautiful, long-lasting paver patio yourself in a weekend or two, and the results genuinely rival professional work when you follow the right steps. The key is understanding that good-looking pavers are mostly about what's underneath them: a properly compacted gravel base, a level sand bed, and solid edge restraints. Get those three things right, pick a pattern you love, and the rest falls into place. This guide walks you through the full process, from choosing a design idea to the final bag of polymeric sand, including how to handle the most common curveballs like uneven ground, existing concrete, and slopes. If you want, follow this guide closely as you plan materials, drainage, base prep, and then lay pavers step by step to complete the job yourself how to do patio pavers yourself. If you want a complete step-by-step approach, follow this guide on how to DIY paver patio from planning through jointing and sealing. If you are looking for patio pavers do it yourself guidance, this guide covers the full workflow step by step, from layout to jointing.
Do It Yourself Patio Paver Ideas: Layout, Prep, Install

DIY patio paver ideas that fit your space
Before you think about base depth or compaction, spend real time on the design. The pattern you choose affects how the patio looks, how long it holds up structurally, how much cutting you'll do, and how much material waste you'll generate. Here are the most popular patterns and what each one is actually good for.
Running bond
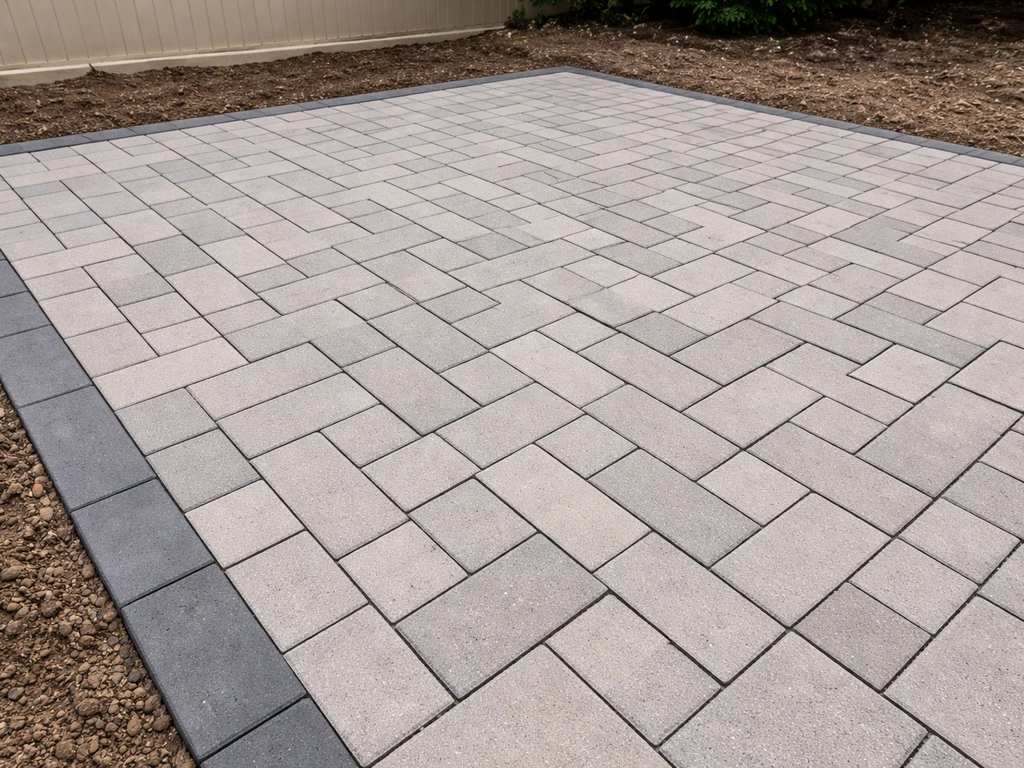
Running bond offsets each row by half a paver length, just like standard brickwork. It's one of the easiest patterns to lay because you can work in long, clean rows and the math stays simple. It works well on rectangular or square patios with few interruptions. Waste typically stays at the low end of the 10 to 15 percent range.
Herringbone
Herringbone is the strongest interlocking pattern available for rectangular pavers. The angled layout locks pavers together mechanically so they resist shifting under foot traffic and furniture loads. You can run it at 45 degrees (diagonal to the patio edge) or 90 degrees (parallel). The 45-degree version looks dramatic and hides minor alignment issues well, but it produces significantly more edge cuts and pushes waste toward the 15 percent mark or higher. If your patio will see heavy use or you live somewhere with freeze-thaw cycles, herringbone is worth the extra cutting effort.
Basketweave and stack bond
Basketweave groups pairs of pavers in alternating horizontal and vertical sets. It has a classic, symmetrical look that suits cottage and traditional home styles. Stack bond lines all joints up in both directions and is the simplest visually, but it offers the least structural interlock. Stack bond is fine for low-traffic patios with solid edge restraints, but avoid it for driveways or anywhere heavy loads are expected.
Project variations worth considering
Beyond flat rectangular patios, a few popular variations change the design and installation details in meaningful ways.
- Fire pit area: Build a circular or square fire pit zone using tumbled or heat-tolerant pavers. Keep the fire pit itself on a non-combustible surface (a gravel or sand-set pit pad works well) and use a contrasting paver color or border ring to define the zone visually.
- Raised patio: If your yard slopes away from the house, a raised patio uses retaining wall blocks or landscape timbers to create a level surface. The base and drainage details become more critical here because retained soil puts lateral pressure on the edges.
- Sloped designs: If a gentle slope is unavoidable, you can work with it by stepping the patio in terraced sections or by choosing a design that follows the natural grade. The drainage slope you build into any patio (1/8 to 1/4 inch per foot, sloping away from the house) means even 'flat' patios have intentional grade built in.
Planning: measuring, layout, drainage, and paver quantities
Measure your intended patio area carefully and sketch it out on paper or a simple app before ordering anything. Multiply length by width to get square footage, then add 10 to 15 percent for waste and cuts. For curved edges or diagonal herringbone patterns, push that waste allowance toward 15 percent or even a touch higher. It's always cheaper to have a few extra pavers than to reorder a partial pallet mid-project when dye lots can vary.
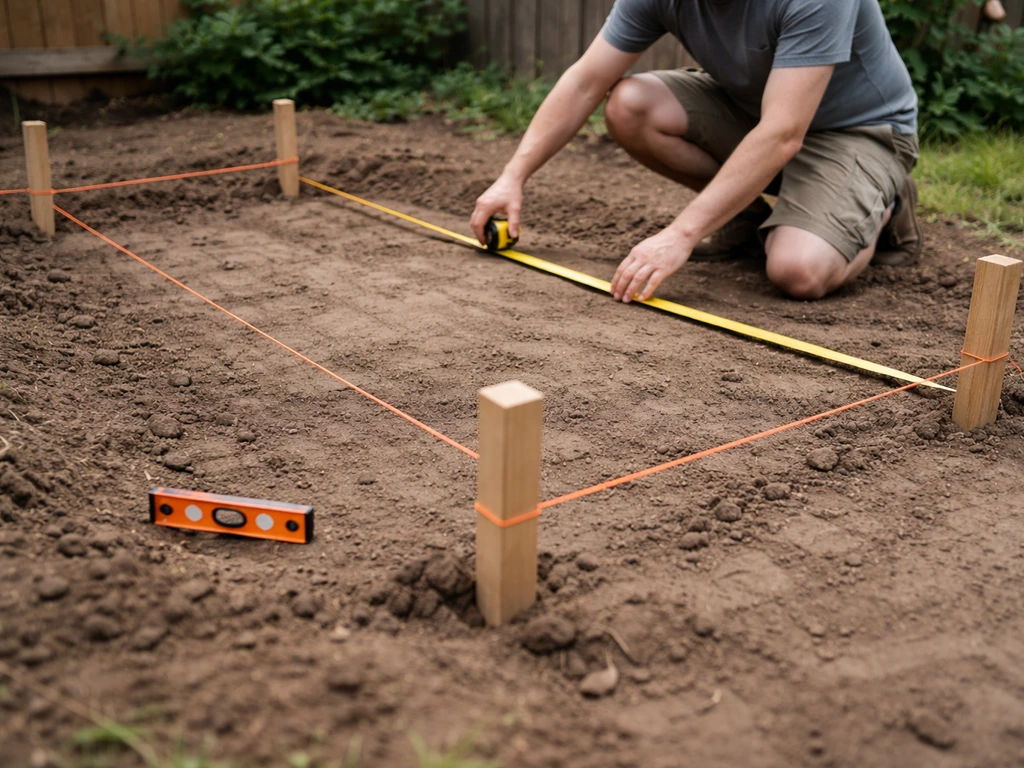
When you plan the layout, think about where joints will fall relative to the house wall, any steps, and permanent fixtures like hose bibs or AC units. Use string lines stretched across the area to visualize rows before a single paver is moved. Keep those string lines up during installation as a reference: they're your best tool for maintaining square and consistent joint spacing.
Drainage planning happens at this stage, not after. Every patio needs to slope away from the house. The standard range is 1/8 to 1/4 inch of drop per linear foot. A 12-foot patio should drop between 1.5 and 3 inches from the house side to the far edge. The Brick Industry Association specifies a minimum of 1/4 inch per foot (a 2 percent grade) for sand-set paving systems, and that's the number I'd plan to hit. You build this slope into the compacted base, not just the surface, so it needs to be part of your excavation plan.
Site prep options: over grass, on concrete, and on uneven ground
The ground you're starting with determines how much prep work is ahead of you. There are three common scenarios and each one has a distinct approach.
Installing over grass
You cannot simply lay pavers on top of grass. The organic material will decompose, the surface will become uneven, and the whole patio will sink. You need to remove the sod first. A rented sod cutter is the fastest method for large areas. For smaller patios, a grub hoe works fine. Once the sod is gone, excavate additional soil until you have enough depth for your base, bedding sand, and pavers combined, plus roughly an inch to account for the drainage slope. Mark your excavation depth at multiple points with stakes so you don't accidentally dig too shallow or too deep in spots.
Installing over existing concrete
Overlaying an existing concrete slab is possible, but only when the slab is structurally sound and drains properly. If the concrete has active cracking, is lifting or heaving, or sits on an unstable base, remove it before proceeding. Pavers installed over a failing slab will fail the same way. When the slab is solid and the drainage is adequate, you can set pavers directly on a thin sand bed or use a manufacturer-approved setting system. If you want to do stone patio pavers do yourself on top of an existing slab, confirm the surface is sound and drains correctly before laying a sand bed or approved setting system. Keep in mind that overlaying raises the finished surface height, which may affect door thresholds, steps, or adjacent hardscape.
Dealing with uneven ground
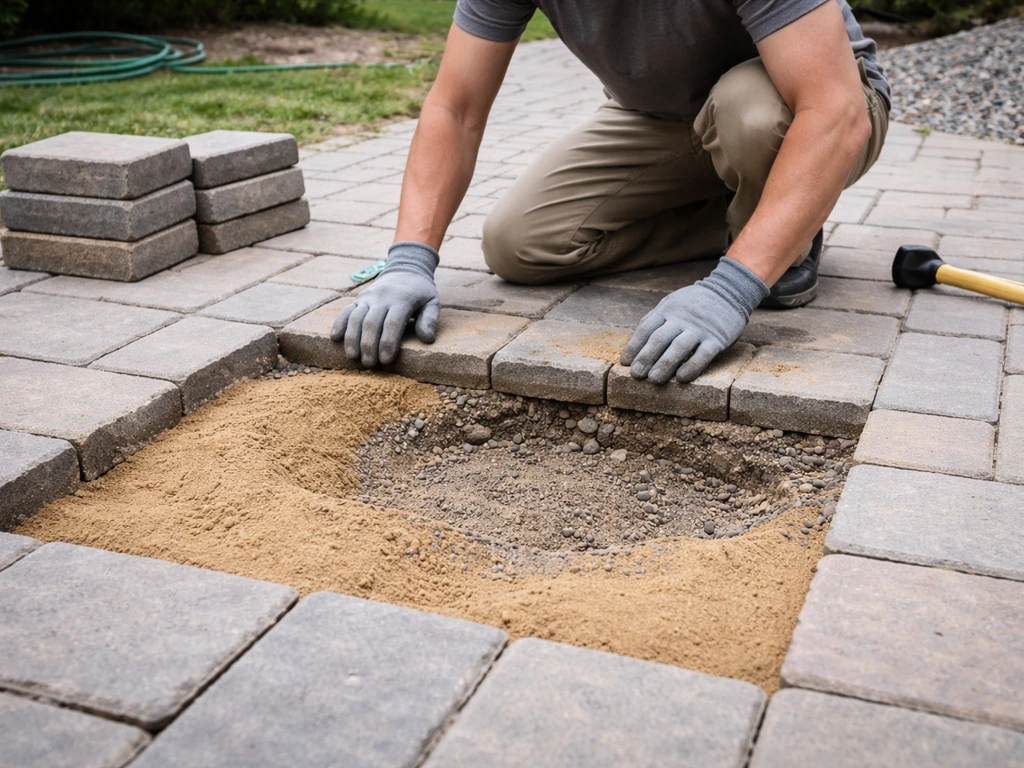
Uneven ground is normal and completely manageable. The key is not to compensate for irregularities with extra bedding sand. Bedding sand is a fine-tuning layer, not a leveling layer. Belgard’s product installation guide also describes specific bedding-sand installation procedures, including using screed pipes or rails to achieve the correct sand bed thickness and grade Bedding sand is a fine-tuning layer, not a leveling layer.. Use your excavation and base compaction to address major grade changes. If one corner is 6 inches lower than another, fix that in the subgrade and base, not with a thick sand bed. A sand bed that's too thick and uneven will compress unevenly under load and cause settled spots within a season or two.
Base installation and leveling/compaction for a solid patio
A properly built base is the single biggest factor in how long your patio lasts. The standard system has three layers: compacted subgrade (native soil), a granular aggregate base, and a bedding sand layer. Here's how to build each one correctly.
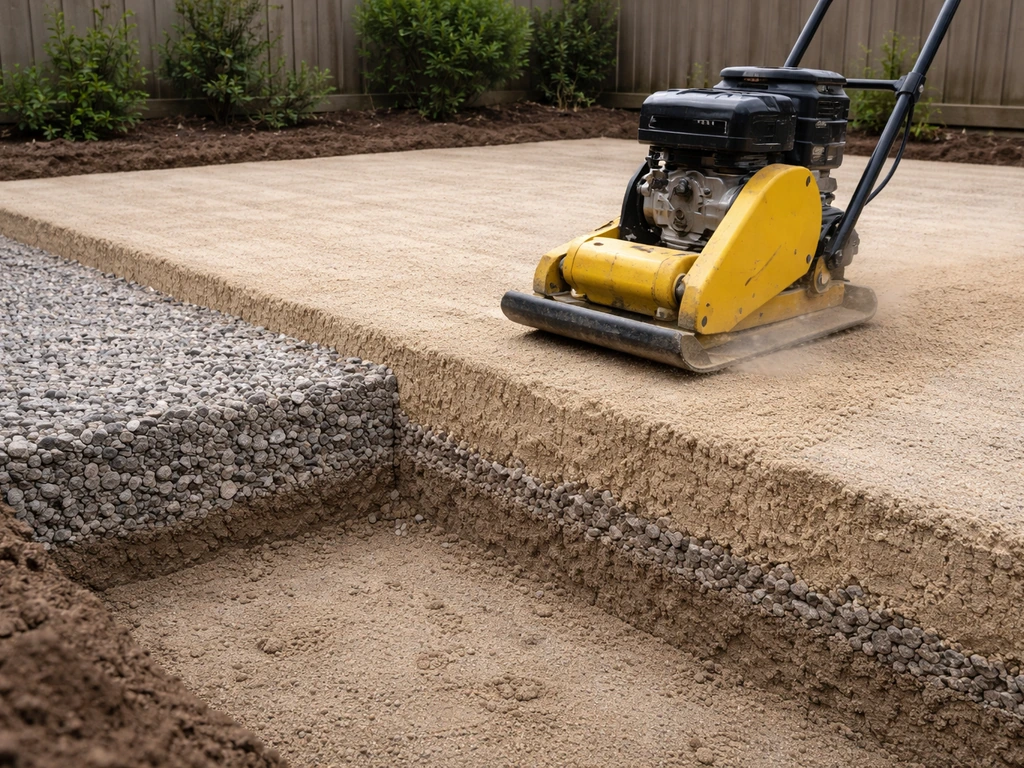
- Compact the native subgrade: After excavating, run a plate compactor over the exposed soil to firm it up. This is especially important in areas with loose or sandy soil. Target at least 95 percent Proctor density for residential pedestrian areas.
- Install and compact the aggregate base: Spread crushed gravel (typically 3/4 inch down to dust, sometimes called 'road base' or 'crusher run') in 2 to 3 inch lifts and compact each lift before adding the next. The total compacted base depth should be 4 to 6 inches for a standard residential patio. Use a plate compactor for each lift. Do not try to compact the full depth in one pass.
- Check the base with a straightedge: Use a 10-foot straightedge to check for high and low spots across the compacted base. The ICPI tolerance reference for base surface is measured over a 10-foot span. Fill low areas and re-compact; don't just add extra sand later to compensate.
- Spread the bedding sand: Once the base is compacted and graded correctly, spread a 1 to 1.5 inch layer of coarse bedding sand (concrete sand, not play sand). Use screed pipes or guides set to the correct height and a straight board to screed the sand flat and at your target drainage slope. Belgard recommends at least 1 inch of bedding sand, spread evenly.
- Do not compact the sand before laying pavers: Screeded sand should be left undisturbed. Walk boards can help you work across it without disturbing the surface if the area is large.
When you run the plate compactor over the finished paver surface after installation, always place a Paver Saver Mat (a thick rubber pad) between the compactor plate and the pavers. Without it, you'll scratch and chip the surface. The goal after compaction is a final surface tolerance of no more than 1/8 inch variation, which is the construction standard Barkman references for finished paver laying.
Edging, slopes, and borders to prevent movement and water problems
Edge restraints are non-negotiable. Without them, even a perfectly laid patio will slowly spread outward as pavers migrate under foot traffic and frost cycles. Plastic edge restraint systems (spiked into the compacted base) are the most practical option for DIY installs. Metal edging is more durable and holds curves better. Install edge restraints on all sides of the patio, including any sides that abut a lawn or planting bed. Drive the spikes every 12 inches, and make sure the restraint sits flush against the paver face without gaps.
Build your drainage slope into the base layer as described above, targeting 1/8 to 1/4 inch per foot sloping away from the house. Going steeper than 1/4 inch per foot creates problems: the compacted base becomes harder to achieve uniformly, and the patio surface starts to feel noticeably tilted underfoot. Keep the slope in that target range. If your yard slopes toward the house, consider installing a channel drain or French drain at the far edge of the patio to intercept and redirect water before it becomes a basement or crawl space issue.
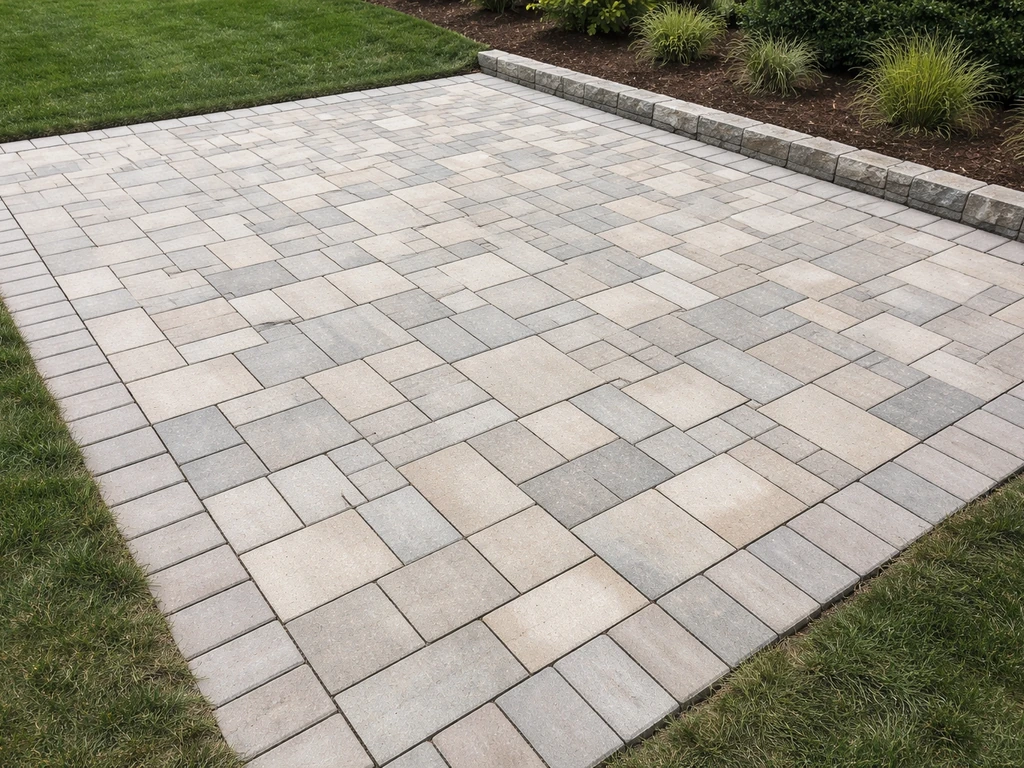
Decorative borders use a contrasting color or larger paver size to frame the patio and define the edge visually. Install border pavers first so you have a straight reference line to work from. This also reduces the number of cuts you need at the edges of the main field pattern.
Cutting, pattern layout, and install sequencing for clean lines
Lay out your pattern with dry pavers before any cutting begins. Start from a fixed, square corner or from the center of the patio (depending on your pattern) and work outward. Use string lines in at least two perpendicular directions to keep your rows square as you progress. Patterns drift subtly as you work, and catching drift early saves a lot of rework.
For cutting, a wet-cut angle grinder with a diamond blade handles most paver cuts on small patios. For larger projects, rent a wet saw (paver saw) from your local equipment rental shop for cleaner, more precise cuts. Mark cuts clearly with chalk or a pencil and always wear eye protection and hearing protection. For curved cuts, score and snap works on some paver types, but a wet saw gives cleaner curves.
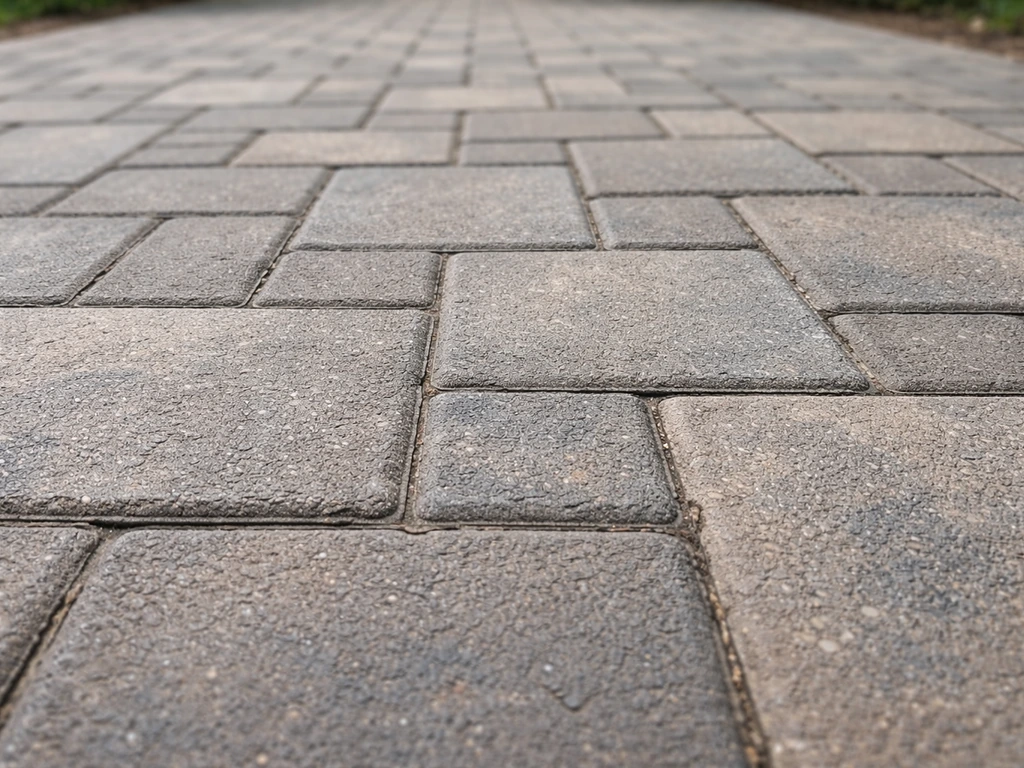
Install sequencing matters. Lay full pavers first, completing as much of the main field as possible. Leave cut pieces for last, working section by section around the perimeter. This approach means most of the patio is set and stable while you're doing the more fiddly work at the edges. Keep joint spacing consistent: most systems call for 1/8 to 1/4 inch joints. Use small plastic spacers if you find yourself fighting to keep joints uniform.
Once the full field is laid, run the plate compactor with the rubber mat pad over the entire surface to set the pavers firmly into the bedding sand. Check your final surface level with a straightedge. The finished paver surface should not vary by more than 1/8 inch, and adjacent pavers should not have lips (height differences) that would create a trip hazard.
Sealing, jointing (sand/polymeric), and ongoing maintenance
Filling the joints is the last installation step and the one that locks the whole system together. You have two main options: regular jointing sand (coarse, dry sand swept into joints) or polymeric sand (sand with a binder that hardens when activated with water).
| Feature | Regular Jointing Sand | Polymeric Sand |
|---|---|---|
| Cost | Lower | Higher |
| Weed resistance | Low | High |
| Ant resistance | Low | High |
| Application requirement | Dry surface, sweep in | Dry surface, sweep in, mist to activate |
| Rain sensitivity after install | Low risk | High risk: must cure before rain |
| Durability | Needs occasional replenishment | Longer lasting, resists washout |
| Best for | Low-traffic areas, easy refresh | Main patio fields, high-traffic areas |
For polymeric sand, follow the instructions precisely. Spread it only on a completely dry surface, sweep it into joints, and blow off excess from paver faces before misting. Fill joints to about 1/8 inch below the paver surface. Polymeric sand will wash out if rain hits it before it cures, so check the forecast and plan for a 24 to 48 hour dry window after installation. Joint widths for most polymeric sand products work best in the 1/8 to 1/4 inch range.
Sealing is optional but extends the life of your pavers and makes them easier to clean. Wait at least 14 days after installation before sealing new concrete pavers to allow them to cure properly. If you used polymeric sand, wait the full curing period specified by the sand manufacturer (typically 24 to 72 hours) before applying sealer. Use a penetrating sealer for a natural look or a wet-look sealer if you want enhanced color. Apply in the shade, on a clean dry surface, and follow the product label for coverage rates and recoat timing.
Ongoing maintenance is genuinely low effort when the base and jointing are done right. Sweep or blow off debris regularly to prevent staining and organic buildup. Re-apply joint sand or polymeric sand if you notice joint depth decreasing. Inspect the perimeter edge restraints each spring, especially after a hard winter. Reseal every 3 to 5 years depending on your climate and traffic.
Common DIY mistakes and troubleshooting
Most patio problems trace back to one of a handful of root causes. Here's what to watch for and how to fix it.
Sinking and settling
If pavers sink in isolated spots, the most common cause is insufficient base compaction or an inconsistent base depth. Low spots in the base create a void that the bedding sand eventually fills, and the paver above drops. To fix it, remove the affected pavers, add and compact base material to the correct depth, re-screed the sand, and relay the pavers. Don't just add sand to fill the depression without addressing what's underneath.
Shifting pavers
Pavers that shift outward at the edges almost always mean the edge restraints weren't installed, were installed incorrectly, or the spikes pulled out of soft soil. Reinstall with longer spikes driven into the compacted base, not just into loose soil. Interior shifting usually means the patio was laid on too-thick or too-soft bedding sand, or there was no compaction pass after laying.
Lippage (uneven paver heights)
Lippage is when adjacent pavers sit at different heights, creating a lip that's a tripping hazard and looks messy. It's usually caused by screeding the sand bed inconsistently or by not checking individual pavers as they're laid. Use a rubber mallet to tap down any paver that sits proud before moving on. After the plate compactor pass, any remaining lippage over 1/8 inch should be addressed by lifting the paver, adjusting the sand, and relaying it.
Weeds and ant hills
Weeds in paver joints come from seeds blowing in and germinating in the joint material, not from roots growing up from below (assuming you excavated properly). Polymeric sand is the best deterrent because it hardens and leaves little room for seeds to take hold. If weeds appear, treat them with a targeted weed killer rated for hardscape use, let them die, remove them, and refresh the joint sand. Ant hills in joints are more of a nuisance than a structural problem but can undermine joint stability over time. Polymeric sand significantly reduces ant activity in joints.
Poor drainage
If water pools on the patio after rain, the drainage slope is either too shallow or running the wrong direction. Check with a level and a tape measure. If the slope is there but water still pools, look for low spots in individual pavers (lippage in the other direction, essentially). Isolated pooling spots can sometimes be fixed by lifting a few pavers, adding a small amount of sand, and releveling. A persistent drainage problem that runs toward the house needs to be addressed seriously with a channel drain or re-grading, not just ignored.
Your materials, tools, and realistic next steps
Before you buy a single paver, walk your site and answer these questions: Is the ground reasonably stable and not prone to heaving or flooding? Do you have at least 8 to 10 inches of vertical clearance to excavate (accounting for base, sand, and pavers) without hitting utilities, footings, or a high water table? Is your drainage path clear, meaning water has somewhere to go once it leaves the patio? If yes on all three, you're ready to build.
Materials checklist
- Pavers (calculate square footage plus 10 to 15 percent waste)
- Crushed gravel aggregate base (4 to 6 inches compacted depth)
- Coarse bedding sand (1 to 1.5 inches)
- Polymeric joint sand (or coarse jointing sand)
- Plastic or metal edge restraints with spikes
- Paver sealer (optional)
- Landscape fabric (optional, for the base perimeter to reduce soil migration)
Tools checklist
- Plate compactor (rent this, don't buy it unless you have future projects)
- Paver Saver Mat or thick rubber pad for the compactor
- Wet-cut angle grinder with diamond blade, or rented paver saw
- Screeding pipes or guides and a straight screed board
- String lines and stakes
- Rubber mallet
- Level (4-foot minimum) and tape measure
- Shovel, rake, and wheelbarrow
- Push broom and leaf blower (for jointing sand)
- Safety glasses, ear protection, and work gloves
Realistic project timeline
A typical 200 to 300 square foot patio is a two-weekend project for one or two capable adults. Weekend one covers excavation, base material delivery, compaction, and getting the site ready for sand. Weekend two covers screeding, laying pavers, edge restraints, cutting, compacting the finished surface, and jointing. If you want to follow a do it yourself paver patio installation plan, focus on getting the base, drainage slope, and edge restraints right before laying any pavers. Sealing can be done a week or two later once the polymeric sand has cured and the pavers have settled. Don't rush the base work to get to the 'fun' part of laying pavers. The base work is what makes everything else worth doing.
If you're planning related steps like the full installation process from scratch, figuring out how to handle specific ground conditions, or understanding the broader DIY paving workflow, the principles in this guide connect directly to those topics. The ideas and variations here are the starting point; the execution details in each phase are what turn a good design into a patio that lasts 20-plus years with minimal maintenance.
FAQ
What DIY patio paver ideas work best for small or oddly shaped patios with lots of cuts?
Use a layout that minimizes diagonal interruptions, such as running bond or a stack bond with a thick border that hides edge inconsistencies. Plan for pattern continuity by starting from the longest straight edge, then dry-fit and mark cut zones before you order extra pavers, aiming for about 15% waste on shapes with tight curves or frequent boundary changes.
Can I lay pavers over compacted crusher run or do I need a separate gravel base and bedding sand?
Most DIY systems perform best when you have two distinct layers, a compacted granular base for structural support, and a finer bedding sand for leveling. If you use a single aggregate, you usually end up with sand gaps that are too coarse or too stiff, which can increase lippage and shifting under load.
How do I know if my patio grade is correct before I start laying pavers?
After excavating and compacting the base, verify slope with a level or laser and measure drop across the full length, not just at the house line. Then do a quick straightedge check where the sand will sit, if the base is crowned or dips, fix it now because the bedding sand should only fine-tune, not rebuild major grade errors.
What joint width should I use for DIY patio paver ideas, and does it change for different paver sizes?
Stay within the typical range of 1/8 to 1/4 inch, but use the product recommendations for your exact paver and jointing sand type. Wider joints can be more forgiving for minor drift, but they can also increase joint movement, narrower joints can be harder to fill fully with polymeric sand and can trap excess fines.
How long should I wait to walk on the patio after installing polymeric sand?
Avoid foot traffic until the joints are fully activated and cured per the sand instructions, typically after the misting and settling period and once the surface is firm. If it rains before curing, the sand can wash out, so have a plan to cover the patio or postpone joint activation until you have the required dry window.
Is it a mistake to compact pavers right after laying them?
Do not compact prematurely, after the pavers are fully set and cut pieces are installed, then compact with a paver saver mat to prevent surface chipping. Also, re-check a few representative spots after compaction, because minor shifts can create small lips that are easier to correct immediately.
What’s the safest way to handle a patio next to a driveway or walkway where vehicles or heavy loads may cross?
Increase design confidence by prioritizing a stronger interlock pattern, such as herringbone, and make sure edge restraints are installed rigidly along the interface. Also verify that your base depth and compaction match the load expectations, if you are expecting vehicle traffic, treat it as a driveway-style load case rather than a typical yard patio.
My patio is next to steps or door thresholds, how do I avoid tripping when the pavers raise the height?
Measure the current step and threshold heights and account for the combined thickness of base, bedding sand, and pavers before you excavate. If you cannot maintain clearance, you may need to reduce excavation depth, adjust the slope, or modify the path connection, because trying to “hide” height differences with extra sand or partial adjustments usually leads to settlement.
What should I do if I have to cut many pavers for a curved edge?
Dry-lay the field and use flexible planning for the last ring of pavers, cut individual pieces as you go so the curve stays smooth. For best results, keep the main field consistent, then reserve curved cutting for the perimeter, and consider adding a border ring that gives you a straighter reference line.
Do I need to seal my pavers, and can I seal too early?
Sealing is optional, but do not seal until the joints and base have properly cured, especially if you used polymeric sand or installed new concrete-adjacent paving. Sealing too early can trap moisture or interfere with polymer curing, which can lead to joint deterioration or uneven stain behavior.
How can I prevent weeds in joints without completely redoing the patio?
First, maintain joint depth by topping off polymeric or jointing sand as it compacts or depletes, and keep debris out so seeds cannot germinate easily. If weeds appear, remove the plant material, refresh joint material after the area dries, and use a targeted hardscape-safe weed treatment only where needed.
Step-by-step DIY patio paver install: plan, prep base, lay & cut pavers, ensure drainage, then compact, sand, seal.

Step-by-step guide to apply patio paver sand correctly: prep base, set pavers, fill joints, compact, and troubleshoot is

DIY step-by-step how to install patio pavers in sand, from excavation and base prep to leveling, cutting, joint sand and