Yes, you can cut patio pavers yourself, and for most standard concrete or cement pavers, a diamond-blade wet saw gives you the cleanest, safest result. If you don't have a saw, scoring and splitting with a bolster chisel and lump hammer works fine for straight cuts on concrete pavers. Rubber pavers are the easiest of all, a sharp utility knife and a straight edge is all you need. Curves take a bit more patience but are totally doable with a grinder or jigsaw and a cardboard template. The right method depends on your material, the type of cut, and what tools you have on hand, and this guide walks through all of it.
How to Cut Patio Pavers Today: Tools, Steps, and No-Saw Options

Felix Rowe
16 May 2026
Can you cut patio pavers (and when it's actually worth doing)
For most DIY patio projects, yes, cutting pavers is worth it and very doable. Edge pieces almost always need trimming to fit the border of your patio, and cutting is faster and cheaper than hunting for oddly sized pavers or redesigning your whole layout.
That said, a few things are worth considering before you start cutting. Concrete and cement pavers are the most DIY-friendly. Clay pavers are significantly harder and denser, which makes hand-tool splitting much less reliable. If you're working with thick clay units, you'll really want a cut-off saw with a diamond blade rather than trying to score and snap them, it's genuinely difficult to get a clean split by hand on clay. Very thick slabs (say, 80mm or more) also push the limits of manual splitting.
One practical alternative worth considering before you reach for a saw: sometimes you can avoid a cut altogether. If you're laying pavers in a pattern, see whether you can shift the layout so closure pieces fall at the edges and are hidden under a border or edging. Undercutting, angling the blade slightly so the bottom of the piece is just a hair narrower than the top, is another standard trick that makes the cut piece drop in more easily without the risk of it being too tight. It's a small thing, but it saves a lot of frustration.
Tools and materials: saw vs no-saw options
Before picking a method, it helps to know what your options actually are. Here's a quick breakdown of the main tools and what they're good for.
| Tool | Best For | Clean Cut? | Dust/Safety Notes |
|---|---|---|---|
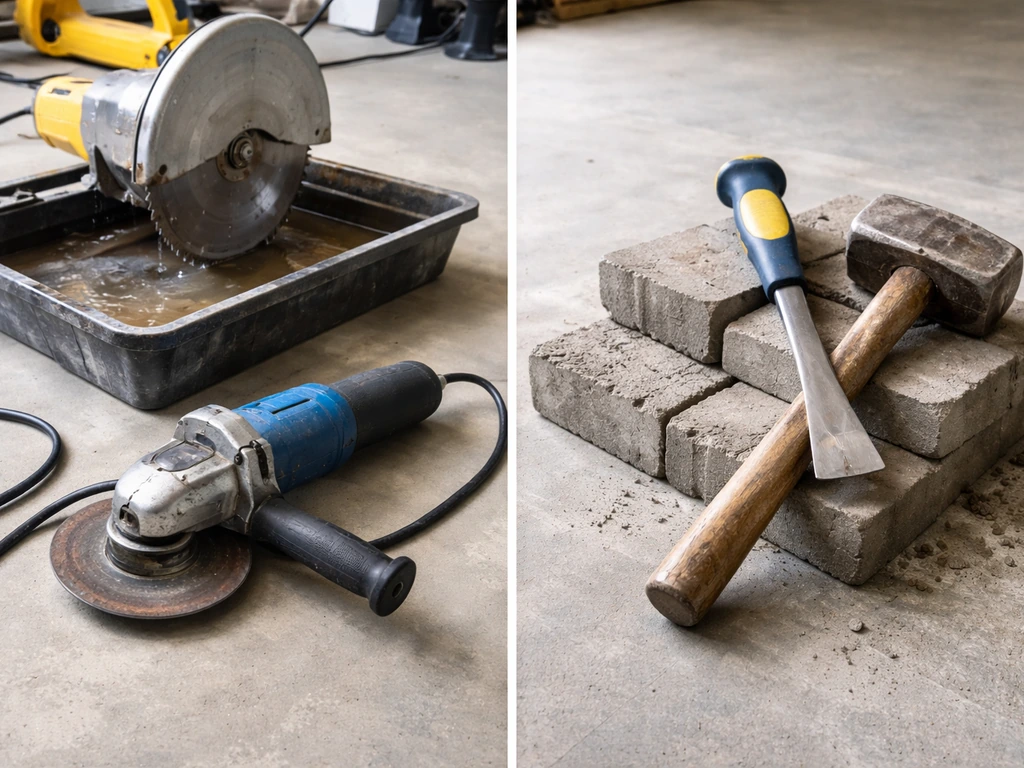
| Wet diamond saw (table saw) | Concrete/cement, straight cuts, volume work | Excellent | Water suppresses silica dust — the safest option |
| Angle grinder with diamond disc | Concrete, curves, small adjustments | Good | Produces significant dry dust — use water attachment or dust mask rated P100/FFP3 |
| Cut-off saw / circular saw + diamond blade | Clay pavers, thick slabs, straight cuts | Very good | Use wet or with dust extraction |
| Bolster chisel + lump hammer | Concrete pavers, straight splits, no power tools | Acceptable | Less dust but flying chips — wear eye protection |
| Block splitter (paver splitter) | Concrete pavers, straight cuts, volume | Good | Almost no dust, but limited to straight cuts |
| Utility knife + straight edge | Rubber pavers only | Excellent for rubber | No dust, very safe |
| Jigsaw with carbide blade | Rubber pavers, soft curves | Good for rubber | Minimal dust |
A quick note on dust safety: this is not something to brush off. Silica dust from cutting concrete or stone is a serious health hazard. Uncontrolled cutting can produce very high levels of respirable silica dust almost immediately. Wet cutting, where water continuously floods the blade, is the single most effective engineering control, and it's why a wet saw is the go-to recommendation for serious paver cutting.
If water starts pooling on your patio pavers after the job, you'll want to know how to drain it effectively so the area stays stable and clean wet cutting. If you're using a dry angle grinder or dry cut-off saw, you need either a dust collection attachment or a high-quality respirator (P100 / FFP3 rated). Always wear safety glasses and work in an area with good airflow.
How to cut concrete and cement patio pavers: straight cuts step by step
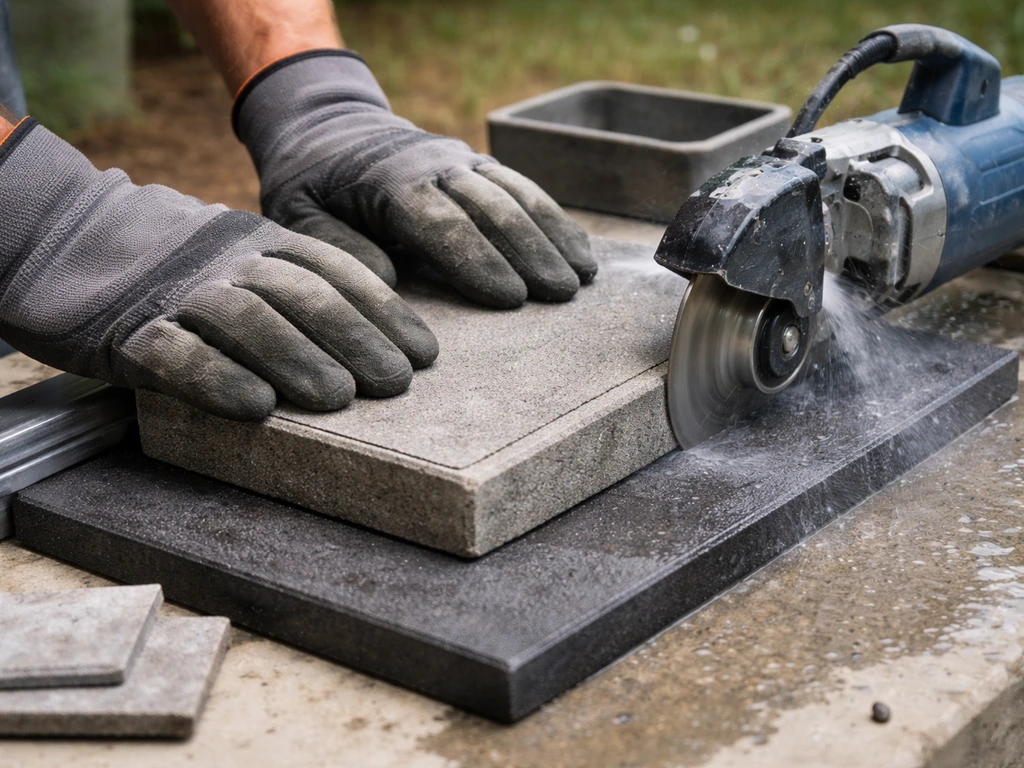
This is the scenario most DIYers are dealing with, trimming concrete pavers to fit edges, borders, or obstacles. If you also need to drill into patio pavers, use the right bit and drilling technique to avoid cracking the material trimming concrete pavers. A wet diamond saw is the cleanest approach, but the steps below apply to any power saw with a diamond blade. Pavingexpert also describes power diamond blades fitted to a power saw as one of the most useful and quick methods for cutting paving units when you need to make cuts A wet diamond saw is the cleanest approach.
What you'll need
- Wet table saw or angle grinder with a diamond-tipped blade (not an abrasive disc — diamond cuts concrete cleanly, abrasive discs create more heat and more dust)
- Tape measure and pencil or chalk
- Speed square or carpenter's square
- Safety glasses, gloves, and a P100/FFP3 respirator if cutting dry
- Ear protection
- Water source if using a wet saw
Step-by-step process
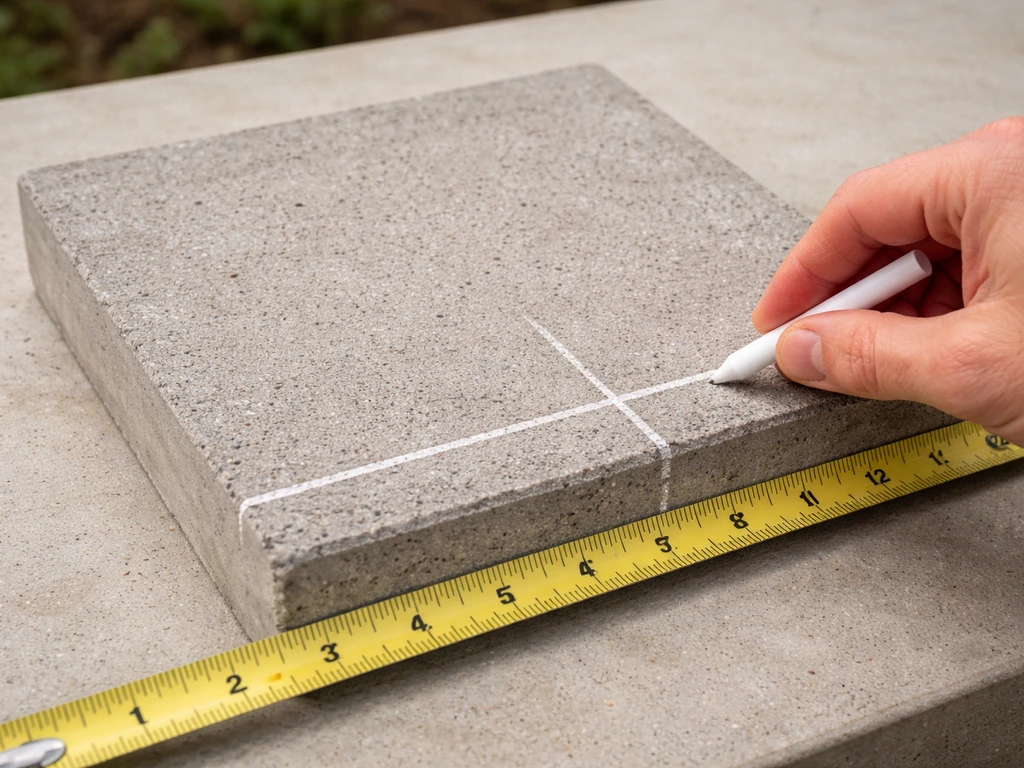
- Measure the gap you need to fill. Hold the paver in position and mark the cut line directly on the paver face with a pencil or chalk. Double-check before you cut — measure twice, cut once is genuinely good advice here.
- Use a speed square to extend the cut line across the full width of the paver and, if possible, mark all four sides so you can see the line from any angle.
- Set up your saw on a stable, flat surface. If using a wet saw, confirm the water is flowing over the blade before you start. Never run a wet saw blade dry — it damages the blade and removes the dust control.
- Align the paver so your marked line meets the blade. Most wet saw tables have a guide fence — use it. Let the blade reach full speed before making contact with the paver.
- Feed the paver through the blade in one smooth, steady pass in a single direction. Don't push hard — let the diamond blade do the work. Don't saw back and forth on the same cut line. One clean pass reduces blade wear and gives a better edge.
- If you're using an angle grinder, clamp the paver securely (or have a helper hold it steady), score along your marked line with a few light passes first to create a groove, then deepen that groove in one or two more controlled passes. Never freehand a long cut without a guide.
- After cutting, inspect the edge. If there are small high spots or rough patches, lay the piece on a flat support and knock them down with a bolster chisel or cold chisel. A tight fit is easier to achieve when the edge is tidy.
- Dry-fit the cut piece into the gap before setting it in mortar or bedding sand. If it's slightly too large, a single additional light pass on the saw or a few chisel taps will clean it up.
Troubleshooting common problems
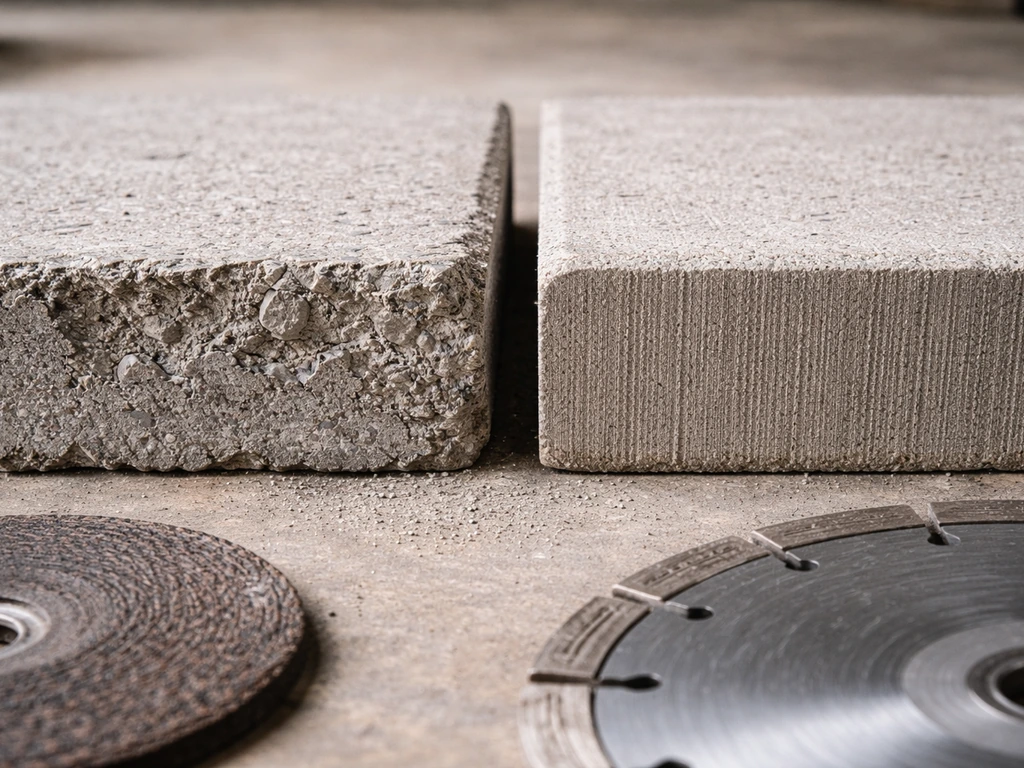
- Chipping or jagged edges: Usually means you're using the wrong blade (abrasive instead of diamond) or pushing the paver too fast through the cut. Slow down and check your blade type.
- Piece is too tight: Try the undercut technique — tilt the blade very slightly so the cut face is fractionally wider at the top than the bottom. The piece will drop in rather than binding.
- Paver cracking during the cut: Often caused by lack of support. The paver should be fully supported on the saw table right up to the blade. Unsupported overhangs flex and crack.
- Blade overheating or scoring rather than cutting: Blade is probably worn or the wrong spec. Diamond blades for concrete should be rated for hard aggregates. A good blade makes a huge difference.
Cutting without a saw: scoring, splitting, and what actually works
No saw? No problem for most standard concrete pavers. The score-and-split method has been used by pavers for decades and works well for straight cuts on pavers up to about 60–65mm thick. With hand tools, Pavingexpert says splitting starts by scoring all around where the split is required, then scoring the cut line into the surface with a cutting edge aligned to the line and struck with a lump hammer [score-and-split method has been used by pavers for decades](https://www.
pavingexpert. com/cuthandtools). It won't give you the laser-clean edge of a wet saw, but for border pieces that will sit against an edge restraint or lawn, it's perfectly acceptable. If you’re really trying to remove patio pavers instead of cutting them, plan for how you’ll lift and reset them without damaging surrounding sections, since that’s a different job than scoring and splitting how to remove patio pavers.
What you'll need
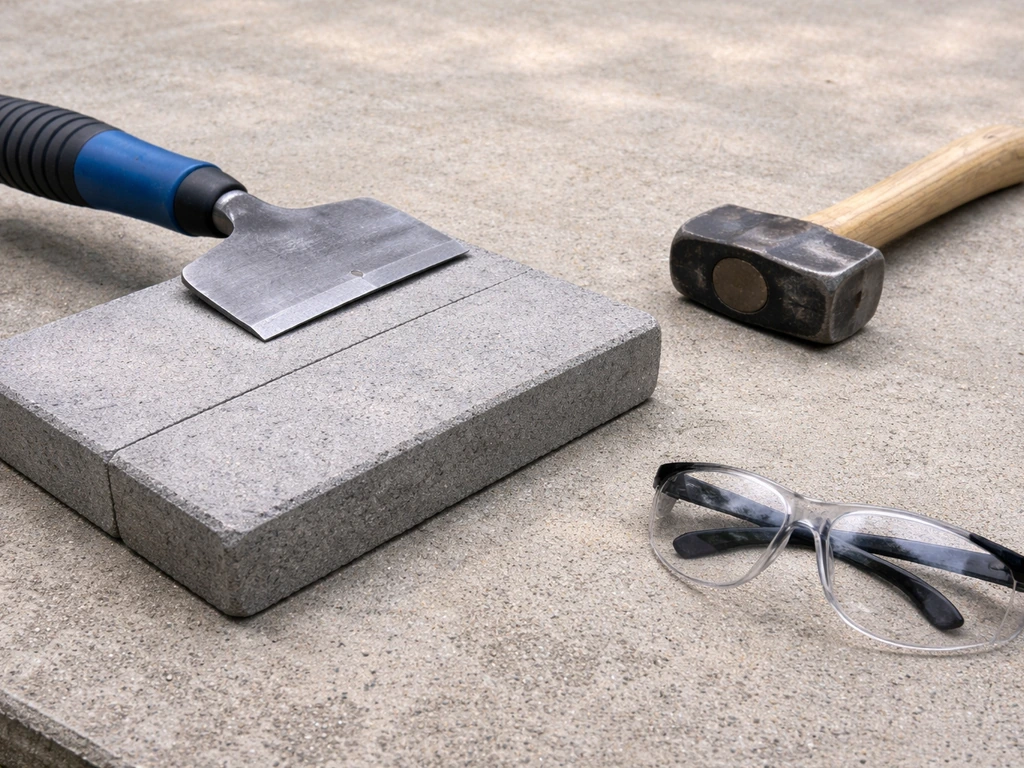
- Bolster chisel (brick bolster, wide and flat — about 100mm wide works well)
- Cold chisel (narrower, for trimming high spots)
- Lump hammer (3–4 lb)
- Safety glasses — chips fly, and this is non-negotiable
- Gloves
- Pencil or chalk for marking
How to score and split a paver
- Mark the cut line on all four sides of the paver using a pencil or chalk and a straight edge.
- Place the paver on a firm, flat surface — not soft ground, which absorbs the hammer blows and makes splitting harder. A piece of old carpet or rubber mat on a concrete surface works well.
- Position the bolster chisel on the cut line and strike it firmly with the lump hammer. Work all the way around the paver — top face, both edges, and the bottom — scoring a groove approximately 3–4mm deep on each face.
- Once you've scored all the way around, place the bolster chisel in the scored groove on the top face and give it a sharp, confident strike. The paver should split cleanly along the scored line.
- If it doesn't split on the first attempt, go around again deepening the score before trying again. Patience here pays off.
- After splitting, inspect the cut edge. Lay the piece on support with the cut edge facing up and use a cold chisel to knock off any high points or ridges so the piece will sit flat in the gap.
- Dry-fit the piece. If it's even slightly too large, trim a little more with the chisel rather than forcing it — a forced piece can crack later.
If you have a lot of straight cuts to make and no saw, it's worth asking a local tool hire shop about a block splitter (sometimes called a paver splitter or guillotine). These mechanical splitters use leverage to snap the paver cleanly with almost no dust and very consistent results. They're typically available to hire for a day at a reasonable cost, and for a full patio border, the time saving is significant.
One thing the score-and-split method genuinely can't do well: curved cuts. For anything other than a straight line, you'll need a power tool, or, if you're cutting rubber pavers, a utility knife works great. Curves on concrete really do require a grinder or saw. More on that below.
How to cut rubber patio pavers
Rubber pavers are a totally different animal, and honestly, cutting them is much easier than cutting concrete. You don't need power tools, there's no silica dust, and the risk of a cracked or ruined paver is essentially zero. The main thing to get right is using a sharp blade and taking multiple passes rather than trying to force through in one go.
What you'll need
- Sharp utility knife or box cutter (fresh blade makes a big difference — replace it if it feels like it's dragging)
- Straight edge or metal ruler for straight cuts
- Marker or chalk for marking cut lines
- Cutting mat or piece of scrap wood underneath to protect your surface
- Jigsaw with a fine-tooth blade for curves or thicker rubber tiles
Step-by-step for straight cuts on rubber pavers

- Mark your cut line clearly on the rubber surface with a marker or chalk.
- Lay the rubber paver on a cutting mat or sacrificial board so you're not cutting into your floor.
- Position your metal straight edge firmly along the cut line and hold it down securely — or clamp it if possible.
- Draw the utility knife blade along the guide with moderate, even pressure. Don't try to cut all the way through in one pass. Make the first pass light just to score the surface.
- Make additional passes along the same line, pressing slightly deeper each time, until the blade cuts all the way through. This usually takes 3–5 passes depending on paver thickness.
- Peel the two pieces apart gently. The cut edge should be clean and smooth. If there's any slight roughness, a quick pass with the blade along the edge will clean it up.
For curved cuts on rubber, a jigsaw with a fine-tooth blade is your best friend. Mark the curve clearly, clamp the rubber flat on your work surface (rubber can shift around), and cut slowly with the jigsaw at a steady pace. Rushing causes the rubber to tear rather than cut cleanly. A utility knife also works for gentle curves if you're patient, just score the curve in multiple passes and let the blade follow the shape gradually.
One rubber-specific tip: cold temperatures make rubber stiffer and harder to cut cleanly. If you're working in cold weather, bring the pavers indoors for an hour or two first, they'll cut much more smoothly when they're at room temperature.
How to cut curved patio pavers
Curved cuts on concrete pavers are where a lot of DIYers get nervous, but the honest truth is that the technique is straightforward, it just takes a bit more preparation and patience than a straight cut. The key is good templating and using an angle grinder or jigsaw with the right blade.
Planning your curved layout first
Before cutting a single paver, think about your layout strategy. For a curved edge, say, a circular patio or a curved border, you want to minimize the number of cuts and make sure each cut piece is as large as possible (tiny slivers are fragile and look bad). A useful approach from professional paving practice: for gentle curves with radii between about 0.6 and 5 metres, you often only need to cut one edge of each border paver, not both. Lay your full pavers as close to the curve as possible, then only trim the pieces that actually cross the curved line.
Dry-laying is your best friend here. Before cutting anything, lay all your pavers out in the planned pattern without mortar or adhesive. This lets you see exactly which pieces need cuts and what shape those cuts need to be. Mark the curved cut line directly on each paver using a chalk line or by holding it in position and tracing along a flexible guide (a garden hose works well as a curve template for marking).
Templating for accuracy
For complex or tighter curves, make a cardboard template first. Cut the template to the shape you need, fit it in the gap, adjust until it fits well, and then trace that template onto your paver. This takes a few extra minutes but saves a lot of wasted pavers. The iterative approach, cut a rough template, test it, trim a little more, test again, is far more reliable than trying to measure a curve precisely and cut it perfectly on the first attempt.
Cutting the curve: step by step
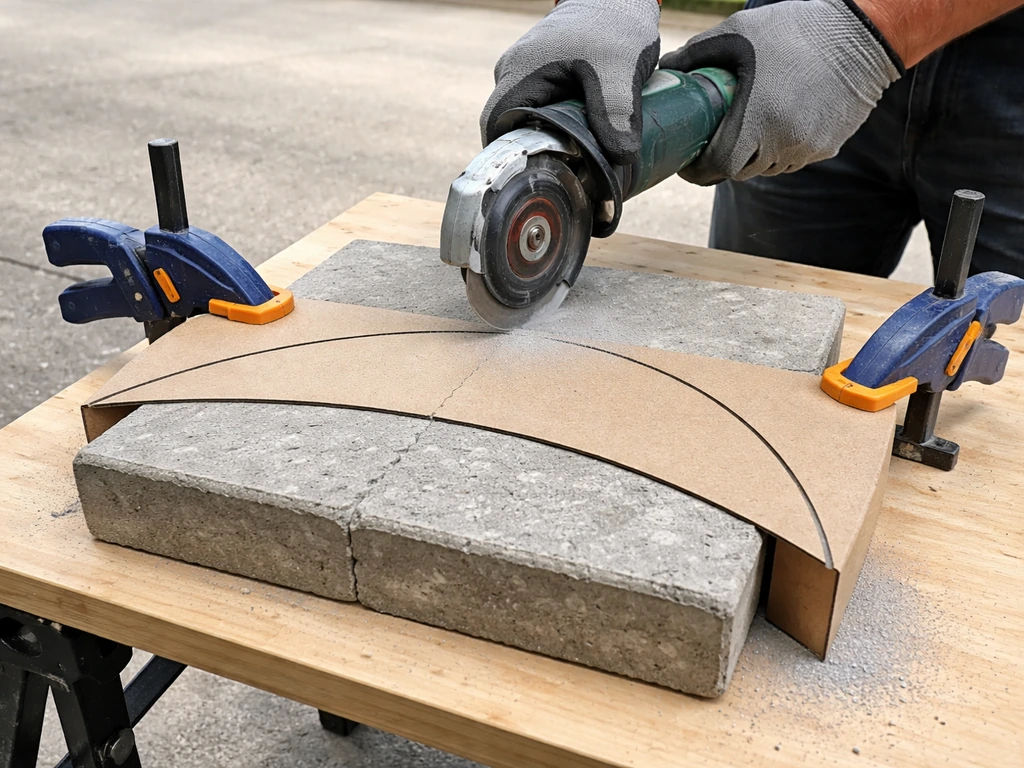
- Mark the curve clearly on the paver face using your template or direct tracing from the dry-laid position.
- Secure the paver on a stable work surface. For curved cuts, clamping is important — the paver will want to shift as you cut around the curve.
- Use an angle grinder with a diamond disc (or a jigsaw with a diamond or carbide blade for smaller pavers). A wet saw table isn't practical for curves because you can't maneuver the paver around a fixed blade the way you need to.
- Start the cut at one end of the curve line. Move the grinder slowly along the marked line, keeping the disc perpendicular to the paver face. Don't rush — let the diamond blade do the cutting.
- For tighter curves, make a series of short relief cuts (straight cuts toward the curve line but stopping just short of it) to remove the bulk of the waste material first, then clean up the curve with the grinder. This reduces the amount of material the blade has to work through in a single curved pass.
- After cutting, dry-fit the piece into the gap. Almost certainly you'll need to knock off a few high spots — use a cold chisel or the edge of the grinder disc to trim these down gently.
- Repeat the fit-and-trim process until the piece sits cleanly. For curved work, this back-and-forth is totally normal, not a sign you've done anything wrong.
A note on circles specifically
Cutting pavers to form a full circular patio or circular feature is its own specialized technique with extra layout considerations. If that's your project, the process deserves its own focused walkthrough covering how to calculate pie-slice cuts, how to work from the center outward, and how to keep cuts consistent around the full ring.
Troubleshooting curved cuts
- Chipping along the curve: Slow down your cutting speed and make sure you're using a diamond blade, not an abrasive disc. Abrasive discs are far more likely to chip concrete on curves because of the irregular contact angle.
- Piece doesn't sit flush: Almost always a high spot on the cut edge. Run your finger carefully along the cut face to feel for ridges, then knock them down with a cold chisel before trying again.
- Curve doesn't match the gap: Your template may have shifted during tracing. Next time, use small pieces of tape to hold the template firmly while you trace. For the current piece, if it's close, trim to fit rather than starting over.
- Paver cracking during curved cut: Usually caused by an unsupported section flexing as the blade passes through. Make sure the paver is fully supported on a flat, firm surface with only the waste portion overhanging.
A few final tips before you start cutting
Always cut a few test pieces before committing to your actual edge pavers, especially if you're new to this. Offcuts or damaged pavers from your delivery are perfect for practicing your technique. Getting a feel for your tool and the paver material before you're cutting the real pieces makes a noticeable difference in confidence and result quality.
Keep your layout in mind as you cut. Plan the sequence so you cut each edge piece, dry-fit it, confirm it's right, and only then set it permanently. Don't pre-cut a whole batch of pieces in assembly-line fashion and then try to fit them, dimensions shift as you work, and you'll end up with pieces that don't quite fit the gaps they were cut for.
Finally, if you're working with extra pavers left over from a previous project, cutting them down for closure pieces is a great way to use them up rather than letting them go to waste. And if this project leaves you with leftover cut offcuts, those smaller pieces can sometimes work as filler elsewhere in your patio or garden, so hold onto them until the project is fully complete. And if this project leaves you with leftover cut offcuts, you can also plan ahead for how to dispose of patio pavers safely and legally once you're done. After the pavers are removed, you can follow a similar careful approach to prep the base so the next patio surface sits level and stable how to remove patio pavers.
FAQ
How do I prevent pavers from cracking or breaking on the wrong line when I cut them?
For concrete or cement pavers, the most common failure is trying to cut or split them without a proper support base. Always cut with the paver fully supported (not hanging over the edge of sawhorses), and for scoring, use light, repeat passes rather than one deep attempt. If you see micro-cracks running away from the cut line, stop and reset your line, because deeper scoring usually makes the break worse instead of cleaner.
Can I cut all my patio pavers before I lay them, or should I cut as I go?
Yes, but only if the fit truly needs it. When trimming edge pieces, plan for small dimensional changes caused by bedding sand or slight base unevenness. Dry-fit the piece in place, then remove and trim a little at a time. Avoid pre-cutting everything before bedding, because mortar and sand thickness can shift the final gap.
What should I do about water cleanup when I’m using a wet saw?
For wet cutting, the key is controlling water so it doesn’t undermine the base or leave muddy bedding behind. After you finish a cut session, spread a tarp to catch drips, then sweep up slurry and allow the area to dry fully before you spread bedding sand or set pavers. If water pooled earlier, let it drain and stabilize before proceeding, otherwise you can end up with soft spots or uneven setting.
How can I tell if my saw blade is the wrong one for patio pavers?
Don’t use a masonry blade meant for block that’s not rated for concrete pavers, and don’t use a blade without a diamond grit designed for the material. If your cut-off wheel chatters or the paver edge looks fuzzy or chipped, the blade is often the wrong type or worn. For best results, use a diamond blade intended for cutting concrete/stone pavers and keep the blade aligned to the marked line.
What’s the cleanest way to make straight cuts without a wet saw?
If you need a straight edge but you don’t have a wet saw, a dust-minimizing option is renting a mechanical paver splitter (guillotine) for straight cuts. If you’re using an angle grinder instead, expect more chipping at the edge unless you finish the line with a light pass. For best edge appearance, plan to remove material in stages and do a final “cleanup” pass right at the line.
How do I measure closure gaps accurately so my cut pieces actually fit?
Dry-laying is the best way to avoid surprises, but you can also do a “gap check” before cutting. After you dry-fit the last full paver, measure the real closure gap at multiple points along the edge (because borders and curves are rarely perfectly uniform). Transfer the measured gap to each individual paver rather than assuming one constant width.
Why does my rubber paver tear or leave a jagged edge when I cut it?
Rubber pavers are different, so don’t treat them like concrete. If the cut is rough, it’s usually because the blade is dull, the blade is moving too fast, or the paver is too cold. Let rubber acclimate to room temperature, clamp it so it cannot shift, and use multiple shallow passes rather than forcing a single deep cut.
What’s the best way to handle tight curves in concrete pavers without making the gap too wide?
For curved concrete cuts, avoid trying to cut to the final line in one go. Cut close to the line, then do careful trimming passes so you don’t overcut and end up with an oversized gap. Also, choose blades appropriately (fine-tooth type for jigsaw where applicable), and slow the feed rate when the curve tightens so the tool doesn’t jump or chip.
How do I cut pavers to fit around posts, drains, or irregular obstacles without ending up with a loose top gap?
If you’re trimming to fit around an obstacle, the safest approach is to cut the closure piece, dry-fit it, then verify clearance on both the top edge and bottom edge. Small undercutting or angling can help the piece drop into place without binding, but overdoing it can create a visible gap at the top surface. Aim for a subtle change and confirm fit before you bed it.
Is it really necessary to cut test pieces first, and what should I check on the test cuts?
Plan a test set even if you’ve cut pavers before, because deliveries can vary by batch and thickness. Cut one or two offcuts using your exact setup (same blade, same depth, same scoring pressure) and check the fracture quality or kerf width. If the cut edge is chipping, adjust your technique before committing to the real border pieces.
Next Articles

How to Use Patio Paver Sand: Step by Step DIY Guide
Step-by-step guide to apply patio paver sand correctly: prep base, set pavers, fill joints, compact, and troubleshoot is

How to Install Patio Pavers in Sand: Step-by-Step
DIY step-by-step how to install patio pavers in sand, from excavation and base prep to leveling, cutting, joint sand and
How to Make a Patio With Pavers and Sand Step by Step
Step-by-step guide to install paver patio with sand setting layer, from planning and base to leveling, cutting, joint fi