Laying patio pavers yourself is absolutely doable in a weekend or two. The process goes like this: plan your layout, excavate 8 to 10 inches deep, compact a 4 to 6 inch gravel base in layers, screed 1 inch of bedding sand, set pavers in your chosen pattern, cut the edges to fit, lock in edge restraints, fill joints with polymeric sand, and seal. To get the layout and install steps right from start to finish, follow a patio pavers how to lay guide that matches your pattern and drainage plan. Do every one of those steps correctly and your patio will stay level, drain properly, and hold together for decades. Skip or rush any of them, especially the base, and you'll be pulling the whole thing up in a few years to start over.
How to Lay Pavers for a Patio: Step by Step DIY Guide
Felix Rowe
30 Apr 2026
Plan your project before you touch a shovel
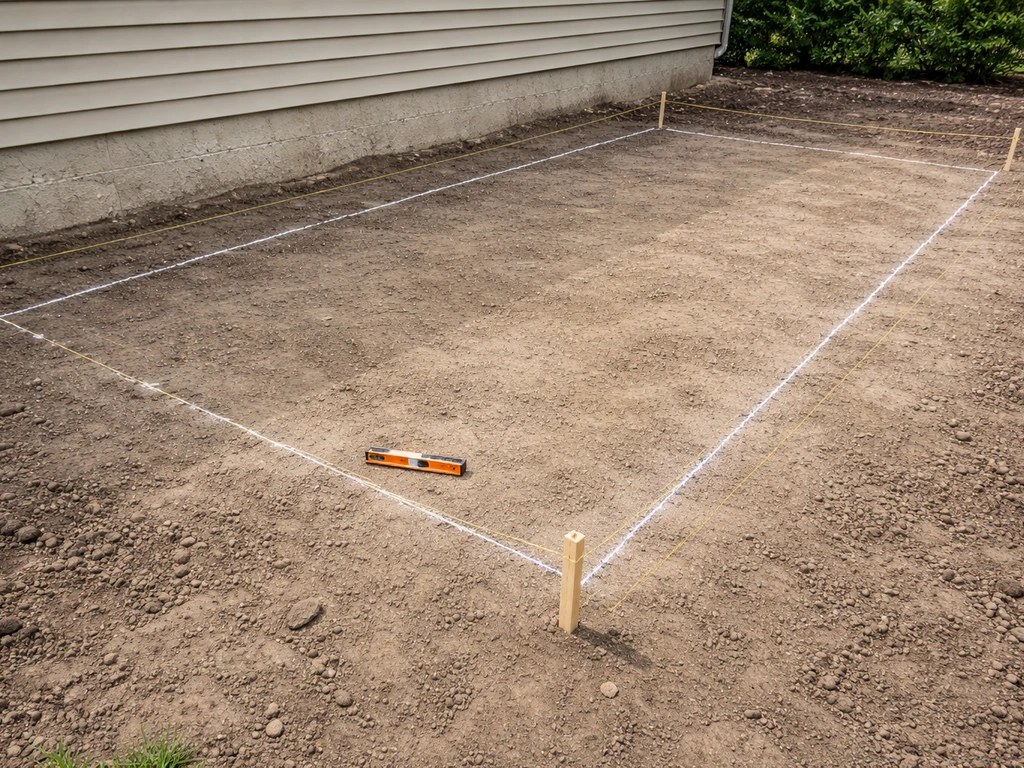
Good planning saves you money, cuts down on wasted pavers, and prevents you from discovering mid-project that your layout is crooked. Measure your patio area carefully and sketch it on paper first. Then head outside with stakes and string lines to mark the actual boundary of the patio on the ground. Use a tape measure and a chalk line, check your corners with the 3-4-5 triangle method (measure 3 feet along one side, 4 feet along the perpendicular side, and confirm the diagonal is exactly 5 feet), and adjust until everything is square.
Drainage slope matters here too. Your patio needs to pitch away from the house at roughly 1/8 inch to 1/4 inch per foot. That sounds tiny, but across a 12-foot-wide patio it means a 1.5 to 3-inch drop from the house side to the outer edge. Factor this into your string line height now, because you're building the base and setting the pavers to match that slope.
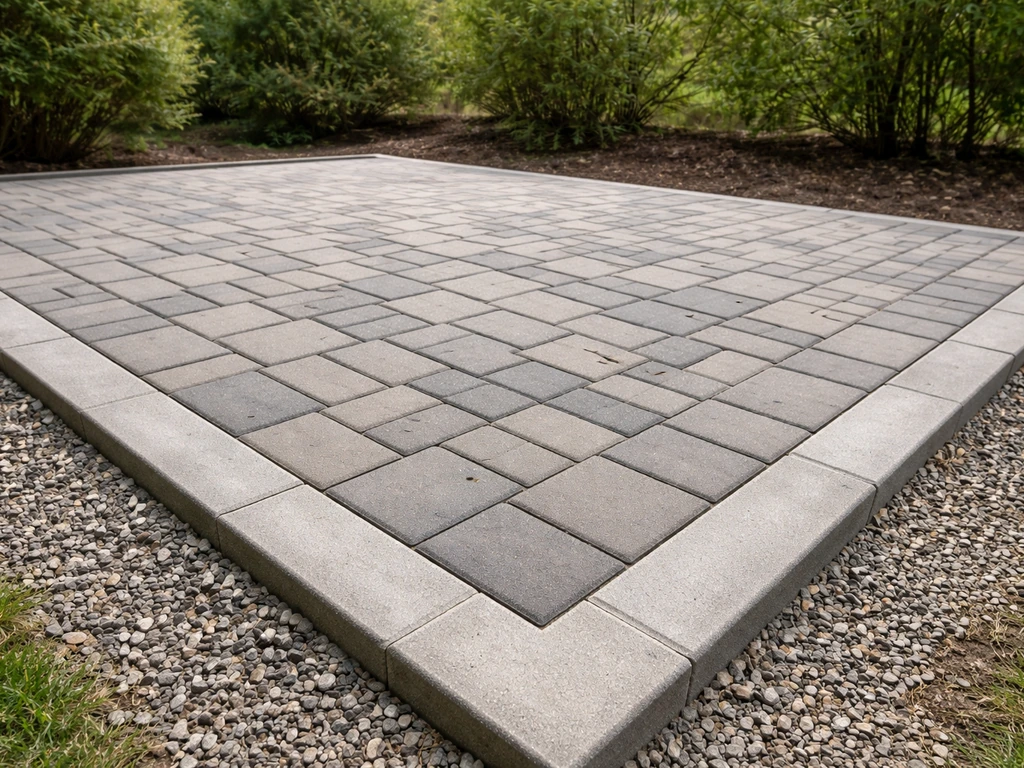
Choosing a paver pattern
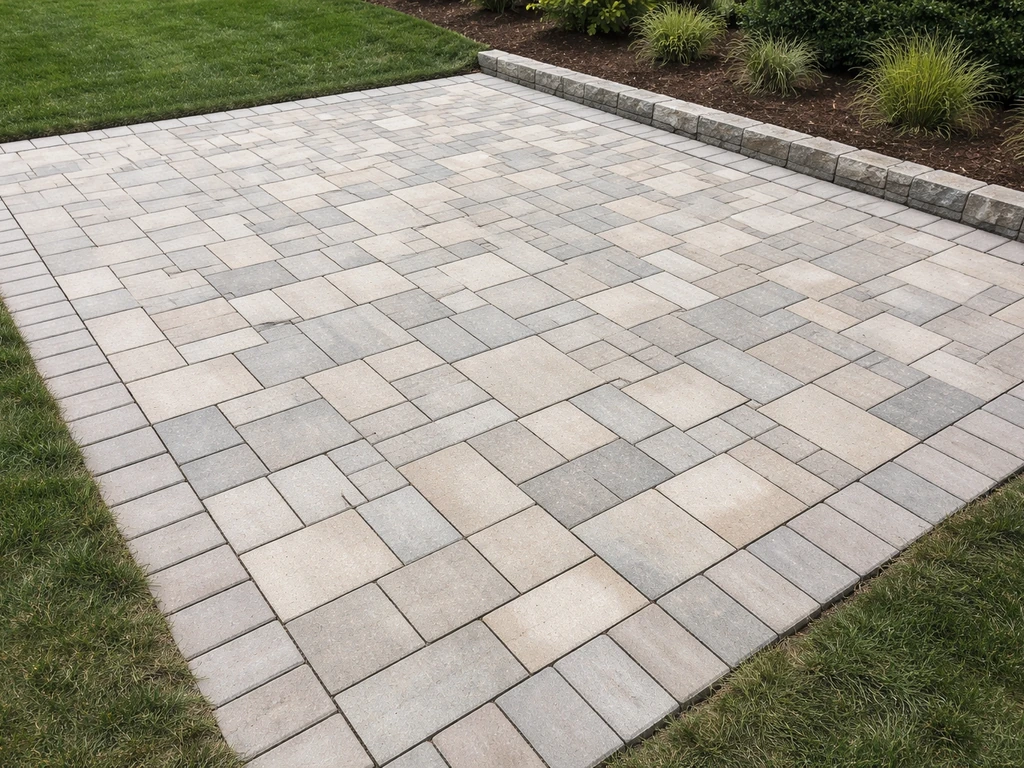
Your pattern choice affects how much cutting you'll do and how structurally stable the finished surface is. Running bond (rows offset by half a paver, like standard brick) is beginner-friendly and needs very few cuts on a rectangular patio. Herringbone is one of the most popular DIY patterns and is structurally strong because the interlocking angles distribute load well, but it does require angled cuts at the borders. A diagonal herringbone pattern looks great but multiplies your cut count, so save that for a smaller patio if it's your first time. Grid (stack bond) is the easiest to lay but offers the least interlock, so use it only with a very solid edge restraint system. Whatever pattern you choose, use reference string lines as you work to keep rows straight and the pattern true.
Materials and tools you'll need
Here's what to gather before you start. Missing a tool mid-project is frustrating, and some of these, like the plate compactor, are worth renting rather than buying for a one-time job.
Materials
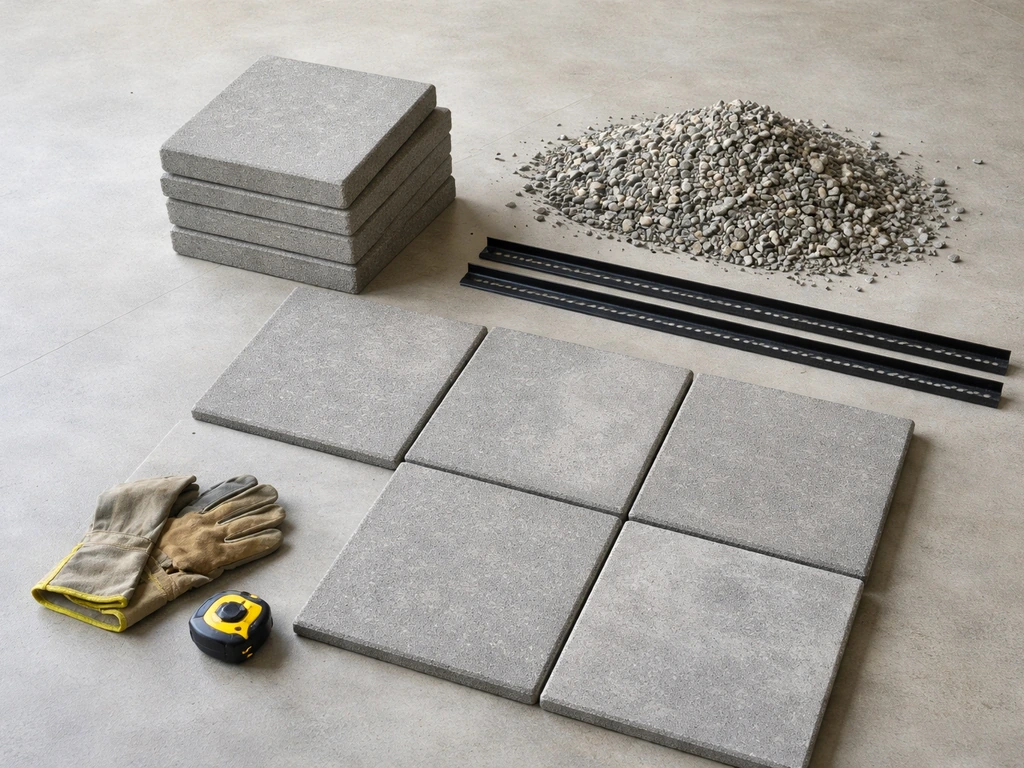
- Concrete pavers (standard residential thickness is about 2 3/8 inches; order 5 to 10 percent extra for cuts and breakage)
- 3/4-inch minus crushed stone or road base gravel (enough for 4 to 6 inches of compacted depth)
- Coarse bedding sand (enough for 1 inch of depth across the entire area)
- Plastic edge restraint and 8 to 10-inch non-galvanized spikes to anchor it
- Geotextile landscape fabric (weed barrier, placed between the gravel base and native soil)
- Polymeric jointing sand (for joints up to 2 inches wide)
Tools
- Plate compactor (rent one with enough horsepower for the job; an underpowered machine won't consolidate the base properly)
- Hand tamper (for corners and spots the plate compactor can't reach)
- Sod cutter or spade for stripping grass
- Excavation tools: flat spade, digging shovel, wheelbarrow
- Tape measure, chalk line, string line, and stakes
- Level and a long straight 2x4 for screeding
- 1-inch diameter metal or PVC pipes (screed guides for the sand bed)
- Rubber mallet
- Wet-cut concrete saw or angle grinder with diamond blade for cutting pavers
- Broom and garden hose with misting nozzle
- Safety gear: eye protection, hearing protection, dust mask rated for silica (especially when cutting)
Site prep and excavation
Start by clearing everything inside your string-line boundary. If you're laying over grass, strip it with a sod cutter or flat spade. Don't try to skip this step and just bury the grass, it will decompose and cause the base to sink unevenly. If you're dealing with uneven ground or a slope, this is your chance to rough-grade the area before excavating. For a sloped yard, you'll either step the patio in tiers or build a retaining wall on the low side, both of which require extra planning before you dig.
Once the surface is cleared, excavate to a total depth of about 8 to 10 inches below your finished paver surface. For the patio result you want, pay close attention to how you excavate, build the base, and set the pavers level throughout how to set pavers for patio. That accounts for 4 to 6 inches of compacted gravel, 1 inch of bedding sand, and roughly 2 3/8 inches of paver thickness. Use your string lines as a reference and check depth frequently with your tape measure. If you hit soft or wet soil at the bottom of the excavation, dig a bit deeper and add more gravel. Remove all roots and organic material you find.
One situation worth calling out: if you want to lay pavers over an existing concrete slab, the process is different. You skip the excavation, verify the concrete is in good shape with no major heaving or cracks, and either set pavers directly in a mortar bed or use a panel-based system on top. Laying over concrete means a shallower overall buildup but you trade flexibility for convenience. For bare ground, the full excavation approach described here is the right move.
Building and compacting the base
The base is the most important part of this whole project. A well-built base is why some patios look perfect after 20 years and others are a lumpy mess after two. Don't rush this phase.
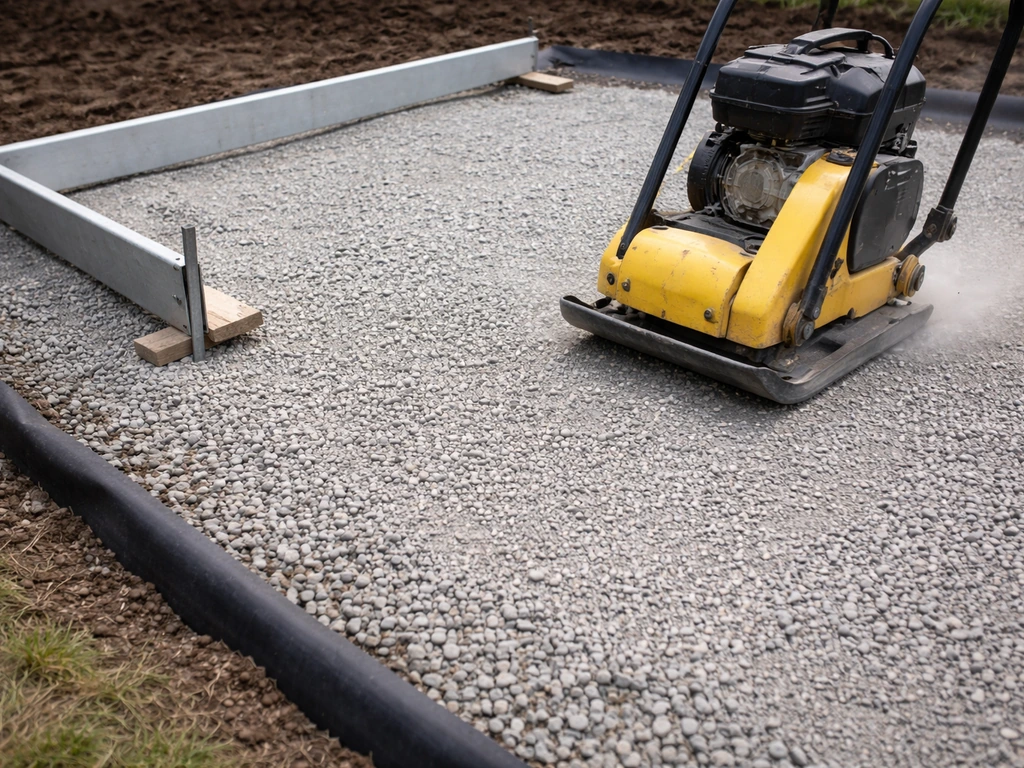
Start by laying landscape fabric over the excavated soil. This keeps weeds out and prevents soil from migrating up into the gravel over time. Then add your crushed gravel, but don't dump it all in at once. Compact it in layers no more than 4 inches thick (called lifts). Add a 4-inch layer, run the plate compactor over it in overlapping passes, then add the next layer and compact again. Keep going until you reach your target compacted depth of 4 to 6 inches. Compacting in lifts is non-negotiable because a plate compactor can only consolidate material to a certain depth in one pass. If you dump 6 inches in at once, the bottom layer doesn't get properly compacted, and that's where settling starts.
Check your slope as you build the base. Use your string lines and a level frequently to make sure the gravel surface matches your intended drainage pitch of 1/8 to 1/4 inch per foot away from the house. It's much easier to fix slope problems in the gravel than after pavers are down.
Once the gravel is fully compacted, install your edge restraints before adding the sand. Snap the plastic edging into place along the perimeter of your layout and drive 8 to 10-inch spikes through the pre-drilled holes to anchor it. Any edge not bordered by an existing solid structure like a concrete wall or foundation needs this restraint. Without it, the pavers along the edges will gradually creep outward and the whole surface will start to spread and settle.
Now spread 1 inch of coarse bedding sand over the compacted gravel. Lay two 1-inch diameter pipes parallel across the surface as screed guides, spaced a few feet apart. Pour the sand between them, then drag a 2x4 along the top of the pipes to level it perfectly flat. Remove the pipes after screeding each section and fill the channels left behind with sand, smoothing by hand. Do not walk on or compact the screeded sand, it needs to stay loose so the pavers can be pressed into it evenly.
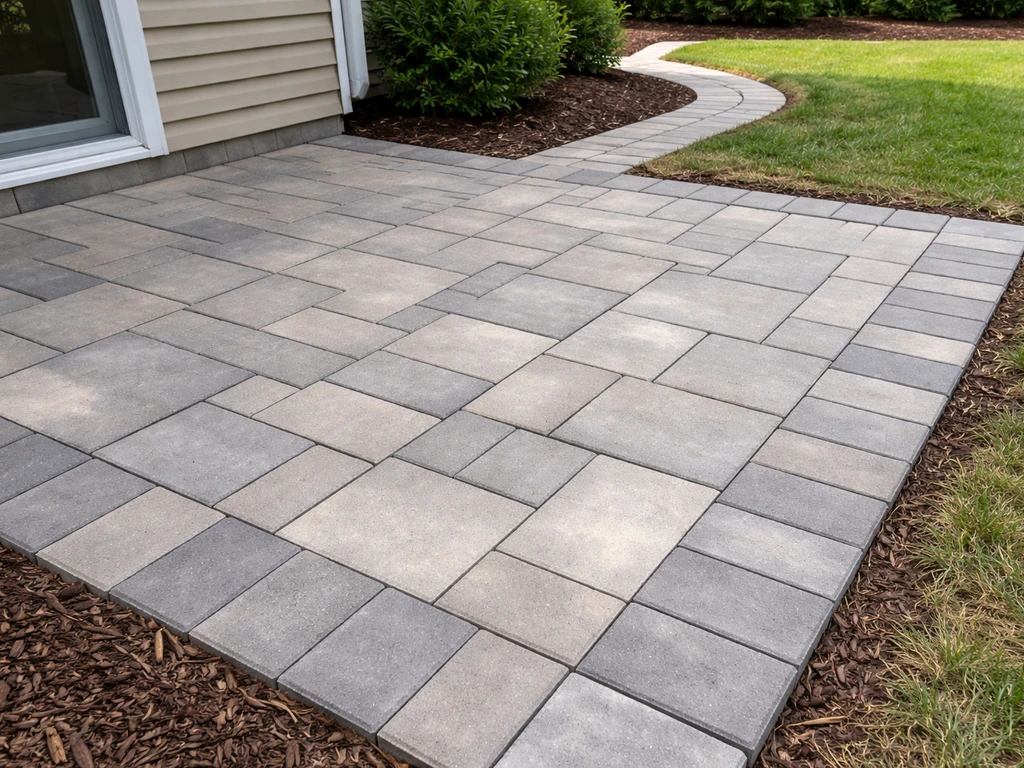
Setting pavers and keeping everything level
Start laying pavers from a corner or a straight edge, working outward. For a practical walkthrough, use the best way to lay patio pavers as your checklist from start to finish. Place each paver gently onto the sand bed, don't slide it (sliding disturbs the sand surface and causes lippage). Press it down firmly or tap it with a rubber mallet. Keep a consistent joint gap between pavers, typically 1/8 to 3/16 inch. Use tile spacers or cut pieces of plywood to maintain consistent spacing if you're finding it hard to keep gaps even by eye.
Check your level frequently. Lay a long straight edge or a 4-foot level across several pavers at once to spot any high or low spots. If a paver sits too high, lift it, remove a little sand, and reset it. If it's low, add a small amount of sand and re-set. The goal is a smooth, consistent surface with no paver riding higher than its neighbor (that height difference is called lippage, and it's a tripping hazard). Keep checking your string lines to make sure rows are staying parallel and the pattern is tracking correctly.
Once you've set a section of pavers, run the plate compactor over them with a rubber pad attached to the base plate to protect the paver surface. This seats the pavers evenly into the bedding sand and helps lock them in place. Do this before you do your final cuts along the edges.
Cutting pavers to fit the edges and corners
Save all your edge and border cuts for last. It's much easier to work your way across the main field of full pavers and then go back and measure each cut individually. Measure the gap you need to fill, mark the paver with a pencil, and make the cut.
For straight cuts, a wet-cut concrete saw is the cleanest and safest tool. The built-in water feed cools the blade and suppresses silica dust, which is a real respiratory hazard when cutting concrete pavers dry. If you're doing a smaller project or just have a few cuts, an angle grinder with a diamond blade works but creates a lot of dust, so wear a proper silica-rated respirator, not just a paper dust mask. A chisel and hammer works for simple straight cuts on thinner pavers but gives you much less control.
For tight corners, curved borders, or fitting around obstacles like posts or drain covers, mark the cut line carefully and take your time. Curved cuts can be done with an angle grinder or a saw with a segmented diamond blade, cutting in small increments. Lay the cut paver in place before moving on to make sure the fit is right before you set it permanently in sand.
Once all your cuts are in place, go back and run the plate compactor over the entire surface one more time. This is also a good moment to walk the whole patio and tap any individual pavers that look slightly high or low, adjusting as needed.
Filling joints, sealing, and keeping the patio looking good
Polymeric sand: how to do it right
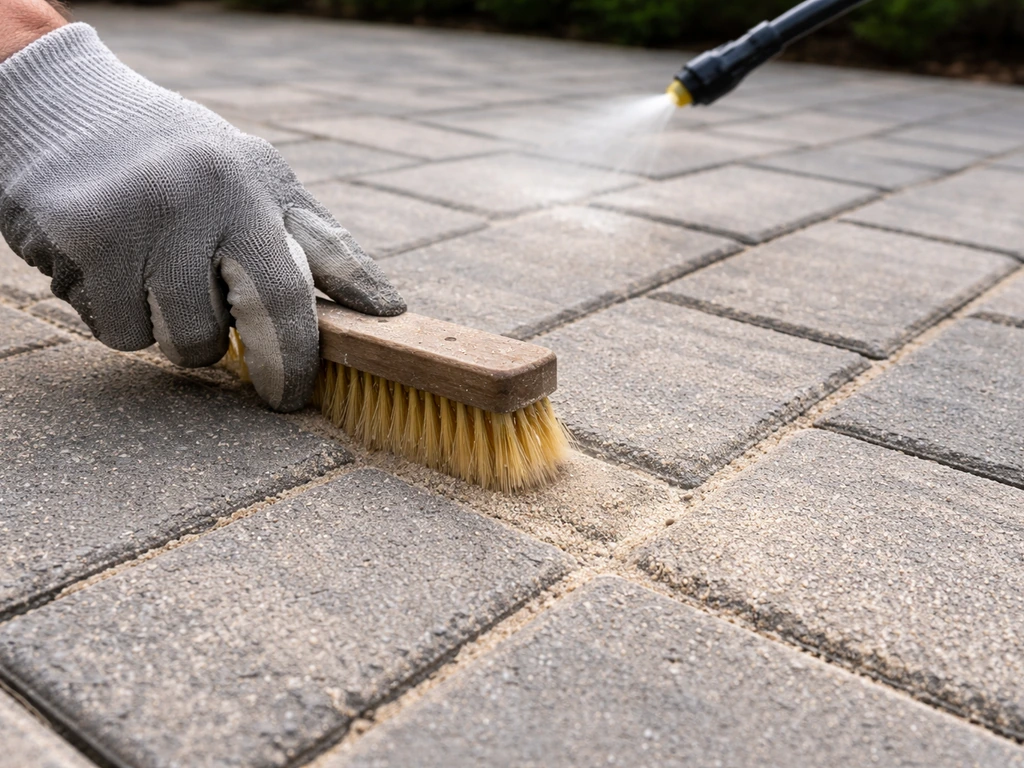
Polymeric jointing sand is the right material for filling paver joints. It's polymer-modified graded sand that hardens when activated with water, locking the joints against weeds, ants, and washout. Pour it dry over the surface and sweep it into the joints with a stiff broom. Work it in from multiple angles until every joint is filled flush to the top of the pavers. Run the plate compactor over the surface again (with the rubber pad) to compact the sand fully into the joints, then sweep in more sand to top off any that settled.
Before you add water, make sure the paver surface is completely dry and that rain isn't in the forecast for the next several hours. Wet pavers will cause the polymeric sand to haze and stain the surface. Once you're sure everything is dry, activate the sand by misting the surface with water, not blasting it. Use a gentle misting nozzle and saturate the joints until no more water can penetrate. This activates the polymer binders. Let it cure as directed on the bag, usually 24 hours minimum.
When to apply sealer
Most manufacturers recommend waiting at least 90 days after installing polymeric sand before applying a paver sealer. This gives the polymers time to fully cure and lets any efflorescence (the white mineral residue that commonly appears on new concrete pavers) work its way out. After that waiting period, a good penetrating or film-forming sealer will protect the surface from staining, UV fading, and freeze-thaw damage. Apply it on a dry day, follow the product instructions, and plan to reapply every 3 to 5 years depending on traffic and climate.
Troubleshooting the most common problems
| Problem | Likely Cause | Fix |
|---|---|---|
| Uneven or rocking pavers (lippage) | Inconsistent sand depth or debris under pavers | Lift the affected pavers, re-screed the sand, reset, and re-check with a straight edge |
| Pavers shifting or spreading at edges | Missing or inadequately spiked edge restraint | Add edge restraint and drive spikes every 12 inches; re-set shifted pavers |
| Standing water on the patio | Insufficient drainage slope or low spots in base | Lift pavers in the low area, re-grade the sand and gravel to restore slope, reset |
| Weeds growing through joints | Regular sand used instead of polymeric, or polymeric sand washed out | Remove old joint material, refill with fresh polymeric sand, and activate correctly |
| Sunken section of patio | Under-compacted base or soft soil below | Remove the affected pavers, excavate to firm soil, rebuild the base in compacted lifts, reset pavers |
| Polymeric sand haze on paver surface | Sand applied to damp pavers or activated incorrectly | Clean with a manufacturer-approved polymeric sand haze remover; prevent by ensuring dry conditions next time |
Ongoing maintenance
A well-built paver patio is low maintenance, but it's not zero maintenance. Check the joints each spring and top up any areas where polymeric sand has eroded. Reseal every few years to keep the surface protected. If you live in a cold climate, use sand or paver-safe ice melt products in winter, not standard rock salt, which can degrade both the pavers and the joint sand over time. Every few years, walk the surface and tap individual pavers to feel for any that have shifted. Catching and re-setting one or two pavers early prevents a bigger repair later.
Realistic expectations before you start
A small patio in the 100 to 150 square foot range is a solid first DIY project and is completable in a weekend for someone reasonably fit, with help for the heavy lifting. If you're wondering how to lay a small paver patio, focus first on planning the layout, then build a solid, well-compacted base for a level, long-lasting finish. A larger patio (300 square feet or more) is a genuine multi-day project that benefits from having a helper for excavation and paver transport. The hardest physical parts are the excavation and moving the base gravel, both of which you can ease by renting a mini excavator or hiring someone to do the dig and deliver gravel directly into the area.
The most common reason DIY paver patios fail isn't bad paver-laying technique, it's a weak or improperly compacted base. If the base problems happen, the long-term fix really does mean removing everything down to the soil and rebuilding. That's a painful lesson. So take your time on the excavation and base phases, and don't let anyone talk you into skipping the plate compactor rental or cutting the gravel depth short. If your layout involves tricky elements like a fire pit surround, a raised section, or building on a significant slope, those scenarios add complexity that's worth researching specifically before you start digging.
You can absolutely do this. The steps aren't complicated, and there's no part of this project that requires professional expertise if you're willing to be methodical. Follow the sequence, check your levels constantly, don't rush the base, and you'll have a patio you're proud of.
FAQ
What joint spacing should I use, and what if my pavers already have spacing lugs or built-in gaps?
Use the manufacturer’s recommended gap if your pavers have lugs or molded spacer bars. If they do not, stick to about 1/8 to 3/16 inch. If you end up consistently narrower than that, you can’t fully fill joints later, and poly sand won’t lock properly, so adjust early by using spacers or cut plywood strips while laying.
How do I choose the right base gravel, and does “crushed” really matter?
Yes, crushed or angular gravel matters because it interlocks when compacted. Prefer a clean base gravel sized for paver patios (often marketed as “crush run” or similar) rather than rounded river rock. Rounded stone compacts poorly, which leads to pumping, shifting pavers, and joint sand washout.
Can I lay pavers directly on sand instead of a gravel base?
For a patio, no. Sand-only setups typically settle and create uneven surfaces because sand does not provide the structural support and drainage buffering that a compacted gravel base does. If you skip gravel, the joints will also erode faster under foot traffic.
How do I prevent “hollow” spots after compacting the pavers?
Hollow spots usually come from insufficient compaction in the base or too-thin bedding sand coverage. Before setting pavers, confirm the gravel base is built in lifts and compacted to the target depth. After installing, don’t just compact once, do a final pass and tap for movement, lifting and re-setting any pavers that feel loose.
What should I do if I realize the patio slope is wrong after the pavers are already down?
If the error is small, you can sometimes correct it by lifting affected sections and re-leveling with additional bedding sand (keeping the overall slope consistent). If the slope is significantly off, plan on removing pavers and adjusting the base, because you cannot “fix” slope with sand without creating lippage, weak edges, and drainage problems.
Do I need landscape fabric under the gravel, and can it cause problems if I skip it or use the wrong type?
In most cases, fabric helps limit weed growth and reduces soil migration into the gravel. If you use fabric, make sure it is laid smooth and overlaps seams, so it does not create voids. Avoid heavy plastic that can trap water, and avoid skipping fabric where weeds are common, especially on sunny, disturbed areas.
Can I reuse edge restraints or timber edging I already have?
You can reuse restraints only if they are straight, stable, and still have usable anchors. Timber edging often rots or moves, which allows pavers to creep. For long-term stability, verify the restraint line is solid and drive new spikes where needed so the edges cannot bow outward.
Should I compact the bedding sand before laying pavers?
No, keep the 1 inch bedding sand loose after screeding. Compacting it reduces the bedding’s ability to let each paver seat evenly, which increases the risk of lippage. Compacting belongs to the gravel base, then later you compact the pavers with a rubber pad to seat them.
Why does my polymeric sand fail, even if I followed the steps?
Common causes are not filling joints fully, washing the sand out before it cures, or adding water too aggressively (blasting rather than misting). Also check that joints were dry before activation. If the weather turns wet too soon or you walk on the surface immediately, the sand may not harden correctly.
How long should I wait before using the patio after misting the polymeric sand?
Let it cure for at least the minimum time stated on the bag, often 24 hours, and avoid heavy foot traffic during that period. If rain is possible before cure, protect the surface. Waiting longer than the minimum helps, especially in cool or humid weather.
Can I install pavers over an old concrete slab and still use polymeric sand?
Yes, you can use polymeric sand for joints on top of concrete in most situations, but you need to use the appropriate installation system and ensure the slab has no major heave, spalling, or structural cracking. If the slab moves seasonally, the top layer can crack or shift, so fix underlying concrete issues first.
What is the best way to cut pavers for accuracy at borders?
Do main field cuts last, and measure the gap at multiple points along the border, because walls and edges are rarely perfectly straight. Mark cuts with a pencil on a face reference line, dry-fit the piece in the sand before committing, and aim for tight fits that still allow joint gap.
What ice melt can I use in winter, and what should I avoid?
Use paver-safe ice melt products labeled as safe for polymeric joints. Avoid standard rock salt and aggressive chloride-based products, which can degrade both the pavers’ surfaces and joint material over time. If possible, use a plastic shovel and keep the joint sand topped up each season.
How do I know if I should hire help or rent equipment for my patio size?
For small patios, you can often rent a plate compactor and handle excavation manually or with light tools. For larger areas (around 300 square feet and up), excavation and gravel movement become the bottleneck, so hiring excavation help or renting a mini excavator can save days. If you don’t have a good way to move and distribute base gravel, that is a sign to get assistance.
Next Articles
Patio Pavers Do It Yourself: Step-by-Step Guide
Step-by-step DIY patio paver install: plan, prep base, lay & cut pavers, ensure drainage, then compact, sand, seal.
How to Build a Paved Patio: Concrete or Pavers DIY
DIY guide to build a paved patio with concrete or pavers: planning, base prep, drainage, steps, tools, and maintenance t
How to Build a Pavers Patio: Step-by-Step DIY Guide
Step-by-step DIY how to build a pavers patio: planning, base prep, laying, cutting, patio steps, finishing, and troubles