
Installing patio pavers is one of the most rewarding DIY projects a homeowner can take on. For more detailed patio paver installation tips, see the linked checklist for step-by-step guidance and common pitfalls to avoid. A well-built paver patio can last 30 or more years, adds real curb appeal, and is genuinely achievable over a couple of weekends if you plan carefully, build a proper base, and take your time laying the field. This guide walks you through every phase from the first measurement to the final coat of sealer, including the trickier scenarios like working over existing concrete, grading a slope, or tying in raised steps. For additional paver patio tips and troubleshooting advice, see this focused resource. For a focused, step-by-step walkthrough on how to patio paving, see this detailed how-to guide.
Patio Pavers Installation Guide: DIY Plan with Checklists

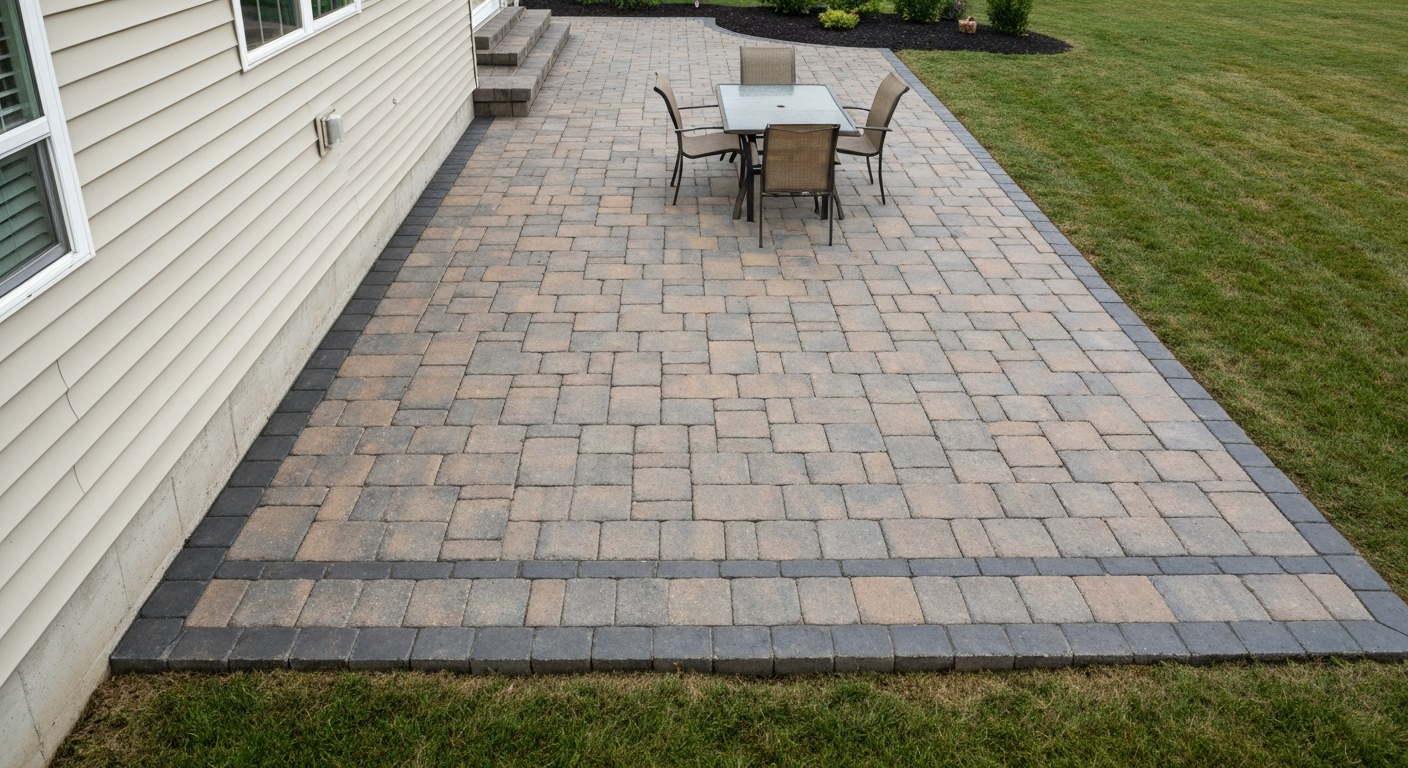
Who this guide is for and what to expect
This guide is written for homeowners who have basic DIY confidence, access to rental equipment, and a patio between roughly 100 and 400 square feet in mind. You do not need professional hardscape experience, but you do need to be comfortable with physical labour, following a sequence carefully, and asking for help when the work calls for it. Expect a straightforward 10x12 ft patio to take two people a full weekend: one day for planning, marking, excavation, and base work, and a second day for laying, cutting, jointing, and compacting. Larger patios or those with slopes, raised borders, or integrated steps will need an extra day or two. Budget time generously the first time you do this.
The sections below build on each other in the order you will actually need them on the job. Read through the whole guide once before you start. You will catch details early that save you from undoing finished work later, which is the single most common (and frustrating) mistake DIYers make.
Project planning and design
Before you buy a single paver, sit with a sketch and answer a few questions. What is the patio for: dining, lounging, a fire pit area, a transition from wood steps to grade? The answer drives size, shape, and whether you need to plan for a built-in fire feature or connecting paver steps to your house. A dining area for four needs at least 120 sq ft; add chairs and a grill and 160-200 sq ft is more comfortable. If your house already has wood steps landing on grade, you may want to read about connecting those steps to the paved surface as part of this project.
Drainage direction is non-negotiable. The surface must slope away from your house and any adjacent structures at a minimum of 1 inch of fall per 8 feet of run (roughly 1% to 2% grade). Getting this wrong causes water to pond against your foundation, and fixing it means pulling everything up. Mark your drainage direction on your sketch before you mark anything on the ground.
Check your local municipality about permits. Most jurisdictions do not require a permit for a ground-level paver patio under a certain area (often 200 sq ft), but some do, and almost all require you to call your utility locating service (811 in the US) before any excavation. Call 811 at least three business days before you dig. This is not optional. Striking a gas line or buried electrical conduit is a genuine safety hazard and a costly repair.
- Call 811 to mark underground utilities at least 3 business days before excavation
- Check your municipality for permit thresholds (common threshold: patios over 200 sq ft or within X feet of property line)
- Confirm drainage direction: slope away from the house at 1 in. per 8 ft minimum
- Decide on connected features now: steps, raised edges, fire pit, or planting borders
- Note any existing drainage swales, downspout discharge points, or buried irrigation lines
Measuring and marking the site
Accurate layout saves material and prevents a lopsided result. Start by establishing a baseline, usually the wall or edge of your house, and measure out squarely using the 3-4-5 triangle method: measure 3 ft along the wall, 4 ft out perpendicular, and the diagonal between those two points should be exactly 5 ft. Adjust until it is. Drive stakes and run string lines to define all four corners, then measure corner to corner on both diagonals. If those two measurements match, your layout is square.
Use a line level or a digital level on the string lines to establish your finished surface elevation at the house, then set the far string at the correct drop. For a 12-ft-wide patio sloping away from the house, a 1.5% grade means the far edge sits 2.16 inches lower (12 ft x 0.015 x 12 in/ft = 2.16 in). Mark this on your stake and tie the string at that elevation. This string line becomes your reference for every depth measurement during excavation and base building.
Draw a scaled plan on graph paper or a free online tool. Use a scale of 1 square = 1 ft. This lets you experiment with paver patterns and dimensions before you are on your knees in the dirt. Scaled plans also reveal awkward cuts at the edges that you can often eliminate by shifting the layout a few inches.
Tools, materials, and quantity checklists
Tools you will need
- Tape measure (at least 25 ft), stakes, and string line with line level
- Spade shovel and flat-blade spade for edging
- Plate compactor (rent one; this is not optional)
- Screed pipes (two 1-inch diameter metal conduits or rods, 6-8 ft long)
- Straight 2x4 or screed board, at least 8 ft long
- Hand tamper for tight spots the plate compactor cannot reach
- Rubber mallet
- Angle grinder with diamond blade or a wet-cut masonry saw (rent if only cutting a few dozen pieces)
- Level (4 ft) and torpedo level
- Wheelbarrow and square-blade shovel for moving base material
- Broom (stiff push broom for polymeric sand)
- Safety glasses, hearing protection, work gloves, knee pads, and dust mask rated N95 or better for cutting
- Garden hose with spray nozzle
- Chalk line
How to calculate quantities
For bulk materials (crushed stone base, bedding sand), use this formula: cubic yards = (area in sq ft x depth in inches) divided by 324. For example, a 120 sq ft patio needing a 6-inch compacted base requires (120 x 6) / 324 = 2.22 cubic yards of crushed stone. Add 10-15% for compaction loss and waste, so order about 2.5 cu yd. For the 1-inch bedding sand layer: (120 x 1) / 324 = 0.37 cu yd, round up to 0.5 cu yd.
For pavers, divide the project area (in sq ft) by the coverage area of one paver (also in sq ft), then multiply by a waste factor. Use 1.05 to 1.10 (5-10% waste) for straight running bond or stack patterns, and 1.10 to 1.15 (10-15% waste) for 45-degree herringbone or curved layouts. Always round up to the nearest full bundle or cube, and try to buy from one production run to avoid color variation.
Material checklist
- Pavers (quantity per formula above, with waste allowance)
- 3/4-inch minus crusher-run or dense-graded aggregate for base (compactable; not river gravel)
- ASTM C33 concrete/coarse washed sand for bedding layer (not masonry sand, play sand, or stone dust)
- Polymeric jointing sand for filling joints
- Plastic spike-down or aluminum edge restraints with 10-inch spikes
- Geotextile landscape fabric (for use under base on soft or weedy subgrades)
- Paver sealer (optional, but recommended for stain resistance)
Choosing pavers, patterns, colors, and edge restraints
Paver material options
| Material | Typical Size | Durability | Cost Range (per sq ft installed) | Best For |
|---|---|---|---|---|
| Concrete interlocking pavers (ASTM C936) | 4x8 in, 6x6 in, 6x9 in | Excellent; 30+ yr lifespan | $8–$20 | General patios, driveways, steps |
| Natural clay brick pavers | 4x8 in | Excellent; color is baked in | $10–$25 | Traditional look, walkways |
| Natural stone (flagstone, bluestone) | Irregular to 12x24 in | Very high; varies by species | $15–$40+ | Organic, high-end aesthetic |
| Porcelain pavers | 12x24 in, 24x24 in | Very hard; low absorption | $12–$30 | Modern designs, pool surrounds |
| Permeable/PICP concrete pavers | Various | Equal to standard concrete | $15–$30 | Drainage-sensitive sites, green infra |
Concrete interlocking pavers manufactured to ASTM C936 are the most practical choice for most DIY patios. They are consistent in thickness (typically 2 3/8 in or 3 1/8 in), widely available, and designed specifically for sand-set installation. If drainage is a concern on your site, permeable interlocking concrete pavers (PICP) are worth considering; they allow water to pass through the joints into an open-graded aggregate base, reducing runoff significantly. ASTM C1781 is a standard test method for permeability/plugging resistance referenced in PICP guidance.
Laying patterns
- Running bond (brick-like offset rows): easiest to lay, 5% waste, works well in long rectangular spaces
- Stack bond (grid): straightforward but shows any unevenness prominently; use sparingly
- Herringbone (45° or 90°): strongest interlocking pattern, best for driveways, 10-15% waste due to edge cuts
- Basketweave: pairs of pavers alternating direction; good for square spaces, moderate waste
- Random/ashlar: mix of different sizes for a natural look; plan the layout carefully on paper first
Joint widths and edge restraints
Most concrete paver manufacturers design their units with a 1/8-inch spacer nub built into the side, which sets the joint width automatically. For natural stone or porcelain without spacers, keep joints between 1/4 and 3/8 inch. Wider joints allow more movement and are harder to keep clean. Use polymeric jointing sand (not regular sand) in all joints; it sets firm when activated with water and resists ants, erosion, and weed germination.
Edge restraints are mandatory for any sand-set paver installation. Without them, pavers migrate outward over time and joints open up. ICPI Tech Spec 3 requires a restraint on all unconfined edges, with 10-inch spikes driven at roughly 12 inches on center for pedestrian patios and 8 inches on center for driveways or curves. The base material must extend at least 6 inches beyond the last paver row so the spikes anchor in compacted stone, not loose soil. Plastic spike-down restraints work well for most patios; aluminum or steel restraints hold tighter on curves.
Preparing the site
Removing turf and grading over grass
Strip the sod first with a flat spade or a rented sod cutter. Remove all organic material from the footprint plus 12 inches on each side (the base extends beyond the pavers, remember). Roots, lawn clippings, and topsoil left in place will decompose and cause settling. Once sod is stripped, excavate to your target depth. For a 4-inch compacted base, 1-inch bedding sand, and a 2 3/8-inch paver, you need roughly 7.5 inches of total excavation below your finished grade. Round up to 8 inches and fine-tune with grading.
Grade the excavated floor so it mirrors the intended slope of the finished surface. A 1% to 2% fall away from the house in the excavated floor means the finished patio will drain correctly without you fighting the base on installation day. Compact the native soil with a plate compactor before adding any base material. If the soil is soft, wet, or clay-heavy, lay geotextile fabric over the compacted subgrade before adding stone. This separates the subgrade from the base aggregate and prevents fines from migrating up and weakening the base over time.
Installing pavers over existing concrete
You can install pavers over an existing concrete slab, but only if the concrete is structurally sound (no heaving, deep cracking, or soft spots) and the finished elevation will not create a hazard at door thresholds, steps, or transitions. Adding 1 inch of sand plus a 2 3/8-inch paver raises the surface about 3.5 inches. Check that no door will swing into the new surface and that water can still drain away from the house. If the existing slab drains toward the house, you will need to address that before overlaying. The three installation methods for over-concrete work are sand-set, mortar-set, and bituminous-set. Sand-set is the most DIY-friendly and still reversible; mortar-set is permanent and requires thinner pavers or more careful elevation planning.
Working on uneven or sloped ground
Sloped ground is workable as long as the grade is consistent and you build the base to compensate. If the slope is gentle (under 10%), grade the excavated floor parallel to the intended finished surface and build a uniform base depth throughout. Steeper slopes may require a terraced or raised-edge design to keep the base depth manageable. On very uneven ground, the base depth will vary section by section; check depth frequently with a tape measure from your string line reference. Never thin the base below 4 inches in any spot for a pedestrian patio, even in areas that only need minor fill.
Building the base and drainage system
Excavation depth guidelines
| Application | Sandy/Well-Drained Soil | Clay or Weak Subgrade | Notes |
|---|---|---|---|
| Pedestrian patio (DIY) | 4–6 in compacted base | 6–8 in compacted base | ICPI minimum 4 in; deeper in frost climates |
| Residential driveway | 6–10 in compacted base | 8–14 in compacted base | Techo-Bloc and ICPI guidance ranges |
| Raised patio / retaining edge | 6–8 in compacted base | 8–10 in compacted base | Consult engineer if retained height exceeds 24 in |
| Overlay on existing concrete | 1 in bedding sand only | N/A (slab is the base) | Slab must be structurally sound |
These ranges come from ICPI Tech Spec recommendations and manufacturer guidance from suppliers like Techo-Bloc. The deeper end of each range is appropriate if your soil is clay-heavy, stays wet, or if you are in a climate with significant frost heave. When in doubt, go deeper; adding more base material costs far less than pulling up a settled patio in five years.
Step-by-step base installation
- Compact the native subgrade with a plate compactor until it feels firm. If the soil is soft or disturbed, make multiple passes.
- Lay geotextile fabric over the compacted subgrade on clay or weedy soils. Overlap seams by at least 12 inches. Do not use fabric as a substitute for proper compaction.
- Add crusher-run (dense-graded) base aggregate in lifts no deeper than 4 inches at a time. Adding all the material at once prevents adequate compaction in the lower layers.
- Compact each lift with a plate compactor, making at least two perpendicular passes. Target 95% relative compaction; on a DIY job this means the surface no longer moves visibly under the compactor.
- Check the graded surface of the base against your string lines. It should be uniform and match your intended slope.
- Set two 1-inch diameter screed pipes or conduits on the compacted base, parallel to each other and spaced 6-8 feet apart, at the correct elevation for your bedding sand layer.
- Pour ASTM C33 concrete/coarse washed sand over the base between the screed pipes to a depth slightly above the pipes, then drag a straight 2x4 screed board across the pipes to flatten it to exactly 1 inch.
- Remove the screed pipes carefully, fill the channels with sand, and smooth lightly. Do not compact the bedding sand at this stage.
- Begin laying pavers immediately; do not leave screeded sand exposed to rain or foot traffic.
A note on drainage: if your site collects water from a large contributing area (like a sloped yard draining toward the patio), consider routing a French drain or catch basin before building the patio. For sites where reducing stormwater runoff matters, permeable PICP systems with an open-graded aggregate base (using No. 57 or No. 2 stone as a reservoir layer) are a legitimate option and are endorsed by EPA green infrastructure guidance. The Green Streets Handbook (EPA) recommends using ICPI design guidance for permeable paver systems and treats permeable pavers as an LID/green-infrastructure practice that can reduce runoff and peak discharge when properly designed. PICP requires more precise base design and specific aggregate gradations, but the installation process at the paver level is similar to conventional sand-set work.
Installing edge restraints and framing for raised patios and steps
Standard edge restraint installation
Install edge restraints after the last full row of pavers is laid on each edge but before you fill joints and compact. Position the restraint hard against the side of the paver, not against the face. Drive 10-inch galvanized spikes through the restraint holes and into the compacted base at 12 inches on center for straight runs and 6-10 inches on center on curves. The critical detail here is that the spikes must hit compacted aggregate base, not soil. If the base does not extend at least 6 inches beyond the paver edge, the spikes will pull out over time and the edge will creep outward.
For plastic restraints, use the flat-spike style on straight edges and the slotted or segmented style on curves. Aluminum restraints bend smoothly and hold well on arcs; they cost more but are worth it on a curved patio edge. Steel angle restraints are typically overkill for residential patios but are appropriate for driveways or commercial work.
Raised patio edges and retaining borders
A raised patio edge (where the patio sits higher than the surrounding grade) requires a structural border, not just a spike-down restraint. Common DIY solutions include soldier-course pavers set on end and secured with concrete at the base, concrete retaining wall blocks, or natural stone border courses mortared in place. Whatever you use, the retained height matters: anything retaining more than 8 inches of soil or base material should be designed carefully, and anything over 24 inches of retained height really should involve a structural engineer or a licensed contractor. Frost pressure, saturated backfill, and surcharge loads (like furniture or people standing near the edge) all add stress to retaining edges that homeowners underestimate.
For paver steps that connect to the house or transition from a raised patio to grade, the steps need their own compacted base and edge restraints independent of the patio. See the patio paving steps section for detailed instructions on building independent step bases, riser heights, and proper tread installation. Each step riser is typically 6 to 7 inches tall and each tread should be at least 11 to 12 inches deep. Build the step base as a solid, compacted aggregate footing, then set the tread pavers on a 1-inch sand bed the same way you set the field pavers. Tread pavers should overhang the riser by about 1 inch. If you are tying wood steps into a paver patio surface, plan that connection in this phase so the step stringer footing does not conflict with your base.
Fire pit integration
If the design includes an in-patio fire pit, frame the opening before laying the field pavers. The fire pit surround typically sits on its own compacted base and is built with fire-rated concrete blocks or purpose-made fire pit rings, not standard pavers (which can crack or spall under repeated heat). Leave a gap between the fire pit structure and the surrounding pavers to allow for thermal expansion. Most manufactured fire pit kits specify a minimum clearance to combustibles; follow those instructions and check local ordinances, as some municipalities prohibit open fire features within certain distances of structures.
Laying and cutting the pavers
Start laying from a corner or a straight edge, working toward the open field. Never walk on the screeded sand bedding; kneel on a piece of plywood or a foam kneeling pad placed on already-laid pavers. Set each paver down gently in one motion rather than sliding it into position; sliding disturbs the sand bed and creates high spots. Tap each paver firm with a rubber mallet and check frequently with a level. Pavers should be flush with each other with no lips greater than 1/8 inch between adjacent units.
Cut pavers for the border rows last. Measure each piece individually rather than assuming all edge gaps are the same. For straight cuts, an angle grinder with a diamond blade works well for occasional cuts. For a project with many cuts or on hard stone or porcelain, renting a wet-cut masonry saw is worth the cost. Always wear safety glasses, hearing protection, and an N95 or better dust mask when cutting. Silica dust from concrete and stone cutting is a serious long-term respiratory hazard.
Filling joints, compacting, and finishing
- Sweep the paver surface clean of any debris or loose material before applying jointing sand.
- Pour polymeric jointing sand over the paver field and sweep it into the joints with a push broom, working in multiple directions to fill completely.
- Run the plate compactor over the entire paved surface to set the pavers into the bedding sand and vibrate the jointing sand deeper into the joints. Use a rubber pad or protective plate under the compactor to avoid scratching the paver faces.
- Add a second round of polymeric sand, sweeping it in again. Most polymers need two applications to fill joints adequately.
- Blow or sweep off all excess sand from the surface. Polymeric sand left on the surface when activated will leave a haze.
- Activate the polymeric sand with a gentle mist from a garden hose, working systematically across the surface. Follow the manufacturer's instructions for drying time (typically 24 hours) before allowing foot traffic.
- Inspect all joints after 24 hours. Any low spots or gaps should be refilled before the patio is in regular use.
Sealing the finished patio
Sealing is optional but worth doing for most concrete and clay pavers. A good sealer enhances color, repels oil and food stains, and slows efflorescence (the white mineral bloom that appears on new concrete pavers). Wait at least 60 to 90 days after installation before sealing; the pavers need time to cure and for any initial efflorescence to work its way out. Apply sealer on a dry day with no rain forecast for 24 hours, following the manufacturer's dilution and recoat instructions. A roller works for flat surfaces; a pump sprayer is faster on larger patios. Most sealers need reapplication every 3-5 years.
Troubleshooting common problems
Settling and uneven pavers
The most common cause of settled or rocking pavers is an insufficiently compacted base or bedding layer that was too thick. To fix a settled area, lift the affected pavers, add or remove bedding sand as needed to bring the surface back to grade, and reset. If the settling keeps recurring in the same spot, the base itself is failing, usually because of poor compaction or water infiltrating through a joint. In that case, the repair needs to go deeper: pull the pavers, excavate, re-compact, and rebuild.
Drainage problems
Ponding water on the patio surface means the slope is insufficient or reversed in that area. Minor drainage issues can sometimes be addressed by lifting and re-grading a small section. If the entire patio drains toward the house, the problem is in the original grade of the base and the fix involves more significant rework. This is why getting the slope right before you lay a single paver is so important.
Joint erosion and weed growth
If polymeric sand erodes or weeds grow in joints within the first year, the sand was either not activated properly, applied in rain, or was the wrong product. Sweep out the affected joints, dry them fully, and reinstall polymeric sand according to the manufacturer's instructions. Regular joint sand refills (every few years) are a normal part of paver maintenance.
Efflorescence on new concrete pavers
White or gray surface bloom on new concrete pavers is efflorescence: soluble salts migrating to the surface as moisture evaporates. It is normal and typically disappears on its own within the first season. If it persists, a diluted muriatic acid wash (following manufacturer safety precautions carefully) or an efflorescence cleaner designed for concrete pavers will remove it. Rinse thoroughly afterward.
Maintaining your paver patio
- Sweep regularly and rinse with a garden hose as needed; avoid pressure washers on joints, as they erode jointing sand
- Inspect and top up polymeric joint sand every 2-3 years or when joints look hollow
- Reapply sealer every 3-5 years to maintain stain resistance and color
- Check edge restraints each spring; re-drive any spikes that have worked loose over winter
- Remove moss and algae with a diluted outdoor cleaner (not bleach, which can discolor concrete pavers) and a stiff brush
- Reset any pavers that rock, rise, or settle before the problem spreads to adjacent units
- Keep downspout discharge directed away from the patio; concentrated flow from downspouts can erode the base edge over time
Realistic time and cost estimates
| Project Size | Estimated Time (2 people) | Material Cost Range | Equipment Rental |
|---|---|---|---|
| 10x10 ft (100 sq ft) | 1.5–2 days | $600–$1,800 | $150–$250/day |
| 12x16 ft (192 sq ft) | 2–3 days | $1,100–$3,500 | $150–$250/day |
| 20x20 ft (400 sq ft) | 3–5 days | $2,200–$7,000+ | $150–$250/day |
| Paver steps (4-5 steps) | Add 0.5–1 day | $300–$800 | Included in patio rental |
Material costs vary significantly by region, paver choice, and whether you are renting vs. owning equipment. Natural stone and porcelain pavers sit at the high end; standard concrete interlocking pavers are the most budget-friendly. These ranges reflect material only; they do not include delivery fees, permit costs, or dump fees for excavated material.
When to call a professional
Most homeowners can confidently handle a ground-level patio up to 300-400 sq ft without professional help. There are situations, though, where calling a licensed contractor is the smarter move. If your site has significant drainage issues that require engineered solutions, if you need a retaining wall over 24 inches, if the patio is near a property line that requires a survey, or if the project involves structural connections to the house (like a porch or attached raised patio), professional involvement protects both your investment and your safety. Similarly, if after reading this guide the scope feels genuinely beyond your current skills or available time, hiring a pro for the base work and doing the laying yourself is a perfectly valid split.
Patio paver installation done right is durable, beautiful, and genuinely achievable for a capable DIYer. Build the base correctly, get the slope right, and use proper materials in the joints and at the edges. Everything else is patience and attention to detail. If you are planning to add steps, a raised border, or a connected wood stair, read through the relevant sections carefully before you start so those features are built into the base plan from day one rather than retrofitted after the field pavers are down. For detailed instructions on building steps with patio pavers, consult the section on framing and constructing paver steps. That is the approach that separates a patio that lasts a generation from one that needs repairs in three years.
FAQ
What authoritative standards and references should I use when writing a DIY patio pavers installation guide?
Use ASTM C936 for concrete interlocking paving units (material specs), ICPI technical specifications and PICP design manual for construction details (base depths, edge restraints, permeable paver design), and EPA guidance for stormwater/permeable pavements. Also consult local DOT or municipal specs for regional compaction and frost-depth requirements and paver manufacturers' technical sheets for product-specific recommendations.
What are the essential planning steps before starting a patio pavers project?
1) Define patio footprint, elevation and drainage (establish positive slope 1/8"–1/4" per ft away from house). 2) Choose paver type, size and pattern (consider wear and cutting). 3) Check utilities and permits; verify door thresholds and local codes (impervious area rules, setback). 4) Measure and calculate material quantities (area, paver count, base volume). 5) Prepare a realistic schedule, skill checklist, and safety plan.
What tools, materials and quantities do homeowners typically need?
Tools: tape measure, builder’s level or laser, string/stakes, shovel, wheelbarrow, plate compactor, edging tool, 4-ft screed board, rubber mallet, jointer/broom, angle grinder or wet saw with diamond blade, safety gear (glasses, gloves, dust mask). Materials: pavers, 1" ASTM C33 bedding sand, compacted aggregate base (3/4" minus or No.57/3/4"-minus depending on spec), edge restraint (aluminum/steel/plastic or concrete curb), polymeric sand or jointing sand, geotextile for soft soils or permeable systems, stabilizing grid (optional). Quantity formulas: base cu yd = (Area ft² × depth in) ÷ 324. Paver count = (Area ÷ paver coverage) × (1 + waste allowance—5–10% straight patterns; 10–15% angled/curves).
What are typical base and bedding specifications for residential patios?
ICPI prescriptive guidance: pedestrian patios/walkways—minimum 4" compacted aggregate base plus 1" screeded course of ASTM C33 bedding sand. Adjust base depth to soil strength and climate: use 4–6" on sandy, 6–8" on clay/soft soils; compact base to ~95% relative compaction where specified. For permeable pavers follow ICPI PICP reservoir sizing and open-graded aggregate guidance.
Step-by-step: How do I install pavers over compacted soil (typical backyard patio)?
1) Stake layout and set elevations (allow slope for drainage). 2) Excavate to accommodate paver thickness + 1" sand + compacted base (typically 4–8"). 3) Compact subgrade and place geotextile if required. 4) Install, spread and compact aggregate base in lifts; achieve specified depth after compaction. 5) Screed 1" bedding sand over tack board, keeping sand loose and even. 6) Lay pavers from string line/pattern, keeping consistent joint widths. 7) Trim edges and fit cuts. 8) Install edge restraint anchored into base (not into soil). 9) Sweep joint sand/polymeric sand into joints; compact surface with plate compactor using protective matting to avoid chipping. 10) Re-sweep and apply final compaction sweep; seal if desired per manufacturer.
How do I install pavers over existing concrete?
Options: sand-set overlay, thin-set mortar, or full-depth structural overlay. Key points: ensure existing concrete is sound (no large cracks, spalling) and provides positive drainage; clean and degrease surface; use a tack/bonding layer if required; install 1" screeded bedding (sand) for sand-set overlay but be cautious of creating trip hazards at door thresholds—maintain required door clearance. Edge restraints and ties into surrounding grade still required. For permeable goals, overlay on concrete is generally not recommended.
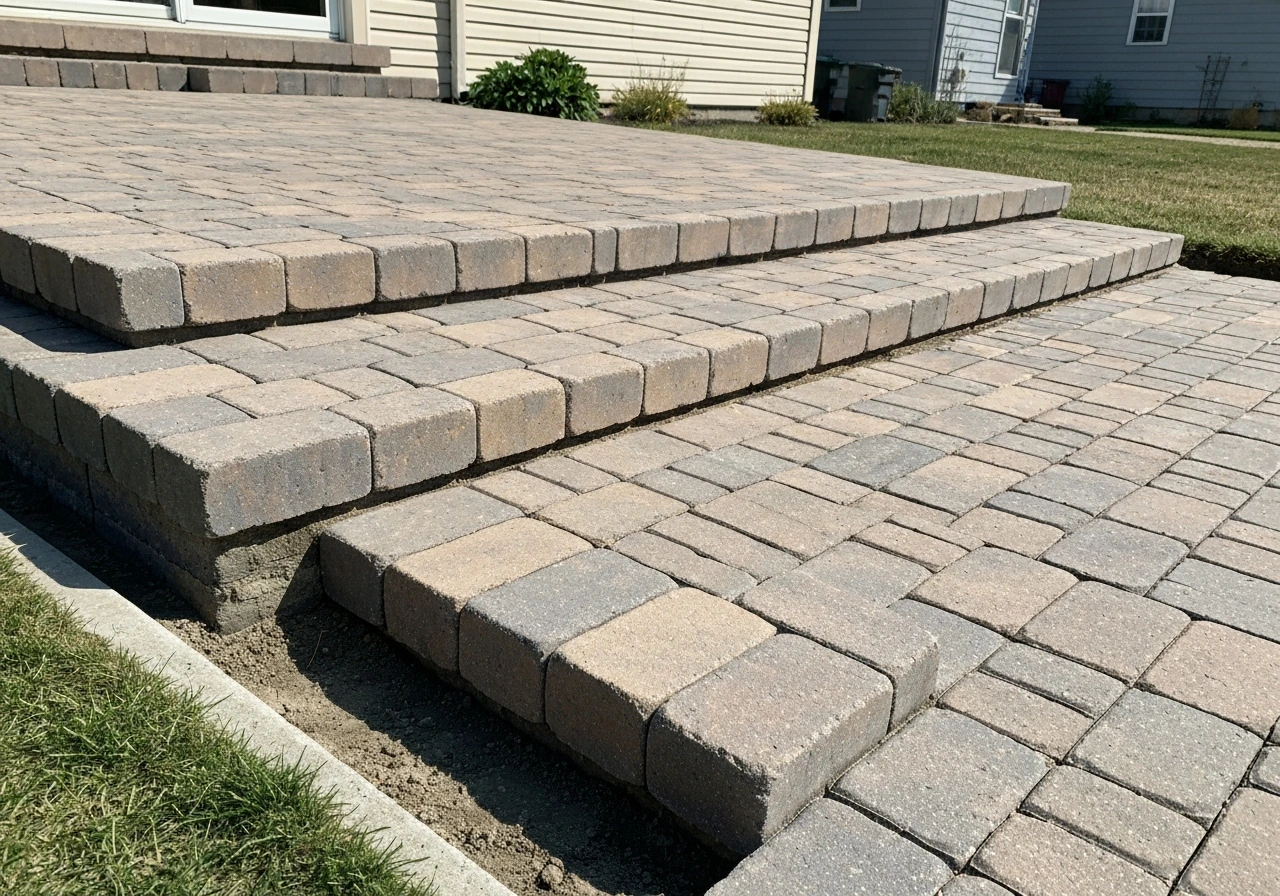
DIY guide for building steps with patio pavers: layout, base prep, grading, paver layout, finishing, sealing, and fixes.
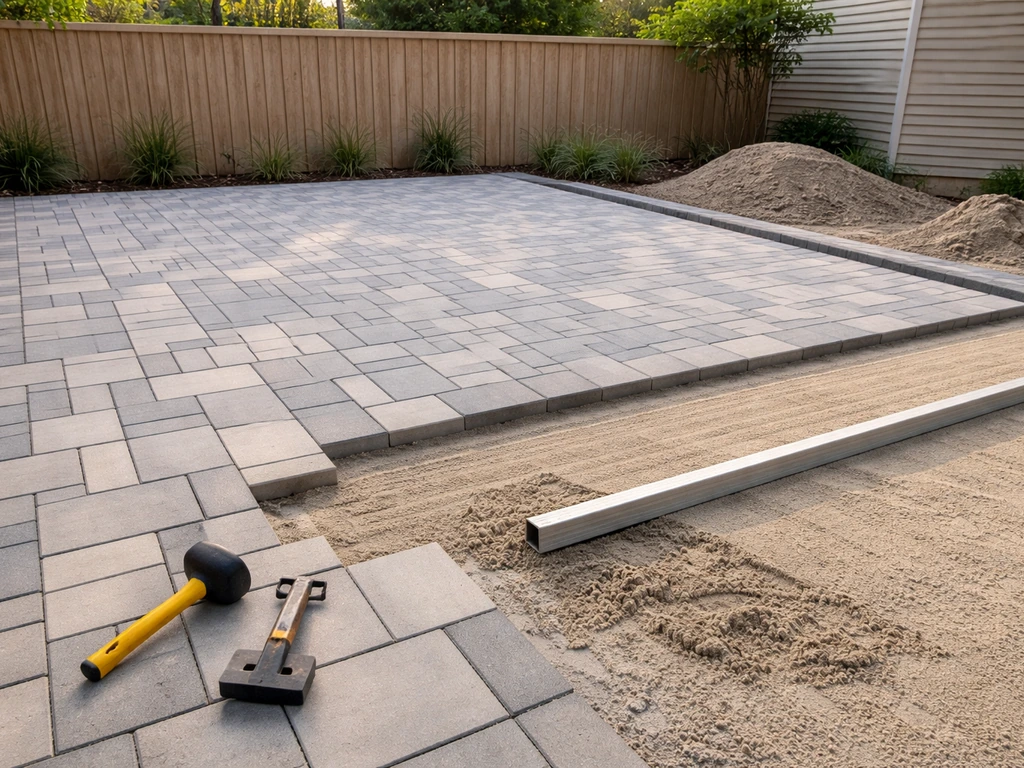
DIY how to patio paving: plan, build a solid base, install pavers, fix drainage issues, and maintain or seal long term.
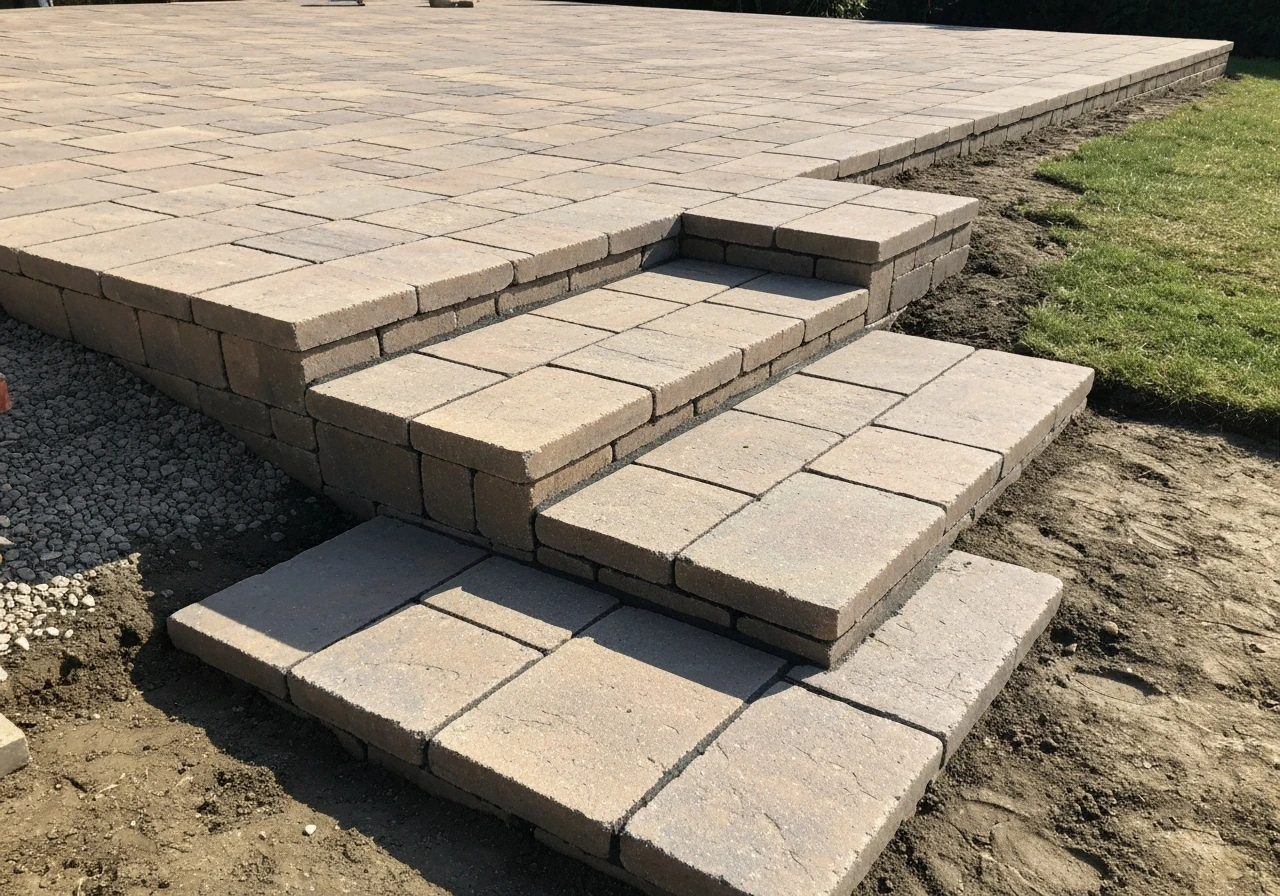
DIY guide to design and install patio paving steps with safe tread-riser sizing, drainage, base prep, and troubleshootin