You can absolutely attach a pergola to a paver patio, but the pavers themselves can't do the structural work. The posts need to be anchored into concrete, either an existing slab beneath the pavers or new footings you pour at each post location. Skip that step and you'll end up with a pergola that rocks, settles, or lifts pavers over time. Do it right and you'll have a solid, long-lasting structure with a clean finish around each post.
How to Attach a Pergola to a Paver Patio: Secure Anchors

Felix Rowe
21 Jun 2026
First, figure out what you're working with
Before you buy a single piece of hardware, you need to know what's under your pavers. There are three common situations, and each one changes your approach.
- Sand-set pavers over a compacted aggregate base: This is the most common setup for DIY paver patios. The pavers float over about 4 to 6 inches of compacted crushed stone and roughly 1 inch of bedding sand. There's no structural concrete underneath. You'll need to pour new footings at each post location.
- Pavers over an existing concrete slab: Some patios have pavers laid over a concrete slab, either set in mortar or floating on a thin sand bed. Here you can anchor directly into the concrete slab, as long as it's thick enough (typically 3.5 inches minimum) and in good condition.
- Pavers near a house foundation or existing concrete pad: If your pergola posts can be positioned close to the house or near an existing concrete footing, you may be able to anchor into that structure instead of pouring new footings.
To figure out which situation you have, pull up a paver in a low-visibility spot near where a post will go. If you hit sand and gravel below, you're dealing with a floating sand-set system and you'll be pouring footings. If you hit concrete, check the thickness with a small probe hole before planning your anchor approach.
Pick the right anchoring method before you start
There are two reliable methods for attaching pergola posts to a paver patio. Which one you use depends entirely on what's under those pavers. A solid build plan for how to build a pergola on a paver patio starts with choosing the right post attachment method for your patio’s substrate.
| Method | Best for | Key hardware | Main trade-off |
|---|---|---|---|
| Pour new concrete footings at post locations | Sand-set pavers with no concrete below | Tube forms, anchor bolts, adjustable post bases (e.g., Simpson ABW or PPRC) | More labor; need to wait for concrete to cure |
| Anchor into existing concrete slab | Pavers over a concrete slab in good condition | Wedge anchors or epoxy anchors, adjustable post bases | Slab must be thick enough and crack-free |
| Anchor to adjacent structural concrete or house | Posts near foundation or existing footings | Through-bolts or anchor bolts into concrete structure | Limited flexibility on post placement |
The method that works in the most situations, and the one most pros default to, is removing pavers at each post location, digging down to frost depth, and pouring a concrete tube footing with embedded anchor bolts. The post base then bolts onto those anchor bolts, and you re-set the pavers neatly around the base plate. It preserves the look of your patio and gives you a structurally independent footing for each post.
Step-by-step: pouring footings through your paver patio
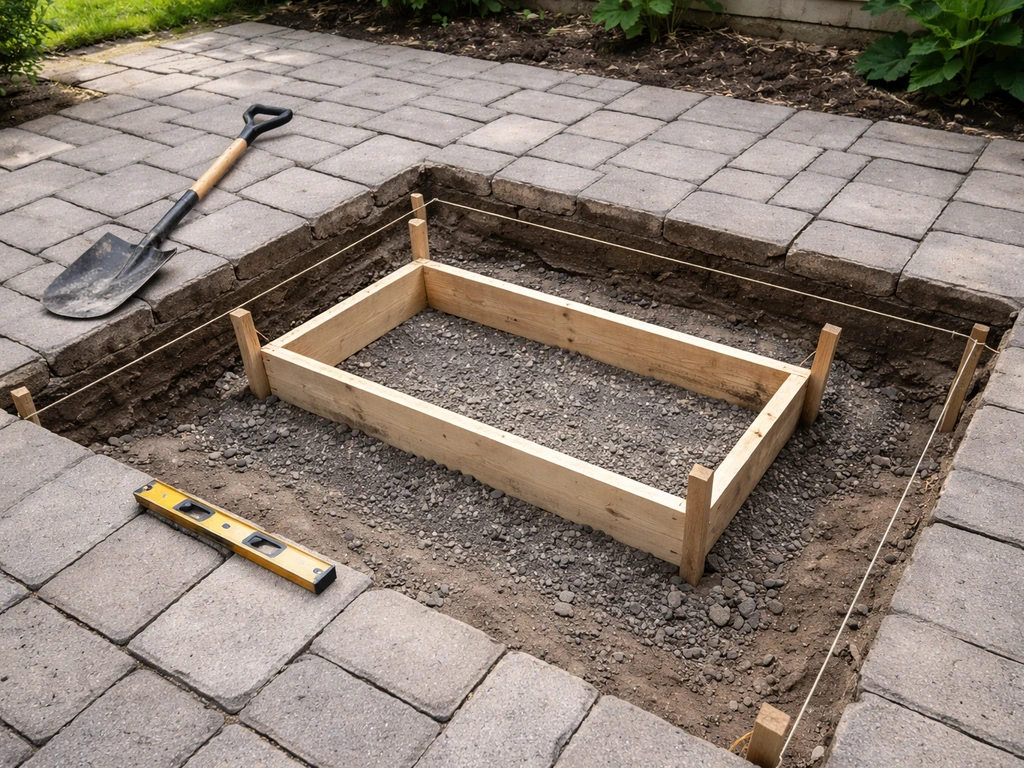
This is the most involved method, but it's the right call for most sand-set paver patios. Budget a full weekend: one day for excavation and pouring, one day for post base installation after the concrete cures. You'll need a post-hole digger or rented auger, tube forms (typically 10 to 12 inches diameter), anchor bolts, and a bag mix or ready-mix concrete.
- Mark your post locations precisely. Lay out string lines or use a chalk line to confirm the pergola footprint before you touch a single paver. Double-check your measurements and confirm the layout is square by measuring diagonals.
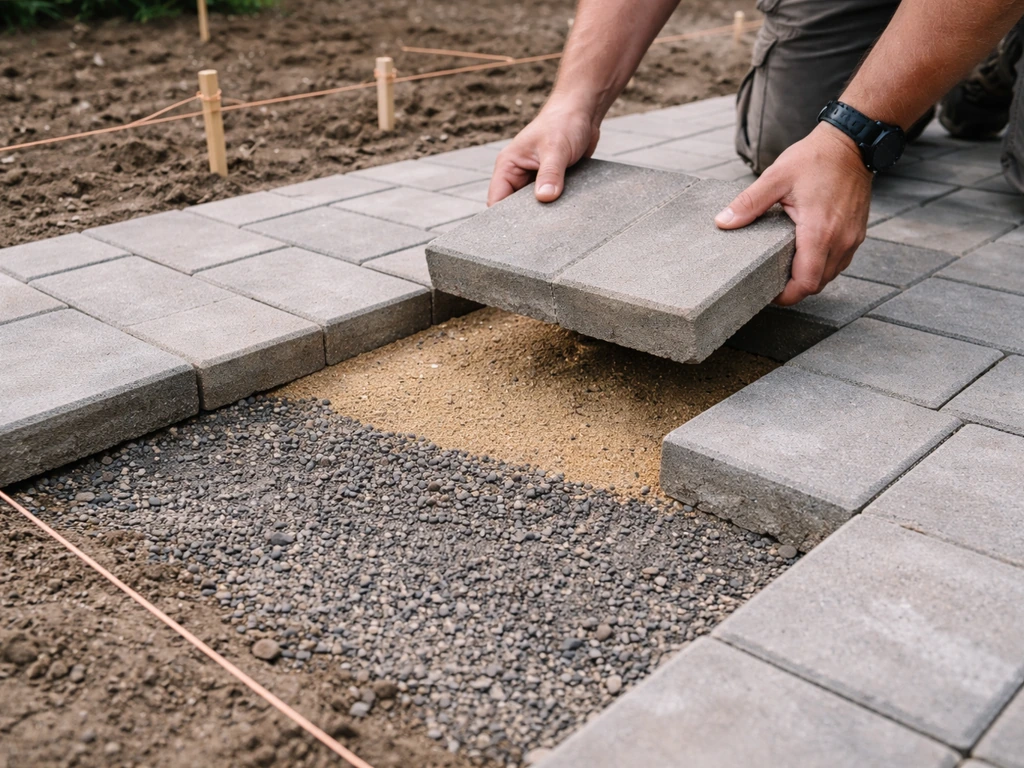
- Remove pavers at each post location. Carefully lift pavers in roughly a 24-inch square around each post center. Set them aside in order so you can re-set them the same way. Scoop out the bedding sand and set it aside too.
- Dig your footing hole. The hole needs to go below your local frost line. In mild climates this might be 12 to 18 inches; in northern states it can be 36 to 48 inches. Check your local building department for the required frost depth. The hole diameter should match your tube form, typically 10 to 12 inches. Per IRC R403.1.4, footings must reach the frost line and rest on a stable bearing layer.
- Set your tube form. Drop a cardboard tube form into the hole so the top sits about 2 to 3 inches above the surrounding paver base layer. This keeps the concrete above the gravel base and gives you a clean anchor surface.
- Mix and pour concrete. Use a bag-mix (like Quikrete 5000) or have ready-mix delivered. Fill the tube form and work out air bubbles with a rod or stick. For a typical 4x4 or 6x6 pergola post, a 10-inch diameter tube footing is standard.
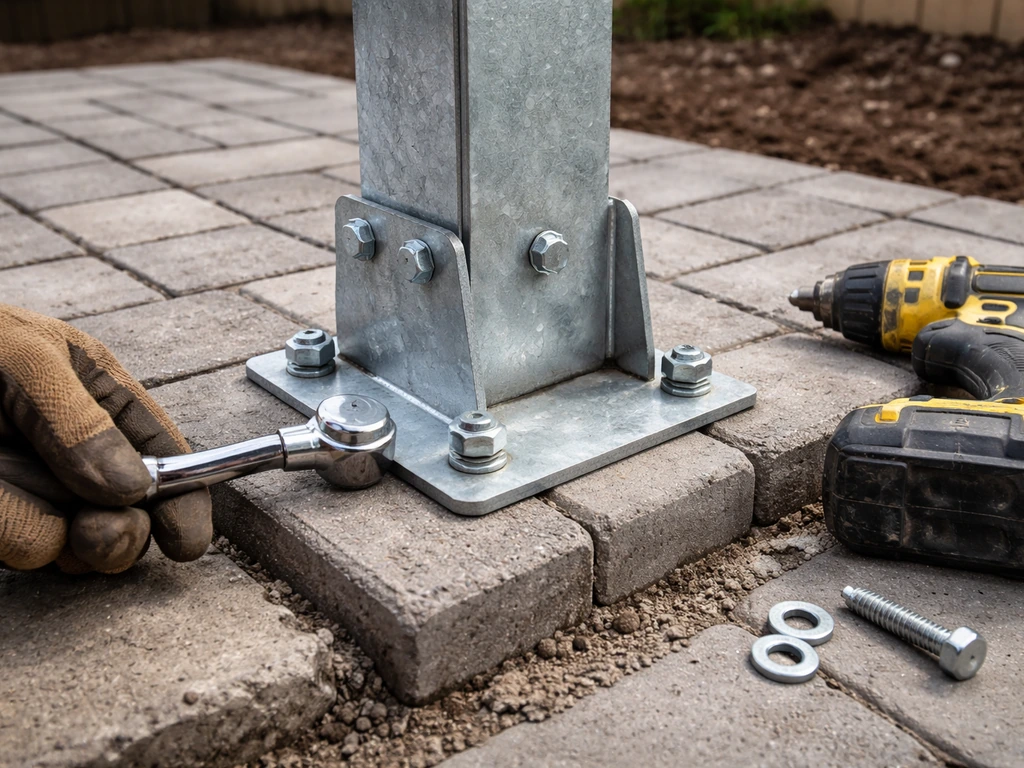
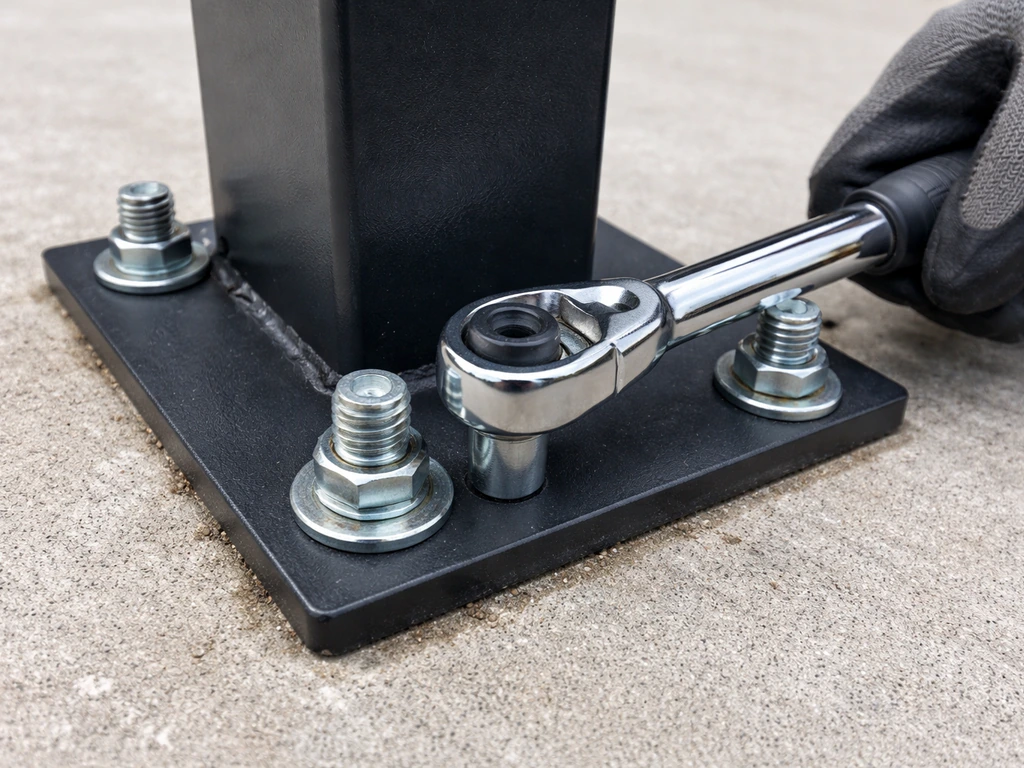
- Set anchor bolts wet. While the concrete is still wet, push your anchor bolts into the center of the footing at the correct bolt-hole spacing for your post base. Use a post base as a template to get the spacing right. Double-check the bolts are plumb and at the right height. This is easier than drilling in post-installed anchors later, so don't skip it.
- Let the concrete cure fully. Most bag-mix products reach working strength in 24 to 48 hours, but wait the full recommended cure time before loading the anchor bolts. Cover the footing with plastic if rain is expected.
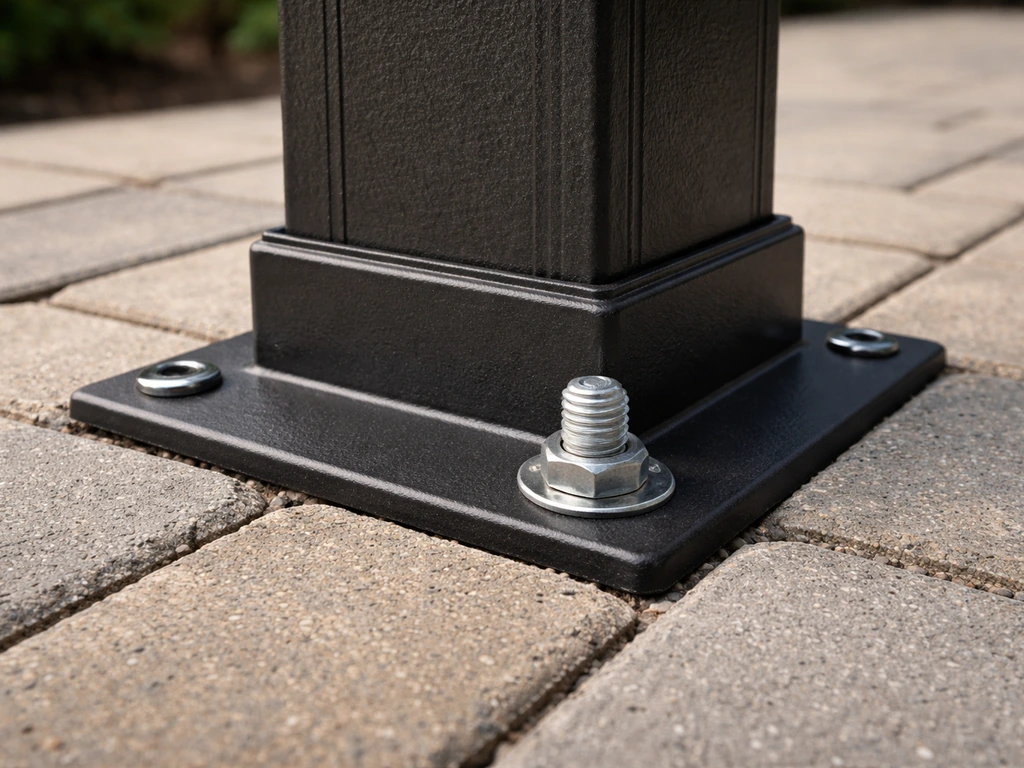
- Install the post base. Thread nuts and washers onto the anchor bolts, set the adjustable post base over them, and tighten down. Simpson Strong-Tie ABW or PPRC-series bases work well here; they provide a standoff that keeps the post end off the concrete, which reduces rot and moisture damage over time.
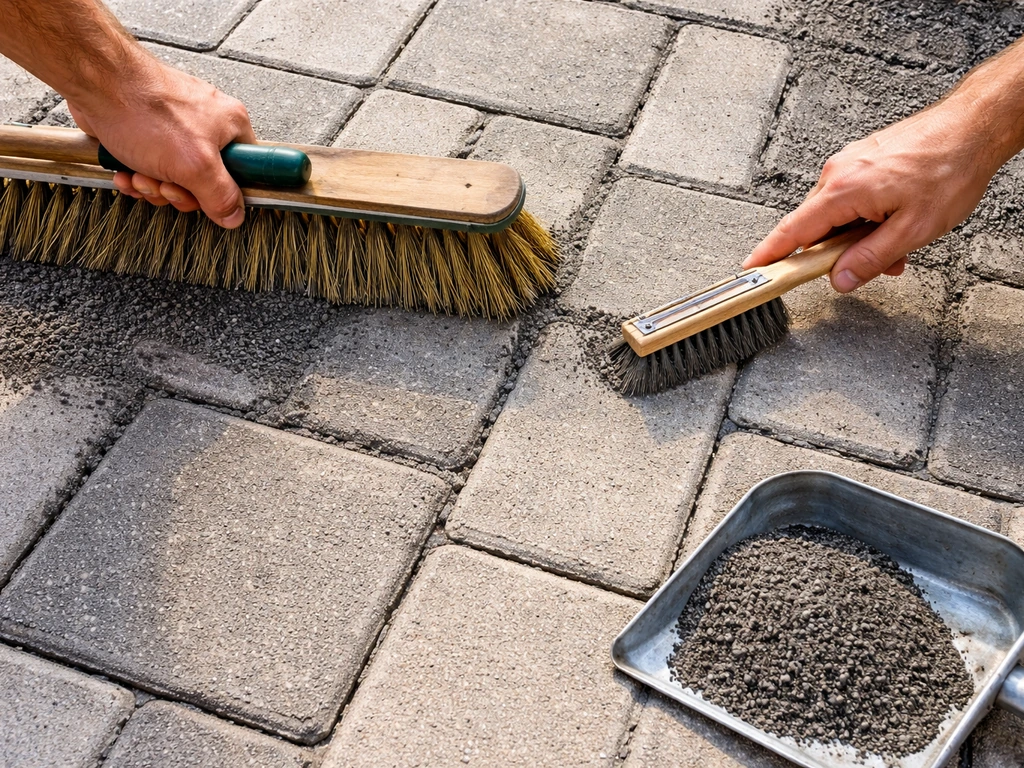
- Re-set the pavers. Lay your bedding sand back down (aiming for roughly 1 inch nominal thickness, screeded flat), then cut or trim pavers as needed to fit neatly around the base plate flange. Fill joints with polymeric sand and compact lightly.
Step-by-step: anchoring into an existing concrete slab
If your pavers are sitting on a concrete slab, you're in luck: this method is faster and less disruptive. The key is making sure the slab is structurally sound and thick enough to accept the anchor type you're using. A cracked, spalling, or thin slab (under 3.5 inches) is not a reliable anchor point.
- Remove pavers at post locations. Lift the pavers carefully in an area slightly larger than your post base footprint. If they're set in mortar, you'll need a chisel and some patience.
- Confirm slab condition and thickness. Probe the exposed slab. Look for cracks, delamination, or soft spots. If the slab is in good shape and at least 3.5 inches thick, you can proceed with post-installed anchors.
- Mark and drill anchor bolt holes. Use your post base as a template to mark the bolt hole locations on the concrete. Drill with a hammer drill and the correct diameter masonry bit specified by your anchor manufacturer. Hole diameter and depth are not optional guesses: they are engineered specs, and getting them wrong causes anchor failure.
- Clean the holes thoroughly. This step gets skipped more than any other and causes more anchor failures than almost anything else. Use a blowpipe to blow out dust, then brush with a wire brush, then blow again. If you're using epoxy anchors (like Simpson SET-XP), the hole must be completely clean and dry for the adhesive to achieve rated load.
- Install anchors per manufacturer specs. For wedge anchors, insert the anchor and tighten to the specified installation torque with a torque wrench. Do not tighten by feel. For epoxy anchors, inject adhesive, insert the threaded rod, and wait for the full cure time before loading. Follow edge distance minimums strictly: anchor capacity drops significantly if you're too close to the slab edge.
- Mount the post base. Once anchors are set and cured, install your post base, checking that it's level and oriented correctly for the post direction.
- Re-set pavers around the base. Cut and fit pavers around the post base flange, re-lay with bedding sand, and fill joints with polymeric sand.
Hardware selection and post layout
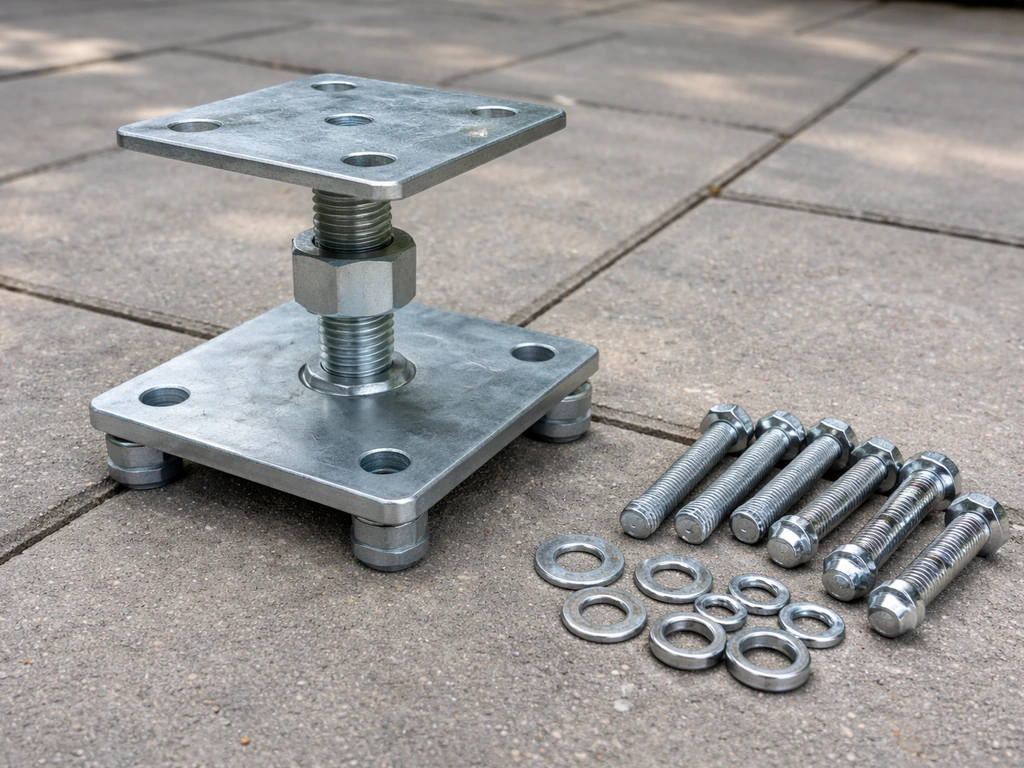
The post base you choose matters more than most people realize. A cheap angle bracket from a big-box store and a handful of deck screws is not a pergola anchor. For outdoor structural post connections on a paver patio, you want adjustable standoff post bases from Simpson Strong-Tie (ABW or PPRC series are common choices), galvanized or stainless steel construction, and anchor bolts rated for the load. Here's what to look for when selecting hardware.
- Post base type: Use adjustable standoff bases that lift the post bottom off the concrete surface by at least half an inch. This prevents moisture wicking into end grain and dramatically slows rot.
- Corrosion resistance: For an outdoor patio environment, ZMAX galvanized or stainless steel post bases are the right call. Standard galvanized will work in most climates; go stainless if you're near saltwater or using treated lumber with high copper content (ACQ or CA-treated wood requires stainless or ZMAX hardware).
- Anchor bolts: Use manufacturer-specified anchors, not random lag bolts. For wet-set installs, standard J-bolts or anchor bolt assemblies work fine. For post-installed into existing concrete, use Simpson wedge anchors or SET-XP epoxy anchors sized to your post base bolt holes.
- Post size: Most residential pergolas use 4x4 or 6x6 posts. Select a post base rated for your post size and load. When in doubt, size up.
- Layout and spacing: Standard pergola post spacing runs 8 to 12 feet, but check the pergola manufacturer's specs or your structural plan. Confirm posts are square before anchoring anything permanently.
For post layout, set up batter boards and string lines before you mark a single hole location. Use the 3-4-5 triangle method or measure diagonals to confirm square. A quarter-inch error in layout is easy to fix at the string-line stage and a serious headache after the concrete is poured.
Troubleshooting: rocking, movement, and water problems
Post is rocking or leaning
If a post rocks, the first thing to check is whether the anchor bolts are actually tight. Use a torque wrench to confirm the bolts are at the manufacturer's specified torque, not just hand-tight. If the bolts are tight but the post still moves, the post base may not be making full contact with the concrete, or the footing itself is moving. Dig around the footing to check for signs of heaving (frost) or settlement. A footing that wasn't poured to frost depth in a cold climate will heave every winter.
Anchor bolts feel loose or spin
Wedge anchors that spin or won't torque down are almost always the result of a hole that's too large, too deep, or not cleaned properly before installation. If you're dealing with this on an existing install, the fix is usually epoxy: drill out to a slightly larger diameter, clean meticulously, and use an epoxy anchor system to re-anchor. Don't keep tightening a spinning wedge anchor hoping it catches; it won't.
Pavers lifting or cracking around post bases
This is exactly what happens when post bases are anchored into the pavers themselves rather than through them into concrete or footings. If you see lifted or cracked pavers around a base, the post is transmitting load into the paver surface instead of into the structural substrate. The fix is to remove the affected pavers, assess the footing or concrete below, and reinstall using proper anchors tied into the structural layer. Trying to re-mortar pavers around a base that isn't properly anchored is just delaying the same failure.
Water pooling around post bases
Standing water around post bases accelerates corrosion and can undermine bedding sand over time. Belgards notes that paver systems are commonly built in a base-and-bedding sequence, with bedding sand typically specified around 1 inch nominal thickness to support paver stability and adjustability bedding sand over time. When you re-set pavers around a post base, make sure the surrounding paver surface drains away from the base, not toward it. A slope of about 1/8 inch per foot is usually sufficient. Fill the paver joints near the post with polymeric sand, compact it well, and seal the joint where the base plate meets the concrete or footing. This keeps water out of the annular space around the anchor bolts.
Settlement and differential movement
If your patio pavers are settling unevenly, it usually points to a base compaction issue: either the aggregate base wasn't compacted thoroughly during installation, or water has been washing out the bedding sand. This matters for post bases because differential movement between the patio surface and the structural footing can stress the base plate over time. If settlement is ongoing, address the paver base issue before installing a pergola. Pulling up the affected pavers, re-grading, adding crushed stone if needed, re-compacting, and relaying with fresh bedding sand is the proper fix.
Finishing up: sealing, maintenance, and long-term care
Once the pergola posts are set and the pavers are re-laid around each base, take a few extra steps to protect the whole system long-term. If you're building a hot tub on top of a paver patio, plan the support and anchoring around the tub's weight and vibration so the base stays stable build a paver patio for a hot tub.
- Fill and compact all paver joints with polymeric sand. Pay special attention to joints near post bases. Polymeric sand locks together when wetted and resists ant activity and washout far better than plain sand.
- Seal the pavers. A penetrating paver sealer protects the surface from staining and helps lock the polymeric sand in the joints. Apply after the polymeric sand has fully cured (usually 24 to 48 hours after wetting). This also reduces water infiltration that could destabilize the bedding sand near footings.
- Inspect hardware annually. Once a year, go around each post base with a torque wrench and check that anchor bolts are still at the correct torque spec. Wind and vibration cycles can gradually work fasteners loose, especially in the first year or two after installation.
- Check for corrosion at hardware. Look for rust staining or white corrosion on post base hardware, especially at the interface between the base and wood post. Catch surface rust early with a wire brush and a coat of cold galvanizing spray. If a base shows deep corrosion or structural compromise, replace it.
- Re-seal pavers every 3 to 5 years. Sealer breaks down over time. A light re-application on schedule keeps the paver surface protected and the joint sand locked in place.
- Re-check post plumb seasonally in the first year. Especially in cold climates, check post plumb each spring after the first frost season to confirm the footings haven't moved. Minor settling sometimes occurs in the first year before things fully stabilize.
Tools and materials to have ready before you start
Getting everything on site before you start saves a lot of frustration. Here's what you'll need for the most common scenario: pouring new footings through a sand-set paver patio. If you're also asking can you build a fire pit on a paver patio, plan the anchoring and load path the same way so the base stays stable over time.
| Category | Item | Notes |
|---|---|---|
| Layout | Batter boards, string line, stakes | For precise post positioning |
| Layout | Measuring tape, speed square | Confirm square with 3-4-5 or diagonal check |
| Excavation | Post-hole digger or rented auger | Auger is much faster for multiple posts |
| Concrete | Tube forms (10–12 inch diameter) | One per post location |
| Concrete | Bag-mix concrete (Quikrete 5000 or similar) | Roughly 2 to 3 bags per 10-inch footing at 24 inch depth; more for deeper frost lines |
| Anchors | J-bolts or anchor bolt assembly (wet-set) | Use post base as template for bolt spacing |
| Post bases | Simpson ABW or PPRC adjustable post bases | Match to post size; ZMAX or stainless finish |
| Fasteners | Structural screws or bolts per post base spec | Use manufacturer-specified fasteners only |
| Drilling (if anchoring into slab) | Hammer drill + masonry bits | Sized per anchor manufacturer spec |
| Anchors (if anchoring into slab) | Wedge anchors or epoxy anchors + threaded rod | Follow hole-cleaning protocol for epoxy |
| Finishing | Bedding sand, polymeric sand, paver sealer | For re-setting and protecting pavers around bases |
| Safety | Safety glasses, gloves, hearing protection | Required for hammer drilling and compaction work |
| Verification | Torque wrench | For installing and checking anchor bolt torque |
One last thing: check with your local building department before you start. Many jurisdictions require a permit for pergolas above a certain size or attached to the house. The permit process also gets you a code review of your footing size and depth, which is actually useful. If your pergola is freestanding and modest in size, you may be in the clear without a permit, but it's worth a five-minute phone call to confirm.
If you're also thinking about adding a fire pit or a hot tub to the same patio area, plan all the footings at once so you're only doing the excavation work a single time. If you plan a fire pit patio on the same paver area, building the footings in the same layout helps keep everything stable.
FAQ
Can I attach pergola posts directly to pavers without pouring footings?
You usually need to anchor each post to concrete or frost-depth footings, not to pavers. If you have only a thin slab or deteriorated concrete, the safest approach is to remove pavers to pour new tube footings (or consult a structural pro for engineered alternatives). A span of decking material across pavers is not a substitute for a true post connection.
How do I tell if my patio has sand-set pavers, concrete slab, or something in between?
Do a pre-check at each planned post location. Remove one or two pavers near the post line, then confirm what the layer thickness is (sand and gravel depth, and whether there is real concrete underneath). If you find an unknown mix or only a masonry bed, assume you need tube footings and verify measurements before ordering hardware.
If my patio has a concrete slab, can I use post anchors without digging to frost depth?
Yes, but the anchor only works if it reaches sound concrete at the right depth and is installed per the anchor manufacturer. A typical mistake is using hardware rated for light loads, or fastening into thin, cracked, or spalled concrete. If the slab is under about 3.5 inches or shows damage, plan for tube footings instead of relying on the slab.
Do I need to shim pergola post bases when anchoring to concrete or footings?
Not always. The post base plate should sit on a clean, solid surface with full contact to prevent wobble and stress points. If you have to shim, use the manufacturer-approved method (often a precision shim or leveling system), and never rely on shimming alone to compensate for a footing that shifted or wasn’t poured level.
How tight should the post base anchor bolts be, and how do I verify it?
Use a real torque wrench and tighten to the listed value, then re-check after installation and after the first season if you notice any movement or settling. “Snug plus a few turns” is a common cause of loose bases, especially where vibration loads exist.
What should I do if a wedge anchor keeps spinning or won’t torque down?
If a wedge anchor spins, stop. Pull it, clean the hole, and verify the drilled diameter and depth match the anchor instructions. For failed existing anchors, the reliable fix is typically an epoxy anchor system installed in the enlarged, properly cleaned hole, not repeated tightening.
How do I prevent water from pooling around pergola post bases on paver patios?
For a clean connection, polymeric sand plus sealing at the base plate is helpful, but drainage is the priority. Make sure the surrounding paver surface slopes away from the post base, compact joints well, and avoid sealing in a way that traps water. If you see persistent pooling, address drainage before sealing.
My pavers are settling unevenly, can I still install the pergola posts now?
If you have uneven settling, treat it as a substrate problem first. Pull the affected pavers, re-grade the base, add or replace crushed stone if needed, re-compact, and re-lay with fresh bedding sand. Trying to “tighten your way out” of settlement can crack base plates and loosen anchors over time.
Why would my pergola post cause cracked or lifted pavers, and how do I fix it?
Often the biggest cause is load being transferred into the pavers rather than into the structural layer, which shows up as lifted or cracked pavers around a base. The correct repair is to remove the affected pavers, inspect footing or slab condition, then reinstall with anchors tied into concrete or properly formed footings. Re-mortaring pavers around a wrong anchor point usually fails again.
Can I use polymeric sand and still seal around the base plates for outdoor pergola posts?
Yes, but handle the joint and seal details carefully. Place polymeric sand for paver joints, then seal the gap where the base plate meets the concrete or footing so water does not migrate into the annular space around the bolts. Also keep bedding sand from washing out by maintaining the proper slope away from the posts.
If I’m adding a hot tub or fire pit on the same patio, how should I coordinate footings with the pergola?
Plan it so each major element has its own structural footings, then coordinate excavation so you can pour in a single campaign. Don’t rely on shared or overlapping load paths between a pergola, fire pit, or hot tub. Layout each footing location first to avoid rework.
Do I need a permit to attach a pergola to my patio, and what will inspectors usually want to see?
In many places, attached or larger pergolas require permits, and the permit review often affects footing size and depth. A common mistake is building first and discovering you need an engineered footing detail later. If you’re unsure, call the building department before digging so you can align the plan with local requirements.
Next Articles
How to Build a Fire Pit Patio With Pavers
Step by step DIY guide to build a square or circular paver fire pit patio, including base, safety clearances, drainage.
How to Anchor a Gazebo to a Paver Patio Step by Step
Step-by-step DIY methods to anchor a gazebo to paver patios, avoiding cracks, resisting wind, and troubleshooting wobble
How to Apply Polymeric Sand to Patio Pavers: Step by Step
Step-by-step DIY guide to apply polymeric sand between patio pavers, prep joints, spread, fill, and activate without haz