Once your patio pavers are laid and your base is solid, applying polymeric sand is a half-day job that locks your joints permanently, chokes out weeds, and stops erosion. The process goes like this: sweep dry polymeric sand across your pavers, work it into the joints until they're filled to about 1/8" below the paver surface, blow off every grain of excess from the paver faces, then activate it with a shower-setting hose in small sections. If you need a more detailed walkthrough, see our guide on how to use quikrete patio paver jointing sand correctly for best results. Miss any of those steps or do them out of order, and you'll end up with haze on your pavers, joints that never harden, or sand that washes out the next time it rains. This guide walks you through every step so you get it right the first time. Follow the rest of this guide, and you will know exactly how to put sand between patio pavers, from prep through activation and curing. If you are wondering how to use patio paver sand, follow the steps in this guide from dry spreading through water activation.
How to Apply Polymeric Sand to Patio Pavers: Step by Step

When polymeric sand is (and isn't) the right choice
Polymeric sand is the right call for most standard interlocking concrete paver patios installed over a compacted gravel base and bedding sand. It outperforms regular jointing sand in almost every way: it resists weeds, holds its shape through freeze-thaw cycles, and doesn't wash out like loose sand does. If you've already gone through the work of building a proper draining base and laying your pavers, polymeric sand is the logical finish. If you want step-by-step guidance, this article breaks down how to install patio pavers in sand, including the base prep, paver layout, and joint finishing. If you want the full patio workflow from layout to base to paving, see this guide on how to make a patio with pavers and sand.
That said, it's not the right tool for every situation. Here's where it falls short:
- Submerged or constantly wet areas: Polymeric sand is designed for draining installations. If a section stays wet or underwater regularly, the binders won't cure properly and the joints will fail.
- Heavily textured or deeply grooved pavers: Manufacturers like Unilock specifically warn against using polymeric sand on pavers with deep surface texture. The polymer particles get trapped in the grooves and create stubborn haze you can't remove.
- Joints narrower than about 1/8" or significantly wider than 1": Very tight joints won't let sand fill properly. Very wide joints (over 1") are hard to pack fully and often look uneven. Most residential paver installations target a maximum 1/8" joint width, which is the sweet spot for polymeric sand performance.
- Damp or rainy days: You cannot apply polymeric sand to wet pavers, period. Every major manufacturer says the same thing. Plan your application day for dry weather with at least 48 hours of temperatures above 0°C (32°F) in the forecast.
If your joints are filled with regular sand right now and you're retrofitting, polymeric sand still works, but you'll need to remove the old sand first. More on that below.
Prepping the patio pavers before sand application
Prep is where most DIY polymeric sand jobs fail before they even start. Rushing past this stage is the number one cause of haze, incomplete joint fill, and sand that never hardens. Give this the attention it deserves.
Make sure the surface is completely dry
The pavers and the existing joint space both need to be bone dry. If it rained in the last 24 hours, wait. Even moisture sitting in the joints from overnight dew can cause problems. The Hanover guideline is blunt: "DO NOT apply Poly Sand to damp pavers." If you're unsure, wait another day.
Clear the joints
If this is a brand-new installation, the joints should already be mostly clear from the installation process. Remove any debris, loose paver chips, or dust. If you're redoing an older patio that had regular jointing sand, you'll need to pull out that old sand first. A pressure washer works well for this, but then you have to wait until everything is completely dry again before proceeding. A stiff brush and a shop vac can also clear joints without introducing water.
Check your joint depth
Your goal is to fill the joints so the sand surface sits at least 1/8" (3 mm) below the top of the paver, or right at the bottom of the chamfer (that small beveled edge most pavers have). If you fill right to the top, you'll trap sand on the paver surface and set yourself up for haze. If joints are too deep because your bedding sand settled unevenly, you may need to work in the polymeric sand in passes.
Calculate how much sand you need
Coverage per 50 lb bag varies a lot based on joint width. Use this as your planning guide before you buy:
| Joint Width | Coverage per 50 lb Bag |
|---|---|
| Up to 1/4" | 50–75 sq ft |
| 1/4" to 1/2" | 25–50 sq ft |
| 1/2" to 3/4" | 15–25 sq ft |
| 3/4" to 1 1/4" | 22–42 sq ft |
Buy a little more than your calculation says. Running short mid-job means you'll end up with some joints activated and some not, which is messy to fix.
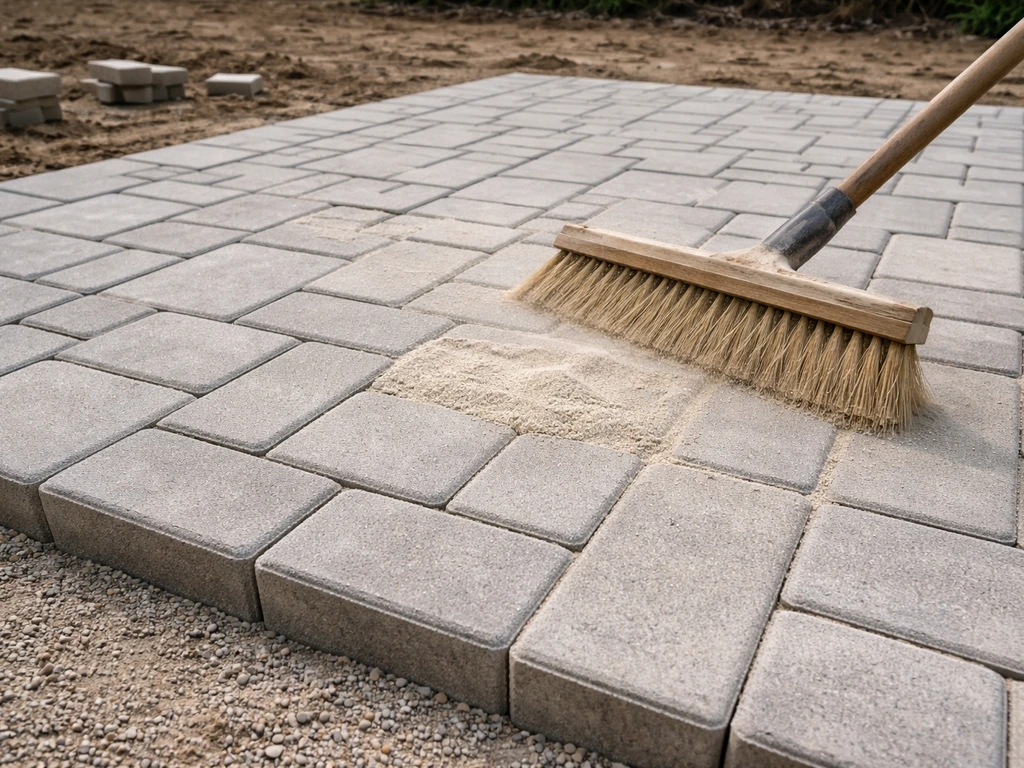
How to spread polymeric sand over pavers evenly
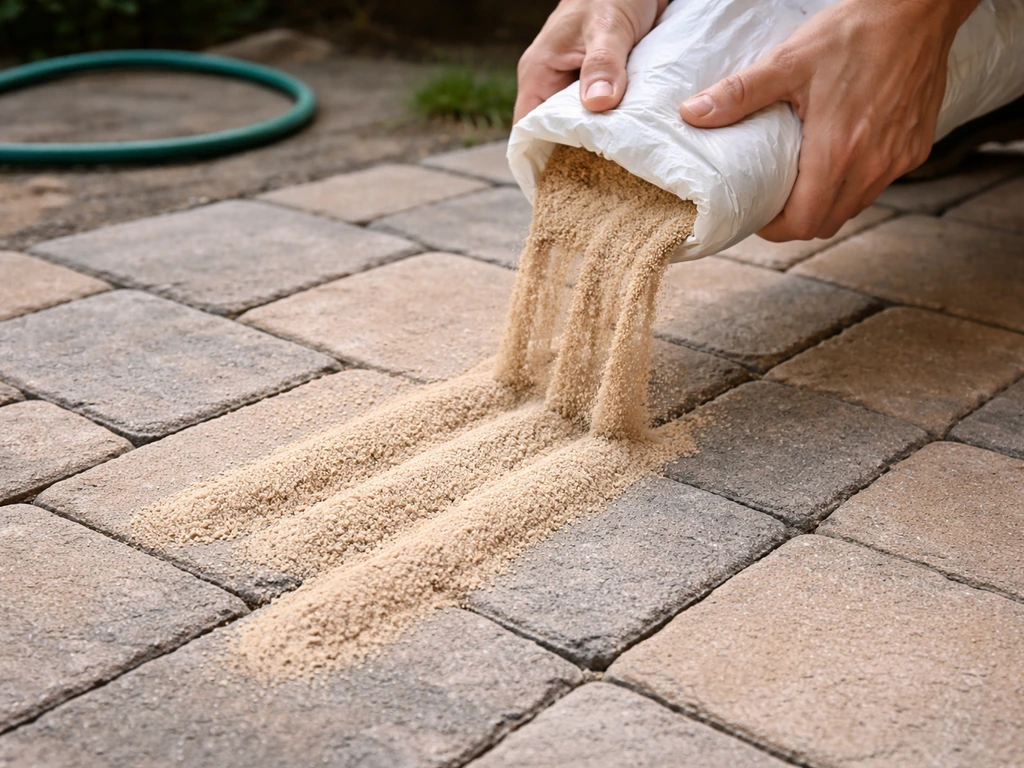
With dry pavers and clear joints, you're ready to spread. Open your bag of polymeric sand and pour it directly onto the paver surface in a line. Don't dump the whole bag in one spot.
- Pour sand across a manageable section of the patio, roughly 50–100 square feet at a time. Working in sections keeps you from spreading activated sand too thin or rushing the cleanup.
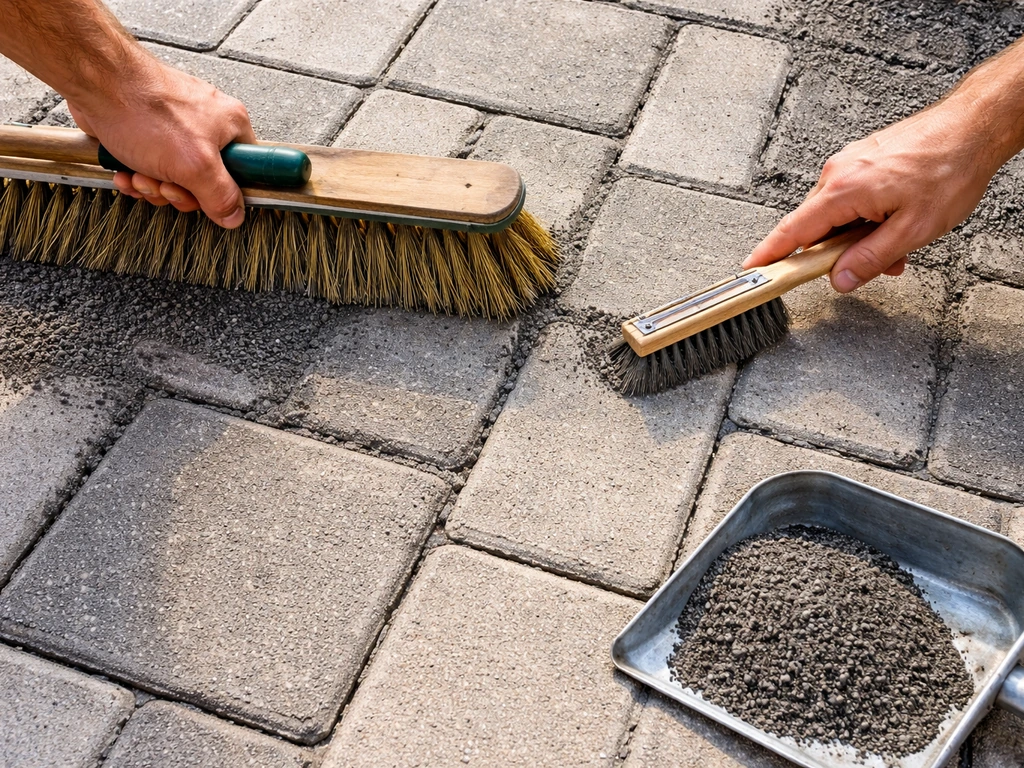
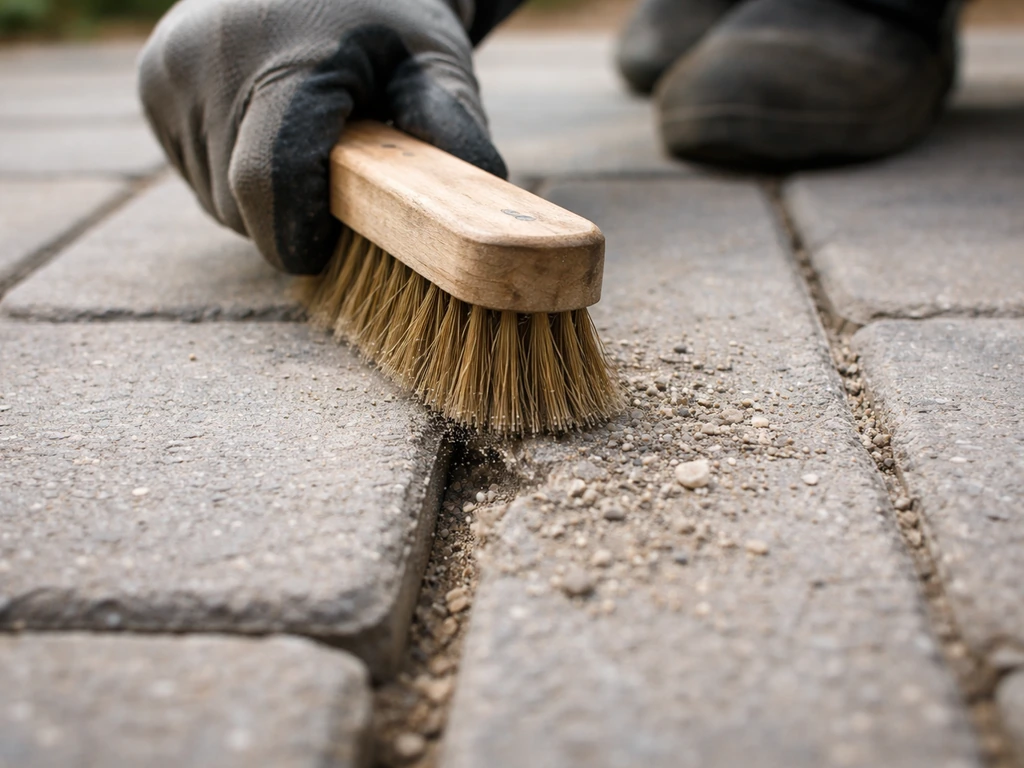
- Use a push broom to sweep the sand back and forth across the pavers. You're pushing it into the joints, not just spreading it on the surface. Work diagonally to the joint lines so the bristles push sand into the gaps rather than just dragging along them.
- Keep sweeping until you can see the joints are filling up. The sand will disappear into the gaps as you work. Don't worry about the excess on top yet.
- Run a plate compactor over the pavers if you have one. Belgard's installation guidance specifically recommends this step because the vibration drives sand deeper into the joints and settles it more evenly than sweeping alone. If you don't have a compactor, a rubber mallet and a scrap piece of 2x4 can help you tap pavers and encourage the sand to settle, though it's slower.
- After compacting (or tapping), add another pass of sand and sweep it in again. The joints should be noticeably fuller now. Repeat until joints are filled to the correct level: at least 1/8" below the paver top or at the chamfer bottom.
Working sand into the joints (technique and timing)
Getting sand fully into the joints is the step that separates a good application from one that fails. Sand that's only sitting in the top inch of a joint won't hold. You want it packed through the full depth.
The compactor is your best tool here. Multiple passes with the plate compactor drive sand down and eliminate air pockets. If you're doing a small patio without a compactor, do at least three sweeping passes, and after each one spend a few minutes pressing sand into joints by hand along the edges and anywhere the broom can't reach well.
One thing to watch: don't overfill the joints. It sounds obvious, but in the rhythm of sweeping it's easy to pile up too much. If sand sits above the chamfer level or mounds up above the joint, you'll have excess polymer binder on the paver face when you wet it, and that creates haze. Keep checking the joint level as you go.
The leaf blower step (don't skip this)
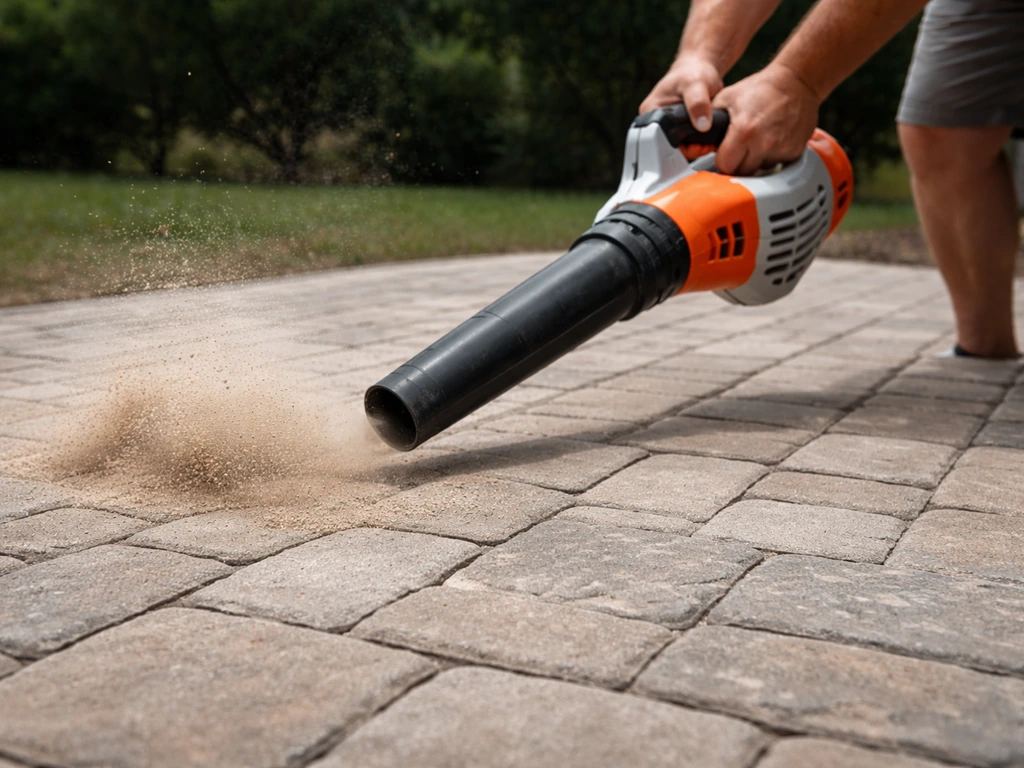
Before you touch a drop of water, grab a leaf blower and blow off every single grain of sand from the paver surfaces. This is the most important haze-prevention step in the whole process. Run the blower at a low-to-medium setting and work methodically across the patio. You'll see sand moving around, and that's fine as long as you're blowing it off the paver faces and not blasting it out of the joints. Hold the blower at an angle so the airflow skims across the surface rather than pointing straight down into joints. Use this same pass to level the sand height: the goal is to bring it to that 1/8" below the top level consistently.
Check once more after blowing. Crouch down and look across the paver surface at a low angle. If you can see any sand dust or fine particles on the paver faces, blow again. Any residue left on the surface when water hits it will bond there and leave a haze that's very difficult to remove after the fact.
Activating polymeric sand with water correctly
This is the step that triggers the polymer binders and turns loose sand into a firm, locked joint. It's also where the most mistakes happen. Follow this process carefully.
Set your hose to shower, not mist
Use a garden hose with a nozzle set to the "shower" or gentle rain setting. Do not use a fine mist. Misting applies too little water too slowly, and it doesn't penetrate the full depth of the joint. Don't use a strong jet either. A jet of water will physically dislodge sand from the joints and undo everything you just did. The shower setting delivers enough volume to saturate the joints while being gentle enough not to wash sand out.
Work in small sections and move steadily
Work one section of roughly 100 square feet at a time. Move the hose slowly and steadily across the surface, letting water soak into the joints without puddling. You're looking for the water to visibly penetrate and the sand to darken, but you don't want standing water pooling on the pavers. If puddles form, you're going too slow or the base drainage is limited. Use a leaf blower to gently move pooled water off the surface without disturbing the joints.
After your first pass, wait no longer than 2 to 3 minutes, then do a second pass over the same section. The first pass saturates the upper portion of the joint. The second pass drives water deeper and fully activates the binders through the entire joint depth. RCP Block & Brick also recommends multiple mist or watering cycles, with each pass after the previous water application has absorbed, to activate polymeric sand throughout the full joint depth multiple passes. Some manufacturers recommend a third light pass if joints are deeper than average. The goal is thorough saturation, not flooding.
Timing and weather window
Once activated, the sand needs time to cure before it gets rained on. Techniseal's SMARTSAND can handle unexpected rain about 60 minutes after activation, but as a general rule, aim for at least 90 minutes of dry time before any rain exposure, and 24 hours before deliberate watering or heavy rain. Keep foot traffic light for at least 24 hours. Keep vehicles off entirely for 48 to 72 hours. If temperatures are going to drop below 0°C (32°F) in the next 48 hours, postpone the job. The polymer binders need above-freezing temperatures to cure properly.
Cleanup, curing, and common problems to troubleshoot
What normal looks like after activation
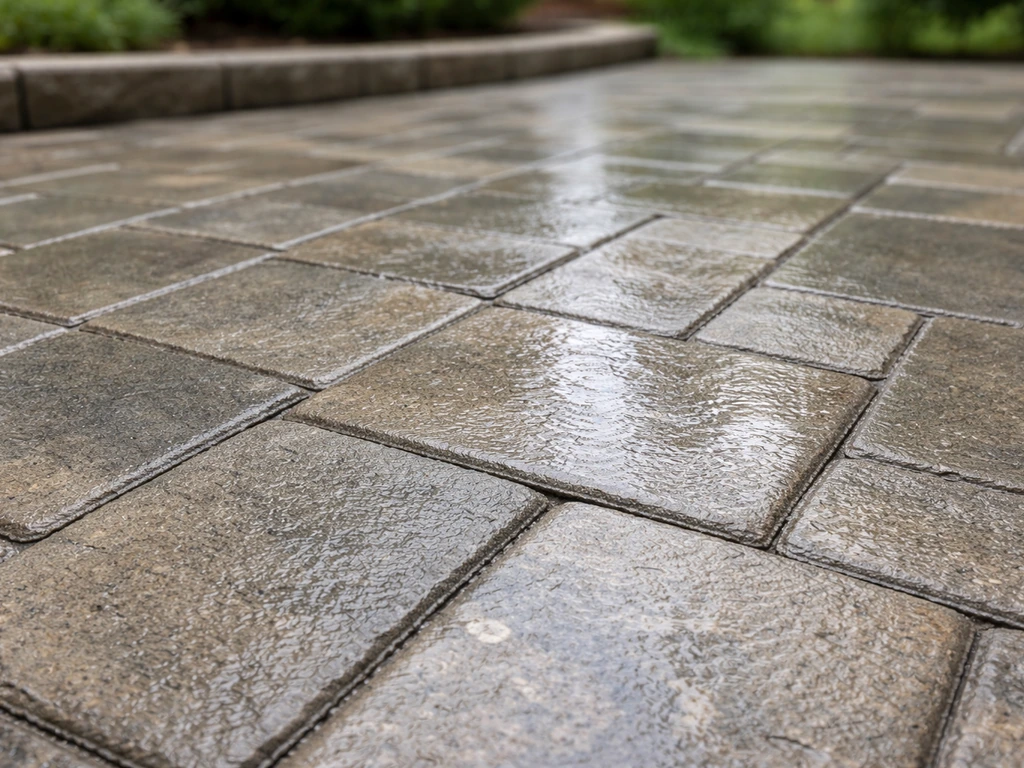
After you've watered everything in, the joints will look dark and slightly settled. That's expected. As the patio dries over the next 24 hours, the joints will lighten and firm up. You'll notice the sand no longer shifts when you tap it. That's the polymer doing its job.
Haze on the paver surface
If you notice a white or cloudy film on your pavers after everything dries, that's polymer haze, and it means some binder got activated on the paver face rather than just in the joints. This usually happens because the leaf blower step was rushed or skipped. For light haze, try scrubbing with a soap-and-water solution and a stiff plastic brush. For stubborn haze, you may need a specialized paver cleaner designed for efflorescence or polymer residue. Don't use acid-based cleaners without checking your paver manufacturer's guidance first.
Sand didn't settle into joints
If joints look partially empty after the first sweeping pass, that's normal and expected. Sweep and compact again. Polymeric sand almost always requires multiple passes. If joints still seem shallow after two or three passes, check whether there's debris at the bottom blocking the sand from dropping in.
Sand washing out during activation
If sand is visibly washing out of joints when you apply water, your nozzle pressure is too high. Switch to a gentler shower setting and hold the nozzle further from the surface. If sand washes out even at a gentle setting, the joints may not have been filled deeply enough before activation, or the pavers have an unusual spacing issue.
Joints feel soft or crumbly after curing
Soft joints after 48–72 hours usually mean one of three things: not enough water during activation (the binders in the lower portion of the joint never activated), too much water too fast (the sand was displaced before it could bond), or the pavers were damp when you applied the sand. If it's a full section of joints, you'll likely need to remove the sand and start over after the patio dries completely.
Maintenance and when to re-sand or re-activate
Polymeric sand is durable but not permanent. In most climates, well-applied polymeric sand lasts 5 to 10 years before it starts showing real wear. Here's how to keep it performing and know when it needs attention.
Routine care
- Avoid pressure washing the joints directly. A low-pressure rinse across the paver surface is fine, but a pressure washer aimed into joints will erode the sand over time.
- Pull any weeds that do manage to sprout promptly. Polymeric sand drastically reduces weeds but doesn't eliminate them entirely, especially along edges.
- Keep the patio surface clear of standing water when possible. The sand handles rain fine, but persistent pooling in low spots stresses the joints.
Signs it's time to re-sand
- Joints look visibly lower than when first filled (sand has eroded or settled significantly)
- Weeds are growing through joints in multiple areas
- Joints crumble or feel loose when you press on them
- Pavers are starting to shift or rock slightly
When any of these signs show up, re-sanding is a straightforward fix. Remove old sand down to a stable base (pressure washing works well for this), let everything dry completely, and apply fresh polymeric sand using the same process described in this guide.
What about sealing?
If you're planning to seal your pavers, always apply polymeric sand first and let it fully cure. Then wait at least 3 months before sealing. That waiting period allows natural efflorescence (mineral deposits that rise to the surface on new concrete pavers) to dissipate. Sealing over fresh efflorescence traps it under the sealer and creates a cloudy, blotchy look that's difficult to correct. If you do see efflorescence, a soap-and-water scrub with a stiff plastic brush handles light cases, and a dedicated paver cleaning product tackles anything stubborn before you seal.
One last thing worth saying: applying polymeric sand is genuinely satisfying work because the results are immediate and obvious. You go from a patio that looks a little rough around the edges to one that looks finished and solid. Take your time with the dry prep and the leaf blower step, follow the water activation process in small sections, and you'll get it right. The whole job on a typical backyard patio takes around half a day, and it'll protect your paver investment for years.
FAQ
Can I apply polymeric sand in stages over multiple days, or do I need to activate the whole patio right away?
You should activate only the section you finish preparing and blowing off. In practice, plan to sweep and fill, blow the same area, then activate it with water within that work window. If you leave dry polymeric sand sitting in the joints for too long, dust and surface moisture can interfere with proper binder activation and increase haze risk.
What should I do if I accidentally get polymeric sand on the paver faces after sweeping?
Blow it off immediately before water goes anywhere near the patio. If some residue is already set, wait for full dry time and remove it with a dedicated paver cleaner or soap-and-water plus a stiff plastic brush, then reassess. Avoid acid cleaners unless your paver manufacturer explicitly approves them, because some pavers can etch.
How do I know the joints are filled deeply enough before I activate?
Use the target height as your checkpoint (about 1/8 inch below the paver top, or at the bottom of the chamfer) and verify with a quick visual sweep while you compact. If joints look partially empty after initial sweeping, do additional sweep-and-compact passes before watering, because thin, top-only fill often leads to soft joints after curing.
Will a higher water pressure hose spray work if it rinses the sand into the joints better?
No, high pressure is a common failure mode. Switch to a gentle shower or rain setting, keep the nozzle at a comfortable distance, and move slowly while allowing water to soak in. A jet can physically dislodge the sand and undo the joint packing you worked to achieve.
Do I need to compact again after the water activation step, or should I leave it alone?
Leave it alone once activated. The goal is for the binders to hydrate and set within the joint depth. Compacting after wetting can shift sand, create uneven binder distribution, and contribute to residue on the paver faces.
How long should I wait before mowing, washing, or using chemicals on the patio?
Plan for at least 24 hours of light foot traffic and 48 to 72 hours before vehicles. For mowing or routine cleaning, wait until full curing, typically about 24 hours after activation (and longer if temperatures were cool). For chemicals, especially detergents or cleaners, wait until the sand has fully hardened and then spot-test, since residue can react with fresh binder and affect appearance.
What temperature and weather conditions are safest for polymeric sand curing?
Do not apply when pavers or joints are damp, and postpone if temperatures will drop below 32°F (0°C) in the next 48 hours. Also avoid applying in rain or heavy dew conditions, because moisture in the joints can prevent proper binder activation and lead to weak or uneven curing.
If my pavers are uneven or the joints vary in width, how do I adjust the sanding and activation?
Fill to the correct joint height consistently, even if that means multiple passes. Wider joints often take more material and may require extra sweeping and compaction before blowing. During activation, keep each worked section small (around the 100 square foot scale described) so you can achieve uniform darkening without letting puddles form.
Can I apply polymeric sand over a base that drains poorly, or should I fix drainage first?
Fix drainage first when possible. Poor drainage increases the chance of puddling during activation and leaves water trapped in the joints, which can wash out sand or cause incomplete binder activation. If puddles form while watering, you are likely applying too slowly or the site drainage is limiting, and the job outcome will be less reliable.
What’s the best way to remove old regular joint sand before re-sanding with polymeric?
Remove it down to stable material and clear the joint space so the new sand can sit at the right depth. A pressure washer can work, but you must allow the patio and joints to dry completely afterward. If you want to avoid water introduction, use a stiff brush to loosen material and a shop vac to pull out debris and dust.
How do I handle soft or sandy joints that appear only in certain areas of the patio?
Localized softness usually points to a specific step issue in that area, such as insufficient water coverage (binders not activated at full depth), sand that sat too shallow (debris at the bottom), or leftover moisture when you applied. Re-sand those affected joints only after removing loose material down to clean, stable depth and letting everything dry fully.
Is sealing compatible with polymeric sand, and how does it change the timing?
Yes, but apply polymeric sand first and let it cure thoroughly before sealing. Wait at least 3 months before sealing to allow normal mineral efflorescence to dissipate, because sealing too early can trap minerals and create a cloudy or blotchy finish that is hard to correct.
DIY guide to seal patio pavers, clean joints, use polymeric sand, choose sealer, and stop weed growth with proper prep.
Learn how to seal a paver patio step by step: clean, choose penetrating or wet-look sealer, apply, cure, and maintain.
DIY guide to lock patio pavers: edge restraints, compacted base, jointing, sealing, slopes, tools, costs.