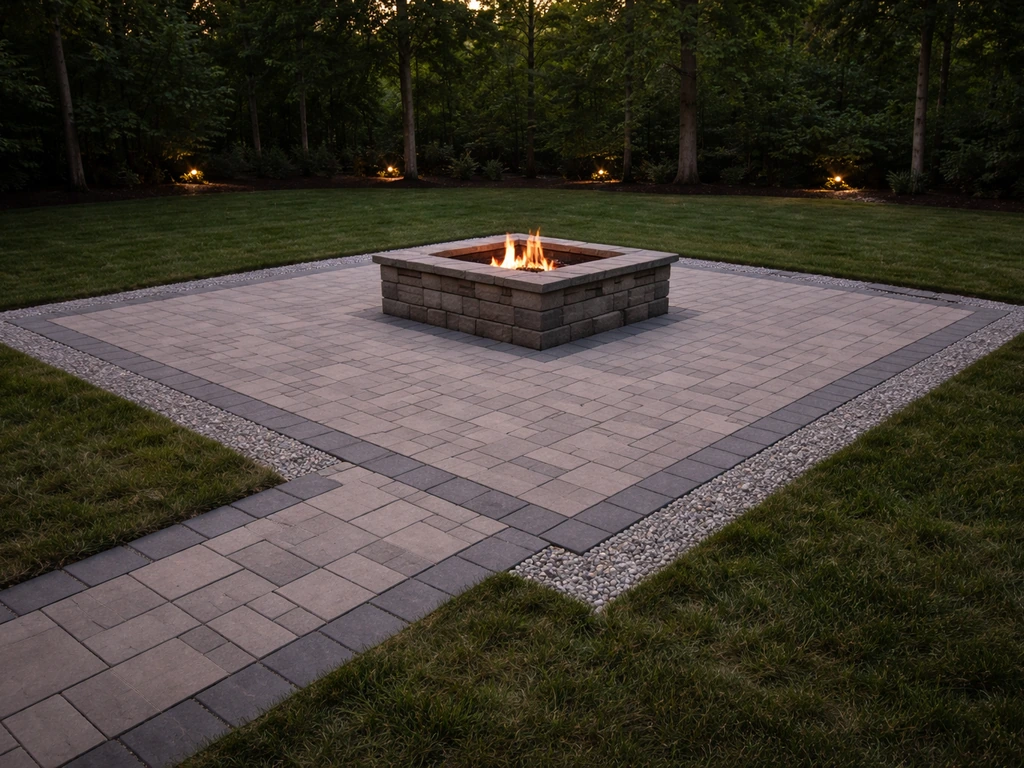
You can absolutely build a paver patio with an integrated fire pit as a DIY project, and when it's done right, it's one of the most rewarding backyard upgrades you can make. The key is treating the fire pit and the patio as one connected system from the very beginning: same base preparation, coordinated layout, proper heat clearances, and pavers cut to fit cleanly around the fire pit opening. Skip any of those steps and you'll end up with cracked pavers, settling around the fire pit, or a setup that isn't safe to use. This guide walks you through the whole build, start to finish, for both square and circular fire pit patio designs.
How to Build a Fire Pit Patio With Pavers

Felix Rowe
14 Jun 2026
Plan the layout first: square vs. circular fire pit patio
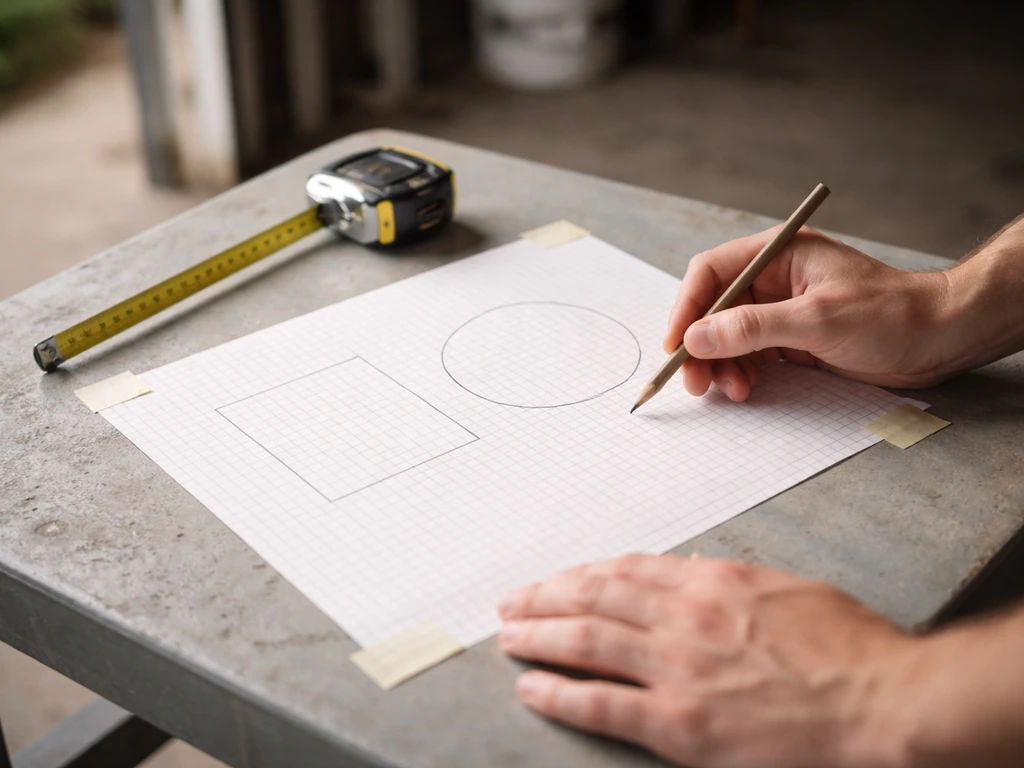
Before you touch a shovel, spend real time on paper (or use free design software like SketchUp or even graph paper). The two most popular approaches are a square or rectangular patio with a square fire pit, and a circular or curved patio layout centered on a round fire pit. Each has trade-offs.
| Design Style | Paver Cutting Complexity | Material Waste | Best For | Typical Fire Pit Style |
|---|---|---|---|---|
| Square/Rectangular patio + square fire pit | Low to moderate | Low | Straight-line patios, modern aesthetics | Block-built square surround or steel insert in a square frame |
| Rectangular patio + circular fire pit | High (curved cuts needed) | Moderate to high | Classic backyard look, round seating arrangement | Pre-cast ring, metal bowl insert, or block kit |
| Circular patio + circular fire pit | Very high | High | Dedicated fire pit focal point, smaller footprint | Pre-cast ring or metal bowl insert |
For most first-time DIYers, a rectangular patio with a circular or square fire pit in a corner or centered along one edge is the most manageable. It minimizes curved cuts while still looking intentional. Whatever you choose, mark the fire pit location on your plan before you finalize patio dimensions, because the fire pit zone affects base prep, clearances, and your cut pattern.
A few planning numbers to lock in early: decide on your fire pit diameter or footprint (common DIY fire pit rings are 36" to 48" in diameter), your total patio square footage, and the exact center point of the fire pit on your property. From that center point, you'll measure all your clearances and lay out everything else. Mark the full patio perimeter and the fire pit zone with spray paint or stakes and string before you dig anything.
Safety and design rules for fire pit placement on pavers
This is the section most people skim and then regret skipping. Pavers themselves are non-combustible, which is why they're a great fire pit surface. But the clearances between your fire pit and anything combustible (wood fences, pergolas, overhangs, furniture, vegetation) are non-negotiable from both a safety and code standpoint.
For a standard wood-burning fire pit or a gas fire pit up to 200,000 BTU, you need a minimum of 36 inches of horizontal clearance from the edge of the fire pit or burner pan to any combustible material. For gas fire pits in the 201,000 to 400,000 BTU range, that minimum jumps to 48 inches. Overhead clearance requirements are equally important: 84 inches of vertical clearance for lower-output units, and 120 inches for higher-output gas models. If you're planning a pergola or shade structure over the patio, make sure the fire pit location keeps the flame well outside those minimums. Building a pergola on top of a paver patio also means thinking about how the framing will attach to the pavers safely pergola on a paver patio. Building a pergola on a paver patio is a related project that requires careful fire pit placement coordination.
For gas fire pit inserts specifically, there's an additional concern: the valve and manifold area needs clearance from grade, and LP tank covers must be placed according to whether the surrounding surface is combustible or non-combustible. Always pull the installation manual for your specific insert before finalizing placement, because manufacturer specs can be stricter than general guidelines.
- Keep the fire pit at least 10 feet from your home, garage, or any structure with combustible siding
- Check local ordinances: many municipalities require a permit for permanent fire pits and restrict open burning
- Don't place the fire pit directly under tree branches, even leafless ones in winter
- Avoid locating the fire pit at the low point of the patio where wind funnels or drainage collects
- If using a gas insert, have a licensed gas professional run the line; don't DIY underground gas
- Choose fire pit pavers or retaining wall blocks rated for heat if building a block surround; standard concrete pavers can crack from direct sustained flame exposure
Site prep and base excavation
Good base preparation is what separates a patio that looks great for 20 years from one that starts heaving and settling after the first winter. This is especially true around a fire pit, where the weight concentration and thermal cycling put extra stress on the sub-base.
How deep to dig
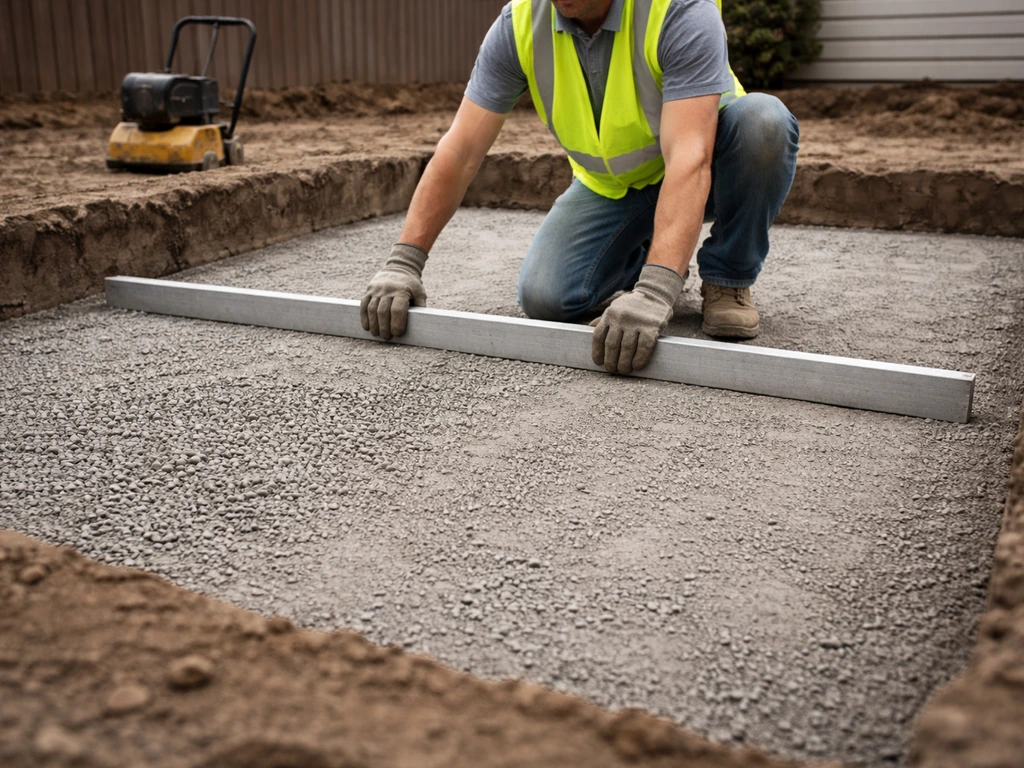
For a pedestrian patio, you're typically excavating about 7.5 to 8 inches below finished grade. That accounts for 4 inches of compacted crushed stone base, 1 inch of bedding sand, and the thickness of your pavers (usually 2. A Unilock paver base is made by spreading clear stone gravel or crushed stone and compacting it, then installing a bedding course of coarse sand or similar graded material on top compacted crushed stone base. 375 to 3.125 inches depending on the product). If your soil is clay-heavy or you live in a freeze-thaw climate, bump the base depth to 6 inches of compacted crushed stone, putting your total excavation closer to 9.5 to 10 inches. Under the fire pit structure itself, excavate to the same depth as the surrounding patio so the whole area sits on a consistent base. Don't dig the fire pit zone deeper unless you're pouring a concrete footing for a heavy block build.
Clearing the area and slope
Strip all vegetation and topsoil from the entire patio footprint plus about 6 inches beyond your planned edge. Topsoil is too organic and compressible to build on. Once you're down to subgrade, check your slope: you need a consistent pitch of about 1/4 inch per foot of patio width away from your house for drainage. Some sources cite a minimum of 1/8 inch per foot, but 1/4 inch is the practical sweet spot that keeps water moving without making chairs feel tilted. Use a long level and a measuring tape to confirm slope as you excavate, adjusting subgrade height across the area rather than trying to fix it in the sand layer later.
Geotextile fabric: worth it here

Lay a woven geotextile fabric over the compacted subgrade before adding your base material. This permeable filter fabric keeps your crushed stone base from mixing down into the native soil over time, which is one of the sneaky causes of settling and drainage problems years down the road. It's cheap insurance, especially if you have sandy or silty soil. Overlap seams by at least 12 inches and run the fabric up the sides of your excavation edges.
Building the paver base, leveling, and drainage
With the subgrade prepped and fabric down, you're ready for the base layers. This is where the project gets physical.
- Add crushed stone (also called clear stone or compactable gravel) in lifts no deeper than 3 to 4 inches at a time. Compact each lift thoroughly with a plate compactor before adding more. Do not dump in the full depth and compact once — you won't get uniform compaction through thick lifts, and the base will settle unevenly.
- Check your slope constantly as you compact. Use a string line set at finished paver height, accounting for your 1 inch of bedding sand and paver thickness. Your compacted base surface should mirror the slope you want in your finished patio.
- Once the compacted base reaches the right height, spread a 1-inch layer of coarse bedding sand (concrete sand, not play sand) uniformly across the area. Screed it flat using a screed board and pipe guides. Don't compact the sand — it needs to remain workable so pavers can be set and adjusted.
- For the fire pit zone specifically, install the fire pit base structure (block ring, metal insert frame, or pre-cast base) directly on the compacted gravel base before spreading bedding sand around it. This is the correct sequencing: set your fire pit foundation on compacted stone, then work the sand and pavers up to it.
Drainage deserves extra attention around the fire pit. Because the fire pit creates a solid mass in the middle of your patio, water can't drain through that area and gets redirected. Make sure your slope directs runoff away from the fire pit perimeter, not around it in a way that pools against the block surround or insert base. If you're building in a low spot or have naturally poor drainage, consider adding a French drain or channel drain along the downhill edge of the patio.
Integrating the fire pit: inserts, borders, cutting pavers, and clearances
This is where the project gets interesting and where most DIYers need to slow down and think carefully. The fire pit is the focal point of the whole build, and how you handle the transition between the fire pit structure and the surrounding pavers determines how professional the finished result looks.
Choosing your fire pit type
There are three common approaches for a paver patio fire pit: a steel bowl or ring insert set into a block surround, a pre-cast concrete ring kit, or a custom-built block wall forming a square or circular pit. Steel inserts are the most DIY-friendly because they handle the heat and you just need to build a decorative block surround around them. Pre-cast kits come with specific clearance and ventilation requirements from the manufacturer, so follow those instructions exactly. Custom block builds give you the most design flexibility but take more time and skill to get level and plumb.
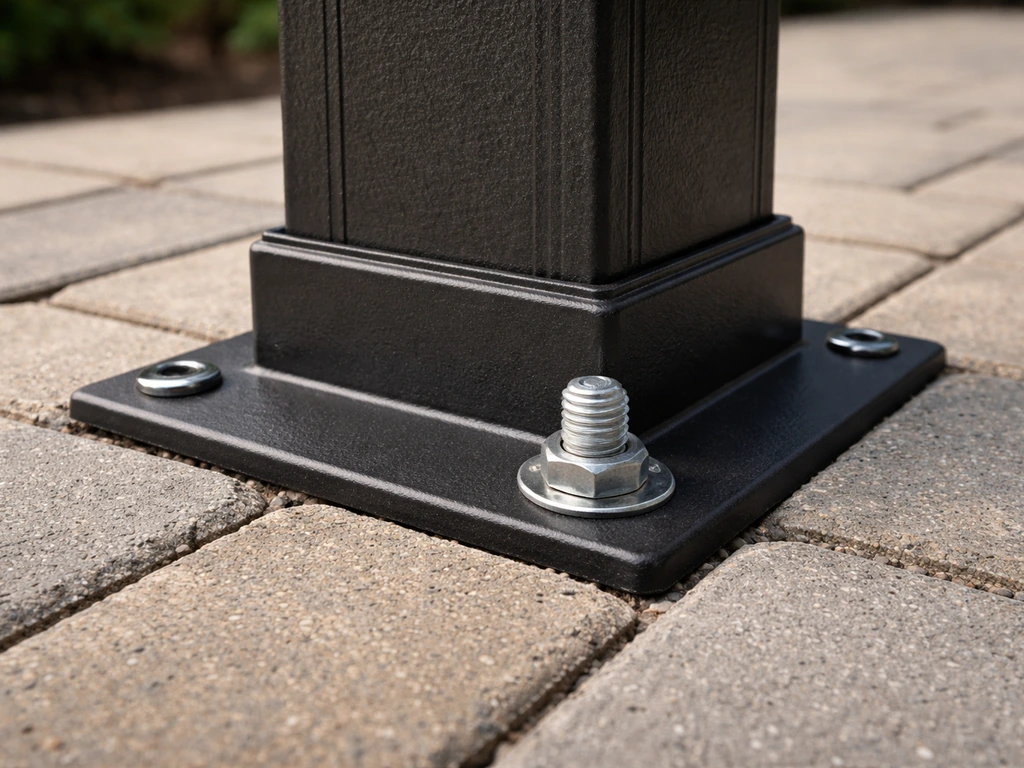
Setting up the fire pit surround and frame
After your compacted base is ready and before you spread bedding sand, install the fire pit surround on the compacted gravel. If you're building a block ring or wall, use a concrete adhesive between courses and check for level after each row. For circular designs, lay out the first block ring dry before you glue anything to verify the diameter and confirm it aligns with your center stake. For square designs, use a framing square constantly. The top of the fire pit surround should end up at or slightly above finished paver height (most builds target 12 to 18 inches above patio surface for comfortable seating use).
Cutting pavers to fit around the fire pit
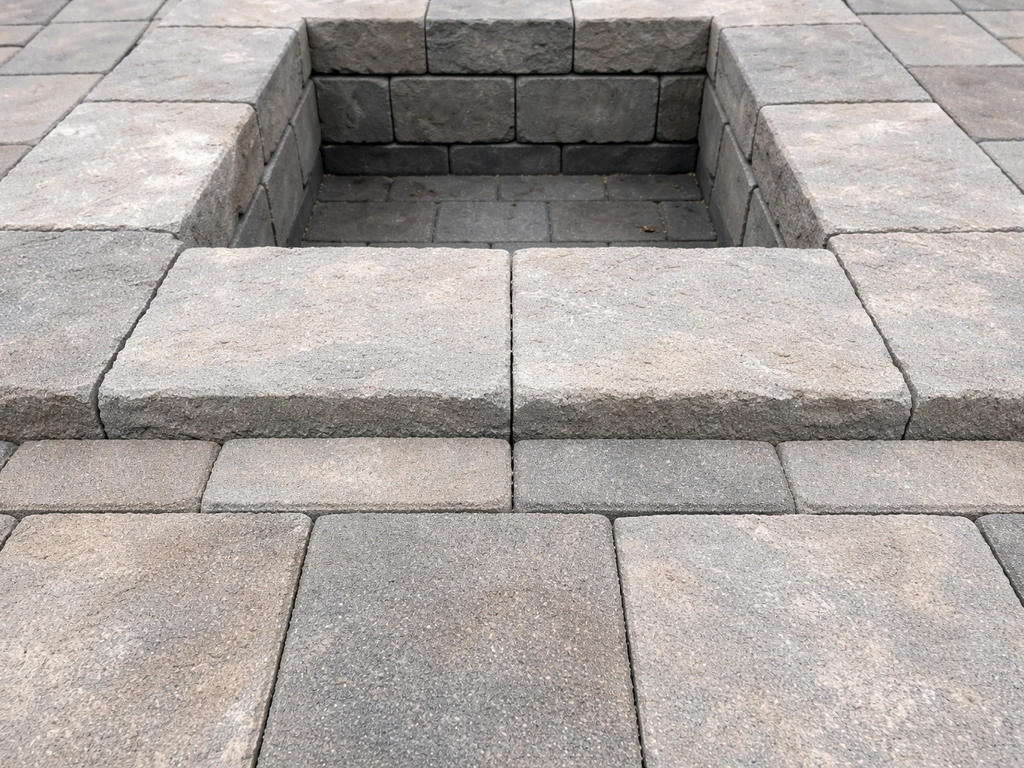
The cut pavers around the fire pit opening are the hardest part of the whole job. For a square fire pit, cuts are straightforward right angles that any diamond blade wet saw or guillotine splitter can handle. For a circular fire pit, you're cutting curves or angled segments, which requires a wet saw and patience. Use the Barkman 'cut to fit' method: mark one paver at a time using the actual fire pit surround as a template, cut it, test the fit, then move to the next. Don't try to measure a whole row at once because small errors compound quickly around a curve.
Leave a small gap (about 1/4 inch) between the cut paver edges and the fire pit block surround. This allows for minor thermal expansion and prevents the pavers from being forced up if the surround shifts slightly. Fill this joint with polymeric sand, just like the joints between pavers. Do not use rigid mortar at this joint because it will crack as the two structures move independently.
Border and soldier course around the fire pit
Running a dedicated border row (soldier course) of pavers immediately around the fire pit surround gives the design a clean, finished look and also provides a practical restraint that keeps the surrounding field pavers from drifting. Lay your field pavers almost to the fire pit, then install the border row last, cutting field pavers to meet it cleanly. Use the same sequencing for the outer patio perimeter: install edge restraints along the outer edges before you sweep in joint sand so nothing shifts during that final step.
Finishing: edging, sealing, curing, and keeping it looking good
Edge restraints
Plastic snap-together edge restraints (the kind you spike into the compacted base along the patio perimeter) are essential. Without them, pavers at the edges slowly migrate outward over time, opening up joints and allowing settlement. Spike them every 12 inches. For curved sections, use the flexible segmented version rather than trying to force rigid restraints around a curve.
Polymeric sand and joint filling
Once all pavers are set and edge restraints are in, sweep polymeric sand into the joints using a push broom. Make multiple passes in different directions to work it fully into every joint. Compact the entire patio surface with the plate compactor (put a rubber pad under the plate to protect paver surfaces) to settle pavers fully into the bedding sand. Sweep in more polymeric sand until joints are consistently filled within about 1/8 inch of the paver surface. Then activate the polymeric sand by misting it with water according to the product directions. Don't flood it.
Sealing the pavers
Sealing is optional but highly recommended for a patio that will have a fire pit, because soot and ash can stain unsealed pavers permanently. Wait a minimum of 24 hours after the pavers are completely dry before applying sealer. If there's any moisture in the paver or joint sand, the sealer will cloud or delaminate. Before sealing, make sure the surface is completely clean and free of efflorescence (the white powdery haze that sometimes appears on new concrete products). Efflorescence must be removed with a specific cleaner before sealing, or you'll trap it under the coating. Apply sealer only when air temperature is between about 50°F and 80°F. Avoid sealing in direct midday sun because the product can dry too fast and streak.
Ongoing maintenance
Plan on reapplying sealer every 2 to 3 years depending on sun exposure and traffic. After heavy use of the fire pit, sweep or blow off ash and debris before it grinds into the paver surface. If you notice joints losing sand over time (especially after heavy rain), top them up with fresh polymeric sand and re-activate with water. Staying on top of this small maintenance task prevents the bigger problems: weed intrusion, ant nests, and base erosion from water flowing freely through open joints.
Troubleshooting common problems
Pavers sinking or settling unevenly
This almost always comes back to the base. Either the base wasn't compacted in proper lifts, the excavation wasn't deep enough, or the bedding sand layer was too thick (over 1 inch). If you have a localized low spot, you can lift the affected pavers, add a small amount of base material or additional bedding sand, re-screed, and relay those pavers. Don't just add sand on top or pour dry concrete mix into joints to level things out. Address it at the base. Settlement is especially common directly adjacent to the fire pit if that area wasn't compacted as thoroughly as the rest of the patio.
Water pooling on the patio
Pooling water is a sign that the slope wasn't established correctly or that settling has created a low point. Small pooling issues can sometimes be corrected by carefully lifting a section of pavers, re-grading the bedding sand to restore slope, and relaying. For chronic pooling that suggests a base or drainage problem below the surface, you may need to excavate and rebuild that section properly. Housedigest notes that poor base materials or installation can wash out joint or surface sand, which contributes to water pooling and can also encourage weeds and fungus, so the solution often requires fixing the base and drainage rather than just replacing pavers chronic pooling that suggests a base or drainage problem below the surface. Patching the surface without fixing the underlying drainage is a temporary fix that usually fails within a season.
Gaps opening up around the fire pit
If gaps appear between the cut pavers and the fire pit surround after the first season, the surround itself may have shifted slightly due to freeze-thaw cycles or settling. Check whether the surround is still level and plumb. If the block surround has moved, you may need to disassemble and rebuild it on a better base. For minor gaps that are cosmetic rather than structural, refill with polymeric sand and seal. If you used rigid mortar at that joint originally, now you know why the flexible gap approach works better.
Cracked pavers near the fire pit
Standard concrete pavers right up against an open wood-burning fire pit can crack from thermal stress, especially if the fire pit surround doesn't have an insert to contain the heat. Using a steel insert inside your block surround dramatically reduces the heat transfer to adjacent pavers. If you already have cracked pavers, replace them individually by lifting them out, cleaning up the bedding sand, and setting new ones in place. They rarely need cutting unless they're in the border row.
Weeds and moss growing in joints
This is a joint sand problem. If regular sand was used instead of polymeric sand, or if the polymeric sand wasn't activated correctly, it leaves voids that fill with debris and become weed habitat. The fix is to clean out the joints (a stiff brush or low-pressure washer), let everything dry completely, and sweep in fresh polymeric sand. Seal afterward to help lock it in. Don't use herbicides alone as a long-term fix because you're not addressing the open joint that allows seeds to germinate in the first place.
Realistic expectations: time, tools, and when to call a pro
A fire pit patio in the 200 to 400 square foot range typically takes a motivated DIYer a full weekend for demo and base prep, another half day for base compaction and screeding, and a full day for setting pavers and finishing. Budget extra time for the fire pit surround build and cuts around the opening. Total hands-on time is usually 20 to 35 hours depending on complexity and how much ground clearing is needed.
Essential tools: plate compactor (rent it, don't skip it), wet diamond blade saw for cutting (rent from a tool rental shop), screed pipes and a straight board, rubber mallet, level, string lines and stakes, push broom, and a garden hose with a misting nozzle. A laser level makes slope verification much easier and is worth renting for a project this size.
Call a professional if: your site has significant grade change (more than 12 inches across the patio area), you have drainage issues that require engineered solutions, you want a gas fire pit (the underground gas line must be done by a licensed plumber in most jurisdictions), or your soil conditions are unusual (expansive clay, fill soil, or high water table). Everything else, including a wood-burning fire pit patio with pavers on reasonably level ground, is absolutely within DIY reach if you follow the base prep steps carefully. Yes, if you follow the steps in this guide, you can build a fire pit patio with pavers safely and successfully. For a gazebo, you also need to anchor it properly to the paver patio so it stays stable in wind and weather anchor a gazebo to a paver patio.
FAQ
Can I build the fire pit patio directly over existing concrete or pavers instead of excavating?
Usually no. Paver patios need a compacted, properly sloped base and bedding sand. If you place pavers over old hard surfaces, you can trap water, prevent correct drainage, and create a pathway for movement that leads to cracked or heaving pavers around the fire pit. In most cases you will need to demo down to soil or an engineered base layer.
What is the best seating height target for pavers around the fire pit?
Aim for the fire pit surround top to land slightly at or above finished paver height, many DIY builds target about 12 to 18 inches above the patio for comfortable standing-to-seated transitions. If you go too low, the flame and smoke can feel obstructed, and if you go too high, the cut paver band becomes harder to keep consistent and level.
How do I handle wiring or outdoor outlets near the fire pit patio?
Plan electrical conduits and low-voltage landscape wires before you set pavers, and route them away from the fire pit’s clearance zone. Keep conduit penetrations above the base where they can be serviced, and avoid placing splices or junctions in areas that will be under loads from compaction or frequent maintenance.
Do I need to change anything if I live in a heavy freeze-thaw climate?
Yes, prioritize deeper and well-compacted crushed stone, confirm drainage slope with a level, and pay extra attention to base consistency directly adjacent to the surround. Freeze-thaw magnifies small base defects, so recheck compaction in the fire pit perimeter before bedding sand and again after setting the surround and border row.
How far should I keep pavers from the actual flame area if I’m using a gas fire pit insert?
Follow the manufacturer’s minimum clearances for the burner, valve, and surrounding surfaces, and then treat the insert perimeter as the “no compromise” boundary. The clearance you must respect is not just the outer shell location, also consider where heat is directed and where controls sit, especially near grade and around any LP tank access points.
Is it okay to use regular sand for the joints around the fire pit patio?
Not if you want long-term weed control and stable joints. Regular sand tends to wash out or leave voids, which creates debris traps and weed germination points. Use polymeric sand for paver joints, and activate it correctly with misting, not flooding.
What should I do if polymeric sand washes out after a heavy rain?
First inspect for a low spot or failed slope. Then clean and dry the joints, sweep out loose material, refill with fresh polymeric sand, and re-activate according to the product instructions. If joints keep failing in the same area, that indicates drainage or compaction issues below the surface, not just a surface sand problem.
Can I mortar the joint between the cut pavers and the fire pit surround?
Avoid rigid mortar at that transition. The surround and the paver field move differently due to thermal cycling and ground movement, and a hard mortar joint can crack. Use a small expansion gap (about 1/4 inch as a starting target) and fill it with polymeric sand to keep the joint flexible.
Why do pavers sometimes crack or separate right next to the fire pit even when the patio is installed correctly?
Most often it is heat transfer or base inconsistency. Using a steel insert inside the block surround reduces heat stress on adjacent pavers. Also verify that the base under the fire pit zone was compacted and leveled the same as the surrounding patio, because weak compaction near the center concentrates stress.
How do I prevent staining from soot and ash around the fire pit?
Sealing is optional but recommended specifically because ash and soot can permanently discolor unsealed pavers. After cleaning, ensure the patio is fully dry, apply sealer within the recommended temperature window, and then keep a quick cleanup routine after burns so residue does not grind into the surface.
How long should I wait after sealing before using the fire pit?
Give the sealer enough cure time per the product label, and do not fire the pit heavily immediately after application. Heat can interfere with curing and can increase surface marking or streaking, particularly if the patio is still outgassing moisture.
Do I need to reinstall or adjust the fire pit surround if gaps show up later?
Check first for level and plumb. If the surround shifted, you may need to disassemble and rebuild it on a better base. If the surround is still structurally sound and the gaps are minor, you can sometimes treat it as a joint-filling issue using polymeric sand, but never ignore recurring movement.
When is it worth hiring a professional instead of DIY?
Hire help if you have major grade changes, uncertain drainage that may require engineered solutions, expansive clay or a high water table, or if you want gas with an underground gas line that needs licensed work in your jurisdiction. Professionals are also helpful if you are building on fill soil or if site access limits proper excavation depth and compaction.
Next Articles
How to Anchor a Gazebo to a Paver Patio Step by Step
Step-by-step DIY methods to anchor a gazebo to paver patios, avoiding cracks, resisting wind, and troubleshooting wobble
How to Use Quikrete Patio Paver Jointing Sand: Guide & Tips
How to use Quikrete Patio Paver Jointing Sand: step-by-step application, tools, timing, coverage, and care.

How to Use Patio Paver Sand: Step by Step DIY Guide
Step-by-step guide to apply patio paver sand correctly: prep base, set pavers, fill joints, compact, and troubleshoot is