Caring for a paver patio comes down to four habits: keep it clean, keep the joints full, deal with weeds and stains before they get worse, and reseal every few years. Do those four things consistently and a well-built patio will look sharp and stay stable for 20-plus years. Skip them and you end up with weeds splitting joints, pavers shifting underfoot, and surface staining that gets harder to reverse every season you wait.
How to Care for a Paver Patio: DIY Maintenance Guide

Felix Rowe
20 Jun 2026
What good paver care actually prevents
Before diving into the how, it helps to understand the why. Pavers themselves are extremely durable, but the system around them, the bedding sand, the joint sand, the edge restraints, and the compacted base, is what makes or breaks long-term performance. Neglect lets water work its way into joints and undermine the base. Weeds and roots push pavers apart. Joint sand erodes and pavers start to rock. Deicing salts accumulate on the surface and accelerate surface wear. Skipped cleaning lets oil and organic stains set permanently. None of these failures are dramatic on day one, but they compound fast, and by the time most homeowners notice, they're looking at a repair project instead of a maintenance task.
- Joint erosion leading to rocking or shifting pavers
- Weed and moss growth that splits joints and lifts pavers
- Surface staining from oil, rust, algae, and organic debris
- Base settlement or washout from drainage problems
- Surface deterioration from deicing salt buildup
- Edge restraint failure that lets the perimeter spread outward
Staying ahead of all of these is genuinely manageable. Most of the work happens twice a year, a solid spring cleanup and a fall prep session, with light maintenance in between.
Routine cleaning: when, how, and what to skip
Plan on giving your patio a thorough cleaning twice a year: once in spring after winter is fully over, and once in fall before leaves start sitting on the surface and rotting. In between, a quick sweep every week or two is all you need. Leaves, pine needles, and organic debris hold moisture against the surface and stain pavers if left to decompose, so don't let them pile up.
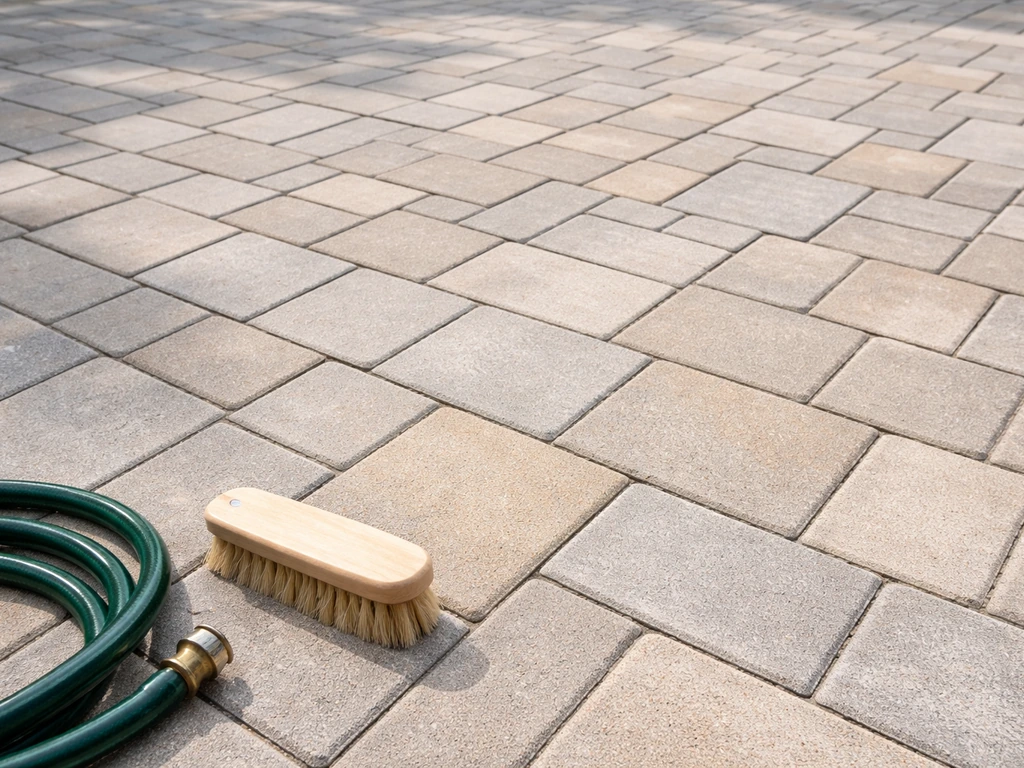
Basic cleaning steps
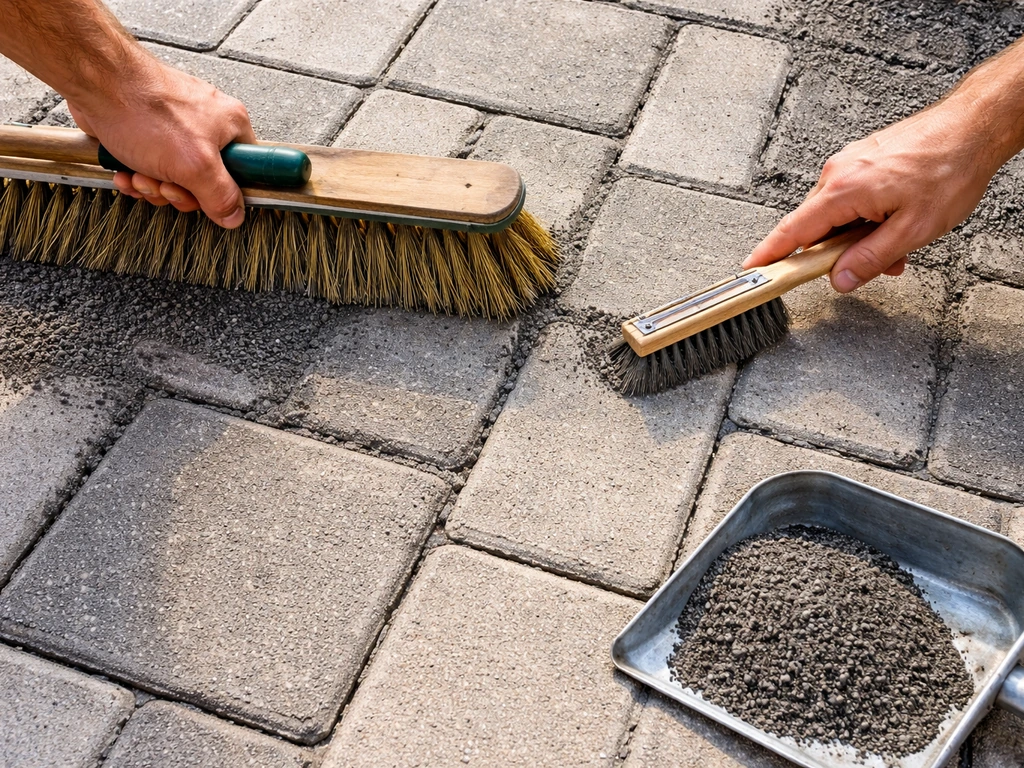
- Sweep the entire surface with a stiff push broom to clear loose debris, dirt, and any sand that has migrated onto the tops of the pavers.
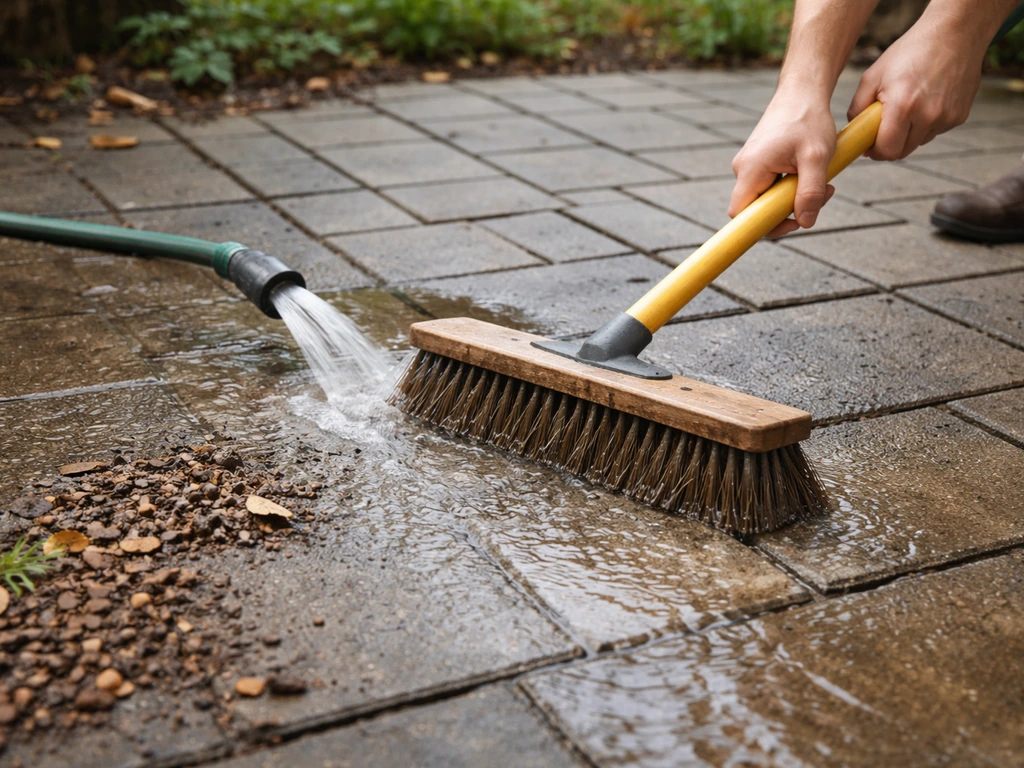
- Rinse with a garden hose to remove fine dust and surface grime.
- For general cleaning, mix a mild dish soap with water and scrub with a stiff-bristle brush. This handles most everyday grime without any risk to the surface.
- For tougher buildup, use a purpose-made paver cleaner or a diluted white vinegar solution (for organic staining). Always rinse thoroughly after.
- If pressure washing, use a fan-tip nozzle at 1,200 to 1,500 PSI and keep the wand moving. Never use a pinpoint or zero-degree nozzle — it etches and scars the paver surface, which makes it look worse and accelerates wear. Work in the direction of the joints, not across them.
- After any pressure washing, expect to lose some joint sand. Plan to replenish it within a week or two.
Spring cleaning should always include a dedicated pass to rinse away de-icing salt, sand, and any winter residue. These materials are abrasive and chemically corrosive if left sitting, and they're the leading cause of premature surface wear on concrete pavers.
Dealing with weeds, moss, algae, and stains
Weeds in paver joints are one of the most common complaints homeowners have, and honestly, they're mostly a joint sand problem. When joints are fully packed with polymeric sand, there's almost nowhere for weed seeds to germinate. The weeds you're fighting are a symptom of depleted or regular (non-polymeric) joint sand. That said, you still need to deal with what's there before refilling.
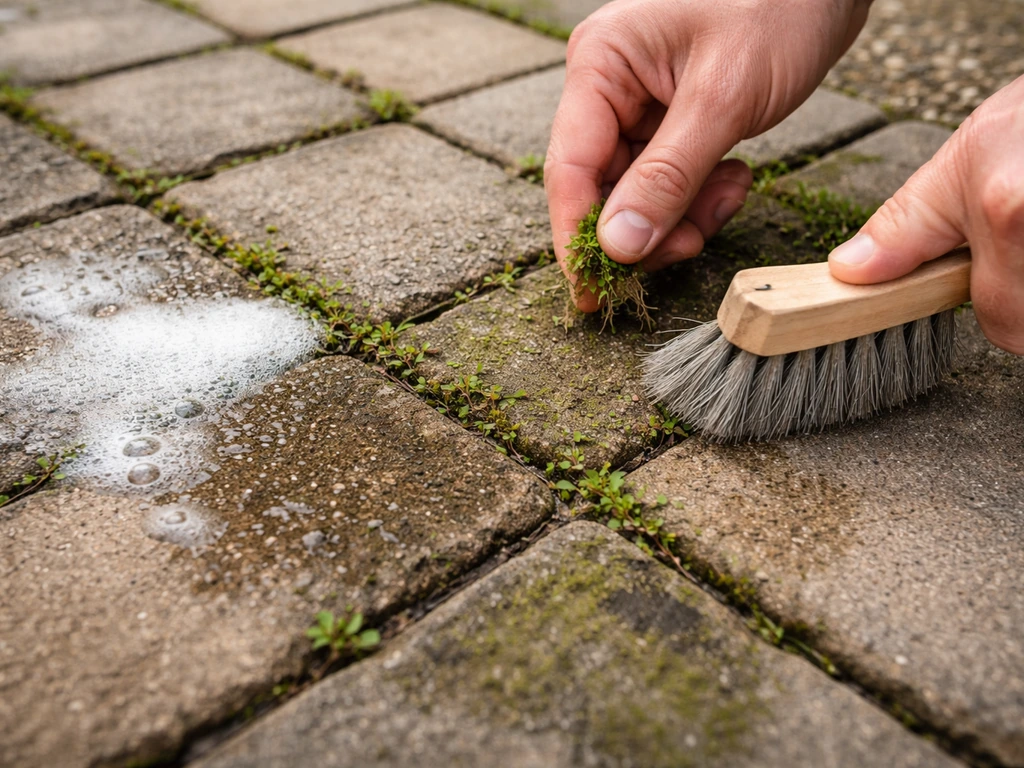
Weeds and moss
- Pull weeds by hand or use a stiff-bristle joint brush to work them out of joints. Get the roots if you can.
- For persistent weeds, a targeted application of a paver-safe weed killer (check the label for concrete-safe formulas) works well. Avoid broad-spectrum herbicides that can stain or damage surrounding plants and soil.
- Moss and algae thrive in shaded, damp areas. A diluted bleach solution (1 part bleach to 10 parts water) kills moss and algae effectively. Scrub it in, let it sit for 10 minutes, then rinse thoroughly. Don't let bleach run into garden beds.
- Once the surface is clear, the real fix is repacking the joints with polymeric sand so new growth can't get a foothold.
Common stains and how to treat them
| Stain Type | Treatment | Notes |
|---|---|---|
| Oil or grease | Apply an absorbent (cat litter or baking soda) immediately, then scrub with a degreaser | Act fast — older oil stains are much harder to lift |
| Rust | Use a rust-specific paver cleaner with oxalic or phosphoric acid | Don't use bleach — it won't touch rust |
| Algae / green film | Diluted bleach or commercial algae remover, scrub and rinse | Recurs in shaded areas — sealing helps reduce it |
| Tannin (leaf, berry) | Oxygen bleach (like OxiClean) scrubbed in, then rinsed | Works best when treated before stain sets in |
| Efflorescence (white haze) | Purpose-made efflorescence cleaner or diluted muriatic acid (follow product directions exactly) | Very common on new pavers — usually clears up with weathering and cleaning |
| Paint or sealant drips | Paint stripper formulated for masonry, test in a hidden area first | May require multiple applications |
Efflorescence deserves a special mention because it worries a lot of homeowners. It's that chalky white haze that appears on the surface, especially on newer installations. It's caused by soluble salts migrating out of the concrete as moisture moves through the pavers. It looks bad but it's not structural damage. It usually diminishes on its own within the first year or two. If you want to speed things up, a commercial efflorescence cleaner used before sealing will take care of it.
Keeping the joints full: sand maintenance done right
Full, stable joints are what hold a paver patio together. Joint sand prevents movement between pavers, keeps water from infiltrating straight down into the base, and closes off the germination zone that weeds love. If your joints look hollow, cracked, or you can see gaps between pavers, this is your highest-priority maintenance task.
Polymeric sand vs. regular joint sand
Regular kiln-dried sand is easy to apply but washes out and allows weed growth. Polymeric sand contains binders that activate with water and harden the joint, dramatically improving weed resistance and joint stability. For most homeowners, polymeric sand is worth the extra cost. Use it whenever you're doing a full joint refill, especially if weed pressure has been a problem.
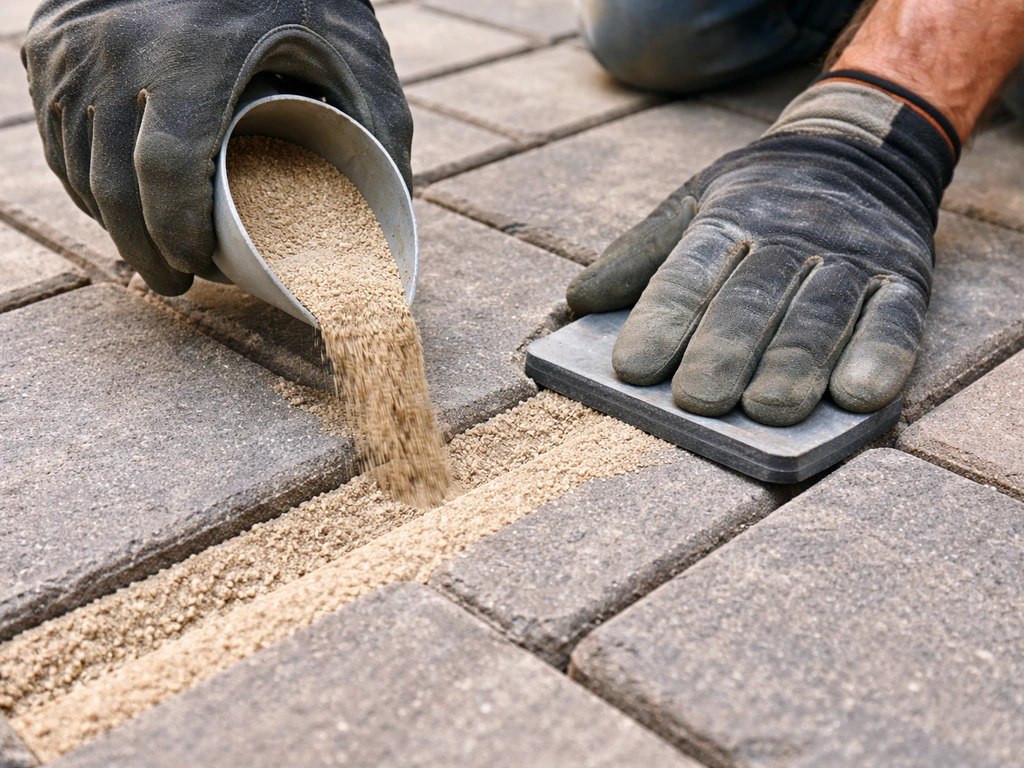
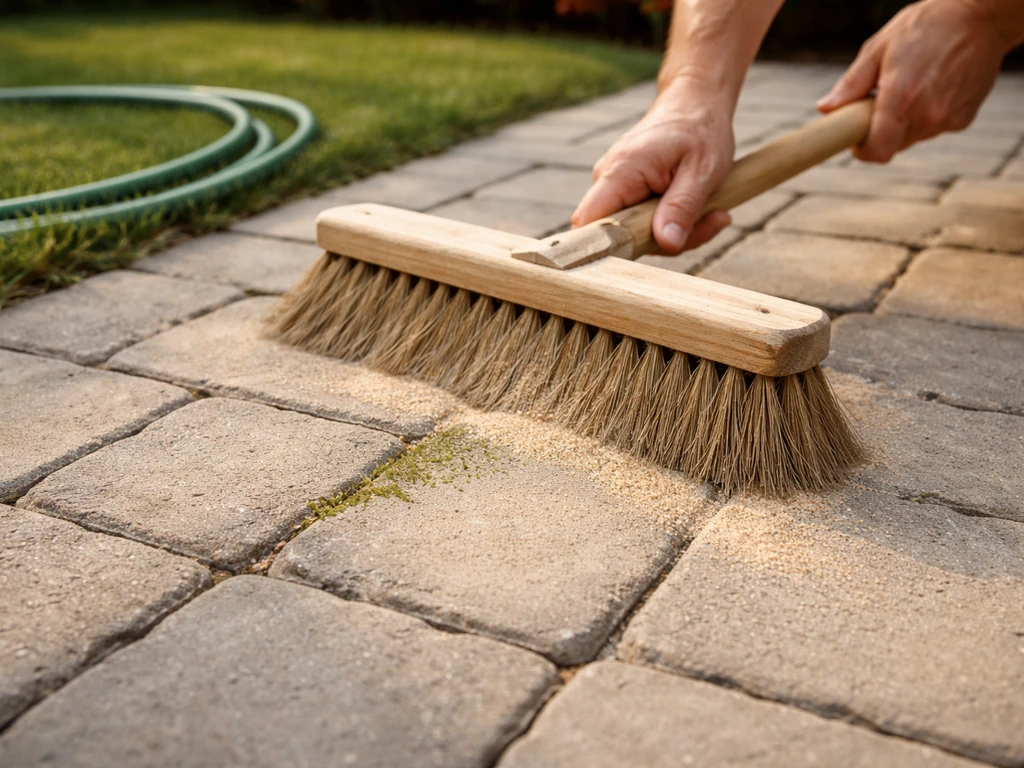
How to refill paver joints with polymeric sand

- Clean the patio surface thoroughly and let it dry completely. Polymeric sand should not go into wet joints — moisture interferes with proper curing.
- Remove any existing loose sand, weeds, or debris from the joints using a stiff brush or compressed air.
- Pour polymeric sand over the dry patio and sweep it into the joints with a stiff push broom. Work in multiple directions to fully pack the joints.
- Aim to fill joints to within about 1/8 inch of the paver surface — not flush to the top, but close. Underfilled joints won't lock properly; overfilled joints create a surface mess when you activate with water.
- Blow or sweep all excess sand off the paver surfaces before wetting. Any sand left on top will harden there.
- Activate with a fine mist (not a hard spray) from a garden hose. Wet the entire surface, wait 10 to 15 minutes, then mist again to fully saturate the joints. The goal is to get water all the way to the bottom of the joint, not just dampen the top.
- Keep foot traffic off the patio for at least 24 hours. Avoid rain for the first 24 to 48 hours after application — check the forecast before you start.
- Wait at least 30 days after applying new polymeric sand before applying any sealer over the joints.
One thing that trips people up: polymeric sand only works if your joints are deep enough to hold it. If your pavers were installed with very thin joints (less than 1/8 inch wide), polymeric sand may not perform well. Euclid’s PRO-PAVER PolySand TDS also specifies a waiting period of 10 to 15 minutes and re-wetting with a fine mist to fully saturate the joint, along with minimum temperature requirements after application polymeric sand may not perform well. Ideally, joints should be between 1/8 and 1/2 inch wide for polymeric sand to seat and cure properly.
Sealing your pavers: whether to do it, how to apply it, and when to reseal
Should you seal your patio?
Sealing is optional but genuinely useful. Techniseal’s Paver Prep TDS specifies waiting at least 30 days on newly installed polymeric sand before cleaning or sealing waiting at least 30 days before cleaning or sealing. A good sealer makes stains easier to clean, enhances the color of the pavers (if you want that look), reduces moisture absorption that leads to efflorescence, and slows algae growth. If your patio is in a shaded or damp area, gets heavy use, or is near a grill or food prep area, sealing is a smart call. If it's a lightly used patio in a dry, sunny spot, you can go without and just focus on the cleaning and joint maintenance.
Sealer types at a glance
| Sealer Type | Finish | Best For | Breathable? |
|---|---|---|---|
| Penetrating/impregnating sealer | Natural/matte | Most patios, reducing moisture absorption, efflorescence-prone areas | Yes |
| Film-forming (acrylic) | Wet-look or gloss | Patios where color enhancement is desired | No (can trap moisture) |
| Water-based acrylic | Satin or gloss | General use, easier cleanup | Partially |
| Solvent-based acrylic | High gloss | Heavy-use areas, deeper color enhancement | No |
For most DIYers, a penetrating sealer is the safest choice. It doesn't change the look dramatically, it lets the pavers breathe (which matters for moisture management and prevents peeling), and it's more forgiving to apply. Film-forming sealers look great but if moisture gets trapped underneath, you'll get a cloudy, peeling mess.
How and when to apply sealer
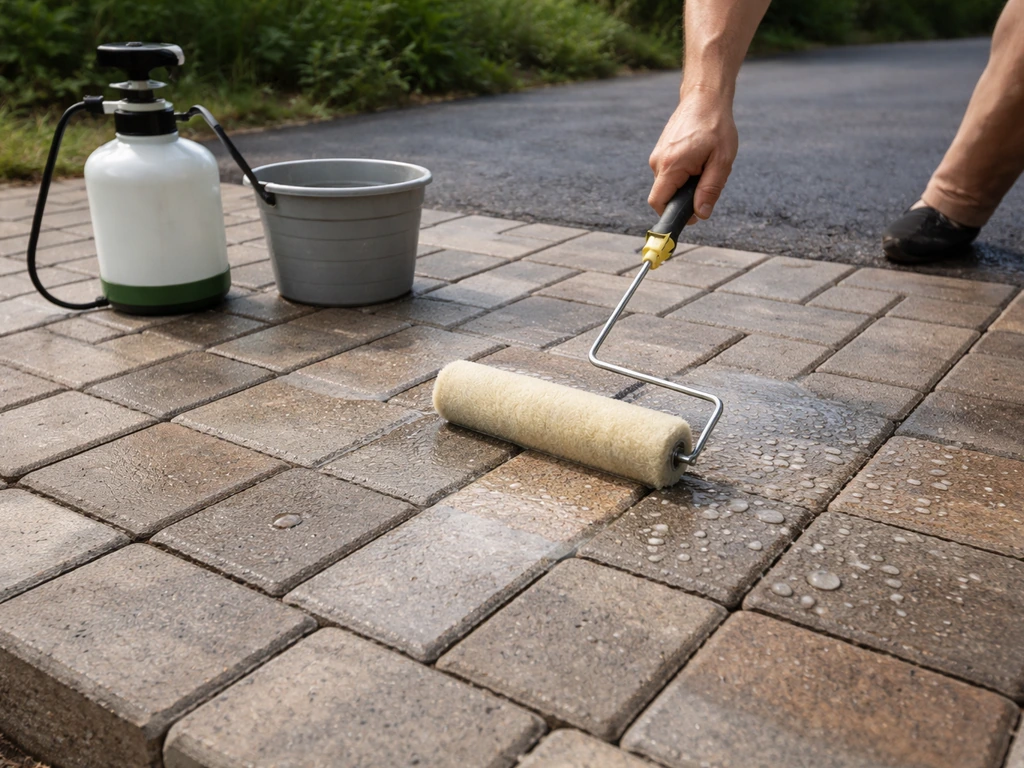
- Wait until new pavers have been installed for at least a few weeks. If you've just applied new polymeric sand, wait a minimum of 30 days before sealing.
- Clean the patio thoroughly and treat any efflorescence with a dedicated efflorescence cleaner. Let the surface dry completely — sealing over damp pavers traps moisture.
- Apply sealer with a low-pressure sprayer or a paint roller in thin, even coats. Avoid puddling or thick application, which leads to a streaky, hazy result.
- Apply a second coat if the product recommends it, typically after the first coat has dried (30 to 60 minutes depending on temperature and humidity).
- Keep traffic off the sealed surface for at least 24 hours, and avoid rain for the same period.
For resealing, a general guideline is every two to three years, or when water no longer beads on the surface. Resealing too often, especially with film-forming sealers, causes buildup that looks cloudy and eventually needs to be stripped. When in doubt, do less rather than more.
Troubleshooting common patio problems
Uneven or sunken pavers
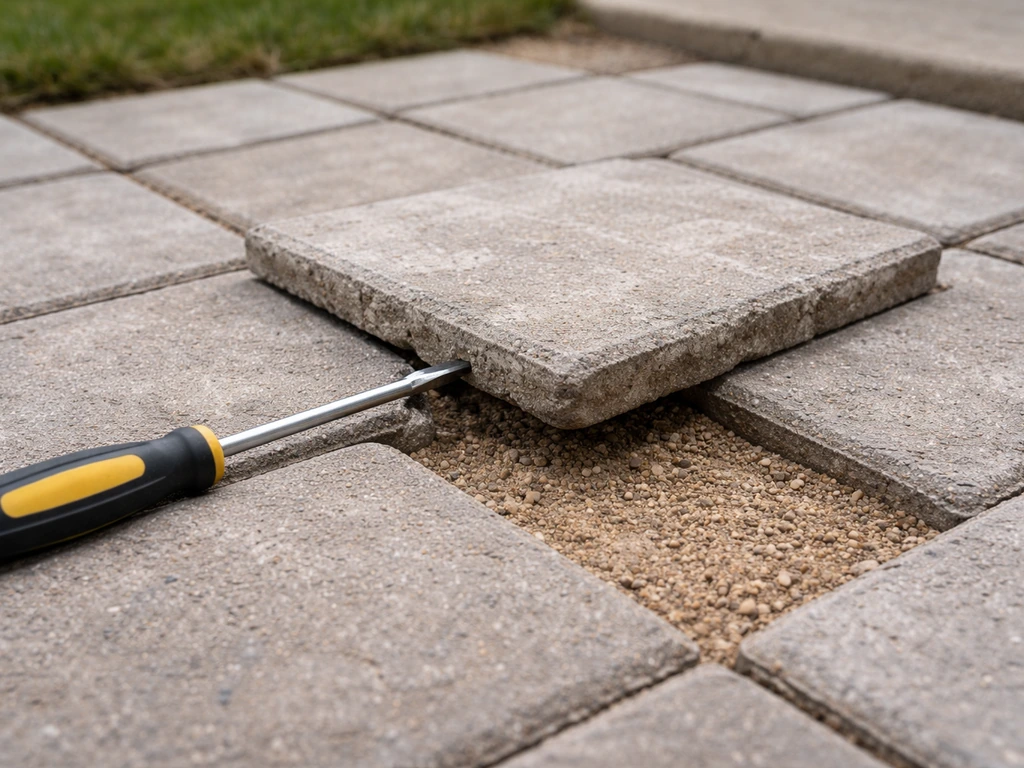
A few sunken or rocking pavers is a DIY fix. Pop the affected pavers out (a flathead screwdriver slipped into the joint works fine), scrape out the existing bedding sand in that area, add fresh coarse sand or bring the base level up, and reset the pavers flush with the surrounding surface. Tamp them down firmly, refill the joints, and you're done. The whole process takes an hour or two for a small section.
If the patio is uneven across a large area, or if there's a consistent slope in the wrong direction causing water to pool, that's a different problem. A systematic pitch issue, where the entire patio or a large section was graded incorrectly, usually means removing that section and rebuilding the base to the correct grade. Maintenance can't fix foundational pitch. If you've got pooling water after every rain and your patio is otherwise new, this is worth taking seriously before base erosion makes the problem worse.
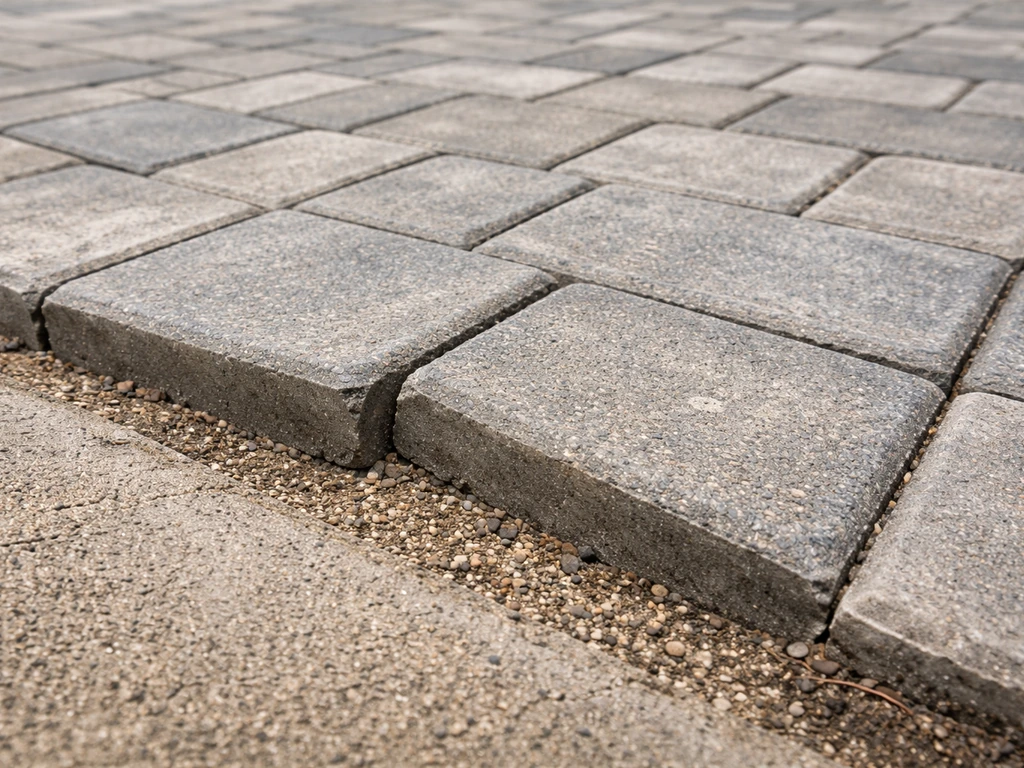
Shifting or spreading pavers at the edges
If pavers near the edge of the patio are spreading outward or sliding out of line, the edge restraints have likely failed, or were never properly installed. Edge restraints need at least 1 inch of contact against the side of the paver to hold the perimeter in place. Check whether the restraint has come loose, cracked, or shifted. If the spikes have pulled out of soft or eroded soil, reset the restraint, drive in new spikes, and backfill firmly around the outside. This is one of those repairs worth doing immediately, because once pavers start spreading at the edge, the whole perimeter destabilizes quickly.
Drainage problems
If water is pooling on the surface or you notice erosion under the edge of the patio, check that the patio still has a slope of about 1/8 to 1/4 inch per foot away from the house. Over time, settling can flatten this slope. You can often correct minor pooling by lifting a section of pavers and adding bedding sand to re-establish the grade. For more serious drainage issues, water consistently flowing toward a foundation, for example, consider adding a channel drain at the low point of the patio. These are available at most home improvement stores and can be set between paver rows with minimal disruption.
Erosion under the patio base
Patios installed over grass (with the sod and topsoil removed and replaced with compacted gravel base) or over uneven ground can develop voids underneath if the subgrade erodes or settles. Signs include pavers that flex underfoot, hollow sounds when you walk on them, or multiple pavers sinking in the same area. Lifting the affected section, adding and compacting fresh base material, and resetting is the right fix. This is more effort but still well within DIY territory for areas smaller than about 20 to 25 square feet.
Seasonal care and feature-specific tips
Winter prep and spring recovery
Before the first snow, sweep the patio clear of debris and leaves. This matters because organic material sitting under snow and ice all winter stains pavers and holds moisture against the surface. If you use a snowblower or plow, keep the blade slightly raised so it doesn't catch paver edges or dig into joints.
On de-icing salts: rock salt (sodium chloride) is hard on concrete pavers and surrounding plants. It's worth switching to magnesium chloride, which is less damaging to the pavers themselves and to nearby vegetation. Avoid calcium chloride too if you can, it's effective at low temperatures but aggressive on concrete surfaces over time. Whatever you use, rinse it off thoroughly once temperatures allow in spring. Residual salt left sitting on the surface is a bigger problem than a single winter's application.
Sloped patios and raised designs
Sloped patios shed water faster, which is good for drainage but means joint sand erodes more quickly than on flat surfaces. Check and replenish joints annually on any sloped installation. Pay extra attention to the low edges of the slope, where water concentrates and can undercut the base if drainage isn't working properly. Raised patio designs with retaining borders need the border walls inspected each spring for any movement, cracking, or shifting, a settled or leaning border can undermine the entire raised section.
Fire pit patios
The pavers immediately around a fire pit take a lot of thermal stress and will show it faster than the rest of the patio. Inspect those pavers annually for cracking, spalling, or surface deterioration. Don't use standard concrete pavers directly under a permanent fire pit, they can crack from direct heat. The area around (but not directly under) the fire pit should be fine with standard pavers, but keep an eye on joint sand in that zone since heat accelerates drying and can cause it to shrink back faster. When sealing, check whether your sealer is rated for high-heat areas near fire pits, not all of them are.
Patios installed over concrete slabs
If your pavers were laid over an existing concrete slab, the maintenance routine is the same, but pay attention to any cracking in the concrete base below. Cracks in the underlying slab will eventually telegraph up through the pavers above them, causing individual pavers to crack or shift. If you notice a line of pavers consistently cracking or lifting along a straight line, the concrete below is the likely culprit. Resetting the affected pavers with mortar or a flexible adhesive appropriate for paver-over-concrete applications is the repair approach here.
Your paver patio maintenance checklist
Here's the full routine condensed into a practical checklist you can actually use. If you follow this schedule, you'll stay well ahead of any serious problems.
Every week or two (5 minutes)
- Sweep off leaves, debris, and dirt
- Spot-treat any oil or grease spills immediately
Every spring (1 to 2 hours)
- Rinse away winter salt, sand, and residue thoroughly
- Inspect all joints and refill any that are low or hollow
- Pull weeds or treat with paver-safe weed killer
- Check edge restraints for movement or damage
- Look for sunken, rocking, or cracked pavers and fix any you find
- Treat efflorescence and stains
- Check drainage slope and address any pooling areas
Every fall (30 to 60 minutes)
- Deep clean the entire surface
- Top up any joint sand that eroded over the summer
- Clear all organic debris before first frost
- Stock up on paver-safe de-icer for winter
Every 2 to 3 years
- Clean, treat efflorescence, and reseal if sealer is no longer beading water
- Do a full joint inspection and replenish polymeric sand as needed
- Inspect raised borders, retaining edges, and fire pit surrounds for any structural shifting
That's really the whole program. Good paver care isn't complicated, it just requires showing up consistently. The homeowners who end up with expensive repair projects are almost always the ones who let a small joint problem or drainage issue sit for three or four seasons. Catch things early and this patio will genuinely outlast most of the house features around it.
FAQ
Can I power wash my paver patio to speed up cleaning?
Use a pressure washer cautiously. High pressure can erode bedding and joint sand, especially in aged joints, and it can force sand out before you re-weed or refill. If you use one, keep the nozzle wide and low-pressure, and avoid blasting along joint lines. A garden hose rinse plus stiff bristle scrubbing usually achieves enough on routine grime.
What should I use to clean algae or mildew on pavers?
For organic growth, target the cause and the surface. Sweep off debris first, then use a cleaner labeled for outdoor concrete or pavers, followed by thorough rinsing. Don’t rely on bleach alone, it can lighten pavers unevenly and leave residue that interferes with joint sand and sealing.
How do I know whether I should repair joints or replace pavers?
If only joint sand is depleted, refill and re-tamp after removing loose sand. If pavers are rocking because bedding sand is gone, you will usually need to lift and reset the affected units. Consistent sinking across a patch (especially on the same footprint) points to base or subgrade issues, not just joints.
Is polymeric sand safe to use on every paver patio?
It performs best when joints are deep enough (roughly 1/8 to 1/2 inch wide) and when the surface is kept from getting prematurely wetted during installation. If you cannot achieve proper joint depth, you may see weak curing and weed resistance that does not match expectations. In those cases, consider using regular joint sand or plan a reset to achieve joint depth.
What’s the correct way to apply polymeric sand so it cures properly?
Spread it into joints, remove excess from the surface, then apply the amount of water recommended by the manufacturer for curing (not just a quick mist). Too little water leaves sand granular and less bound, too much water can flush it out. After curing, avoid washing the patio for several days.
How soon after sealing can I use the patio?
Follow the product label for drying and cure time, since it varies by sealer type. As a practical rule, wait until the surface is fully dry and does not darken with light moisture touch before walking on it normally. For film-forming sealers, foot traffic too early can cause uneven sheen and patchy buildup.
Do I need to clean before resealing, and what if I see efflorescence again?
Yes, reseal only after the patio is clean and dry. If efflorescence is present, treat it first and allow it to fully dissipate, because sealing over active salts can trap salts under the coating and lead to recurring hazing. If the patio is still producing white haze months later, reassess drainage and moisture movement rather than resealing again.
How often should I replenish joint sand on a sloped patio?
On sloped patios, refill joints more aggressively than flat installations. A common approach is an annual joint check, then topping up where joints look hollow or washed out. Pay special attention at the low edges, where water concentrates and joint sand erodes fastest.
What’s the best way to handle weeds that keep returning?
First fix the joint sand condition. Remove existing weeds, then address whether joints are hollow, cracked, or underfilled. If you have been using regular sand and weeds persist, upgrading to polymeric sand (when joint width and depth are appropriate) usually provides longer-term suppression because it reduces the germination zone.
My patio has small gaps or uneven pavers. Can I just fill the gaps with sand?
Sometimes, but only if the pavers are stable and the issue is truly joint loss. If you can rock the pavers, or the gap is the result of missing bedding sand, you need to lift and reset. Filling gaps without addressing bedding or base causes the same movement to return quickly.
How should I remove snow and ice without damaging joints?
Clear leaves and debris before the season, then use plastic shovels or push brooms when possible. Keep tools off the joint lines as much as you can, and avoid digging. For ice melt, follow the earlier salt guidance and rinse after winter when temperatures allow, so residual salts do not keep working on the surface.
Can I use sand, salt, or gravel as a substitute for joint sand?
Avoid substituting materials in paver joints. Regular sand, sand size mismatch, and gravel can wash out or interlock differently, which increases movement and weed growth. If joints are meant to be filled with polymeric sand, use the compatible joint sand system intended for that purpose.
Next Articles
How to Keep Patio Pavers From Moving: Fix and Prevent
Fix shifting patio pavers: diagnose base, bedding, drainage, edge restraints, and reset with proper compaction and joint
How to Maintain a Paver Patio: DIY Care, Repairs, Sealing
DIY steps to inspect, clean, remove weeds, fix uneven pavers, re-sand joints, treat moss, stain and reseal.
How to Apply Polymeric Sand to Patio Pavers: Step by Step
Step-by-step DIY guide to apply polymeric sand between patio pavers, prep joints, spread, fill, and activate without haz