Maintaining a paver patio comes down to four recurring tasks: keeping the joints filled, controlling weeds and organic growth, cleaning the surface safely, and re-leveling any pavers that shift or settle. Do those consistently and most brick paver patios stay solid and good-looking for 20-plus years without professional help. The rest of this guide walks you through exactly how to do each one, in the right order, with the right materials.
How to Maintain a Paver Patio: DIY Care, Repairs, Sealing

Felix Rowe
27 May 2026
Quick diagnosis: what's actually wrong with your patio
Before you grab a pressure washer or a bag of sand, spend 10 minutes walking the patio and taking stock. Most paver problems trace back to one of three root causes: a failing base underneath, joint material that has washed or worn away, or surface-level issues like stains and organic growth. Knowing which category you're dealing with tells you where to spend your effort.
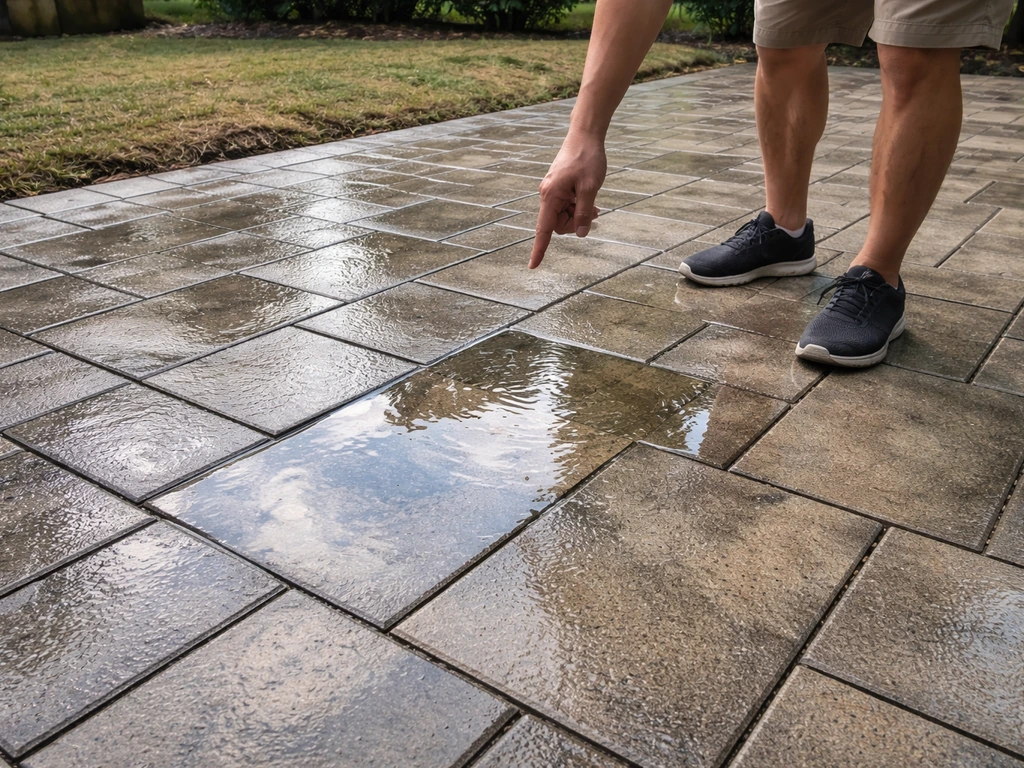
Stand on each section after a rain and look for standing water. Pooling water that doesn't drain within a few minutes is a red flag that the base has shifted or that your drainage slope has been compromised. A properly laid patio should drain at roughly 1/8 to 1/4 inch per foot away from the house. If water is sitting, the problem is below the surface, and sweeping sand into joints won't fix it.
Now look at the joints. Are they noticeably lower than they used to be, or can you see gaps between pavers? Sand washout is extremely common, especially after a few seasons of rain or power washing. When joints empty out, pavers start rocking and shifting because they're no longer held tight against each other. This is usually an easy fix if you catch it early.
- Pooling or standing water after rain: drainage or base slope issue
- Rocking, wobbling, or sunken pavers: base settlement or erosion underneath
- Wide or visibly empty joints: joint sand washout
- Pavers that have lifted unevenly: freeze-thaw heaving (common in cold climates)
- White hazy film on the surface: efflorescence (salt migration from within the paver)
- Green or black slippery patches: moss or algae growth
- Weeds growing up through joints: organic material has accumulated in gaps
- Rust, oil, or dark stains: surface staining requiring targeted cleaners
If you see just one or two of these signs, you can tackle them individually with the steps below. If you're seeing pooling water AND multiple sunken areas AND widely gapped joints all at once, the base likely wasn't compacted properly to begin with, and you may be looking at a more significant re-do of at least a section of the patio. IGL Pavers also notes that skipping excavation or not removing enough soil, along with failing to compact the base properly, can result in pavers sinking and becoming uneven over time base likely wasn't compacted properly. That's worth knowing before you invest in sealer.
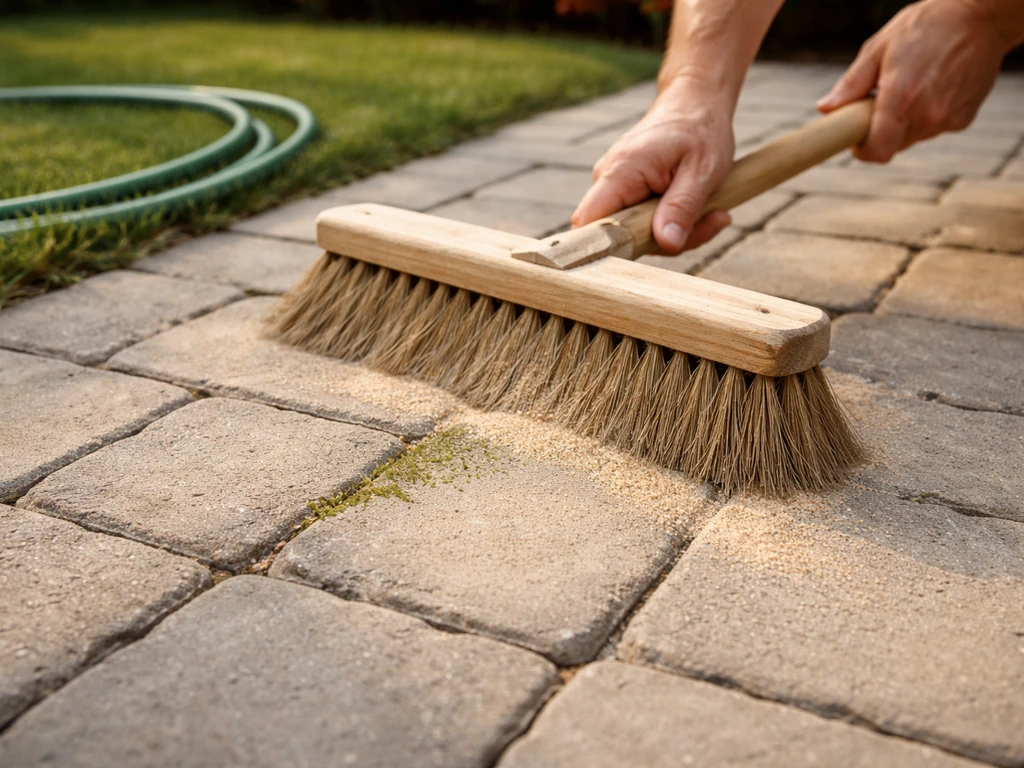
Routine cleaning and how to power wash without wrecking your joints
Regular cleaning is the simplest maintenance task, and it's also the one most people overdo. For general upkeep, a stiff-bristle broom and a garden hose handle most of what accumulates on a paver patio through the season. Sweep off debris weekly if possible, and rinse the surface a couple of times per year. That's enough for a patio that's in good shape.
When you do need to deep clean, a pressure washer works well if you use it correctly. Stay at 1,000 to 1,500 PSI with a 25 to 40 degree fan tip, and keep the nozzle 6 to 12 inches from the surface. The single most common mistake is going too close or using too narrow a nozzle, which drives water straight into the joints and blasts out the sand. Once that sand is gone, your pavers have nothing holding them in place.
When you rinse, keep the water stream moving parallel to the joints rather than directly into them. After you finish washing and the patio dries, check the joints. If they look lower or emptier than before you started, you lost sand and need to refill them before the next rain. This is normal if it's been a few years, but it means you should plan to re-sand after every deep clean.
For brick pavers specifically, the surface is a bit more porous than most concrete pavers, so use the lower end of that PSI range (closer to 1,000) and check a small inconspicuous area first. The cleaning guidance is the same whether you have classic brick or concrete pavers; the joint sand protection is what matters most.
Dealing with weeds, moss, algae, and stains
Weeds in the joints
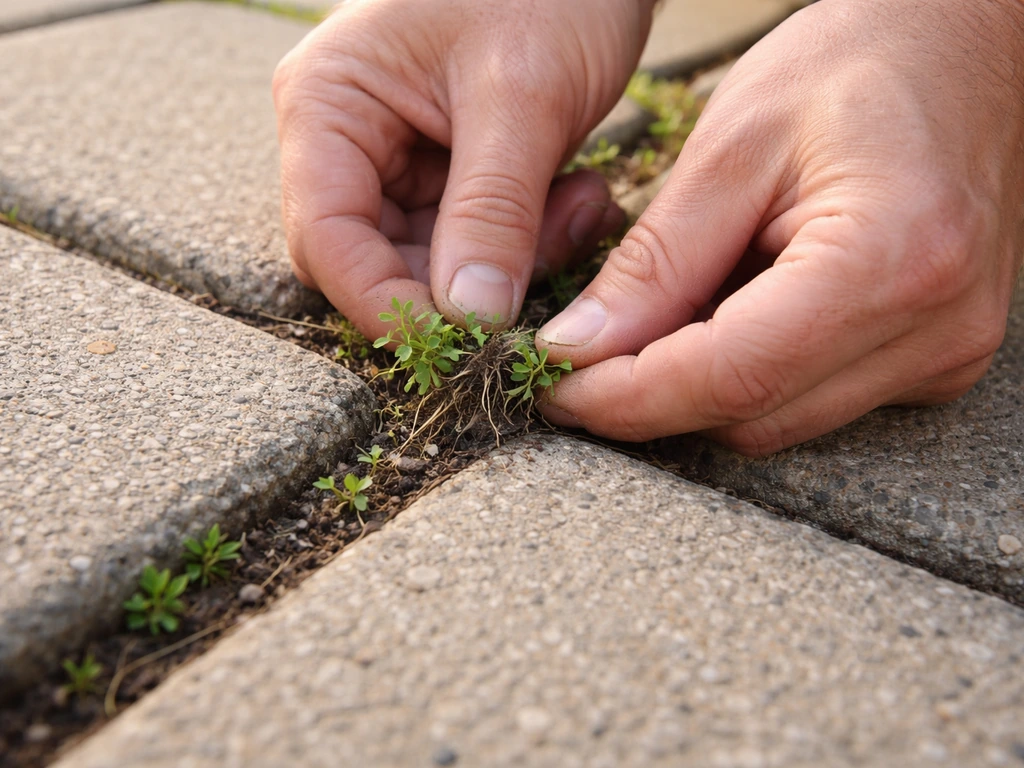
Weeds in paver joints aren't growing from below the base (if your gravel base is right, seeds can't germinate down there). They're growing in organic debris that has settled into the joints from above. The fix is two-part: remove what's there and then fill the joints with polymeric sand, which is much harder for weeds to root in than regular sand. If your patio is struggling with weeds and joint washout, blocking the joints so water and debris can’t undermine the pavers is key how to block pave a patio. Pull weeds by hand or use a stiff joint scraper, treat the joints with a diluted white vinegar solution or a paver-safe herbicide, let them dry completely, and then refill.
Moss and algae
Moss and algae thrive in shaded, damp areas and make surfaces dangerously slippery. A diluted bleach solution (about 1 part bleach to 10 parts water) applied with a stiff brush works well on most paver and brick surfaces. Let it sit for 10 to 15 minutes, scrub, and rinse. There are also dedicated paver cleaners that are less harsh if you're near planted areas. After treatment, improving drainage or trimming overhead shade will slow regrowth more than any cleaner will.
Efflorescence (white haze)
Efflorescence is a white, chalky deposit that appears when water moves through the paver, dissolves salts inside, and then evaporates at the surface, leaving the salts behind. It's extremely common on new patios in the first season or two. The good news: it usually fades on its own with weathering. If you want to speed it up, use an efflorescence-specific cleaner (most hardware stores carry them), scrub with a stiff brush, and rinse thoroughly. Do not seal over efflorescence. Sealing locks the salts under the film and the haze becomes permanent. More on this in the sealing section.
Oil, rust, and organic stains
Oil stains respond best to a degreaser applied while the stain is still fresh. For older set-in oil, apply an absorbent like kitty litter or baking soda, let it sit overnight, sweep it up, then follow with a degreaser and scrub. Rust stains typically require an oxalic acid-based cleaner. Leaf tannin stains (the dark marks leaves leave over winter) usually come off with a general paver cleaner or even a baking soda paste. Avoid muriatic acid on colored or brick pavers unless you're confident about dilution; it can bleach the surface unevenly.
Refilling joint sand and keeping pavers locked in place
This is the most important maintenance task most homeowners skip. Joint sand is what keeps individual pavers from shifting against each other. When it washes away, the whole patio slowly becomes unstable. Plan to inspect and refill joints every one to two years, or immediately after any major cleaning.
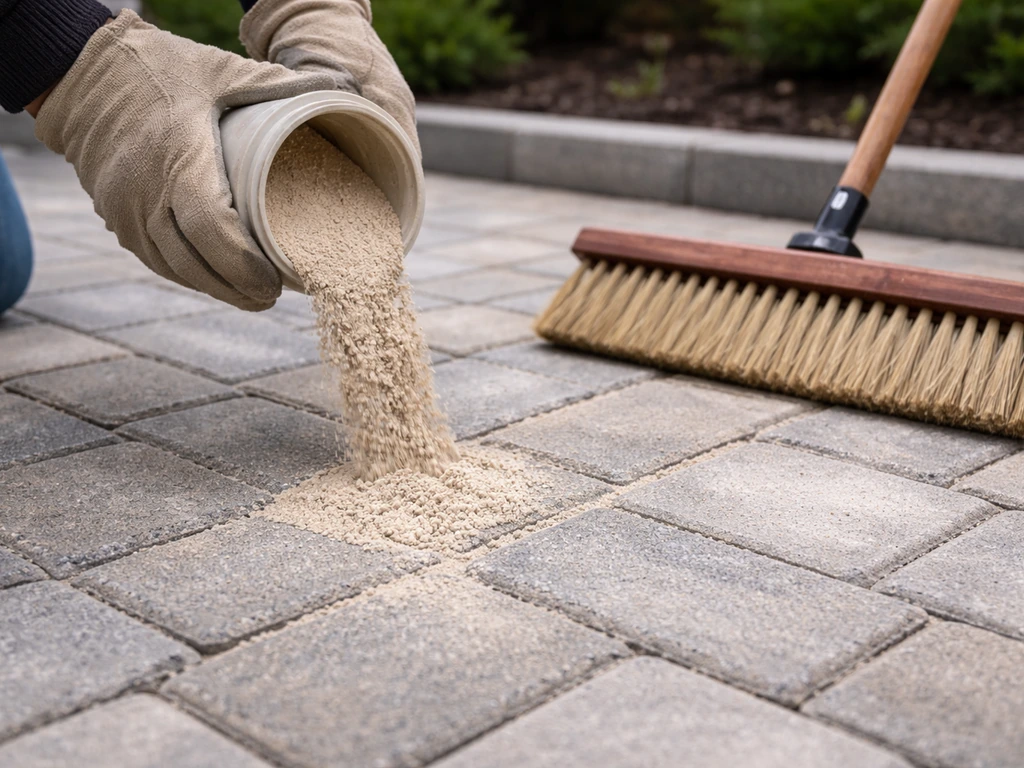
Polymeric sand is the best choice for refilling joints because it hardens slightly when activated with water and resists washout and weed growth far better than plain sand. Use it for any joint that's noticeably lower than the paver surface. Regular kiln-dried sand is fine for very minor topping off, but if the joints are truly depleted, invest in polymeric sand.
One important note from Techniseal's guidance: joints should never be filled completely flush with the top of the paver. Leave a small gap at the top (roughly 1/8 inch below the surface) to support proper water percolation through the joints. Overfilling can actually cause drainage problems.
How to apply polymeric sand correctly
- Make sure the patio is completely dry before you start. Never apply polymeric sand over damp pavers.
- Pour sand across the patio and sweep it into the joints with a stiff-bristle broom, working it in from multiple directions.
- Once joints look filled, use a leaf blower or a shop vac to remove all excess sand residue from the paver surface. This step is critical. Any polymeric sand left sitting on the paver face will activate when wet and leave a hazy film that's very hard to remove.
- Run the leaf blower at low speed across the surface to clear residue without blowing sand back out of the joints.
- Activate the sand with a gentle mist from a garden hose. Do not flood it. Apply a light mist, wait about 5 minutes for absorption, then mist again. Repeat 3 to 4 times.
- Keep rain off the patio for at least 24 hours after activation. A heavy rain immediately after applying polymeric sand can wash it out of the joints before it cures.
- Allow a full 30 days before sealing over newly applied polymeric sand.
Keeping joints well-filled is closely related to keeping pavers from shifting and moving. Tight joints mean individual pavers stay locked against each other. If you want a deeper look at joint stability strategies, the topic of how to keep patio pavers from moving and how to lock in patio pavers both go deeper on the mechanical side of this.
Fixing shifting, settled, and uneven pavers yourself
A few sunken or rocking pavers are a normal maintenance task, not a disaster. If only a handful of pavers have shifted, you can almost certainly fix them yourself in an afternoon. The key is to address the cause, not just the symptom. Re-laying a paver without fixing what's underneath it will just put you back in the same spot in a year.
For an isolated sunken or rocking paver, the usual cause is that the sand bed directly beneath it has compressed or washed away in a low spot. The fix is straightforward: pull the paver, add a bit of coarse bedding sand to bring it back to the correct height, re-level it, and re-set it. Check that the surface slopes at 1/8 to 1/4 inch per foot away from your house before you set it back down.
Step-by-step for re-setting a sunken paver
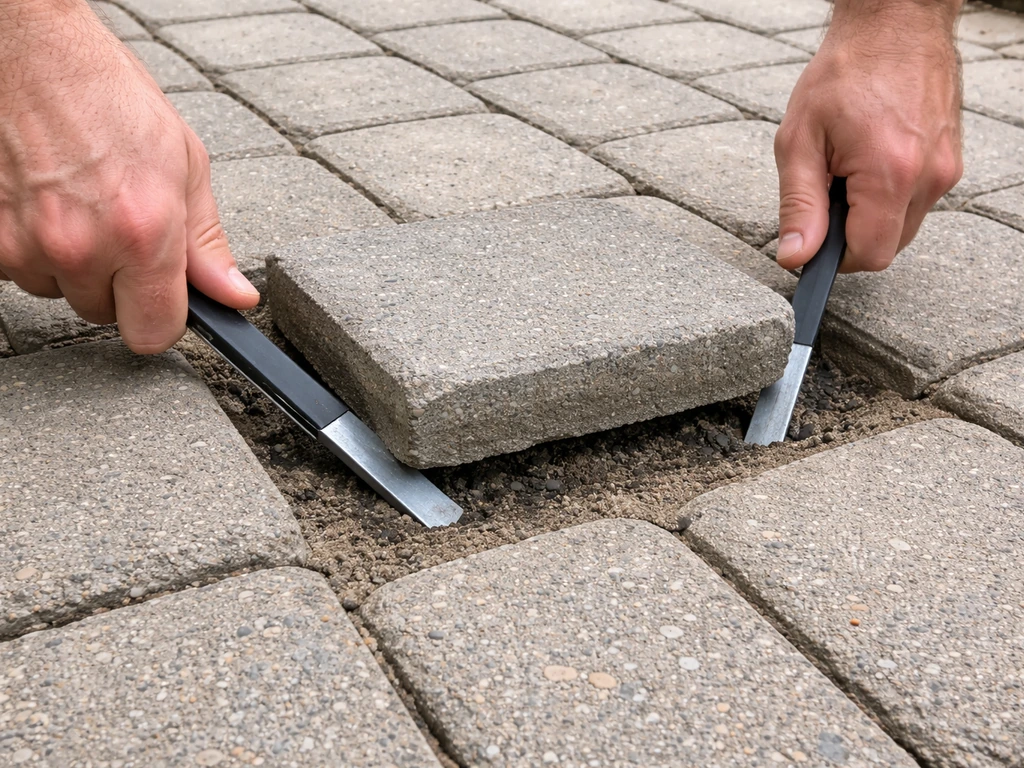
- Remove joint sand from around the paver using a stiff brush or scraper.
- Lift the paver using two flat pry bars or a paver puller. Work carefully to avoid chipping neighboring pavers.
- Inspect the sand bed below. If it's clearly low or eroded, add coarse bedding sand and level it with a screed or a straight piece of lumber.
- Check the height against surrounding pavers using a straightedge or level. The target is flush with neighbors and sloped correctly away from the house.
- Re-set the paver, press it down firmly, and check it again with a level.
- Refill the surrounding joints with polymeric sand and activate with water per the steps above.
If multiple pavers across a large area are shifting or sinking, or if you're seeing pooling water that wasn't there before, the issue is likely deeper than the sand bed. Base settlement from inadequate compaction or freeze-thaw heaving (in cold climates) requires pulling up a larger section, re-compacting the gravel base, correcting the slope, and re-laying. That's still a DIY job for someone comfortable with the work, but it's a bigger project than a quick patch. If you're looking at base repair across more than 20 to 30 square feet, or if you're not confident about re-establishing drainage slope, getting a professional assessment is worth the cost.
Sealing your patio: when to do it, what to use, and how
Sealing is optional but it does real work: it repels oil and stains, slows efflorescence, reduces weed germination in joints, and gives the surface color protection. The question most homeowners get wrong is timing. Sealing too early, especially over a new patio, traps efflorescence salts under the film and creates a permanent haze. Wait 60 to 90 days after a new installation before sealing. If you're still seeing white efflorescence after 90 days, keep waiting until it's gone completely, which can sometimes take up to a year on new concrete pavers.
Choosing the right sealer
There are two main sealer types and they perform very differently. Penetrating (or impregnating) sealers soak into the paver material and don't form a surface film. They protect from within, allow moisture vapor to escape, and don't become slippery when wet. Film-forming sealers (the wet-look, high-gloss type) sit on top of the surface and can create a dangerously slippery film when wet, especially on patios. For a patio or any outdoor walking surface, a penetrating water-based sealer is the safer and more durable choice.
| Sealer Type | Appearance | Slip Risk When Wet | Reapplication Frequency | Best For |
|---|---|---|---|---|
| Penetrating / impregnating | Natural look, no sheen | Low | Every 3-5 years | Patios, walkways, pool areas |
| Film-forming (wet look) | High gloss, enhanced color | Higher | Every 2-3 years | Driveways (not ideal for patios) |
How to apply sealer
- Clean the patio thoroughly and let it dry for at least 24 to 48 hours. Any moisture trapped under the sealer can cause cloudiness.
- Check for and resolve any remaining efflorescence before proceeding.
- Make sure joint sand is topped up and fully cured (wait 30 days after applying fresh polymeric sand).
- Apply sealer with a low-pressure pump sprayer or a roller on a dry day. Avoid applying in direct hot sun or when rain is expected within 24 hours.
- Work in small sections and back-fill toward an exit so you don't seal yourself into a corner.
- Apply a thin, even coat. Two thin coats are better than one thick one. A thick coat can peel.
- Allow full curing time before foot traffic, typically 24 hours for the first coat and another 24 before resuming normal use.
For an existing patio that's already been sealed, re-seal when you notice water stops beading on the surface, which usually happens every 3 to 5 years depending on climate and traffic. If you have a film-forming sealer already on the patio, you'll need to strip or let it fully wear before switching to a penetrating type.
Seasonal maintenance checklist and long-term prevention
The easiest way to think about paver maintenance is as a seasonal rhythm. Spending a bit of time each season means you catch small issues before they become expensive ones.
Spring (your most important inspection)
- Walk the entire patio and press on each paver to check for rocking or sinking
- Look for frost-heaved pavers that lifted over winter and need re-setting
- Inspect joints for sand loss, especially along the edges and any areas where water flows off the patio
- Check the perimeter edging to confirm it hasn't shifted (loose edge restraints allow pavers to spread outward)
- Note any new drainage issues like low spots that didn't pool before
- Treat moss, algae, and winter stains before they get worse in warm weather
Summer
- Pull weeds from joints as soon as you see them, before they root deeply
- Deep clean the patio once or twice during the season using safe pressure-washing technique
- Refill joint sand after any deep cleaning session
- This is the best time of year to apply or re-apply sealer (dry weather, warm temperatures)
Fall
- Clear leaves promptly. Decomposing leaves leave tannin stains and add organic material to joints that seeds weed into
- Top up joint sand before winter if joints look low
- If you're in a freeze-thaw climate, check that drainage slope is clear and functioning before the ground freezes
Winter
- Use a plastic shovel or a rubber-edged snow blower to clear snow. Metal blades can chip paver edges
- If you need de-icer, rock salt used lightly is acceptable. Calcium chloride is better when temperatures drop extremely low, but both should be rinsed off in spring
- Avoid sand or kitty litter as de-icers near joints as they add material that can clog drainage
Preventing the most common problems long-term
Most chronic paver problems come from two things: joint sand that was never maintained and drainage that was never corrected. If you keep joints filled with polymeric sand, keep the surface sloped away from the house, and control organic growth before it gets established, your patio should stay in great shape with minimal effort year after year. The pavers themselves are nearly indestructible; it's the system around them that needs attention.
If you're dealing with a patio that has recurring problems despite regular maintenance, and especially if you're seeing widespread settlement or persistent pooling water, the issue is almost always in the base. That's worth a professional look rather than repeated surface fixes that don't hold. But for the vast majority of homeowners doing regular upkeep, the seasonal checklist above is all you need to keep a paver or brick patio looking exactly the way it did when it was first laid.
FAQ
Can I use household cleaners or is it better to buy paver-specific products?
Yes, but only if you use it for stains and you manage the runoff. Spot-treat with a paver-safe product, keep the rest of the patio dry, and rinse promptly so chemicals do not wash into joints. Avoid saturating the entire surface, since repeatedly wetting polymeric sand and joints can accelerate washout.
What should I do if I still see white haze (efflorescence) after my planned sealing date?
Do not apply sealer if the patio still has active efflorescence (white, powdery deposits). You can clean it and speed fading with an efflorescence cleaner, but sealing while salts are still migrating traps them under the film and makes the haze permanent. A good rule is to wait until the surface stays clear after dry weather.
Should I re-fill joints before sealing, or can I seal as-is?
If polymeric sand has been damaged, do a full joint inspection before sealing. Refill joints first, then allow the patio to dry fully, since sealing over partially emptied joints can lock in gaps and make future refilling harder. Also note that film-forming sealers can increase slipperiness, so choose an impregnating water-based sealer for walkways.
My patio has puddles, can I fix it just by adding more joint sand?
If the patio is draining poorly, focus on slope and the sub-base first, not on more sand. A “quick fix” of adding sand to joints will not correct pooling water caused by a low area or compromised drainage. For a shallow low spot, lifting a section and re-establishing the 1/8 to 1/4 inch per foot slope is typically the right DIY approach.
How do I know whether I need to re-sand after power washing?
After a heavy power wash, you typically need to re-sand joints if they look lower or emptier than before. Plan to check joints once the patio fully dries, then refill. A practical approach is to do a small test area first, rinse carefully, and see how much sand is lost before cleaning the whole patio.
Why does efflorescence keep coming back even after I cleaned it?
Treat efflorescence as a moisture movement issue. Improve drainage away from the house, avoid sealing too early, and do not use acid-based cleaners unless the product is specifically formulated for that purpose, since salts and residues can be driven deeper into pores. If efflorescence keeps returning over many seasons, consider having the installation drainage and base inspected.
What’s the best way to stop weeds from growing in paver joints?
Handle weeds that appear in joints by cleaning out the organic debris first, then refilling with polymeric sand. If you only spray or pull weeds without removing the settled gunk, they often return. For herbicides, avoid re-watering or sealing until joints are fully dry, and follow the label for contact time and safety.
Can I fix a rocking paver by just adding more sand under and around it?
Yes, but avoid the kind that can weaken the base or dislodge bedding. Do not use sharp sand or materials that wash out easily, and do not overfill joints to the very top. If a single paver keeps rocking, it usually means the bedding sand beneath it is compressed or washed out, and you should lift and re-set rather than just adding more top sand.
When should I choose polymeric sand versus regular kiln-dried sand?
Polymeric sand should be used when joints are noticeably depleted, and kiln-dried sand can be used only for very minor topping off. If joints are truly empty from washout, polymeric sand is the better choice because it hardens when activated with water and resists further washout and weed rooting. When in doubt, refill at the joints level you need and avoid flush overfilling.
I’m not sure what type of sealer my patio already has. Can I switch to a penetrating sealer?
If a film-forming sealer is already present, you cannot simply apply a penetrating sealer on top and expect compatibility. You either need to remove the existing film fully or let it wear away completely, then switch to a penetrating water-based sealer. Test in an inconspicuous spot to confirm the old sealer is not preventing water from penetrating.
How often should I reseal, and what signs tell me it’s time?
Expect sealer to last roughly 3 to 5 years in typical conditions, but you should watch for loss of beading (water stops forming droplets). If you notice that water no longer beads, stains start to soak in faster, or joint weeds increase, it may be time to re-apply. Re-sealing too early usually does not fix underlying drainage or joint problems.
What common maintenance mistake is caused by sealing at the wrong time?
Yes, sealing can make some problems worse if they are still active. The most important example is sealing over efflorescence, which can permanently trap salts and create a haze. Also avoid sealing when joints are depleted or when water is pooling, since sealing will not correct slope or a failing base.
Next Articles
How to Use Quikrete Patio Paver Jointing Sand: Guide & Tips
How to use Quikrete Patio Paver Jointing Sand: step-by-step application, tools, timing, coverage, and care.

How to Use Patio Paver Sand: Step by Step DIY Guide
Step-by-step guide to apply patio paver sand correctly: prep base, set pavers, fill joints, compact, and troubleshoot is

How to Install Patio Pavers in Sand: Step-by-Step
DIY step-by-step how to install patio pavers in sand, from excavation and base prep to leveling, cutting, joint sand and