Pavers move because something underneath them is failing, not because of the pavers themselves. Fix the base, get the compaction right, install proper edge restraints, and use the correct jointing sand, and your patio will stay locked in place for decades. If you skip any one of those four things, you'll be resetting pavers every couple of years. Here's exactly how to find the problem and fix it for good.
How to Keep Patio Pavers From Moving: Fix and Prevent

Felix Rowe
6 Jun 2026
Quick diagnosis: what's actually making your pavers move
Before you pull a single paver, spend ten minutes walking the patio and pressing on every section with your foot. Pay attention to where the movement is worst, whether it rocks, sinks, or slides sideways. The pattern tells you a lot about the root cause.
| What you see | Most likely cause | Fix priority |
|---|---|---|
| Pavers sink or rock when you step on them | Insufficient base depth or poor compaction | High — requires base work |
| Pavers creep sideways over time | Missing or failed edge restraints | High — perimeter fix needed |
| Pavers heave upward, especially in winter | Frost movement + poor drainage, inadequate base depth | High — drainage and base |
| Pavers at the edge drift outward | No edge restraint, or restraint not spiked correctly | Medium — restraint replacement |
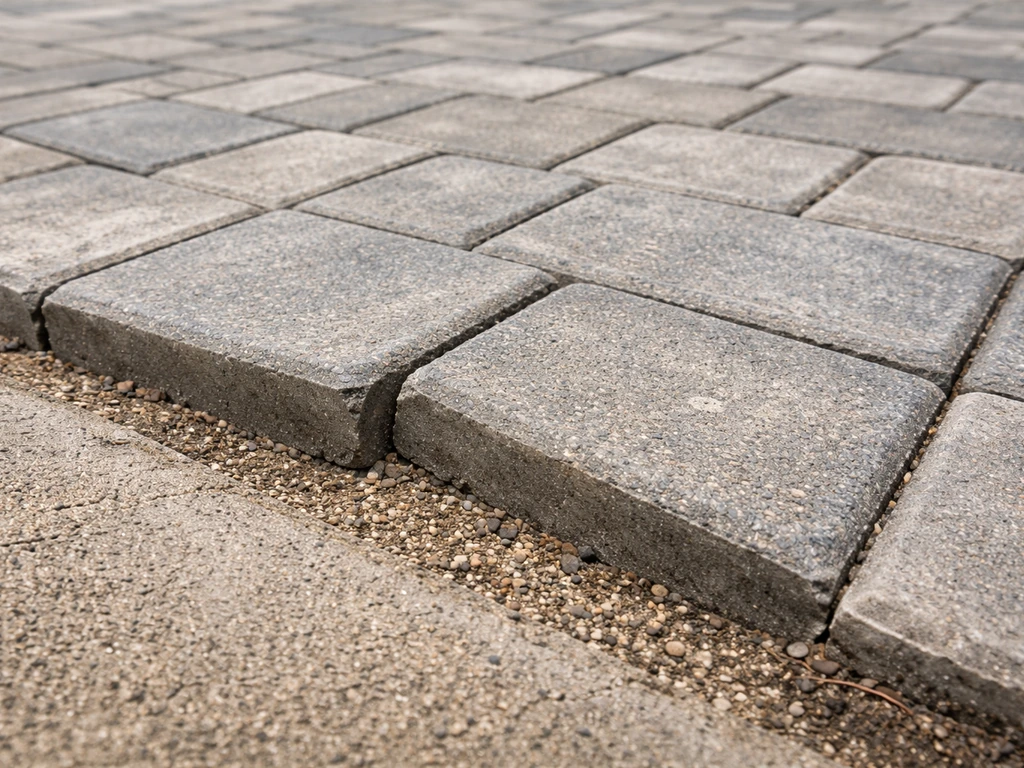
| Joints are empty or eroded | Wrong jointing sand, no polymeric sand, or water washout | Medium — sand replacement |
| Pavers shift only in one area (not the whole patio) | Localized drainage problem or tree root intrusion | Varies — spot repair often works |
| Whole patio is gradually tilting | Base not sloped correctly, water pooling under base | High — full or partial rebuild |
The single most common culprit is an inadequate base, either too thin, not compacted properly, or both. A close second is missing edge restraints. If your patio was installed without either of those done correctly, no amount of joint sand is going to keep things in place.
Fix the base and compaction first
This is the part most DIYers skip when they're trying to do a quick fix, and it's the reason pavers keep moving after a repair. If the base is wrong, everything on top of it will eventually fail. There's no shortcut here.
How deep does your base need to be?
For a standard residential patio with foot traffic, plan on 4 to 6 inches of compacted crushed stone base, plus 1 inch of bedding sand on top. If your soil is clay-heavy or holds water, lean toward the 6-inch side. Areas near a fire pit or under a heavy structure need a full 8 inches of compacted base because the load is higher and any flex will crack grout lines and shift pavers faster. Those numbers are for the compacted depth, not how much you pour in loose.
Compaction: the step that actually matters
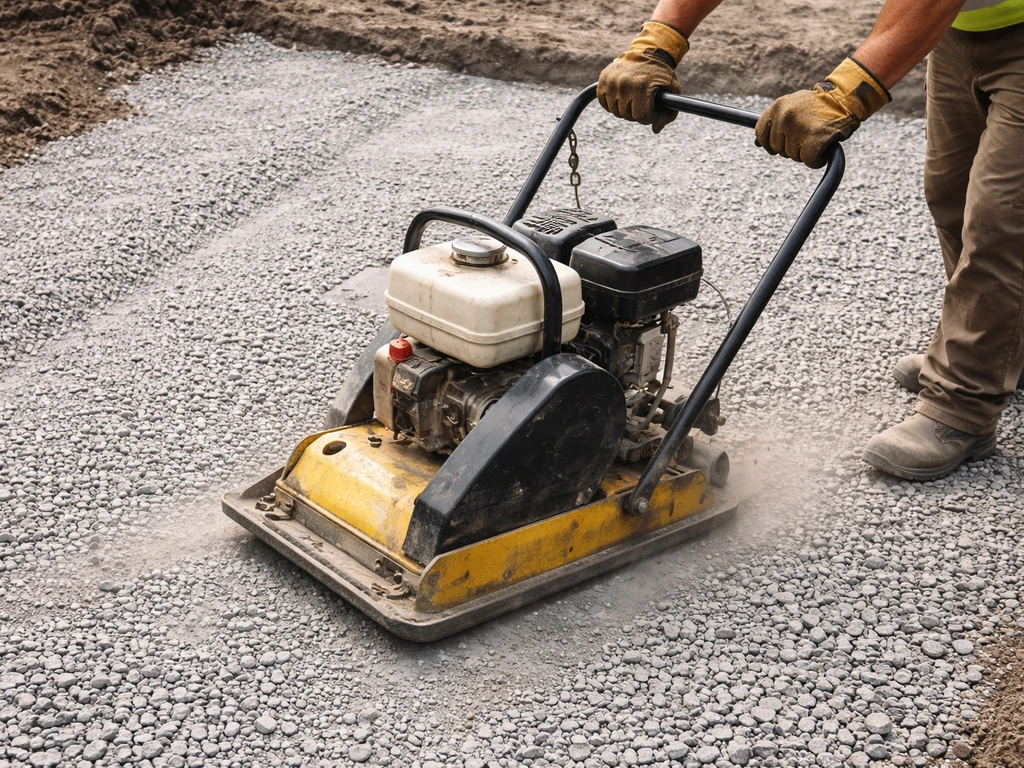
A plate compactor is not optional for this job. If you're renting one, budget a half day and compact the base in two passes: once after you've added your base material, and again after you've graded it to your final slope. A reliable field test for compaction comes from Barkman: drive a 10-inch spike into the compacted base using a 2-pound hammer. If it takes at least 3 hard strikes to drive it in, your compaction is adequate. If the spike slides in easily with one or two taps, the base needs more compaction or more material.
Getting the slope right
Your base needs to mirror the finished slope of your patio surface. Aim for at least 1/4 inch of drop per foot, directed away from your house or any structure. That works out to about 1 inch of slope for every 4 feet of patio. This isn't just for looks: it's what keeps water from sitting under your pavers and slowly undermining the base. If your area has heavy clay or poor natural drainage, consider laying a perforated drainage pipe under the base layer before you compact. It adds a few hours of work but can save you a full rebuild later.
Also make sure your base material extends at least 6 inches beyond your planned paver edge. This gives the edge restraints a solid place to anchor and prevents the perimeter from collapsing inward over time.
Bedding sand and jointing sand: picking the right material
These two types of sand do different jobs, and mixing them up is one of the most common installation mistakes. Getting them right is what locks pavers in place between the base below and the joints around them.
Bedding sand (the layer under the pavers)
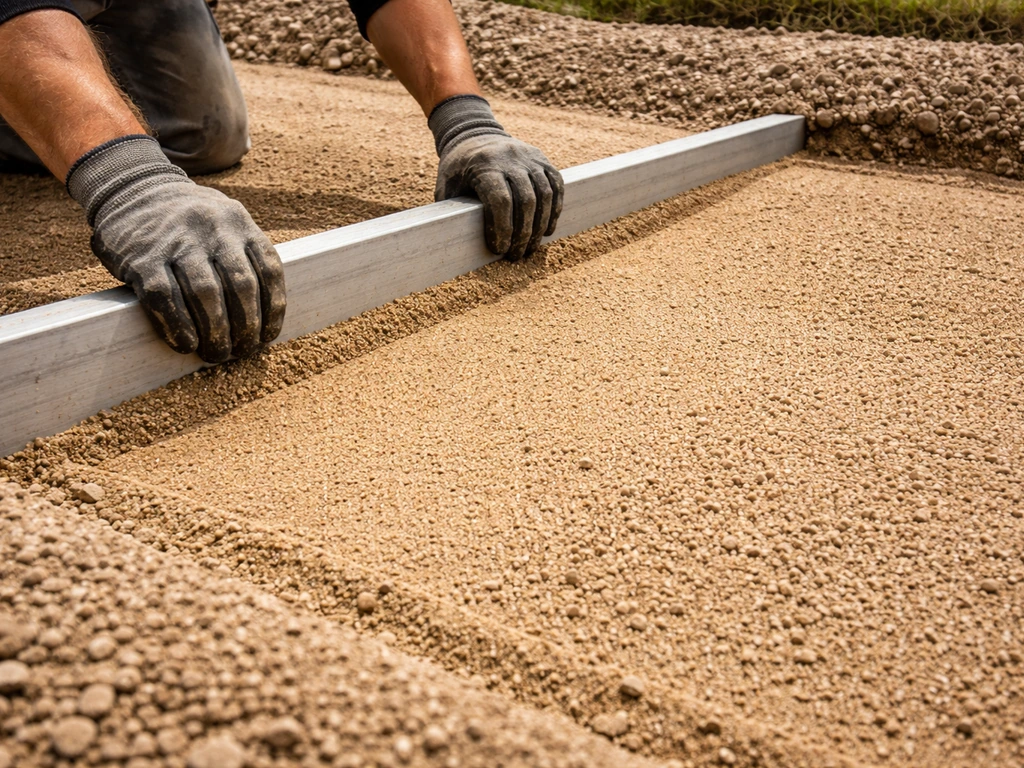
Use coarse concrete sand, sometimes called sharp sand, for the 1-inch bedding layer. Lay it uncompacted, screed it flat to your slope, and don't walk on it before setting pavers. The pavers get pressed into it and slightly embed, which helps them seat firmly. Do not use fine play sand or stone dust for this layer: fine sand compacts and shifts too easily, and stone dust can hold moisture and cause freeze-thaw heaving.
Jointing sand: regular vs. polymeric
Regular dry jointing sand is fine for protected, low-traffic areas with good drainage and stable edging. Sweep it in, compact it, top it off, and you're done. The downside is that it washes out over time and needs to be refreshed every year or two. Polymeric sand is a much better long-term solution for most patios.
It contains a binder that hardens when activated with water, locking the joints and resisting both erosion and weed growth. For a patio that moves around or has chronic joint washout, polymeric sand is almost always the right call. Polymeric sand is also a key step when you're learning how to block pave a patio effectively, especially where joints tend to fail block joint washout.
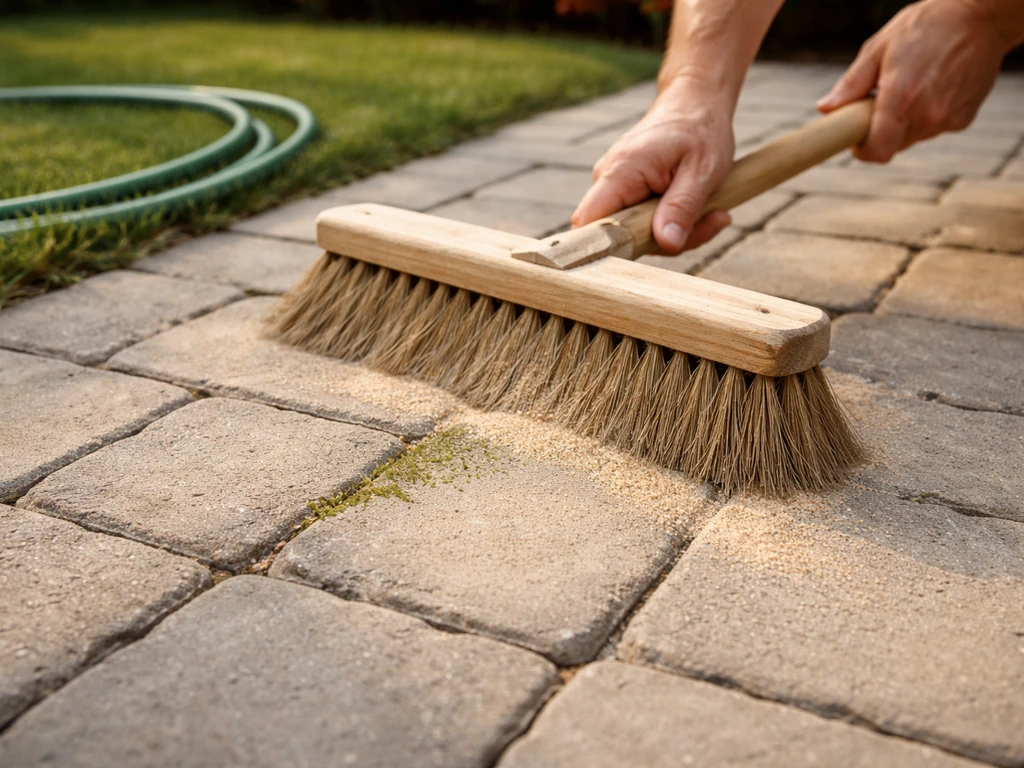
How to apply polymeric sand correctly
This is one area where rushing causes real problems. The joints need to be completely dry before you start, and the sand needs to be packed fully into every joint before you add any water. Sweep the sand across the surface, then run a plate compactor over the pavers (with a rubber pad to protect the surface) to vibrate the sand down into the joints.
Sweep again, compact again, and repeat until joints are filled to within about 1/8 inch of the paver surface. Do not overfill: sand on top of the pavers can cause a hazy residue after activation. Then, starting from the lowest point of the slope, set your hose nozzle to a shower setting and wet approximately 200 square feet for about 30 seconds. Let it absorb, then do a second pass.
Avoid puddling or standing water in the joints during activation. Stay off the patio for at least 24 hours.
When to use mortar instead
For pavers over concrete, near a fire pit with extreme heat, or in any installation that simply cannot flex (like a raised patio edge), mortared joints or a full mortar bed may be the right call. Mortar is less forgiving during installation and can crack if the base isn't perfectly rigid, but it eliminates joint erosion entirely. Most standard sand-set patios don't need it.
Install or replace edge restraints and lock the perimeter
Edge restraints are what keeps your patio from slowly spreading outward at the edges. Without them, even a perfectly installed patio will eventually creep apart, especially on the sides that don't have a wall or curb holding things in. If your pavers are moving, check the perimeter first. Bent, lifted, or missing edge restraints are often the entire problem.
Choosing the right edge restraint
Plastic snap-together edging is the most common choice for residential patios and works well in most situations. It's flexible enough to handle curves and durable enough to last for years. Metal edging (aluminum or steel) is better for straight runs and high-load areas. Avoid wood edging for permanent installations: it rots, it moves with moisture, and it loses its grip on the spikes over time.
Installing and spiking edge restraints correctly
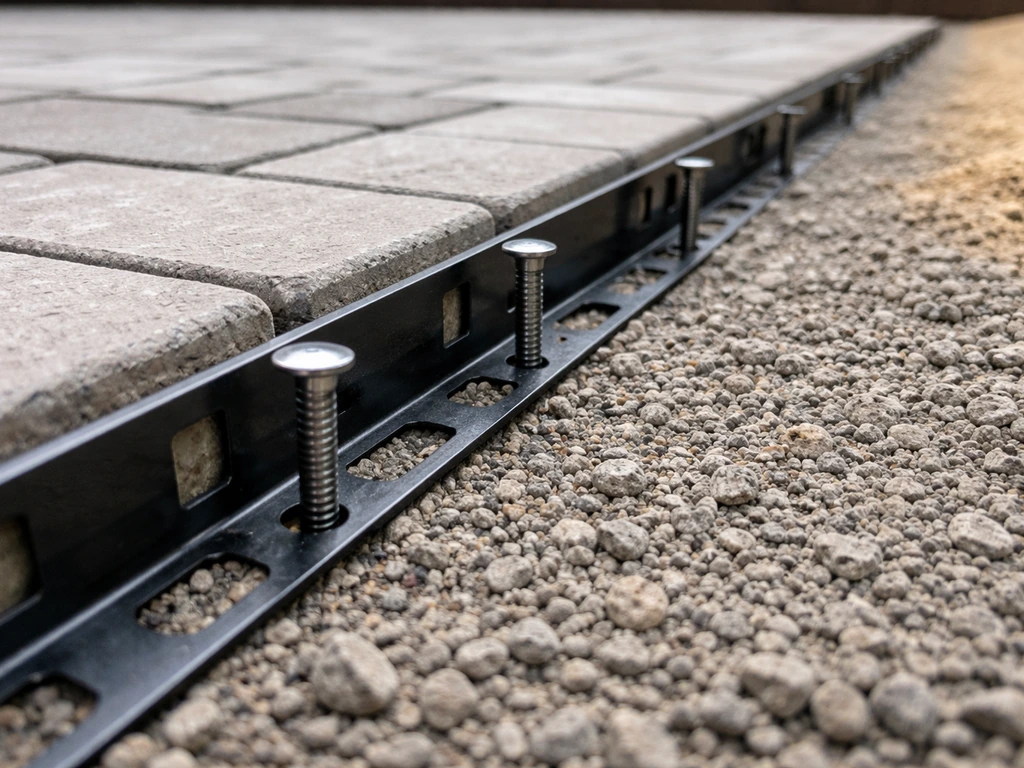
Edge restraints go in after base compaction and before you lay bedding sand. Position the restraint tight against where the outer edge of your pavers will sit, flush with the top of the bedding sand layer. Drive 10-inch spikes through the restraint holes and into the compacted base at a slight inward angle. For a pedestrian patio, spike every third hole at minimum. For areas with heavier use or load, spike every hole. The spikes need to go all the way into compacted base material, not just into soft soil or sand. If a spike goes in easily with no resistance, your base isn't compacted enough at that spot.
After your pavers are laid and jointed, inspect the restraint again. If any section has lifted, pop it back down and add additional spikes. This is much easier to do before you add polymeric sand than after.
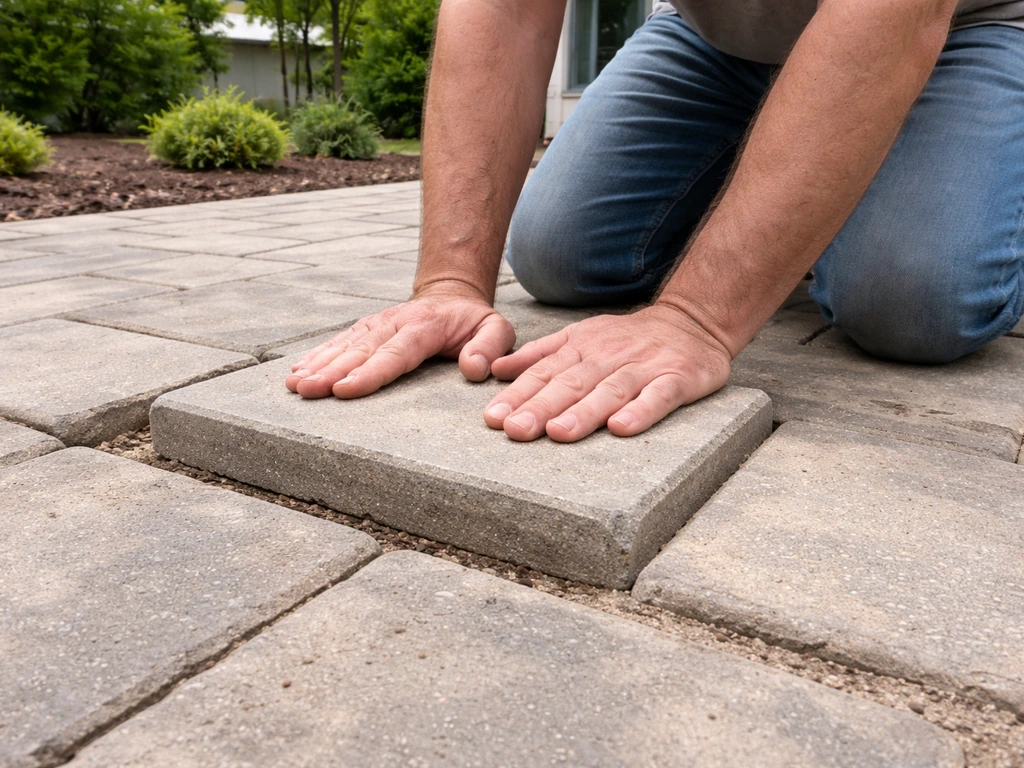
Step-by-step: re-lay moving pavers and re-level
If you've got a section that's already shifting or uneven, here's the process to reset it properly. This works for a small troubled area or a full patio redo. Plan on half a day for a typical 10x10 section, longer if you're rebuilding the base.
- Mark the affected area: Walk the whole patio and flag every paver that rocks, sinks, or is visibly out of level. Pull up pavers about 6 inches beyond the problem zone so you're not chasing the edge of the issue.
- Remove the pavers carefully: Use two flat pry bars or a pair of paver pullers. Lift pavers straight up to avoid damaging edges. Stack them in order if you want to relay them in the same pattern — pavers from the same area will have matched wear.
- Dig out and inspect the base: Scrape out the old bedding sand and examine the base below. Is it compacted? Is there soft or muddy material? If the base is less than 4 inches deep or clearly uncompacted, you need to add crushed stone and re-compact before moving on.
- Correct any drainage problems: If water was pooling under this section, now is the time to address it. Re-grade the base to your 1/4 inch per foot slope, add drainage material if needed, and compact everything thoroughly using a plate compactor.
- Re-compact and verify: Use the spike test described earlier. The base should resist the spike with 3 firm hammer strikes. If it doesn't, add more compacted material and test again.
- Re-screed your bedding sand: Lay 1 inch of fresh coarse concrete sand and screed it flat to your slope using a straight edge or screed board. Do not compact the bedding sand — it needs to stay loose so pavers can embed into it.
- Reset the pavers: Lay pavers back into position, pressing each one down firmly. Use a rubber mallet to seat them. Check level constantly with a long level or straightedge — you want each paver consistent with its neighbors, not perfectly flat to the ground (the whole surface should maintain the drainage slope).
- Check and fix edge restraints: Before jointing, inspect the perimeter restraint. Replace any damaged sections and re-spike as described above.
- Fill and compact joints: Sweep jointing sand (or polymeric sand) into all joints. Run a plate compactor over the section with a protective pad, then sweep and fill again. Repeat until joints are full.
- Activate polymeric sand if using it: Follow the wetting process described in the jointing sand section. Keep the patio clear for 24 hours minimum.
Special cases: pavers over grass, uneven ground, and slopes
Some situations need a slightly different approach. These are the scenarios that come up most often and give DIYers the most trouble.
Pavers over grass or unstable soil
Laying pavers directly over grass or topsoil is one of the fastest ways to end up with a shifting, sinking patio. Grass and organic material compress and decompose over time, and no amount of edging or jointing sand compensates for a base that's literally disappearing underneath you. The only real fix is to excavate, remove all organic material, and start with proper compacted base material.
If you're dealing with an existing patio that was laid over grass, you'll need to lift the whole thing and redo the base. Adding a layer of geotextile fabric between the native soil and your base material helps prevent subsoil from migrating up into your base layer, which is especially helpful in clay or sandy soils.
Uneven ground
Uneven ground doesn't mean you can't have a stable patio, it just means your base work has to be more careful. The goal is a consistently sloped, flat base surface, not a base that mirrors every bump in the ground. Low spots need to be filled with compacted base material, not bedding sand. Raising a low area with extra bedding sand is a common shortcut that fails quickly, because sand under compression will compact further and the paver will sink again. Fill it with crushed stone, compact it, and then screed your standard 1-inch sand layer on top.
Sloped patios and raised designs
On a sloped site, pavers want to migrate downhill over time. Edge restraints at the lower end of a sloped patio take on much more load than they would on a flat surface, so they need to be more robust. Use metal edging on the downhill side and spike every hole rather than every third hole. On steeper slopes (more than about 2 inches per foot), consider a mortared edge or a retaining curb at the bottom to resist the accumulated lateral pressure. For raised patio areas, the perimeter edge is doing structural work, so edge restraints alone aren't enough: you need a proper retaining wall or border course set in mortar to hold the elevation.
Near a fire pit or high-load areas
Pavers around a fire pit expand and contract with heat cycles, which gradually loosens jointing sand and works pavers out of position. Use polymeric sand in these joints rather than regular sand, and give pavers around the fire pit a slightly wider joint (3/8 inch instead of 1/4 inch) to allow for expansion. The base under a fire pit pad should be at least 8 inches of compacted crushed stone, since the weight of the pit itself plus foot traffic around it creates more load than an open patio area.
When a repair keeps failing
If you've reset pavers in the same spot two or more times and they keep moving, something structural is going on beneath the surface. The most common culprits are a chronic drainage issue that's eroding your base from below, tree roots that are pushing up from underneath, or compressible soil that needs to be excavated deeper than you went. At that point, a full excavation and rebuild of that section is usually less work in the long run than another surface fix.
Maintenance and long-term prevention checklist
Once your patio is solid, a little regular attention keeps it that way. Most patio problems are slow-moving: a joint erodes over one season, a spike loosens over two, and by year three you've got a paver that rocks. Catching things early means a 30-minute fix instead of a weekend project. Proper paver care and regular maintenance go hand in hand with keeping things from moving, and the two topics are worth exploring together. Proper paver care also means doing seasonal checks and prompt maintenance so joints and edges do not loosen over time paver care and regular maintenance.
- Every spring: Walk the entire patio pressing on each paver. Flag anything that rocks or feels soft underfoot and address it before the freeze-thaw season the following winter.
- Every spring: Inspect the perimeter edge restraint for lifted sections, bent segments, or missing spikes. Re-spike any loose areas immediately.
- Every 1 to 2 years: Check joint sand levels. If joints look depleted or have visible gaps, sweep in fresh jointing sand or apply a new layer of polymeric sand before erosion gets worse.
- After heavy rain: Check for any sections where water pooled on the surface for more than a few hours. This signals a drainage or slope issue that will undermine the base over time.
- Every 2 to 3 years: Consider applying a paver sealer over polymeric-sanded joints to slow UV degradation of the binder and reduce weed germination in any hairline gaps.
- Any time you see a paver moving: Don't wait. A single shifting paver puts lateral pressure on its neighbors and the problem spreads quickly.
- After tree trimming or landscaping near the patio: Check whether root work or soil disturbance has affected the base near the perimeter.
- Before winter in cold climates: Clear all debris from joints and make sure drainage is unobstructed so water doesn't pool and freeze under the pavers.
The bottom line is that a stable paver patio isn't complicated, but it is unforgiving of shortcuts in the base and edging. Get those two things right, choose the right jointing sand, and maintain your joints every season or two, and you'll have a patio that locks in place and stays that way for years. If you want a step-by-step plan for paver patio maintenance, keep reading to learn how to maintain a paver patio.
FAQ
What should I do first if a few patio pavers are still moving after I re-sanded them?
Stop using sand as a “patch” until you fix the base or perimeter. If pavers wobble in one spot, lift the affected section enough to check whether there is weak, uncompacted crushed stone or missing/loosened edge restraint, then rebuild the base to compacted depth before re-laying.
Can I have moving pavers even if the base looks solid, and if so how do I tell why?
Yes, joint sand can wash out even when the patio is otherwise correct, especially if the slope directs runoff across the joints or if you have areas where water concentrates. Test by running a controlled hose for a few minutes on a dry day, then check which joints lighten or empty.
Why does adding extra bedding sand under a sinking paver usually fail?
For most residential patios, avoid “filling low spots with more bedding sand.” Low areas should be corrected with compacted crushed stone, then you re-install the bedding sand layer at about the planned thickness and slope before setting pavers.
Dry jointing sand washed out, do I need to tear everything up or can I switch products?
If you see gaps and sand migrating out, dry joint sand is likely being washed out or not being properly compacted and activated. For chronic washout, switch to polymeric sand and make sure joints are filled and fully vibrated down before any water activation.
How can I tell whether the problem is the joint sand versus drainage beneath the pavers?
Joint sand type is different from edge and base fixes, but it can also mask a drainage issue. If water is pooling or flowing under the pavers, the base will continue to erode regardless of joint sand, so confirm your slope and drainage path before blaming the sand.
Why do my pavers move more after rain, and what checks should I run right away?
If pavers shift after heavy rain, it often points to fines migrating through the joint or undermining the base from water flow. Check for a consistent slope, verify no low “sponge” areas exist, and consider adding drainage solutions like a perforated pipe only after you confirm the base is correct.
Is it safe to compact pavers right after installation, and how do I avoid damaging them?
Use a rubber pad on the plate compactor when compacting pavers or vibrating joint sand, and do not compact with a metal-only plate because it can chip edges or create micro-rocking points that later turn into movement.
What are common mistakes when activating polymeric sand that can cause pavers to loosen?
When activating polymeric sand, do not soak the patio until you see standing water in the joints. Use short, even passes starting at the lowest point, keep the nozzle on a shower setting, and stay off the surface for at least a day to prevent disruption.
How should I handle paver joint width and sand choice around a fire pit compared with the rest of the patio?
Yes. Use polymeric sand with a slightly wider expansion gap around a fire pit, and do not tie that perimeter to rigid structures that prevent movement. If you have a raised edge around a fire pit, rigid mortar-only approaches can increase cracking risk if the base is not perfectly stable.
If pavers keep moving even after multiple fixes, what is the most likely underlying cause and how do I decide to excavate?
If you already tried re-setting and it moved again multiple times, plan on diagnosing below the surface. Most repeat failures are drainage erosion, compressible soil deeper than your excavation, or tree-root pressure, and those require targeted excavation and rebuild rather than another surface-only fix.
Can missing edge restraints cause pavers to move in the middle of the patio, not just the edges?
Yes, and it is a mistake to assume edging fixes everything. Edge restraints can still fail if the base around the perimeter is thin or poorly compacted, so verify spikes fully penetrate compacted base and that the restraint is continuous with no lifted sections.
What does it mean if the compaction spike test does not meet the threshold, and what is the correct fix?
If you drive a spike and it slides in too easily, that indicates inadequate compaction or insufficient base thickness in that zone. Remedy it by adding and re-compacting crushed stone there, then re-screeding the bedding sand layer, rather than trying to compensate with thicker sand under the pavers.
Next Articles
How to Maintain a Paver Patio: DIY Care, Repairs, Sealing
DIY steps to inspect, clean, remove weeds, fix uneven pavers, re-sand joints, treat moss, stain and reseal.
How to Use Quikrete Patio Paver Jointing Sand: Guide & Tips
How to use Quikrete Patio Paver Jointing Sand: step-by-step application, tools, timing, coverage, and care.

How to Use Patio Paver Sand: Step by Step DIY Guide
Step-by-step guide to apply patio paver sand correctly: prep base, set pavers, fill joints, compact, and troubleshoot is