You can install patio pavers using materials and tools from Home Depot in a single weekend if you have a plan. The basic sequence is: mark and measure the area, dig out 7 to 8 inches of soil, compact a 4-inch gravel base, spread 1 inch of bedding sand, set your pavers, lock in the edges, sweep polymeric sand into the joints, compact again, and seal if you want. If you are shopping at Lowe's, follow the same base and leveling sequence, then use Lowe's paver and edging products to finish the job single weekend. That's it. The rest of this guide walks you through each step with the right products, the right tool order, and the mistakes to avoid before they cost you time and money.
How to Install Patio Pavers with Home Depot Materials

Felix Rowe
4 Jul 2026
Start with the right Home Depot materials and tools
Before you dig a single shovelful, get your materials list together. Home Depot carries everything you need under one roof, which makes this project genuinely doable without hunting around. If you want a step-by-step shopping list, Home Depot is a common place to start for paver patio materials and tools. Here's what you'll be buying or renting.
Pavers
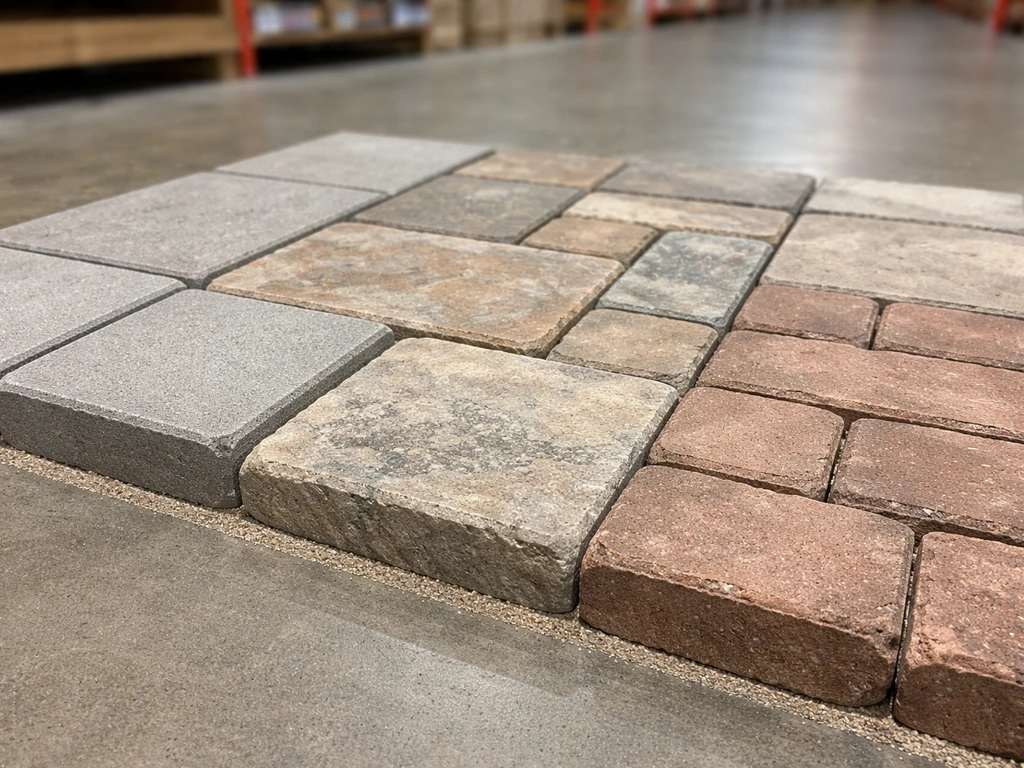
Home Depot stocks concrete pavers, natural stone pavers, and brick-style pavers in a range of sizes (4x8, 6x6, 12x12, and 16x16 inches are common). Concrete pavers from brands like Pavestone and Oldcastle are the most popular DIY choice because they're consistent in thickness (usually 2.375 inches), relatively affordable at roughly $0.50 to $3.00 per piece depending on size, and easy to cut. For a standard patio, budget about 5 to 10 percent extra for cuts and breakage.
Base and bedding materials
- Crushed gravel or crusher run (also called road base): sold in bags or by the bulk yard. You need a 4-inch compacted layer. For a 10x10 patio, you'll need roughly 1 cubic yard of gravel.
- Coarse bedding sand (not play sand): 1-inch layer on top of the compacted gravel. Plan on about 0.5 cubic yards for a 10x10 area.
- Polymeric jointing sand (PermaSand or a similar product): swept into joints after pavers are set. Coverage varies by joint width and paver thickness, but a standard bag covers roughly 25 to 50 square feet when joints are 1/4 inch wide with 2-inch-thick pavers.
- Landscape fabric (optional but recommended): placed under the gravel to suppress weeds without blocking drainage.
Tools to buy or rent
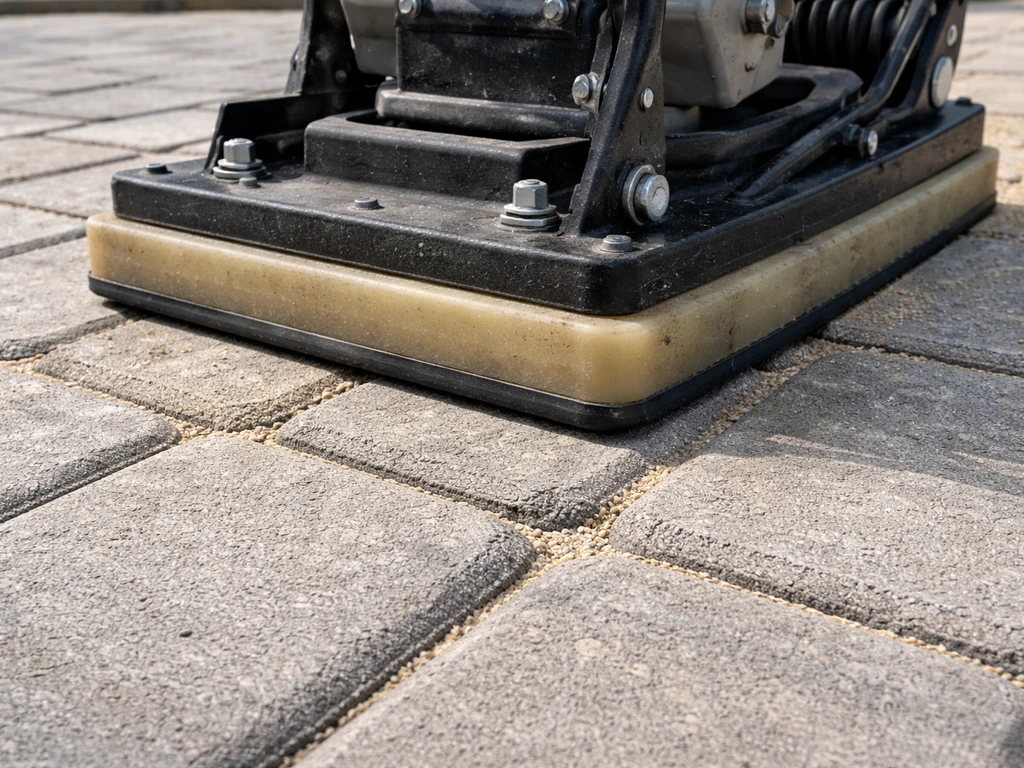
- Plate compactor: rent this from the Home Depot tool rental center. You'll use it multiple times. Renting is the smart move; buying costs $700+.
- Hand tamper: good for tight spots the plate compactor can't reach.
- Rubber mallet: for tapping pavers into place without chipping them.
- Masonry/concrete saw or angle grinder with a diamond blade: for cutting pavers around curves, edges, and obstacles. The angle grinder handles small cuts; rent a masonry saw for a lot of straight cuts.
- Screed board: a straight 2x4 works fine for leveling your sand layer.
- Screed rails: two pipes or metal conduit of equal diameter laid parallel as guides for the screed board.
- Level and tape measure: non-negotiable.
- String line and stakes: for maintaining your layout and slope.
- Spade, flat shovel, and wheelbarrow: for excavation and moving material.
- Broom: for sweeping polymeric sand into joints.
- Garden hose with spray nozzle: for activating polymeric sand.
- Paver edge restraints (plastic or aluminum): sold in the paving aisle, these keep your perimeter pavers from shifting over time.
Safety gear matters too. Wear safety glasses and gloves whenever you're cutting, and a dust mask is essential when cutting concrete pavers. Concrete dust contains silica, which is a real lung hazard.
Measure, mark, and plan drainage and slope

Get your measurements right before you spend a dollar on materials. Measure the length and width of your planned patio, then multiply to get square footage. Add 10 percent for waste. Sketch a rough drawing to scale so you can work out the paver pattern and minimize awkward cuts.
Slope is the most important thing most first-timers overlook. Your patio needs to drain water away from your house and any structures nearby. The standard recommendation is a slope of 1/8 inch per foot, meaning a 10-foot-wide patio should drop about 1.25 inches from the house side to the outer edge. To set this up, tie a string line to stakes at the desired finished height near the house, then lower the string 1/8 inch per foot as you run it out toward the far edge. This string becomes your reference for everything below it: excavation depth, gravel height, sand height, and paver surface.
Mark the perimeter with spray paint or stakes and string. If you're building around a fire pit, mark that footprint separately so you're not laying base material where you'll need to excavate for the fire pit structure later. The same principle applies to raised patio sections: mark the retaining wall footprint before digging.
Prepare the ground: over grass, over concrete, or on uneven areas
Ground prep determines whether your patio stays flat for a decade or starts rocking and shifting after the first winter. Don't rush this phase.
Over grass or bare soil
This is the most common starting point. Excavate the entire area to a depth of about 7 to 8 inches below your desired finished paver surface. That accounts for 4 inches of compacted gravel, 1 inch of sand, and about 2.375 inches of paver thickness, with a little room for adjustment. Remove all grass, roots, and organic material from the area. Organic material decomposes and causes settling. Once the area is dug out, use the plate compactor to compact the native soil at the bottom of the excavation. If your native soil is soft or sandy, this step is especially critical. Optionally, lay landscape fabric before adding gravel to suppress weeds.
Over existing concrete
You can install pavers over an existing concrete slab if the concrete is structurally sound (no major cracking, heaving, or spalling) and if the added height of the pavers won't cause drainage or door-clearance issues. In this case, skip the gravel base and set pavers directly on a thin (1-inch or less) sand layer, or use a setting bed mortar for a more permanent result. If the concrete is cracked or uneven, fill low spots with a concrete patching compound and let it cure before proceeding.
On uneven or sloped ground
A gentle slope is fine and actually helps with drainage as long as you maintain consistent excavation depth relative to your string line. Steeper slopes (more than 1 inch per foot in any direction) may require terracing or a retaining wall on the downhill edge to keep your base from eroding. For raised patio sections, build your retaining border (using retaining wall blocks, also sold at Home Depot) before excavating and compacting inside it.
Build the base, compact correctly, and add bedding sand
This is the phase that separates a patio that lasts from one that doesn't. Take your time here.
- Add gravel in two lifts (layers), not all at once. Pour about 2 inches of crushed gravel or crusher run, then run the plate compactor over it in overlapping passes until it stops sinking. Then add another 2 inches and compact again. You're aiming for a total compacted depth of 4 inches. Two passes in each direction (a grid pattern) is the minimum.
- Check your slope with a level and string line after compaction. The top of your gravel should follow the same slope you established earlier, consistently 5 inches below your intended finished paver surface (1 inch of sand + paver thickness).
- Lay your screed rails parallel to each other, spaced about 6 feet apart. Use rails that are exactly 1 inch in diameter so when you drag your 2x4 screed board across them, you get a consistent 1-inch sand depth.
- Pour coarse bedding sand between the rails and spread it roughly even with a rake.
- Pull the screed board toward you along the rails in a smooth, sawing motion to level the sand. Fill in any low spots and screed again.
- Remove the screed rails and fill the rail tracks with sand by hand. Smooth gently with a trowel. Do not walk on the screeded sand before laying pavers, or you'll leave footprints you'll need to re-level.
- Do not compact the bedding sand before setting pavers. It should be loose so pavers can be tapped level individually.
If your ground has soft or wet patches that keep sinking under the plate compactor, you may need to add extra gravel depth (6 inches instead of 4) or treat those spots with a geotextile fabric before gravel to bridge unstable ground. This is worth addressing now rather than patching later.
Set pavers, keep lines straight, and cut around obstacles
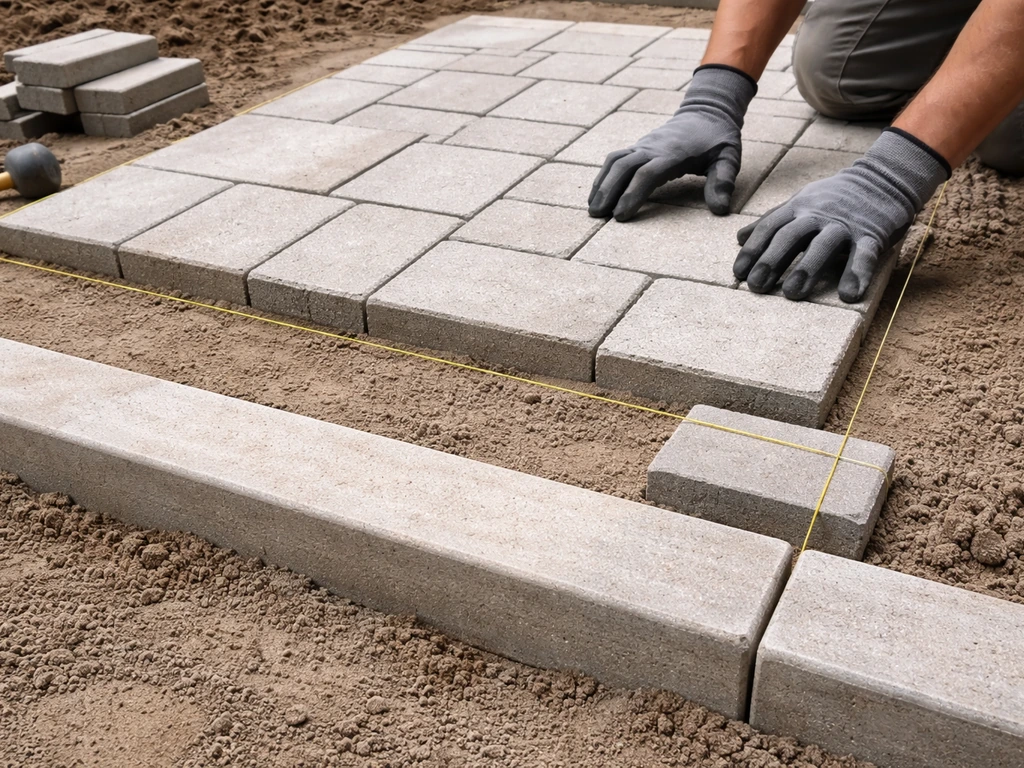
Start setting pavers from a corner or a straight reference edge, working outward. If you want to see the full process step by step, search for a YouTube how to build a paver patio video to match your layout and placement Start setting pavers from a corner or a straight reference edge, working outward.. Kneeling on a piece of plywood distributes your weight so you don't disturb the sand as you work across the patio.
Setting pavers in a pattern
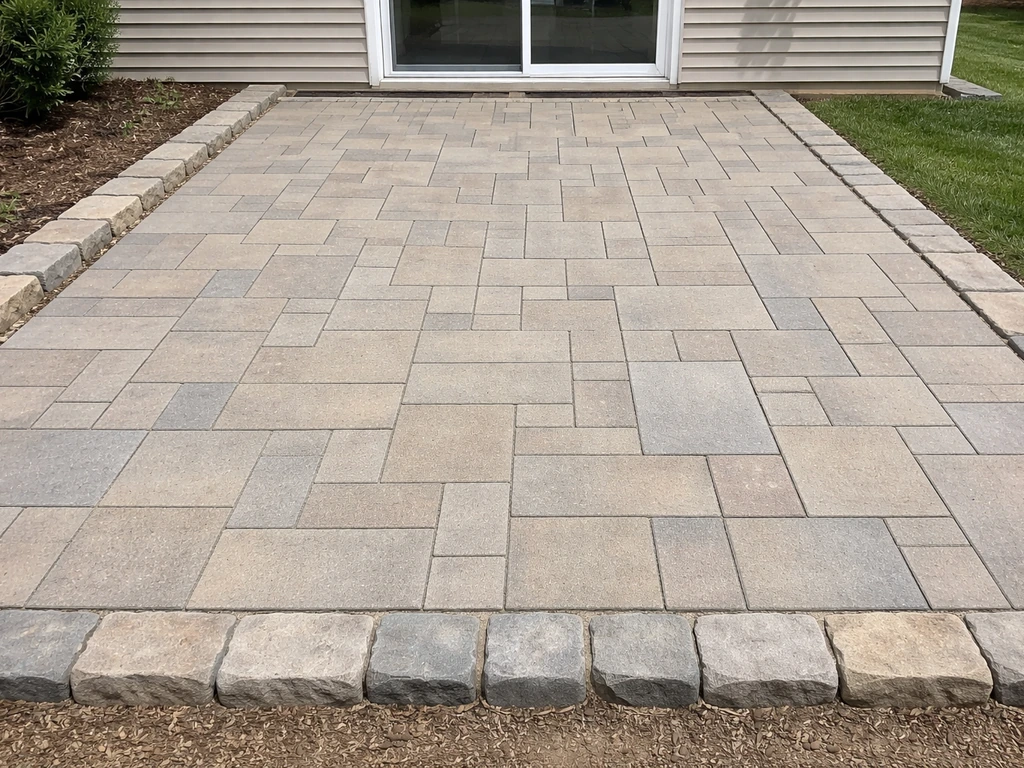
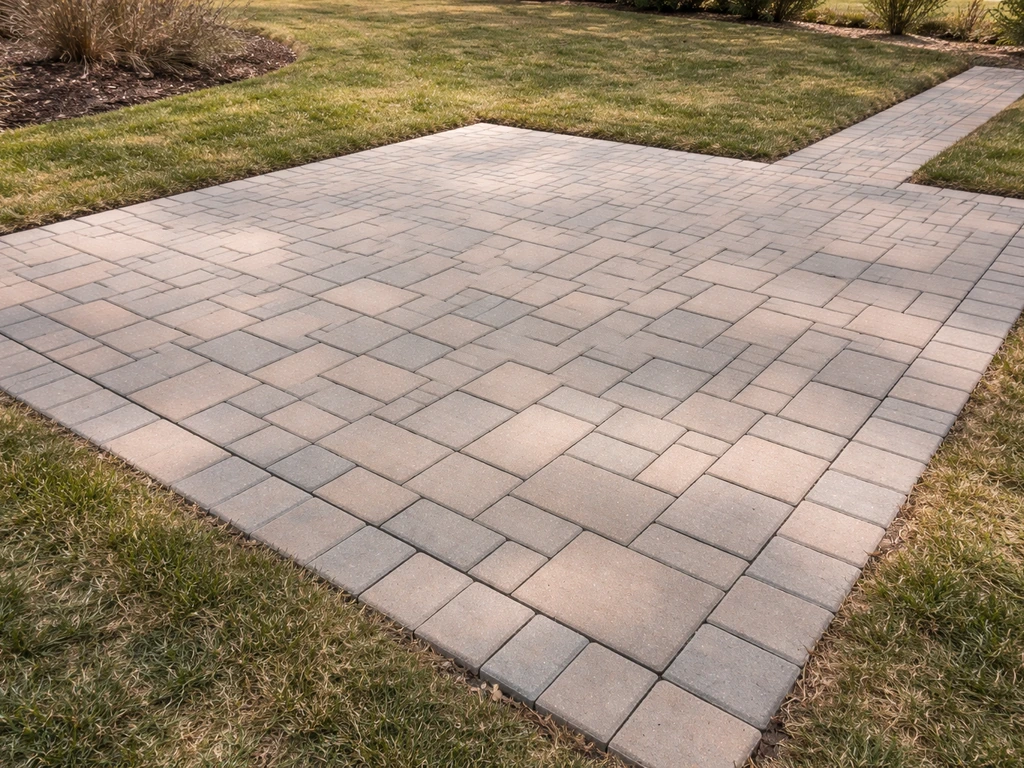
Running bond (like standard brickwork), herringbone, and grid patterns are the most common choices. Herringbone locks together extremely well and resists shifting under heavy traffic, making it the preferred choice for driveways or areas that will see a lot of foot traffic. Running bond is faster and easier for beginners. Whatever pattern you choose, maintain consistent joint spacing (1/8 to 1/4 inch is standard) using paver spacers or by eye-matching the natural spacing as you go. Set each paver straight down without sliding it, which would disturb your sand bed. Use a rubber mallet to tap pavers into full contact with the sand, and check every few rows with a level and a straightedge to make sure you're maintaining your slope.
Cutting pavers cleanly
For straight cuts, a masonry/concrete saw with a diamond blade is the cleanest and most efficient option. Home Depot recommends cutting concrete and brick pavers with tools such as a masonry or concrete saw fitted with the right diamond blade, or an angle grinder with a diamond blade, and setting up the tool depth for clean results cut concrete and brick pavers with a masonry/concrete saw or an angle grinder fitted with a diamond blade. Rent one from Home Depot's tool rental center if you have more than a dozen cuts. If you want a step-by-step walkthrough, you can also check a how-to video for installing a paver patio from start to finish install a paver patio. Mark your cut line with a pencil or chalk, score the line with a light first pass, then cut fully through in one or two more passes. Keep the blade wet (most rental saws have a water trough) to control dust and extend blade life. For small angle cuts or curves, an angle grinder fitted with a diamond blade works well. Always cut outside the patio area, away from your sand bed, and wear safety glasses and a dust mask for every single cut.
Working around obstacles and fire pits
If you're incorporating a fire pit, stop your paver field at the fire pit's footprint and install a ring of pavers or matching stone around the base. Leave a gap of 1 to 2 inches between any combustible material and the fire pit ring. For built-in features like planters or steps, frame those areas with edging before you set pavers around them so you don't end up cutting into pavers that are already set.
Install edges, fill joints with polymeric sand, and compact to finish
Edge restraints
Plastic or aluminum paver edge restraints go around the entire perimeter of the patio after all pavers are set. Snap them against the outside face of the last row of pavers and secure them with the included spikes (usually 10-inch galvanized spikes driven through the restraint flanges into the gravel base below). Edges are what prevent the whole patio from spreading outward over time as pavers shift. Skip this step and you will eventually have gaps, wobbling pavers, and a messy perimeter.
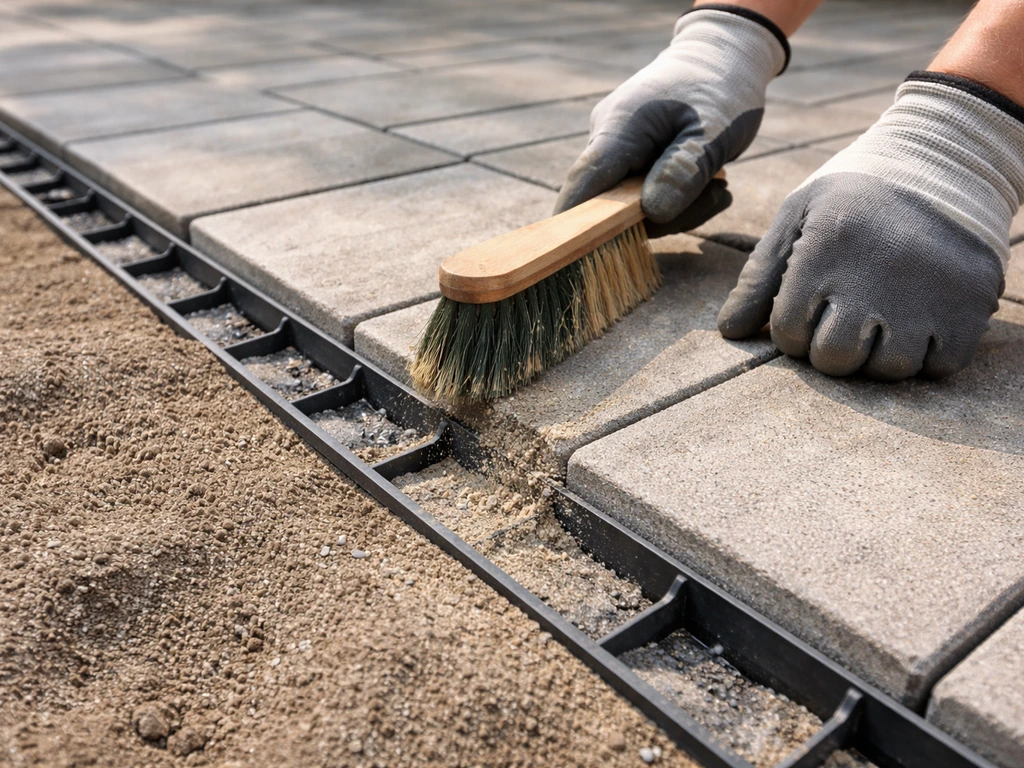
Polymeric jointing sand
Polymeric sand (like PermaSand) contains a binding agent that hardens when wet, locking the joints against weed growth, ant activity, and erosion. Pour the sand over the paver surface and sweep it into the joints with a push broom. Work it in from multiple directions to fill the joints completely. The sand needs to fill the full depth of the joint for it to perform correctly, so check that joints are packed tight, not just surface-filled. Once joints look full, blow or sweep any excess sand off the paver faces. Then, with a leaf blower or gentle broom, remove every bit of polymeric sand from the paver tops before activating. Any sand left on the surface will haze and bond there permanently.
Final compaction and activation
Run the plate compactor over the entire patio one final time with a rubber pad (or a piece of carpet) attached to the compactor plate to protect the paver faces. This seats the pavers firmly into the sand bed. Then sweep a second round of polymeric sand into any joints that settled during compaction. Once you're satisfied the joints are full, lightly mist the entire surface with a garden hose. Don't soak it, just a gentle, even spray across the whole area. This activates the polymeric binder. Let the patio dry and cure for 24 to 48 hours before walking on it heavily.
Sealing, maintenance, and troubleshooting common DIY problems
Should you seal?
Sealing is optional but worthwhile. A good paver sealer (Home Depot carries products from Rust-Oleum and various masonry brands) protects against stains, enhances color, and adds a small amount of joint stability. Wait at least 30 days after installation before sealing so the polymeric sand can fully cure. If you are specifically looking for Lowes guidance, search for a lowes how to paver patio walkthrough that matches your paver type and patio layout. Clean the surface thoroughly, let it dry completely, then apply sealer with a roller or pump sprayer in two thin coats. Reseal every 3 to 5 years, or when water stops beading on the surface.
Routine maintenance
- Sweep regularly to keep debris out of joints.
- Re-apply polymeric sand to any joints that erode or develop gaps from heavy rain.
- Pull any weeds that manage to establish before they root deeply. Polymeric sand resists weeds but isn't 100 percent weed-proof forever.
- If a paver chips or cracks, individual pavers are easy to replace: pry up the damaged one, level the sand beneath, and press in a replacement.
Troubleshooting common problems
| Problem | Likely Cause | Fix |
|---|---|---|
| Pavers rocking or uneven | Sand bed not level or base not compacted properly | Pull up affected pavers, re-level sand, reset and recheck with level |
| Whole section sinking | Insufficient base depth or soft soil below gravel | Excavate further, add more gravel, compact in lifts before resetting |
| Pavers spreading apart at edges | Edge restraints missing or not staked deep enough | Add or re-stake edge restraints, refill joints with polymeric sand |
| Weeds growing in joints | Regular sand used instead of polymeric, or polymeric sand not fully activated | Remove weeds, sweep in new polymeric sand, activate correctly with water |
| Patio draining toward house | Slope set incorrectly at layout stage | Re-establish string lines with correct 1/8" per foot slope and re-grade the base |
| Polymeric sand haze on paver faces | Sand not fully swept off surface before misting | Clean with a diluted muriatic acid wash (follow label directions and wear protection) |
| Wavy or misaligned pattern lines | No string line used during setting | Use a string line snapped every 4 to 6 rows to check alignment as you go |
When the base just isn't right
If you're dealing with persistent settling in one area despite multiple fixes, or if the soil below your excavation is consistently wet or soft (expansive clay, for example), it's worth calling a landscaping contractor for that section. A professional can assess whether a deeper base, drainage pipe, or even a concrete footer is needed. Most patio paver projects are fully manageable as DIY, but problematic soil conditions are the one situation where professional input pays off more than the cost of redoing work.
The complete process from digging to cured joints typically takes one to two weekends for a 100 to 200 square foot patio, depending on your crew size and how much prep work the site needs. If you want a visual walkthrough in addition to these steps, video guides (including those produced by home improvement channels and retailers) can be helpful companions to this written guide, and you'll find related paver project walkthroughs covering everything from YouTube how-to paver patios to This Old House-style detailed builds that complement what you've read here. If you’re looking for how to make a paver patio video, record your project step-by-step as you dig, set pavers, and activate the polymeric sand YouTube how-to paver patios.
FAQ
How do I calculate how much paver, gravel, sand, and polymeric sand to buy from Home Depot?
Start with square footage (length times width) and add 10 percent for waste and cuts. For depth, plan on about 4 inches of compacted gravel plus 1 inch of bedding sand, so you need coverage based on volume, not just square footage. Polymer sand is typically sold by weight, so confirm the label coverage for your joint width and paver thickness, then buy slightly extra because not all sand fills joints the first pass.
Can I use a different base depth than 7 to 8 inches excavation if my yard is uneven?
Yes, but keep the finished elevations consistent using your string line, then adjust the subgrade and base thickness to match. If you excavate less in low spots, you may end up short on base or sand and lose stability, leading to rocking pavers after compaction and weather cycles.
Do I need landscape fabric under the gravel, or will it cause drainage problems?
Landscape fabric can help with weeds, but it is not a substitute for proper drainage and compacted base. If water naturally moves sideways or you have a wet subgrade, fabric can trap fine soil and reduce permeability, so in very damp areas consider geotextile designed for separation and stability, or ask a contractor about drainage solutions.
What if my pavers are slightly different thickness within the same box, how do I keep everything level?
Check thickness variation before installing by stacking a few pieces and measuring. During setup, rely on the screeded sand and consistent string-line height, but avoid “floating” pavers on random sand thickness. If you find significant variation, sort pavers and place thicker pieces together, then fine-tune with sand depth for the rest to prevent unevenness.
How tight should the paver joints be, and what happens if my joints are too wide or too narrow?
A typical joint spacing is about 1/8 to 1/4 inch. Too wide leaves less room for polymeric sand to bind properly and can make edges vulnerable to shifting, too tight can prevent sand from filling full depth and can create elevated paver faces when you compact.
Is it better to cut pavers at the edges or break them in place to avoid extra work?
For clean, stable borders, cut pieces to fit at the perimeter rather than forcing odd gaps. Breaking or over-flexing pavers can create irregular faces that hold sand poorly and can widen joints over time, especially along the edge where movement is most likely.
How do I keep pavers from shifting while I’m setting and leveling, especially on a slope?
Use a straight reference edge and set a few rows at a time, keeping each paver placed straight down without sliding. On a slope, maintain the same relationship to the string line for excavation, gravel, sand, and paver height, then check frequently with a level and straightedge so you do not “stack” corrections that end up out of plane.
Can I use a standard plate compactor on polymeric sand joints right after sweeping it in?
You should only activate polymeric sand after it is fully swept into the joints and after you have removed all residue from the paver tops. When compaction seats the pavers, the joints can settle, so plan on adding a second round of polymeric sand after the first compaction pass, then lightly mist to activate only when joints are full.
Why is my patio hazy or discolored after activating polymeric sand?
Haze usually means polymeric sand got on the paver faces and bonded there when you misted it. The fix is limited once it cures, so prevent it by thoroughly removing all sand from tops before activation, then mist lightly and evenly, not soaking, so binder activates only inside the joints.
How do I know if I should seal my pavers, and when should I wait?
Seal if you want stain resistance and enhanced color, especially for darker pavers that show spots. Wait at least 30 days after installation before sealing so the polymeric sand has fully cured. Also, only seal after the surface is clean and completely dry, otherwise you can trap moisture under the sealer and create blotchy appearance.
What’s the best way to handle door clearance or drainage near the house if my patio height changes?
Do a dry layout first: stack pavers and account for gravel base, sand, and paver thickness to estimate final height. If the patio would block door thresholds or alter drainage away from the house, adjust the design before you dig. Keeping the required slope is critical, so a small change in base thickness can have a big effect on run-off direction.
Can I install pavers over existing concrete if I have old cracks or minor unevenness?
You can only proceed if the slab is structurally sound with no major heaving or spalling, and if the added height will not create clearance or drainage problems. For uneven concrete, fill low spots and let patching cure before placing the leveling bed, otherwise you risk transferring movement to the pavers and creating dips that collect water.
Next Articles

How to Use Patio Paver Sand: Step by Step DIY Guide
Step-by-step guide to apply patio paver sand correctly: prep base, set pavers, fill joints, compact, and troubleshoot is

How to Install Patio Pavers in Sand: Step-by-Step
DIY step-by-step how to install patio pavers in sand, from excavation and base prep to leveling, cutting, joint sand and
How to Make a Patio With Pavers and Sand Step by Step
Step-by-step guide to install paver patio with sand setting layer, from planning and base to leveling, cutting, joint fi