
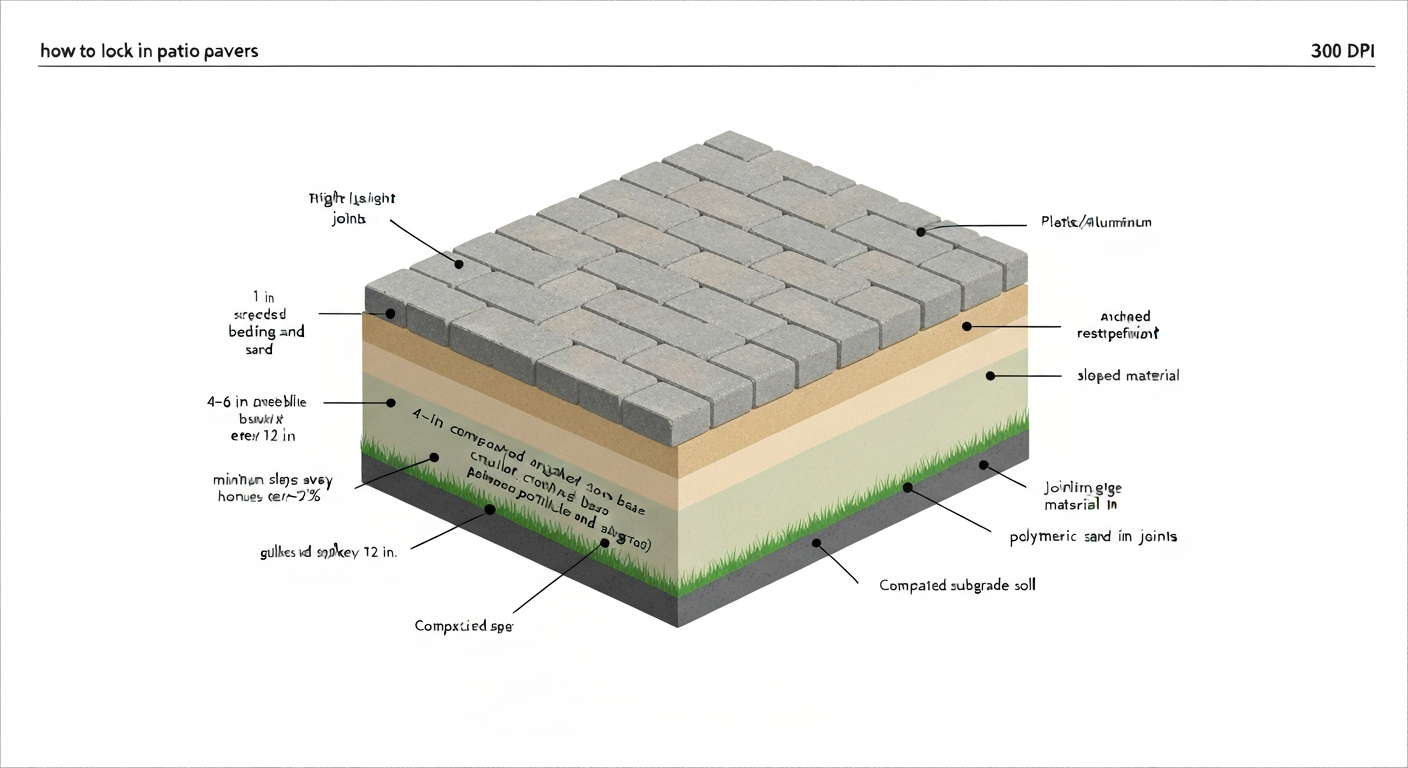
Locking in patio pavers means building a system where every layer, from the compacted subgrade up through the bedding sand and jointing material, works together to stop individual pavers from shifting, sinking, or heaving. You do it with a combination of a properly compacted aggregate base, screeded bedding sand, tight jointing compound (usually polymeric sand), and edge restraints anchored at every exposed perimeter. Get those four elements right and your patio will stay level and tight for years. Skip or shortcut any one of them and you'll be pulling pavers back up sooner than you'd like.
How to Lock in Patio Pavers: Secure, Level & Long-Lasting Tips

Felix Rowe
15 Jul 2026
What 'locking in' actually means (and what this guide covers)
Pavers don't get glued down in most residential installations. Instead, they're held in place by interlock: the weight of the pavers, the friction between them, the jointing material packed into every gap, and the edge restraints that prevent the whole field from spreading outward. When any of those elements is missing or under-built, individual stones migrate, joints open up, and the surface becomes uneven. Keeping pavers from moving is really a drainage, compaction, and containment problem, not just a question of which adhesive to use.
This guide walks through every method a DIYer needs for four common scenarios: a new patio built over soil or grass, pavers laid over an existing concrete slab, installations on slopes or raised areas, and fire-pit zones that deal with heat and heavy foot traffic. For a step-by-step tutorial on how to block pave a patio, see our detailed guide. You'll find a quick decision guide up front, then detailed steps for base building, bedding, edge restraints, jointing, and reinforcement for tricky sites. There are also sections on common mistakes, realistic time and cost estimates, and clear guidance on when a project has grown beyond a reasonable DIY scope.
Quick decision guide: choose your locking method by site condition
Before you buy a bag of polymeric sand or rent a plate compactor, spend ten minutes assessing your site. The right locking method depends almost entirely on what's underneath and what loads the surface will carry. The table below maps the four most common scenarios to the approach that will actually hold up.
| Site Condition | Recommended Base | Bedding | Edge Restraint | Jointing | Key Watch-Out |
|---|---|---|---|---|---|
| New build over soil or grass | 4–6 in compacted crushed stone (ICPI #57 or ¾" minus) | 1 in ASTM C33 screeded sand | Plastic or aluminum spiked restraint, spikes every 12 in | Polymeric sand | Remove all organic material first; organics compress and cause sinking |
| Overlay on existing concrete | Sound, level existing slab (assess first) | Thin sand or stone-chip screed | Restraint spiked or anchored to slab edge | Polymeric sand (stricter dry/cure rules) | Slab must drain well and show no active cracking or lifting |
| Sloped or raised patio | 6+ in compacted crushed stone with possible geotextile | 1 in ASTM C33 screeded sand | Spiked restraint plus step-down pins or deadmen | Polymeric sand | Surface must maintain ≥1.5–2% slope; drainage below base is critical |
| Fire-pit area | 6 in compacted crushed stone (same as pedestrian base) | 1 in ASTM C33 screeded sand | Full perimeter plastic or aluminum restraint | Heat-rated polymeric or dry-pack mortar for immediate ring | Avoid mortar or adhesive for the full field; spot-mortar only around fire-ring base |
If your existing concrete slab is cracked, drains poorly, or shows frost-heave damage, stop before you overlay. A fresh full-depth installation over properly prepared soil will outlast pavers set on a failing slab. Diagnosing drainage and structural soundness before deciding between overlay and full rebuild is the single most important decision you'll make on this project.
Materials and tools checklist
Base materials
- Crushed stone aggregate: #57 stone or ¾" minus (angular, not rounded pea gravel) — quantity depends on area and target depth
- Geotextile separation fabric (Class 2 woven or nonwoven) for sites with clay, saturated, or freeze-thaw-prone soils
- Geogrid reinforcement for slopes steeper than roughly 2: 1 or over soft subgrades (use engineered specs from manufacturer)
Bedding and jointing
- Coarse concrete sand (ASTM C33 gradation) for the bedding layer — typically 1 bag per ~10–12 sq ft at 1 in depth
- Polymeric jointing sand (check product TDS for minimum joint depth/width; most require at least 1½ in joint depth and joint recessed ~⅛ in below paver surface)
- Dry-pack mortar or heat-rated adhesive for fire-pit rings and small spot fixes only
- Stone chips or approved sand for concrete-overlay bedding (check manufacturer's overlay instructions)
Edge restraints
- Plastic snap-edge or aluminum edge restraint (most common for residential patios; sold by the linear foot)
- Galvanized spikes, 10–12 in long, at 12 in spacing for plastic/aluminum restraints (tighter on curves)
- Treated timber edging (ground-contact rated, minimum 2×4) for informal or budget builds
- Concrete curb or poured footing for driveways or vehicular-area edges (requires embedment of ~6 in or per local spec)
Compaction and cutting tools
- Vibratory plate compactor: minimum ~4,000–5,000 lbf centrifugal force, ~75–90 Hz operating frequency (matches ICPI specs for seating pavers)
- Hand tamper for edges and tight corners the plate compactor can't reach
- Screed pipes or rails (1 in diameter) for setting bedding-sand depth
- Long straightedge or screed board (2×4 or purpose-made tool)
- Wet-cut masonry saw (angle grinder with diamond blade works for occasional cuts; wet saw for large jobs)
- Rubber mallet and dead-blow hammer
- String lines and stakes for layout and slope checking
- 4-ft level and line level
- Plate compactor pad (rubber pad attachment) to protect paver surface during compaction passes
- Garden hose or watering can with rose head for activating polymeric sand
Site assessment and preparation
Good preparation is where most DIY patio failures are won or lost. It's not glamorous, but a few hours spent here prevents you from pulling pavers up a year later wondering why they moved.
Call before you dig
Before breaking ground, call 811 (in the US) to have underground utilities marked. Even a shallow patio excavation (typically 8–10 in) can hit irrigation lines, buried cables, or gas service. Also check your local municipality for permit requirements. Many jurisdictions don't require permits for ground-level patios under a certain square footage, but rules vary widely, especially for raised patios, retaining walls taller than 24–30 in, or installations close to property lines. A quick call to your local planning or building department takes fifteen minutes and saves potential fines.
Grading and turf removal
Mark the perimeter with stakes and string, then excavate to the required depth. For a typical 6-in crushed-stone base plus 1-in bedding sand plus the paver thickness (usually 2.375 in or 3.125 in for standard pavers), plan on removing roughly 9–11 in of material. Remove all sod, roots, and organic debris. Organic material compresses over time and is the number-one cause of sinking pavers. Don't try to compact organics into submission, remove them entirely. Once excavated, grade the subgrade so it mirrors the slope you want at the surface: a minimum of 1.5–2% fall away from any structure. That's about ¼ in of drop per foot. Use your string lines to verify this before adding any base material.
Assessing an existing concrete slab for overlay
Walk the entire slab and look for active cracks (ones that move or have vertical displacement), areas that are soft or hollow-sounding when tapped, or spots where water pools. A slab with drainage problems will transfer those problems to your pavers. If the slab is sound, clean it thoroughly and let it dry completely before proceeding. If you find significant cracking, settling, or drainage issues, the honest call is full removal and a new base installation. Overlaying on a failing slab is a temporary fix, not a permanent solution.
Building a stable base
The compacted aggregate base is the foundation of the whole system. Skimping on depth or compaction is the most expensive mistake you can make, because fixing it means pulling up every paver.
Aggregate type and required depth
Use angular crushed stone, not rounded gravel. Angular particles lock together under compaction; rounded ones shift. A ¾-inch minus (also called #57 crushed stone or processed gravel) is the standard choice. For pedestrian patios over stable, well-drained soil, ICPI guidelines and most manufacturer specs call for a minimum 4–6 in of compacted crushed stone. On expansive clay, consistently wet ground, or freeze-thaw-prone sites, go to at least 6–8 in and seriously consider a geotextile separation layer at the subgrade interface. Geotextile prevents fine soil particles from migrating up into your base over time, which is exactly how bases lose their compaction.
Compacting the subgrade and base layers
- Compact the exposed subgrade before adding any aggregate. ICPI Tech Spec 2 requires a minimum 98% standard Proctor (ASTM D698) for subgrade compaction. In practice for a homeowner, this means multiple slow passes with a vibratory plate compactor until the ground stops visibly moving and feels firm underfoot.
- If installing geotextile, lay it now on the compacted subgrade. Overlap seams by at least 12–18 in. The fabric should extend up the sides of the excavation and can be trimmed flush after base installation.
- Add crushed stone in lifts of no more than 4 in at a time. Dumping the full depth at once and running the plate compactor over it once does not achieve adequate compaction.
- Compact each lift with at least two to three passes of the vibratory plate compactor. Work in overlapping rows, each pass overlapping the previous by about half the plate width.
- Grade the top of the base to your target slope using string lines and a screed or rake. The finished base surface should mirror the finished patio slope (≥1.5–2% away from the house).
- Do a final compaction pass on the graded base surface before screeding the bedding layer.
Drainage built in from the start
Drainage is not an afterthought. Pavers on saturated soil heave in winter and sink in summer. The slope built into your base directs surface water away. The open-graded crushed stone base handles subsurface water. If your site is particularly wet or low-lying, consider adding a perforated drainpipe at the base of the excavation routed to daylight or a dry well. Getting water away from the base is more effective than any amount of extra compaction.
The bedding layer: screeded sand vs. mortar bed
The bedding layer is a thin, precisely screeded cushion that gives each paver its final adjustment in height and allows minor surface variation to be corrected. It is not a leveling layer for a bad base.
When to use screeded bedding sand (most patios)
Coarse concrete sand meeting ASTM C33 gradation is the standard bedding material for most residential patio installations. It drains freely, stays firm under compaction, and allows individual pavers to be lifted and reset if needed later. The bedding layer must be screeded to a nominal 1 in (25 mm) depth and should not exceed 1.5 in. A thicker bedding layer compresses unevenly over time and leads to rocking pavers. The ICPI is explicit on this: bedding sand corrects minor surface texture, not base height variations. If your base is off by more than about ¼ in in any spot, fix the base, not the bedding.
Screeding sand step by step
- Lay two screed rails (1-in diameter pipes work well) parallel to your starting edge, set on top of the compacted base, spaced so your screed board spans them comfortably (8–10 ft max).
- Pour coarse bedding sand between the rails and spread roughly with a rake.
- Drag your screed board across the rails in a back-and-forth sawing motion to strike off excess sand and leave a smooth, uniform 1-in surface.
- Carefully remove the screed rails without disturbing the screeded surface. Fill the channels left by the rails with sand and smooth by hand.
- Do not walk on the screeded surface. Lay your first paver from a kneeling position at the edge and work forward, placing your knees on installed pavers as you go.
When to use a mortar bed
A mortar bed (dry-pack or wet mortar set over concrete) is appropriate for overlay installations on an existing concrete slab where a sand screed isn't practical, for steps and raised structures where individual pavers need to be fixed in place, and for fire-pit rings where the immediate stones around the ring see direct heat. Mortar limits your ability to lift and relay individual pavers later and requires a sound, stable substrate that won't crack. For a standard ground-level patio on soil, screeded sand is almost always the better choice.
Jointing: polymeric sand and your options
Once all pavers are laid and before you compact, the joints need to be filled. This step is where many DIYers rush, and it shows up later as weed growth, ant excavation, and pavers that rock.
Polymeric sand: the right choice for most patios
Polymeric sand contains binders that activate with water and cure into a firm, flexible material that resists weeds, insects, and washout far better than regular sand. For it to work correctly, the pavers and joints must be completely dry before application. Most manufacturers (including Techniseal and Alliance Gator) are specific about this: wait at least 24 hours after rain before applying, work only in dry conditions, and follow the product's temperature minimums. Joint depth matters too: most products require a minimum joint depth of around 1.5 in (38 mm) and want the filled joint to sit about ⅛ in below the paver surface, not flush or proud.
Applying polymeric sand
- After laying all pavers, run the plate compactor (with rubber pad attached) over the entire surface to seat pavers and begin closing joints. Do at least two full passes.
- Pour polymeric sand onto the paver surface and sweep it into joints with a stiff-bristle broom, working it diagonally across the joints.
- Run the plate compactor over the surface again with two more passes to vibrate the sand down into the joints.
- Repeat sweeping and compacting until joints are consistently filled to ⅛ in below the paver surface.
- Blow off all excess sand from the paver faces with a leaf blower. No sand should remain on the surface before activation.
- Activate with a gentle mist of water (not a hard spray that displaces the sand). Follow the product TDS for the exact activation method and cure time, typically 24–48 hours before foot traffic.
Regular jointing sand and dry-mortar alternatives
Regular fine sand (meeting ASTM C144, which is slightly finer than bedding sand) is a lower-cost option but washes out more easily and needs periodic re-sanding. It's acceptable for patios in sheltered areas but plan on topping it off every season or two. A dry-mortar mix (3:1 sand-to-Portland cement, brushed into joints and misted) offers more rigidity but cracks in freeze-thaw conditions and makes individual paver replacement harder. For most residential patios exposed to weather, polymeric sand is worth the extra cost.
Edge restraints: keeping the perimeter locked in
Edge restraints are non-negotiable on any perimeter that isn't constrained by a wall, foundation, or curb. Without them, the paver field gradually migrates outward under foot traffic, and once the edges spread, the whole surface loses interlock and starts moving. ICPI standards call for mechanical edge restraints on all unconstrained perimeters.
Comparing your edge restraint options
| Type | Best For | Installation | Durability | Cost (approx.) |
|---|---|---|---|---|
| Plastic snap-edge (PVC) | Standard residential patios, curved edges | Spiked into base with 10-in galvanized spikes at 12-in spacing | Good; UV-stable versions last 20+ years | $0.50–$1.50/lin ft |
| Aluminum edging | Cleaner look, straighter runs, heavier-duty use | Spiked or staked into base; can be bent for gentle curves | Excellent; won't rot or corrode | $1.50–$3.00/lin ft |
| Treated timber (ground-contact) | Informal patios, budget builds, good with landscaping | Staked with rebar or timber stakes | 10–20 years depending on moisture; can rot at soil contact | $0.75–$2.00/lin ft |
| Concrete curb / poured footing | Vehicular areas, driveways, formal designs | Formed and poured; requires curing time before paving | Permanent; very high strength | Higher material + labor cost; requires forming |
| Manufactured poured-in-place edging | Raised patios, formal finishes | Formed in place or precast; anchored to base | Very durable | Moderate to high cost |
Installing plastic or aluminum edge restraints
- Position the restraint tight against the outside face of the last course of pavers. The top of the restraint should sit just below the paver surface so it's hidden.
- Drive 10-in galvanized spikes through the pre-drilled holes and into the compacted base at 12-in spacing (6-in spacing on curves).
- At corners, use the manufacturer's preformed corner pieces or score and snap the straight restraint to bend it.
- Backfill soil or mulch against the outside of the restraint after installation to provide additional lateral support.
Treated timber edging
Use only ground-contact rated treated lumber. Stake it securely with rebar or wooden stakes every 24–36 in, and drill pilot holes before driving spikes through the timber and into the base material. Timber looks great with informal or garden-adjacent patios, but inspect it annually and plan to replace it when it starts to soften.
Slopes, raised edges, and challenging sites
A flat ground-level patio over good soil is as straightforward as paver work gets. Slopes, raised patios, and soft or problem subgrades require a step up in reinforcement strategy. Don't improvise here: if you're dealing with a significant slope or a wall taller than 24–30 in, get an engineered solution or bring in a pro.
Geotextile as a base stabilizer
A geotextile separation fabric laid between the subgrade and your aggregate base does two jobs: it keeps fine soil particles from migrating up into the crushed stone, and it spreads load laterally over soft spots. USDA/NRCS guidance specifies geotextile classes by application, and for residential patio bases over clay or saturated soils, a Class 2 woven or nonwoven geotextile is typical. Overlap seams by at least 12–18 in and run the fabric up the sides of the excavation slightly. Don't skip this on soggy or clay-heavy sites.
Geogrid for slopes and soft subgrades
Geogrids are interlocking plastic mesh panels that you place within the aggregate base layers to add tensile reinforcement. FHWA guidance includes geogrids as an accepted method for stabilizing weak subgrades and reinforcing bases on slopes. They're most useful when your slope exceeds a gentle grade, the subgrade is consistently soft, or the base needs to span a low area without settling. Manufacturers like Tensar provide design charts based on soil CBR values and slope geometry. For anything steeper than about a 3:1 slope, or any wall element more than 24–30 in tall, treat this as a structural engineering question rather than a rule-of-thumb DIY call.
Pins, deadmen, and retaining walls
On sloped installations where the paver field steps down, use long anchor pins (often called landscape spikes or deadmen) to tie the edge restraint into the base at each step change. For raised patios with a vertical face of block or retaining wall, deadmen are long horizontal blocks or ties that extend back into the retained soil mass and provide pull-out resistance. Retaining wall systems above 24–30 in almost universally need engineered design, permit review, and sometimes a structural inspection. Check your local building code before building any wall that retains soil above about knee height.
Freeze-thaw zones
In climates with hard winters, frost heave is a serious threat. Water trapped in the base or subgrade expands when it freezes and physically lifts pavers out of position. The defense is a free-draining base (angular crushed stone, not sand or fine material), adequate base depth below the frost line where practical, and a geotextile to keep fine particles from clogging your drainage. Slopes help enormously: surface water that runs off quickly doesn't saturate the base. Some installers in severe freeze-thaw zones install a drainage pipe at the bottom of the excavation to actively remove water. The Iowa State University Extension notes that paver systems are repairable and individual units can be reset, but correct base drainage is the only real prevention for freeze-thaw movement. See Installing Interlocking Concrete Pavers, Part One | Yard and Garden (Iowa State University Extension) for guidance emphasizing removal of organics, a uniform compacted subgrade, free‑draining aggregate bases, and that individual pavers are replaceable.
Laying patterns, cutting, and final seating
Pattern choice affects both appearance and structural interlock. Running-bond, herringbone (45° or 90°), and basketweave are the most common. Herringbone, particularly 45°-herringbone, provides the strongest mechanical interlock because no joint line runs continuously in any direction, which resists horizontal movement under traffic. Running bond looks clean and installs quickly. Basketweave is decorative and works well in low-traffic areas.
Lay pavers from a corner outward, maintaining consistent joint spacing with plastic spacers or the lugs molded into the pavers. When you reach an edge that requires a cut, mark the paver in place and cut with a wet masonry saw or an angle grinder fitted with a diamond blade. Wear eye protection, hearing protection, and a dust mask (or respirator) for any cutting work. After all pavers are laid, run the plate compactor (rubber pad attached) over the entire surface for a minimum of two passes to seat the pavers into the bedding sand before applying jointing material.
Realistic time and cost estimates
A 200 sq ft patio is a solid weekend project for two people with some basic construction experience, though that assumes the excavation and materials are on site and ready. Here's a realistic breakdown.
| Phase | Time Estimate (200 sq ft, 2 people) | Approximate Material Cost |
|---|---|---|
| Excavation and turf removal | 4–6 hours | $0 (labor) or $150–$300 to rent a mini excavator |
| Base aggregate, delivery, spreading | 2–3 hours | $150–$300 for crushed stone + delivery |
| Compaction (subgrade + base lifts) | 2–3 hours | $80–$150/day for plate compactor rental |
| Bedding sand screeding | 1–2 hours | $30–$60 for sand |
| Paver laying and cutting | 6–10 hours | $500–$1,500+ for pavers depending on type |
| Edge restraints | 1–2 hours | $60–$120 for restraint + spikes |
| Polymeric sand jointing | 2–3 hours | $60–$120 for 3–5 bags |
| Total (materials only) | $900–$2,400+ (pavers are the biggest variable) |
Premium pavers (natural stone, tumbled concrete, large-format) push costs higher. Tool rental adds $100–$300 depending on what you already own. Budget an extra 10% of pavers for cuts and breakage. If you're on a steep slope, dealing with soft ground, or building a retaining wall, add time and cost for reinforcement materials and potentially an engineer's review.
Common mistakes and how to fix them
Sinking pavers
Sinking is almost always a base or subgrade problem. Organics left in the subgrade, inadequate base depth, or base material that wasn't compacted in proper lifts will compress under load over time. To fix: lift the affected pavers, pull the bedding sand, address the base (add and compact more aggregate if it's thin; remove organics if they're the cause), re-screed the bedding layer, and relay the pavers. Rejointing is required after any relay.
Weed growth through joints
Weeds in paver joints usually grow from seeds blowing in and germinating in the jointing material, not from below. Polymeric sand is the best preventive measure. If weeds are already established, remove them manually or with a targeted application of a weed killer safe for hardscapes, then re-sand the joints with fresh polymeric sand once the joints are clean and dry. A geotextile under the base does not prevent weed growth from above; only tight, properly filled joints do.
Frost heave and shifting after winter
If pavers lift and shift after a hard freeze, the base is retaining water. The fix requires addressing drainage: adding or clearing a perimeter drain, improving the base depth and drainage, or in some cases relocating downspout outlets that dump water onto or near the patio. Individual lifted pavers can be reset without redoing the whole patio, which is one of the genuine advantages of a paver system over poured concrete.
Edge creep and spreading joints
If the paver field is slowly spreading outward, the edge restraint has failed (or was never installed). Pull the affected perimeter pavers, reset the edge restraint with fresh spikes into undisturbed base material, relay the perimeter pavers, and refill joints. Don't try to push a spread edge back into place without relaying: you'll crack pavers and the problem will recur.
Maintenance to keep pavers locked in long-term
Once your patio is installed correctly, maintenance is light but regular. For step-by-step cleaning, re-sanding, and seasonal checks, see our guide on how to maintain a paver patio. Sweep or blow off debris before it decomposes and fills joints with organic matter. Inspect the joint sand level every spring: if joints have gone shallow (below ⅛ in from the surface), top them up with fresh polymeric sand following the same dry-surface, activation procedure. Re-sanding may be needed every two to five years depending on traffic and weather exposure. Avoid pressure washing at high pressure directed into joints, which blasts out jointing material. If you do pressure wash to clean the surface, use a lower-pressure fan tip directed parallel to the joints, and re-sand afterward if needed. Keeping pavers from moving over the long term really comes down to maintaining the jointing material and ensuring drainage isn't compromised. For step-by-step seasonal care and cleaning tips, see our guide on how to care for paver patio. Seasonal care and ongoing maintenance overlap closely with broader patio upkeep topics worth revisiting annually. For a concise, step-by-step checklist on how to keep patio pavers from moving, see our detailed guide on that topic.
When to call a professional
Most residential patio projects are well within DIY range if you're comfortable with physical labor, basic grading, and tool operation. The scenarios below are genuine cases where a professional hardscape contractor or a structural/geotechnical engineer adds real value.
- Any retaining wall that will be taller than 24–30 in (most building codes require permits and engineering review at or above this height)
- Slopes steeper than roughly 3: 1 where the paver area is large enough that a failure could cause significant property damage or injury
- Sites with confirmed soft or organic subgrades that don't reach adequate compaction even after remediation
- Driveways or vehicular-load areas (different base depth and edge-restraint specifications; mistakes are costly)
- Any site where utilities are close to the required excavation depth and you're not certain of their exact location
- Overlay installations where the slab condition is uncertain and you can't confidently assess its structural adequacy
- Large-format natural stone pavers (some are 100+ lbs each; handling and cutting safely typically requires experienced labor and equipment)
Hiring a pro for site prep or base work while you handle the laying and finishing is also a completely reasonable hybrid approach. Getting the base right is where most of the permanent value is; if you're not confident in the excavation or compaction phase, outsource exactly that part.
FAQ
What are the main ways to ‘lock in’ patio pavers so they stay level and don’t shift?
The common, proven methods are: 1) Proper compacted aggregate base under the pavers (open‑graded crushed stone) to provide a stable foundation; 2) Correct screeded bedding sand (ASTM C33 concrete sand) of controlled thickness (nominal ~1 in / 25 mm) so pavers seat uniformly; 3) Edge restraints (plastic/metal/treated timber/concrete curbs) mechanically anchored to prevent lateral spread; 4) Jointing with polymeric sand or coarse joint sand and proper compaction to lock units together; 5) Mortar or construction adhesive for installations where pavers must be fixed to a slab or vertical surface (specific limited cases); 6) Mechanical reinforcement for slopes/raised edges (geogrid, pins, anchors, retaining curbs). These are used in combination—the base + edge restraint + jointing is the standard for stable, long‑lasting pedestrian patios.
How do I choose which method is right for my site (new build over soil/grass, overlay on concrete, sloped/raised areas, or fire‑pit)?
Decision guidance: - New build over soil/grass: full‑profile construction—excavate organics, compact subgrade, geotextile if very wet/weak, 4–6 in compacted open‑graded crushed stone base for pedestrian patios (more for vehicles), screed bedding sand, lay pavers, edge restraint, jointing. - Overlay on concrete slab: only if slab is sound, level or uniformly sloped, crack‑free and drains well. Use a thin screened bedding layer (follow manufacturer rules), mechanical edge restraint fastened to slab, and polymeric or approved jointing; otherwise remove slab and build full base. - Sloped/raised patios: increase base thickness where settling is risk, use geogrid or engineered reinforcement on weak subgrades or steep slopes, install robust edge restraints or concrete curb with anchors and grade stakes; consider retaining walls for raised edges. - Fire‑pit areas: use non‑combustible pavers and base; if the pit sits on pavers, use a full compacted base and consider mortar setting or a dedicated concrete ring for the pit to avoid heat‑related movement. When in doubt (slope > moderate, poor soils, heavy loads, drainage problems) consult an engineer or pro.
What materials and tools will I need for a typical DIY patio paver installation that locks in well?
Materials: pavers, open‑graded crushed stone (base), bedding sand (ASTM C33 concrete sand), jointing sand or polymeric sand, edge restraint system (plastic/metal/treated timber/concrete curb), geotextile (optional), landscape fabric (where appropriate), acrylic or masonry sealer (optional). Tools: shovel, wheelbarrow, plate compactor (rental), hand tamper, vibratory plate for final compaction of pavers, screed rails and straightedge, level and string line, rubber mallet, masonry saw or paver splitter, broom, garden hose, caulk gun/adhesive applicator (if using adhesive), stakes, measuring tape, protective equipment. Optional: geogrid, rebar/anchor pins for slopes, mortar tools for set beds.
Step‑by‑step: How do I prepare the base and compact it so pavers don’t settle?
1) Mark and excavate: remove topsoil/organics to required depth (base + bedding + paver thickness + 0.5 in for compaction). 2) Check subgrade: remove loose material, proof‑roll; install geotextile if subgrade is wet or fine‑grained. 3) Spread aggregate base: layer open‑graded crushed stone in lifts (typically 2–3 in per lift) to total 4–6 in for pedestrian patios; more if needed for heavier loads. 4) Compact each lift: mechanically compact to specification (ICPI recommends high compaction—follow local guidance; aim for stiff, uniform base). 5) Final screeded bedding: place nominal 1 in (25 mm) of ASTM C33 bedding sand on top of compacted base and screed to an even profile—do not use bedding sand to correct base irregularities. 6) Check slope: ensure finished surface has positive drainage away from structures (typical ≥1.5–2% slope). 7) Install pavers and edge restraints, then compact pavers with a plate compactor using a protective pad and sweep jointing sand into joints.
How should I lay pavers and handle cutting to minimize movement later?
Answer: Start from a straight permanent edge or string line and work outward in the chosen pattern. Use interlocking patterns (herringbone, stretcher bond, basketweave) appropriate to load—herringbone gives the best interlock for resisting lateral forces. Keep pavers tightly butted (consistent joint width), leave required expansion joint gaps against fixed structures, and cut border pieces to fit with a wet saw or splitter. Avoid walking on freshly laid pavers until seated and compacted. Good layout and tight joints help transfer loads and reduce movement.
What’s the difference between regular joint sand and polymeric sand, and when should I use each?
Answer: Regular joint sand (coarser, often ASTM C144 bedding/ joint gradation) is inexpensive and allows better permeability but can wash out or allow weed growth if joints are wide. Polymeric sand contains binders that activate with water to harden and resist erosion, insects, and vegetation. Use polymeric sand where joints meet the product’s temperature, depth and width requirements and when you want reduced maintenance and better resistance to washout—especially on overlays, slopes, or tighter joints. Follow the product technical data sheet (TDS) closely: joints must be clean and dry, and weather/cure windows respected. For permeable installations, use approved jointing products designed to remain permeable.
Next Articles
How to Care for a Paver Patio: DIY Maintenance Guide
Step-by-step DIY paver patio care: cleaning, weeds, joint sand, sealing, drainage fixes, and troubleshooting sinking or
How to Keep Patio Pavers From Moving: Fix and Prevent
Fix shifting patio pavers: diagnose base, bedding, drainage, edge restraints, and reset with proper compaction and joint
How to Maintain a Paver Patio: DIY Care, Repairs, Sealing
DIY steps to inspect, clean, remove weeds, fix uneven pavers, re-sand joints, treat moss, stain and reseal.