To prep ground for patio pavers, you need to excavate deep enough to fit a compacted gravel base (typically 4–6 inches for sandy soil, 6–8 inches for clay or silty soil) plus about 1 inch of bedding sand, then compact the base in 4-inch lifts, slope everything 1/4 inch per foot away from your house for drainage, and lock the perimeter with edge restraints before a single paver goes down. Get that sequence right and your patio stays flat for years. Skip any part of it and you'll be dealing with sinking, heaving, or shifting pavers before the first winter is over.
How to Prep Ground for Patio Pavers Step by Step

Felix Rowe
29 Jun 2026
Start with drainage and height: the two things most DIYers overlook
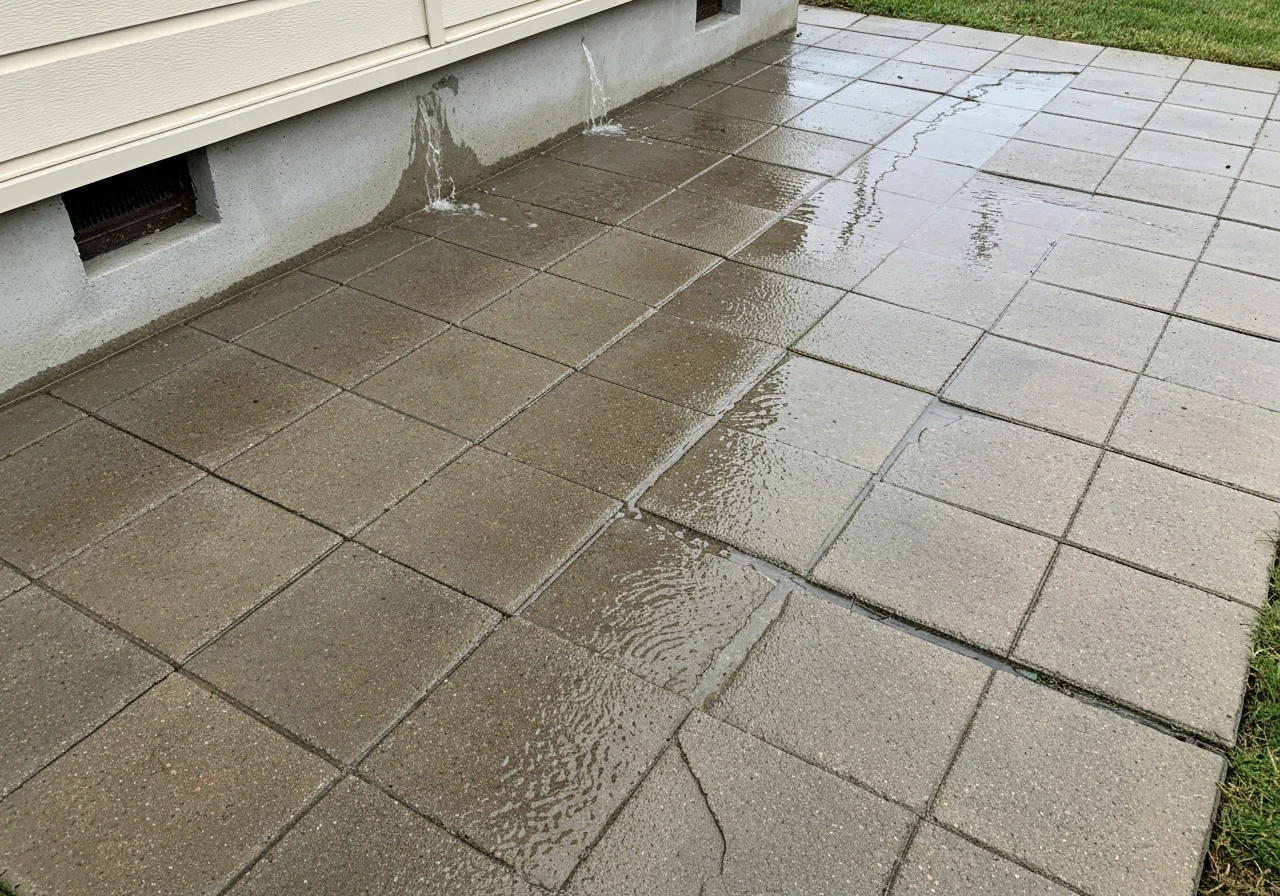
Before you grab a shovel, walk your patio area after a rain and watch where water pools or flows. Your finished patio needs to shed water away from your house at a slope of roughly 1/4 inch per foot (that works out to about 2%). Unilock frames it clearly: less than 1.5% slope won't drain adequately, and anything over 2% will have your patio furniture rocking on an angle. That 1/4-inch-per-foot target is the sweet spot, and both Home Depot and Lowe's installation guides agree on it.
Height matters just as much. Work out your finished paver surface elevation before you dig anything. Measure from a fixed reference point (a door threshold, a step, a foundation ledge) and calculate backward: finished paver surface height, minus paver thickness (typically 2 3/8 inches for standard concrete patio pavers), minus 1 inch of bedding sand, minus your compacted gravel base depth. Unilock describes a sand-set paver patio base as a compacted gravel or crushed-stone base for drainage and load-bearing plus a roughly 1-inch bedding layer of fine chip stone or HPB (and notes 1/8-inch clear chip stone alternatives) minus 1 inch of bedding sand. That total is how deep you need to excavate. Write it down and mark it on a stake before you start clearing.
Also check for underground utilities before any digging. Call 811 (in the US) at least a few days before you start. It's free, fast, and could save you from a very bad day.
Clearing, marking your layout, and removing what's there
Mark out your patio footprint with stakes and string or marking spray paint. Add about 6 inches beyond your planned paver edge on all sides when marking for excavation. This extra material is not wasted. Your gravel base and edge restraints need to extend past the finished patio edge to perform correctly, and Unilock specifically calls out over-excavating the perimeter as a required step for this reason.
Strip out everything inside the marked area. That means sod, topsoil, roots, and any organic debris. Topsoil and organic matter compress unevenly over time, so you don't want any of it under your base. If there's existing hardscape like an old concrete slab or pavers, see the section below on tricky surfaces. For a typical grass-covered yard, a sod cutter (rentable for around $75–$100 per day) makes this step much faster than hand-digging, especially for areas larger than 100 square feet.
How deep to dig and how to build your base

Once the organic layer is gone, you're working with subsoil. The depth you need to excavate from that point depends on your soil type and your total base calculation from the planning step. Here's a practical reference:
| Soil Type | Compacted Gravel Base Depth | Bedding Layer | Typical Paver Thickness | Total Excavation Depth |
|---|---|---|---|---|
| Sandy or gravelly soil | 4–6 inches | 1 inch | ~2 3/8 inches | ~7.5–9.5 inches |
| Clay, silt, or mixed soil | 6–8 inches | 1 inch | ~2 3/8 inches | ~9.5–11.5 inches |
These figures come from Techo-Bloc's installation guide for segmented concrete pavers, and they align with what Concrete Network and Unilock recommend for residential patios. When in doubt, go deeper rather than shallower. A weak base is the number one reason paver patios fail, and the Angi research on common paver mistakes calls this out directly.
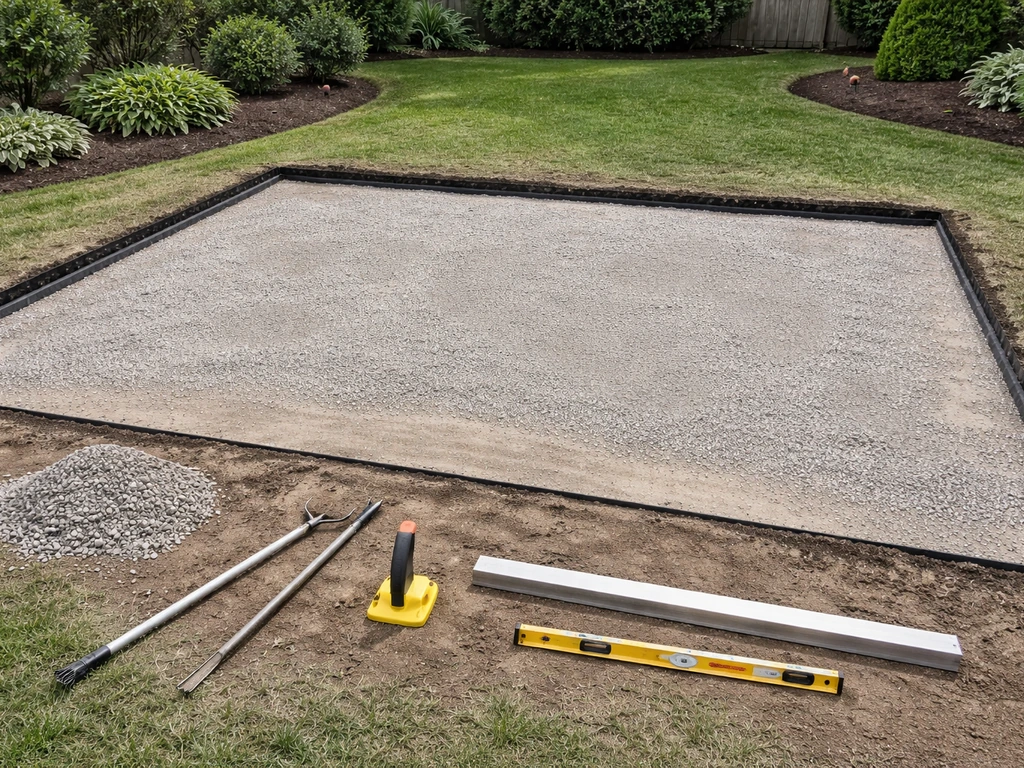
Use crushed stone or processed gravel (sometimes called compactible gravel base, Class II base, or crusher run depending on your region) as your base material. This angular crushed material locks together under compaction in a way that rounded river gravel simply doesn't. Fill and compact in lifts no more than 4 inches thick. A plate compactor can only effectively compress about 4 inches of material at a time, so if you dump 8 inches in and run a compactor over it once, the bottom half stays loose. That loose pocket will settle later and your patio will sink.
Adding and compacting each lift
- Spread your first 3–4 inch lift of crushed stone and rake it roughly level.
- Lightly mist the material if it's very dry. Overly dry aggregate doesn't compact well; overly wet aggregate can displace instead of locking. You want it just damp, not muddy.
- Make at least 4–6 overlapping passes with the plate compactor over the entire area, changing direction on alternate passes.
- Check that the surface feels solid underfoot and doesn't show wheel marks after compaction.
- Add the next lift and repeat until you reach your target base depth, leaving room for 1 inch of bedding material on top.
Rent a plate compactor rather than trying to do this with a hand tamper. For a standard residential patio, a forward-plate compactor with around 5,000 lb of centrifugal force is adequate. Unilock's contractor specs call for 10,000 lb and three minimum passes for driveway work, but a patio sees much lighter loads. Three to six passes per lift at residential patio specs is the practical DIY target.
Compaction, leveling, and setting up your screed surface
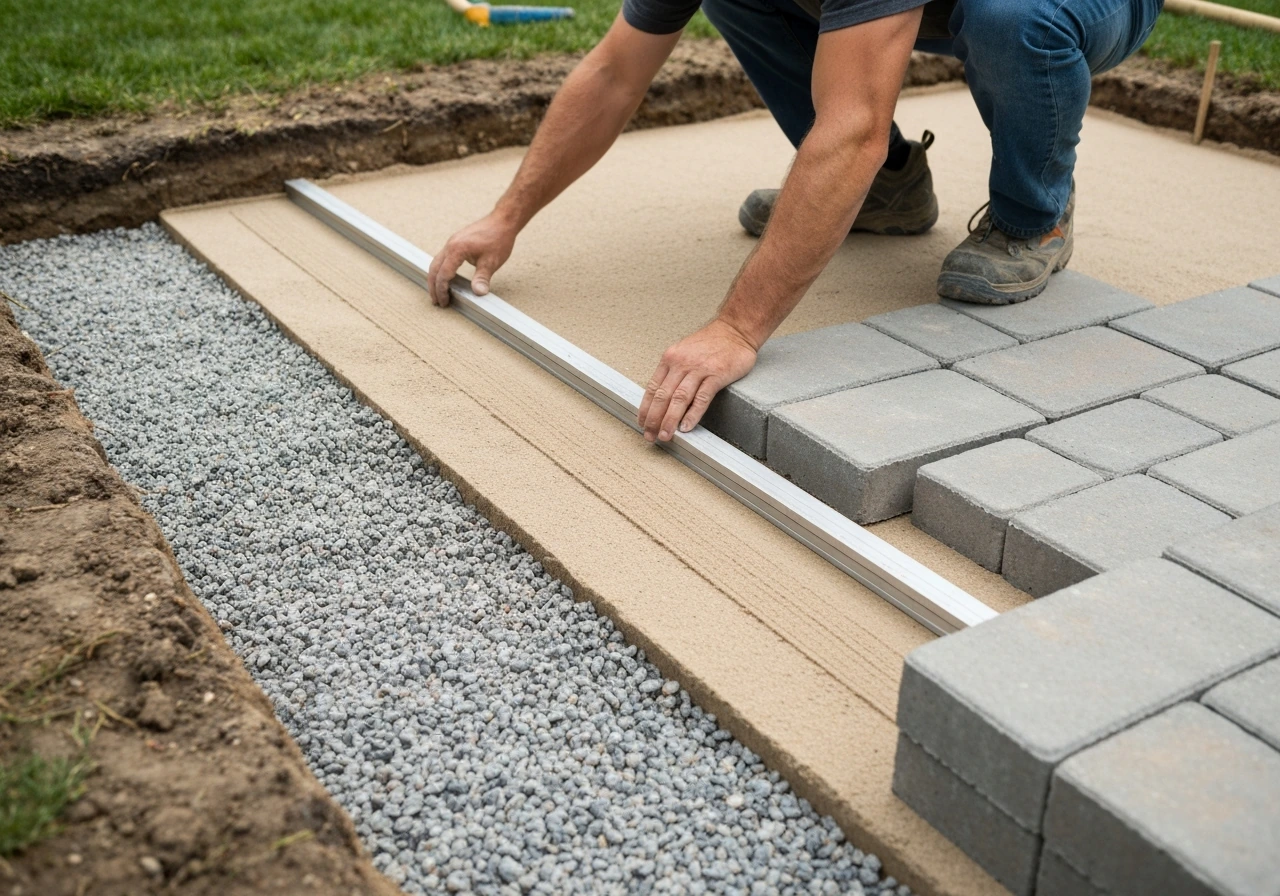
After your gravel base is fully compacted, it's time to set up for the bedding layer, which is what the pavers actually sit on. The standard approach is about 1 inch of coarse bedding sand (sometimes called HP bedding sand or chip stone) spread over the gravel. Don't use fine play sand or concrete sand for this. Coarse chip stone or concrete sand with angular particles compacts and drains better.
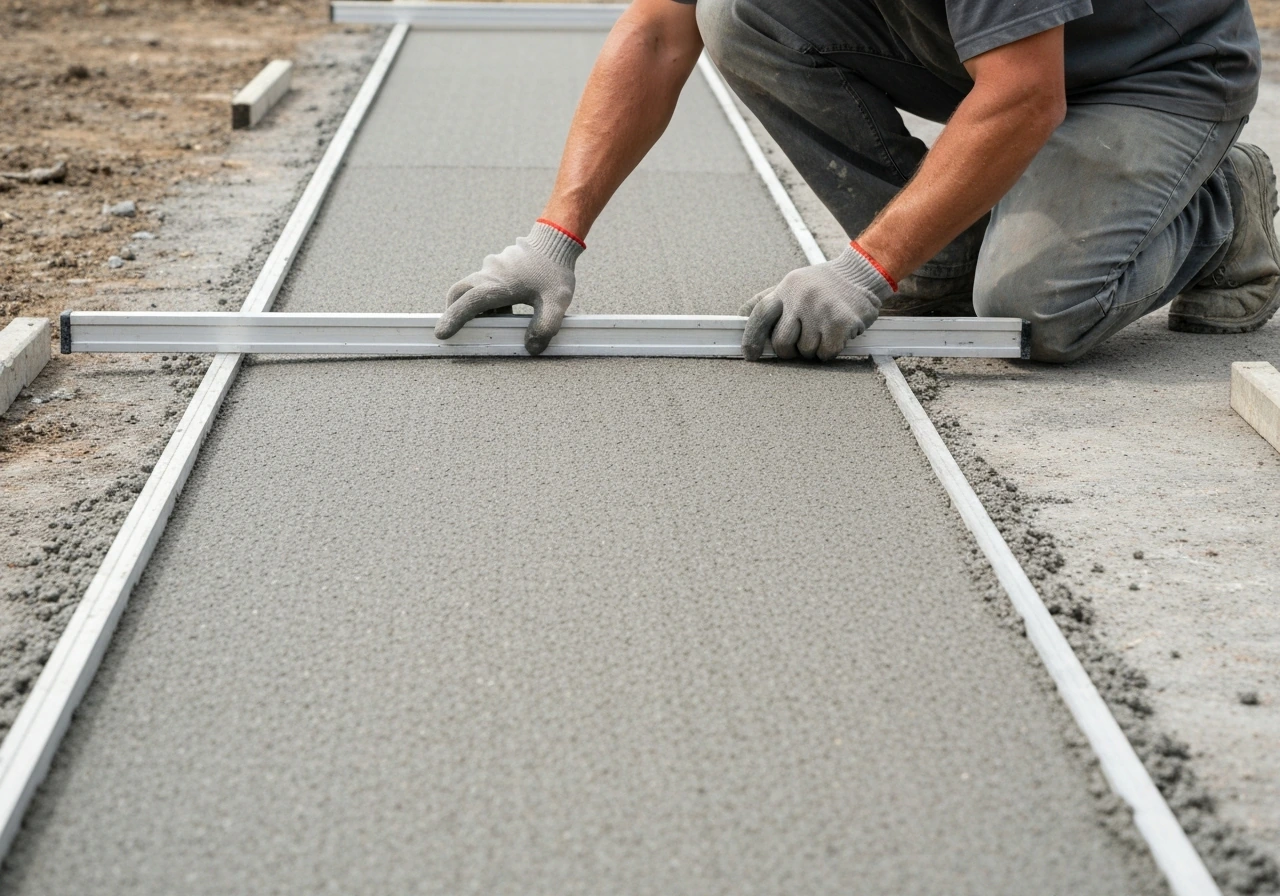
To get that bedding layer perfectly flat and sloped correctly, you'll screed it using straight metal pipes or purpose-made screed rails as guides. Set your screed pipes parallel to each other, about 5–6 feet apart, with their tops sitting exactly 1 inch above your compacted gravel base. Use your string lines (set at the correct slope from your reference points) to position the pipes at the right height and angle. Pull a straight 2x4 or aluminum screed board across the pipes to level the sand between them.
One critical rule during this step: once you've screeded a section, don't walk on the bedding sand. Any footprint or disturbance means you need to re-screed that spot. Unilock's basic tech guide is specific about this, and it's the kind of thing that trips up first-timers. Set up your screed rails so you can work in sections and always lay pavers from one corner outward, kneeling on the pavers you've already placed rather than on the sand.
Set string lines at 3–5 foot intervals across the patio to use as alignment references during paver placement. Unilock's advanced guide recommends this spacing to control joint straightness. Position the string about 1/4 inch off any adjacent wall so it doesn't catch on anything.
Edge restraints: why they matter and how to install them right
Edge restraints are what prevent the outside rows of pavers from slowly migrating outward over time. Without them, your patio gradually spreads, joints widen, and pavers start to rock and shift. Install them before you start laying pavers, not after.
The most common choice for DIY patios is plastic snap-edge restraint (sold under brand names like Snap-Edge or similar). It's flexible enough to follow curves, strong enough for residential use, and it's nailed down with landscape spikes through the base material. Reinforced mortar edging is another option if you want a more permanent border, but plastic edging is usually easier for a first project.
Install the restraint so it sits on your compacted gravel base, not on loose soil outside the excavated area. Techo-Bloc's edge restraint guidance is explicit that the spikes need something solid to anchor into, which means the base must extend under the restraint. Drive spikes every 16 inches for patio applications (Unilock's product data for SnapEdge style edging specifies this spacing for walkways and patios). For curves, you may need to cut or notch the edging and spike more frequently to hold the shape.
The top of the edge restraint should sit just below the finished paver surface so it's hidden once pavers are in place. Check this height before nailing anything permanently.
Dealing with tricky existing surfaces
Laying over grass
You cannot simply lay pavers over grass or topsoil. The organic material decomposes, the soil compresses unevenly, and you'll have a wavy, sunken patio within a season or two. Always strip turf and topsoil completely down to subsoil before building your base. If the area has heavy organic content even in the subsoil layer, dig out an extra 2–3 inches and replace it with compacted gravel.
Laying over concrete
An existing concrete slab can work as a base for pavers, but only if it's structurally solid. Check for cracks wider than 1/4 inch, sections that flex or hollow-sound when you tap them, and areas that drain poorly. Unilock notes that drainage is the biggest risk with paver overlays on concrete because water can get trapped between layers. If the slab is cracked but stable, you can fill cracks with polymeric sand or mortar before adding your bedding layer. If it's heaving or actively moving, the pavers on top will do the same. In that case, removal is the better long-term choice. When conditions look borderline, it's worth having a professional assess it before you invest in materials.
Dealing with uneven or sloped ground
Uneven subgrade means you'll need to cut and fill to create a consistent base depth. Low spots get filled with compactible gravel and compacted in lifts. High spots get excavated down. Never fill low spots with topsoil to save gravel costs. For a sloped site, your base will follow the slope (at your calculated 1/4-inch-per-foot drainage grade) but its depth stays consistent throughout. On steeply sloped sites, you may need step-down sections or a raised patio design, which changes the prep requirements significantly and often benefits from professional planning help.
Special note for fire pit areas
If your patio includes a fire pit, the area directly under and around it benefits from a slightly deeper base (aim for the upper end of your base depth range) and non-combustible materials throughout. Avoid using polymeric sand immediately around a built-in fire pit since repeated high heat can degrade the binders. Regular jointing sand works better in that zone.
How to know when your base is actually ready for pavers
Before any paver touches the screeded bed, run through this checklist. It takes five minutes and saves a lot of rework.
- Gravel base is fully compacted: no visible footprints or movement when you walk on it, and it feels rock solid underfoot.
- Base depth is consistent across the entire area: spot-check with a tape measure in multiple locations.
- Slope is correct: set a long level (or a string line with a line level) across the base from house to outer edge and confirm you have roughly 1/4 inch of drop per foot.
- Bedding sand is screeded flat and undisturbed: no footprints, no ridges, no low spots visible.
- Screed pipes have been removed and the channels filled and leveled.
- Edge restraints are installed, spiked, and sitting at the right height.
- String lines are set and taut for alignment reference.
- You've confirmed the first paver corner position and have a clear starting point.
If all of those are true, you're ready to lay pavers. Don't rush this sign-off. Fixing base problems after pavers are down means pulling pavers up, resetting the bed, and starting over, which is a frustrating afternoon you can easily avoid.
Common mistakes, troubleshooting, and what to realistically expect
Mistakes that bite DIYers most often
- Not digging deep enough: If you try to save time by skimping on excavation depth, the math just doesn't work. Your finished patio ends up too high, or worse, your base is too thin and will settle.
- Compacting too thick a lift: Dump all your gravel in at once and it won't compact properly at depth. Always stay at or under 4-inch lifts.
- Skipping the slope: A flat patio looks great until the first rain. Water will find a way to pool somewhere, usually against your house.
- Setting edge restraints on loose soil: If the spikes aren't anchored in compacted gravel, the restraints will pull out over time and your edges will drift.
- Disturbing the screeded bedding sand: Any footprint before paver placement means that spot will be unlevel. Work from pavers you've already placed.
- Using the wrong sand: Fine play sand or mason sand for the bedding layer can wash out and allow movement. Use coarse bedding sand or chip stone.
When the base won't compact evenly
If you're running multiple passes and still seeing soft spots, check the moisture content of the material. Overly dry aggregate compacts poorly; add a light mist and try again. If the problem is localized, you may have hit a pocket of organic material or soft subsoil. Dig it out, fill with crushed stone, and compact in smaller lifts. If you're dealing with very wet conditions (standing water after rain), wait until the subgrade has dried out before compacting. Compacting wet clay subsoil can actually make it worse by smearing rather than consolidating it.
If the patio heaves or sinks after installation
Heaving in freeze-thaw climates usually means the base didn't get deep enough to get below or minimize frost influence, or water is pooling in the base layer (a drainage slope problem). Sinking usually means inadequate compaction or too-thin a base. If you want to cut costs, focus on getting the base and drainage right first, which is the core of how to pave a patio for cheap. Both problems require pulling up the affected pavers, fixing the base, and resetting. It's not fun, but it's very doable.
Realistic time and material expectations
For a 200-square-foot patio with no major complications, expect the base prep phase alone to take a full weekend for a DIY team of two. Excavation and debris disposal take longer than most people expect, especially if you're hand-digging or dealing with heavy clay. Renting a sod cutter and plate compactor makes the job manageable. Budget around $200–$400 for rental equipment (varies by region and duration), plus material costs for gravel (roughly 1 ton of compacted gravel base per 50–75 square feet at 6-inch depth, give or take by material density). If you're also thinking about the total material list for your project, covering everything from base gravel to pavers and polymeric sand, the full picture involves more planning steps that build on this groundwork. To help you size the materials and plan the job, see what you need to pave a patio total material list for your project.
The base prep is genuinely the hardest part of the whole project, both physically and mentally, because you spend a lot of effort on work that will be completely hidden when you're done. But it's also where the whole project lives or dies. Get this part right and everything that follows, spreading bedding sand, setting pavers, cutting edges, and sealing, will go smoothly and the finished patio will stay solid for a decade or more.
FAQ
Can I lay patio pavers directly on existing gravel or fabric without excavating?
Use landscape fabric only as a separator in certain cases, not as a replacement for excavation and compaction. If you still have topsoil or organic material, remove it first. Then place fabric to reduce weed growth between subgrade and base gravel, but keep the fabric from bunching, and do not rely on it to prevent drainage problems or frost heave.
What if I want to put pavers over an existing concrete slab, is any crack okay?
Yes, but only if the slab is truly stable and drains well. If water pools on or near the slab, an overlay often traps moisture and causes movement, even when the slab looks “mostly fine.” Patch only after confirming there is no active heaving or rocking, and be prepared to adjust the slope and drainage before adding bedding sand and pavers.
How do I know when my soil is dry enough to compact? (especially clay)
Do a simple “hand squeeze” check: if you can form a ball from the subgrade and it stays intact, it is likely too wet and will smear or pump under compaction. Wait for drying until the soil crumbles when squeezed, then compact in thinner lifts to avoid trapping moisture.
On a slope or uneven yard, should I build the base deeper everywhere or only in low spots?
If you need the patio deeper in one area, cut the high spots down and fill low spots with compactible gravel, then keep the base depth consistent relative to your finished-height plan. Avoid feathering with topsoil, and always compact in lifts at 4 inches or less, otherwise the base will settle unevenly and telegraph through the pavers.
What’s the best way to check whether my gravel base is truly level before bedding sand?
For DIY patios, aim for compacted base that is flat, not “mostly flat.” A slight hump can create low joints that collect sand and water, which can wash out over time. Use a straightedge after each compaction lift, and correct high or low areas by regrading and re-compacting before you add bedding sand.
Can I adjust the final level by adding more bedding sand if the base isn’t perfect?
Use a consistent bedding thickness. If you overbuild bedding sand to “make up” for an uneven base, you increase the chance of settlement and rocking. Keep to the target bedding depth, screed it in sections, and only re-screed footprints you disturb, immediately.
What goes wrong if my edge restraints are installed on loose soil or at the wrong height?
Nail it down to the compacted base and make sure the top of the restraint is positioned just below the paver surface height. If spikes go through loose or soft material, they can loosen later, letting the edge migrate. For curves, cut and spike more frequently so the edge stays tight to the string line.
If my patio has a fire pit, should I still use polymeric sand for all the joints?
No. Polymeric sand is designed for joints where it can cure and stay sealed from repeated washout. In areas around a built-in fire pit, heat can degrade polymer binders, making joint failure more likely. Use regular jointing sand in the hot zone and consider a deeper base there as well.
How can I tell if my drainage plan is correct before laying pavers?
After rainfall, check for water movement across the excavated area, not just at the surface. If water follows a channel and pools elsewhere, you likely need to rework the base slope and possibly add drainage measures. Correcting drainage after pavers are down usually means lifting pavers, which is much more disruptive than adjusting base grade beforehand.
What’s the practical best way to handle screeding and paving in sections?
Yes, especially on large patios. Break the job into workable areas so you can screed, place pavers, and complete cuts in a continuous workflow. This reduces the chance you will walk on bedding sand or leave it exposed too long in weather.
What should I do if I keep getting soft spots after multiple compactor passes?
If compaction performance keeps failing in the same spot, stop and investigate rather than repeating passes. That pattern often indicates soft subsoil or a pocket of organic material. Remove the weak material, replace with compactible crushed stone, and compact in smaller lifts until the area holds firmness.
Next Articles
How to Prep for a Paver Patio: Full DIY Checklist
Step-by-step DIY site and base prep for a paver patio: excavation, grading, drainage, leveling, and troubleshooting.

How to Install Patio Pavers in Sand: Step-by-Step
DIY step-by-step how to install patio pavers in sand, from excavation and base prep to leveling, cutting, joint sand and
How to Make a Patio With Pavers and Sand Step by Step
Step-by-step guide to install paver patio with sand setting layer, from planning and base to leveling, cutting, joint fi