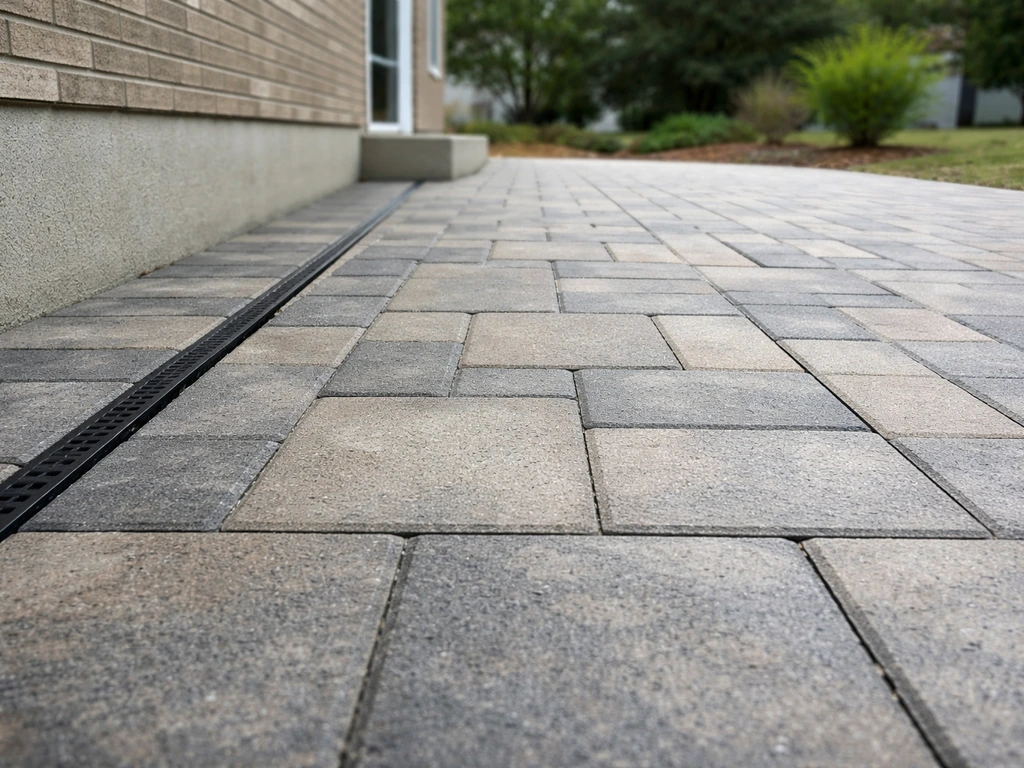
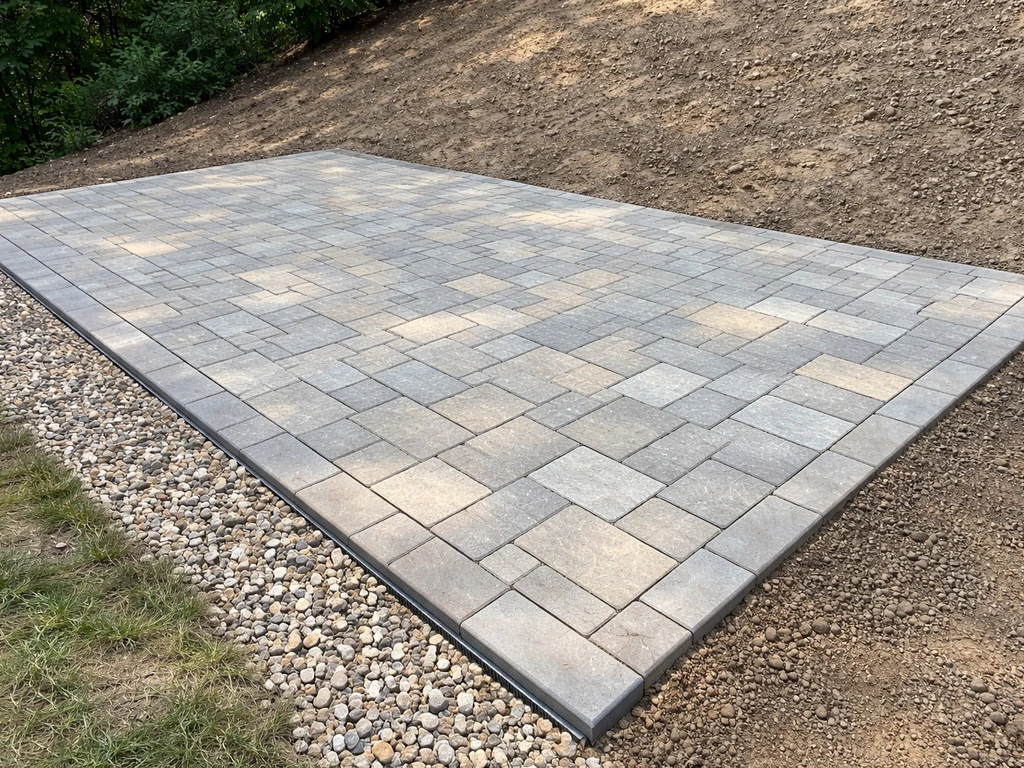
Slope your paver patio a minimum of 1/4 inch per foot away from your house. That's the practical sweet spot most DIYers use, and [it matches the 2% minimum required by building codes for impervious surfaces near a foundation](https://www. iccsafe. org/wp-content/uploads/proclamations/TN04-Rain-and-Groundwater-Management_pdf.
How to Slope a Paver Patio Away From the House

Felix Rowe
18 Jun 2026
pdf). IRC-related technical guidance commonly frames the R401. 3 “6 inches within the first 10 feet” rule as a 5%/2% grade requirement for surrounding grade and impervious surfaces (as applicable) [R401. 3 “6 inches within the first 10 feet” as a 5%/2% grade requirement](https://basc.
pnnl. gov/resource-guides/final-grade-slopes-away-foundation). On a 10-foot-deep patio, that gives you a 2. 5-inch drop from the house edge to the outer edge.
Get that number right from the start, build your base layers to match it, and you'll have a patio that sheds water cleanly instead of pooling against your foundation.
Why slope matters more than most people think
A flat patio sounds fine in theory, but in practice it's never truly flat. Compaction settles unevenly, pavers shift slightly over time, and even a surface that drains well on day one can develop low spots within a season. Without intentional slope built into the base, water has nowhere to go. It sits on the surface, works its way into the joints, freezes and expands in winter, and gradually undermines your bedding sand. Worse, if the patio pitches even slightly back toward the house, you're directing water straight at your foundation, which creates moisture problems in crawl spaces and basements over time.
IRC section R401.3 requires that impervious surfaces within 10 feet of a foundation be sloped a minimum of 2% away from the building. A related federal site drainage regulation (24 CFR § 3285.203) puts that in practical terms: at least 1/2 inch of drop per foot for the first 10 feet. That's actually the steeper end of the range. For a paver patio specifically, 1/4 inch per foot is the standard DIY target because it drains reliably without being steep enough to feel awkward underfoot or cause furniture to wobble. The important thing is that you deliberately engineer this slope into every layer of your project, not just eyeball the finished surface.
Planning your slope and drainage direction
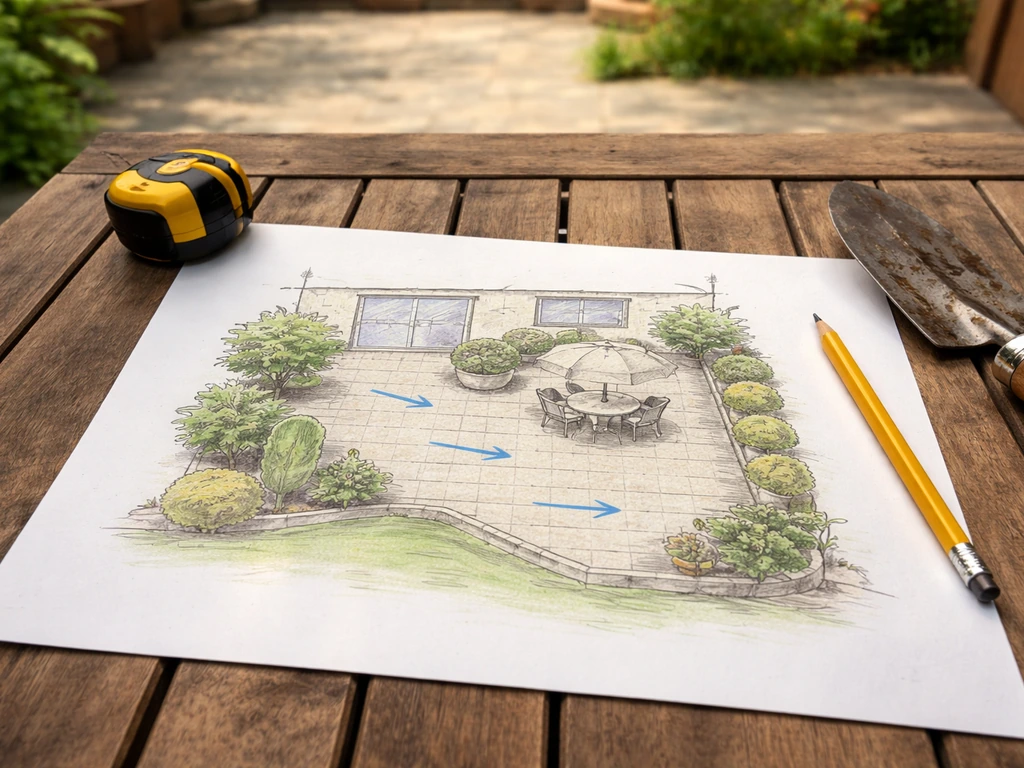
Before you dig a single shovelful, decide where the water is going to end up. Slope away from the house is the non-negotiable rule, but you also need to think about where it goes after it leaves your patio edge. Common drainage destinations include a yard area that can absorb runoff, a gravel drainage strip along the patio's far edge, a French drain, or a swale that redirects water toward a street or storm drain. Avoid directing runoff toward a neighboring property or an area that will just pool in a low corner of your yard.
Map out the slope direction on paper before you start. If your yard already has natural grade sloping away from the house, you're working with that, which makes life easier. If the yard is flat or grades back toward the house, you'll need to create the slope entirely through your excavation and base work. Patios on notably uneven or hilly terrain involve additional planning that goes beyond slope alone. Patios on uneven ground often need extra attention to excavation and base preparation to keep the slope consistent and the pavers stable how to install a paver patio on uneven ground.
Setting your slope targets
Run the math for your specific patio before you start marking grades. Use 1/4 inch per foot as your baseline. Multiply your patio depth (measured away from the house) by 0.25 to get the total drop from the high point at the house to the low point at the outer edge.
| Patio Depth | Total Drop at 1/4"/ft | Total Drop at 1/8"/ft |
|---|---|---|
| 8 feet | 2 inches | 1 inch |
| 10 feet | 2.5 inches | 1.25 inches |
| 12 feet | 3 inches | 1.5 inches |
| 16 feet | 4 inches | 2 inches |
| 20 feet | 5 inches | 2.5 inches |
The 1/4 inch per foot target is the right call for most patios. The 1/8 inch per foot minimum is technically acceptable in some references but leaves almost no margin for the minor settling that happens over the first year or two. If you build to 1/8 inch and a few pavers shift even slightly, you can end up with flat or near-flat sections that collect water. Build to 1/4 inch, and you have a real buffer. Following these steps will help you learn how to level patio pavers so the surface drains correctly over time.
Site prep: grading the slope into the ground
This is where the slope gets established, and it's the most important phase. Everything you build on top of this will follow the grade you set here, so take your time and get it right.
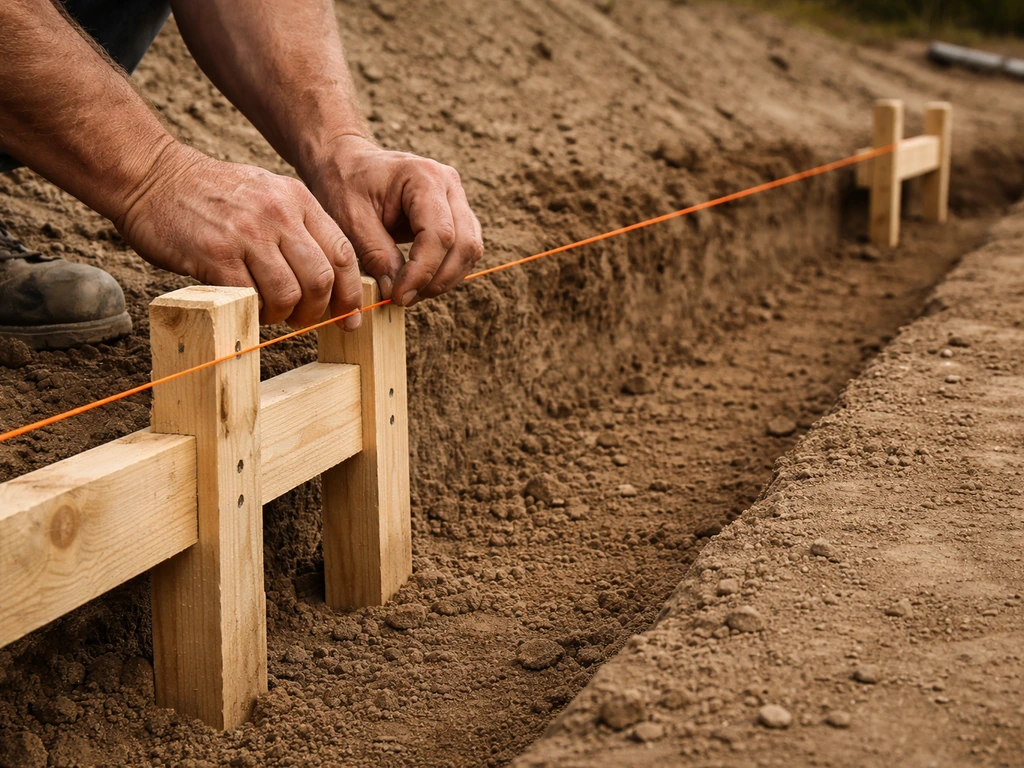
Marking your grade with batter boards and string lines
- Set batter boards at the corners of your patio layout, roughly 2 feet outside the actual patio perimeter so they stay in place while you work.
- Run string lines across the patio area. At the house edge, set one string line at your planned finished surface height. This is your high point.
- At the outer edge, drop the string line by your calculated total drop. For a 10-foot patio at 1/4 inch per foot, that string sits 2.5 inches lower than the house-side line.
- Use a line level or a digital level app on a long straight board to verify the string lines are set correctly. A water level works even better for longer runs.
- Mark the slope on stakes along the length of the patio too, not just the two ends, so you have reference points as you grade.
Excavation depth and setbacks
You need to excavate deep enough to accommodate your full base stack: typically 4 to 6 inches of compacted gravel subbase, 1 inch of bedding sand, and the thickness of your pavers (usually 2 3/8 inches for standard concrete pavers or around 2.5 inches for natural stone). Add those up and you're typically digging 8 to 10 inches below finished surface level. The key detail: your excavation bottom should mirror the slope you're targeting, not be dug flat with the slope compensated in the base layers. If you excavate flat and try to create a 2.5-inch slope using the base alone, you'll end up with uneven base depths and inconsistent compaction.
As you excavate, check your depth against your sloped string lines constantly. Set the bottom of the excavation at a consistent depth below the string line as you move across the patio. This keeps your base layers at uniform thickness throughout, which is what gives you even compaction and a stable surface.
Remove all grass, roots, and organic material. Tamp down the exposed subsoil with a plate compactor before adding any base material. If you find soft or wet spots, dig them out and backfill with compactable gravel. Skipping this step is one of the most common reasons patios develop low spots in the first couple of years.
Building a base that actually drains
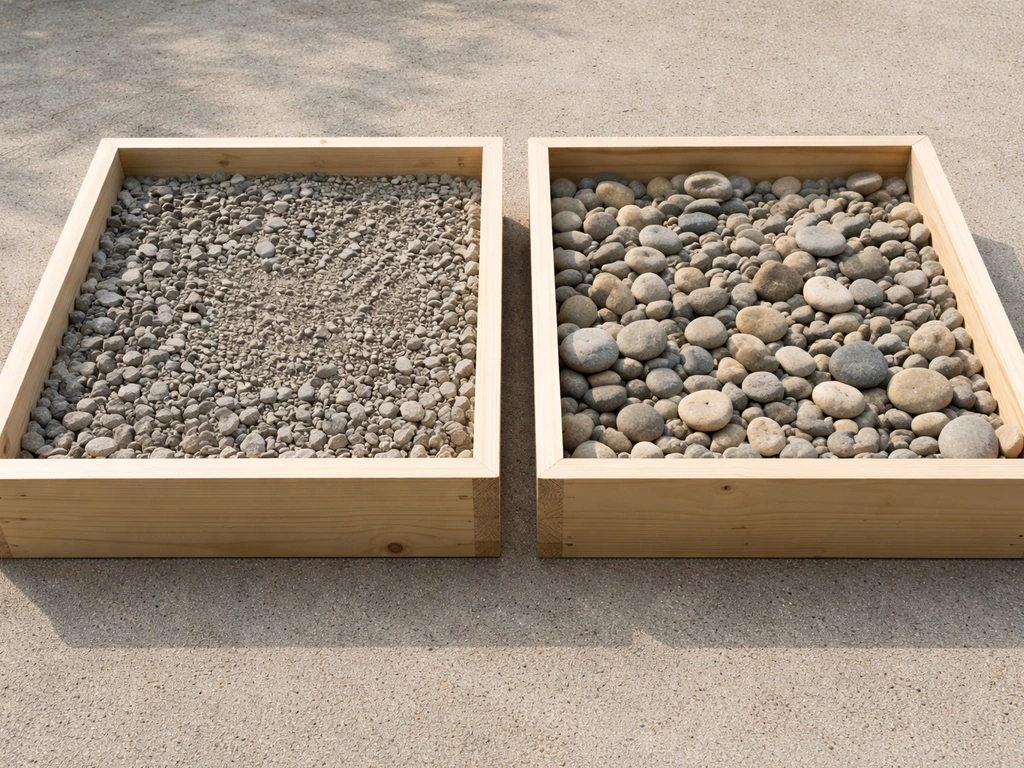
The gravel subbase
Use crushed angular gravel for the subbase, not rounded river rock. Crushed stone (often called processed gravel or road base) locks together when compacted. River rock stays loose and doesn't provide a stable platform. Spread the gravel in 2- to 3-inch lifts, compact each lift with a plate compactor before adding the next.
For a 4-inch subbase, that means two compaction passes. For 6 inches, do it in three lifts. Check the slope of your compacted subbase surface against your string lines before moving on. It should follow the same slope as your finished surface target.
To build a multi level paver patio, you can use the same slope and compaction approach, then step the excavation and drainage lines for each level.
The bedding sand layer
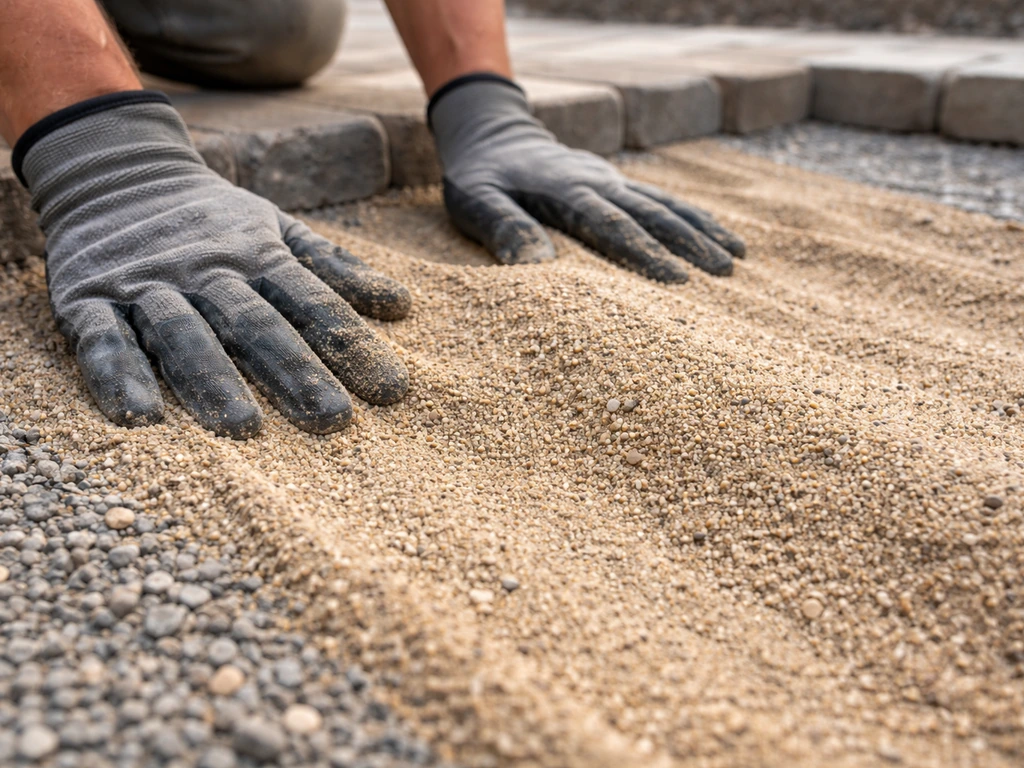
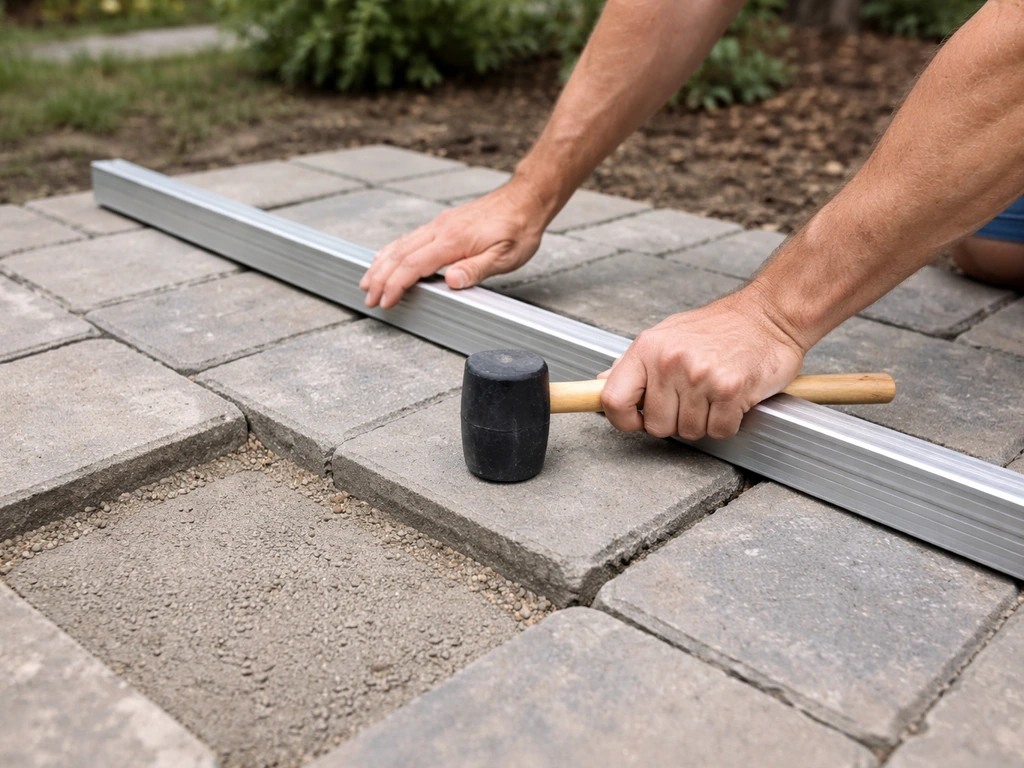
Use coarse concrete sand (sometimes labeled as washed coarse sand or torpedo sand), not fine play sand. Fine sand doesn't compact properly and will shift under load. Spread about 1 inch of sand across the compacted gravel base. Screed it to a consistent 1-inch depth using screed rails or pipes set parallel to each other, following the sloped grade you've established. Screeding creates a smooth, even surface for the pavers to sit on. Once screeded, don't walk on the sand layer before laying pavers. If you disturb it, re-screed that section.
A common mistake here is using the sand layer to correct errors in the gravel base grade. If your gravel base is slightly off-slope, fix it in the gravel, not by adding extra sand in some spots. Uneven sand depth compresses unevenly under the weight of the pavers and will create low spots over time.
Installing pavers while keeping the slope consistent
Setting up string lines for paver installation
Keep your slope string lines up throughout the entire paver installation. Set the string lines at finished paver surface height, with the same slope you've been working to. As you lay each row or section of pavers, check them against the string lines frequently. A good rule is to check every 4 to 6 square feet rather than waiting until you've laid a large area, because correcting a slope error across a large section means pulling pavers and re-screeding.
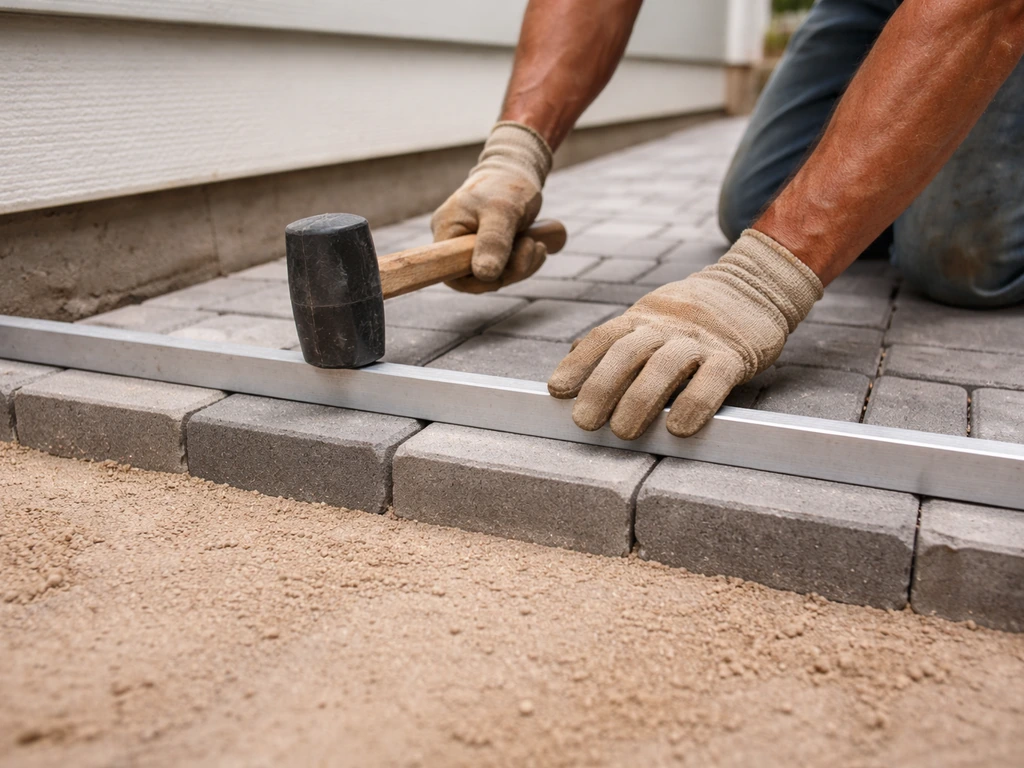
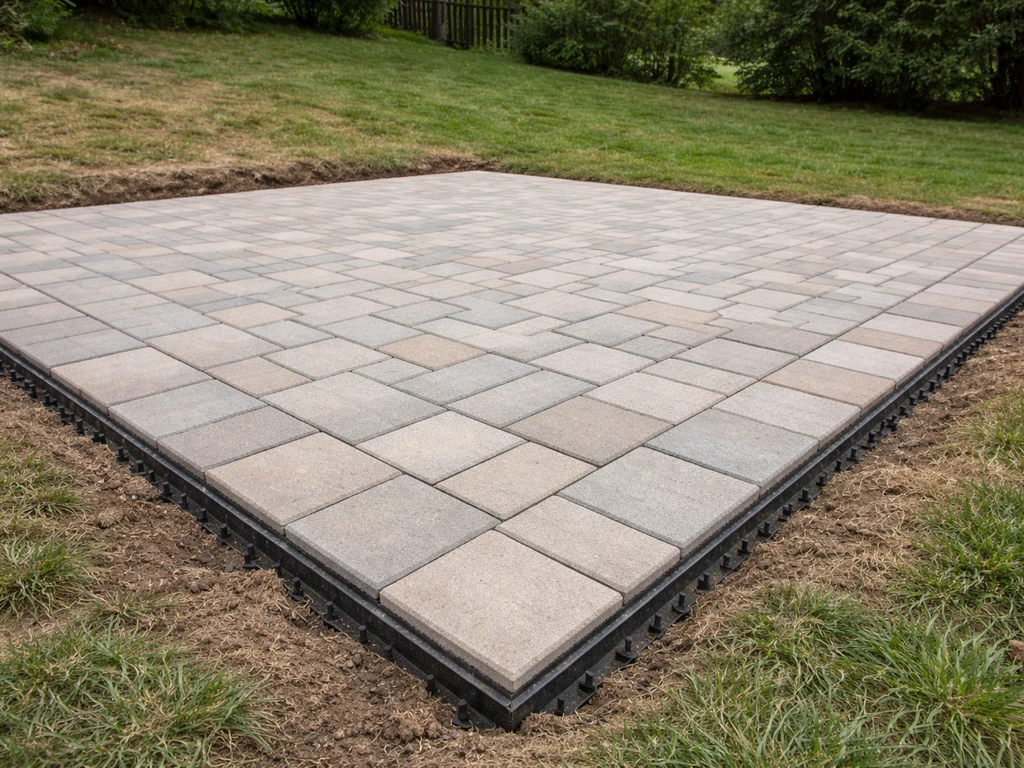
Installing edge restraints first
Plastic or aluminum edge restraints go in before you lay field pavers. They define the perimeter of the patio and prevent the outer pavers from creeping outward over time, which is what causes gaps and slope loss at the edges. Stake the restraints into the compacted gravel base (not just the sand) using 10- to 12-inch spikes. On a sloped patio, the outer edge restraint sits at the low point, so it also acts as a physical stop that keeps the bedding sand from washing out from under the edge pavers during rain events.
Laying and aligning pavers
Start laying from the corner closest to the house, working outward toward the low edge. This way you're always placing pavers onto undisturbed sand. Use a rubber mallet to set each paver, not a regular hammer. Check your slope with a long level (at least 4 feet) periodically across the patio surface, measuring perpendicular to the house. If you want a reliable baseline for how to measure slope for a paver patio, use a long level and measure perpendicular to the house as described above how to measure slope for paver patio. You want to see a consistent slope reading, not a mix of flat and steep sections.
Cut pavers for the edges and any irregular areas with a diamond blade wet saw or an angle grinder with a diamond blade. Measure each cut carefully because even small gaps along the edge can become channels where water collects rather than drains. If you're working around obstacles or curves, a paver splitter handles straight cuts quickly, but a wet saw gives you cleaner, more precise results for awkward angles.
What to do if the slope goes off track
If you check a section and find it's running flatter than your target, pull those pavers up, add a small amount of sand underneath, re-screed, and relay. If a section is running too steep, pull the pavers, scrape away a bit of sand, re-screed, and relay. It's tedious, but catching it as you go is far easier than pulling a completed patio to fix drainage problems after the fact.
Finishing steps that lock in your drainage
Polymeric sand for joints
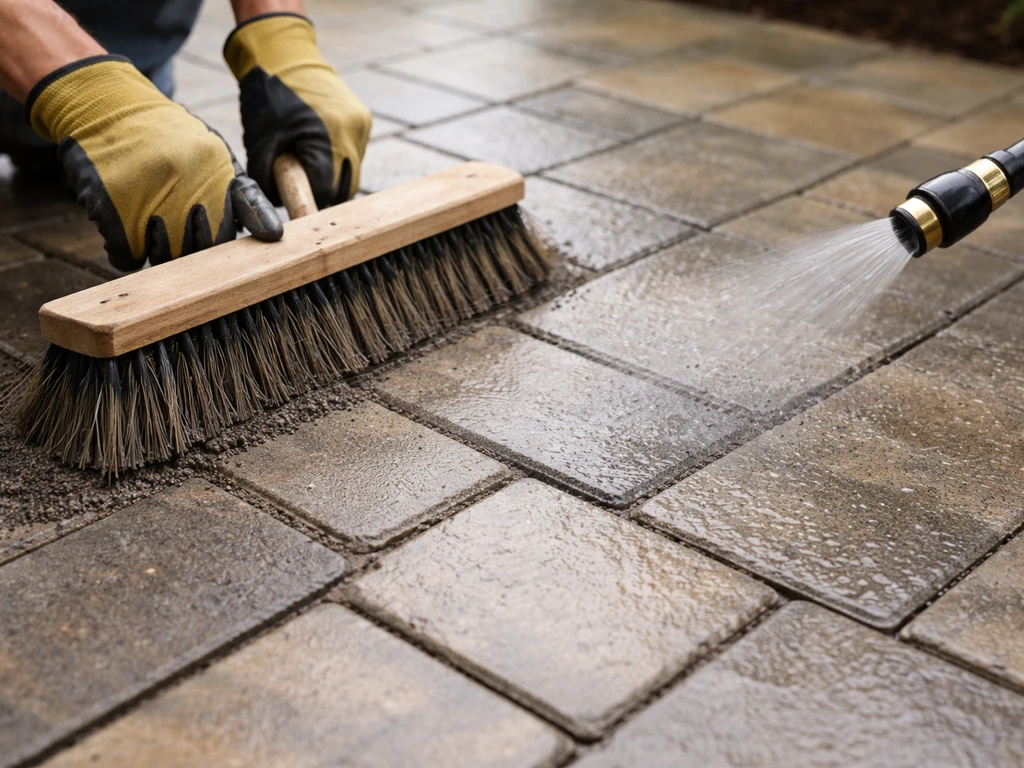
Polymeric sand is the right choice for a sloped patio. It contains binding agents that harden when wet, which means it resists washout from the water flowing across your patio surface. Dry regular joint sand washes out of joints on sloped surfaces relatively quickly, which then allows pavers to rock and shift. Pour polymeric sand over the patio surface, sweep it into the joints with a push broom, and then use a plate compactor over the entire surface to seat the pavers fully and work the sand deeper into the joints. Sweep in a second pass of sand, compact again, then use a leaf blower on low to remove any sand haze from the paver faces before activating with water.
Activate the polymeric sand by misting the entire surface with water. Follow the manufacturer's instructions carefully here because over-watering can wash the binding agents out and under-watering means the sand won't cure properly. Most products call for a fine mist spray in two or three passes, letting each pass absorb before the next.
Sealing: worth it on a sloped patio
Sealing is optional, but it adds real value on a sloped patio specifically. A quality paver sealer helps lock polymeric joint sand in place, prevents staining from organic debris, and makes the surface easier to clean. If you choose to seal, wait at least 30 days after installation to let the polymeric sand fully cure and the pavers to settle. Apply sealer when the surface is completely dry and temperatures are between 50 and 90 degrees Fahrenheit. Use a roller or pump sprayer for even coverage and apply in thin coats rather than one heavy coat.
Post-install checks: the work that most people skip
After the first significant rainstorm, walk the patio and look for any spots where water pools or drains slowly. Identifying low spots early, before they compound into bigger problems, is the whole point of this check. Minor low spots in the first season are common and fixable: pull the affected pavers, add a small amount of sand, re-seat, and re-sand the joints. Also check that the edge restraints are still fully secured and that no sand has washed out from under the outer edge.
Do a second check after the first winter if you're in a freeze-thaw climate. Frost heave can lift individual pavers or sections. Reset any pavers that have shifted using the same process: pull, adjust the sand bed, reset, and re-sand joints. Most patios that were built with a proper sloped base and good compaction come through the first winter in great shape, but a quick inspection saves you from bigger problems building up unnoticed.
Quick reference: your slope targets at a glance
| Specification | Minimum | Recommended for DIY | Notes |
|---|---|---|---|
| Code minimum (IRC R401.3) | 2% (1/4" per foot) | 2% (1/4" per foot) | Required for impervious surfaces within 10 ft of foundation |
| Federal site drainage (24 CFR § 3285.203) | 1/2" per foot | 1/4" per foot for patios | 1/2"/ft applies to surrounding grade, not paver surface |
| Practical DIY target | 1/8" per foot | 1/4" per foot | 1/4"/ft provides buffer for minor settling |
| Total drop on 10-ft patio | 1.25 inches | 2.5 inches | At 1/8" and 1/4" per foot respectively |
| Total drop on 20-ft patio | 2.5 inches | 5 inches | At 1/8" and 1/4" per foot respectively |
Tools you'll need for the job
- Batter boards and mason's string line
- Line level or water level (a 4-foot digital level works too)
- Measuring tape and marking stakes
- Plate compactor (rent one, don't skip this)
- Screed rails or 3/4-inch conduit pipes
- Long straight board or screed board
- Rubber mallet
- 4-foot level
- Diamond blade wet saw or angle grinder with diamond blade
- Push broom
- Leaf blower
- Garden hose with misting nozzle
When this guide doesn't cover your situation
This guide covers the most common scenario: a patio being built at grade on relatively stable ground with a clear drainage direction. If your yard slopes toward the house, or if your patio will be built on a significant natural slope, you're dealing with a more complex situation that involves retaining walls, stepped grades, or multi-level designs.
If your patio site is on an actual slope, use stepped planning and drainage targeting so the base stays consistent from high to low points how to build a paver patio on a slope. Similarly, if you're adding a patio to existing uneven ground with large grade changes, the excavation and grading process is considerably more involved.
Those situations deserve their own planning approach, and pushing forward with standard methods on genuinely difficult terrain is one of the most common reasons DIY patios fail.
If any part of this project involves working within a few feet of your foundation, also check your local building permit requirements. Many municipalities require a permit for paved surfaces over a certain square footage, and having an inspection on record is worth it if you ever sell the house.
FAQ
What if my patio is only 6 feet deep away from the house, do I still use 1/4 inch per foot for the slope calculation?
Yes, the method is the same, just the total drop changes. For a 6-foot-deep patio, 1/4 inch per foot means a 1.5-inch drop from the house edge to the outer edge. Use that total drop to set your string line and excavate the base bottom at the correct sloped elevation, then keep the bedding sand depth uniform.
Can I create the slope after the gravel base by using more or less bedding sand under some pavers?
You should not. Bedding sand is meant to be a thin, consistent setting layer. If you change sand thickness to chase drainage, it will compact differently under load and can create new low spots after a few months. Fix slope errors in the compacted gravel, then screed sand back to the same 1-inch depth everywhere.
How do I handle slope if the patio is not a straight rectangle (curves, angled edges, or irregular shapes)?
Establish the slope by projecting reference lines from the house outward. Keep string lines following the intended slope direction across each section, then verify with a long level that readings stay consistent perpendicular to the house. For irregular perimeters, cut pavers carefully and do not assume the slope will stay correct just because the outer edge looks aligned.
What should I do if I notice small low spots while laying pavers, before the surface is finished?
Correct them immediately. Pull the affected area, remove or add a small amount of sand only if needed to match the target grade, then re-screed that zone so it blends smoothly. Relay the pavers, re-check the slope with the long level, and then re-sand the joints in that corrected area.
Is it acceptable to use a 2% code-style slope instead of the DIY target, and will it feel too steep?
2% is about 1/4 inch per foot and it matches the DIY target for most patios, so it usually does not create a “too steep” feel by itself. The bigger issue is consistency, if your slope varies across the patio because the base is uneven, you can still end up with pooling even when the average slope is correct.
Do I need to slope the entire patio, including the area under tables or planters, or can those areas be flatter?
Slope should be continuous across the whole paved field unless you intentionally design a separate drainage feature. A flatter pocket under a heavy item can trap water and increase freeze-thaw risk at that location. If you want a flatter seating zone, plan a controlled drainage path (for example, a channel or slight diversion) rather than leaving an uncontrolled depression.
How can I tell after installation whether the patio actually drains correctly, not just that the slope “looks right”?
After a rain, do a controlled walk test. Look for lingering wet patches beyond a short timeframe, and check edges for dampness or washed-out joint sand. If water collects, mark the area, then correct by pulling pavers and resetting with proper slope, because surface patching usually does not fix the underlying drainage problem.
Should I compact the subbase in lifts, and what happens if I try to compact too thick in one pass?
Compact in 2- to 3-inch lifts. If you try to compact a thicker layer at once, the lower portion can remain under-compacted, leading to uneven settlement that flattens sections over time. Recheck the subbase slope after compaction with your string lines before adding bedding sand.
What’s the best way to ensure my edge restraint does not move when the patio is on a slope?
Install the restraints before placing pavers and spike them into the compacted gravel base, not just the sand. On a sloped patio, the restraint at the low point becomes the most critical edge because it acts as a stop against sand washout and edge creep, verify it stays level and fully seated along the entire perimeter before you start laying pavers.
Can I seal a patio with polymeric sand right away to protect it from early rain?
Wait for curing and settlement, typically at least 30 days. Sealing too early can interfere with the joint sand curing process, and it can also trap moisture in ways that increase staining or efflorescence. If early rain is unavoidable, focus on proper activation using the manufacturer’s misting instructions and avoid disturbing joints during the cure window.
Will polymeric sand still work if I accidentally over-water it during activation?
Over-watering can wash out binding agents, weakening joint stability, especially on sloped surfaces where water flows across the patio. If joints fail during the first heavy rain, expect rocking pavers and renewed washout. In that case, you may need to re-sand joints and re-activate according to the label directions, or in severe cases remove and reset the affected pavers.
What inspections or permits should I consider if the patio is within 10 feet of the foundation?
Even if the slope method is correct, many areas require permits or inspections for paved impervious surfaces over certain square footage, especially near foundations. Check your local requirements before construction so an inspector can confirm slope, drainage direction, and grading around the foundation.
Next Articles
How to Install a Paver Patio on Uneven Ground
Step-by-step DIY guide for installing paver patio on uneven ground, leveling, base prep, edge restraint, and troubleshoo
How to Build a Paver Patio on a Slope: Step-by-Step DIY
Step-by-step DIY for building a level paver patio on a slope, with grading, drainage, base prep, and anti-shift tips.
How to Level Patio Pavers: DIY Steps for Flat, Stable Results
DIY steps to level patio pavers, fix uneven or sunken areas, prep base and bedding, reset, compact, and add joint sand.