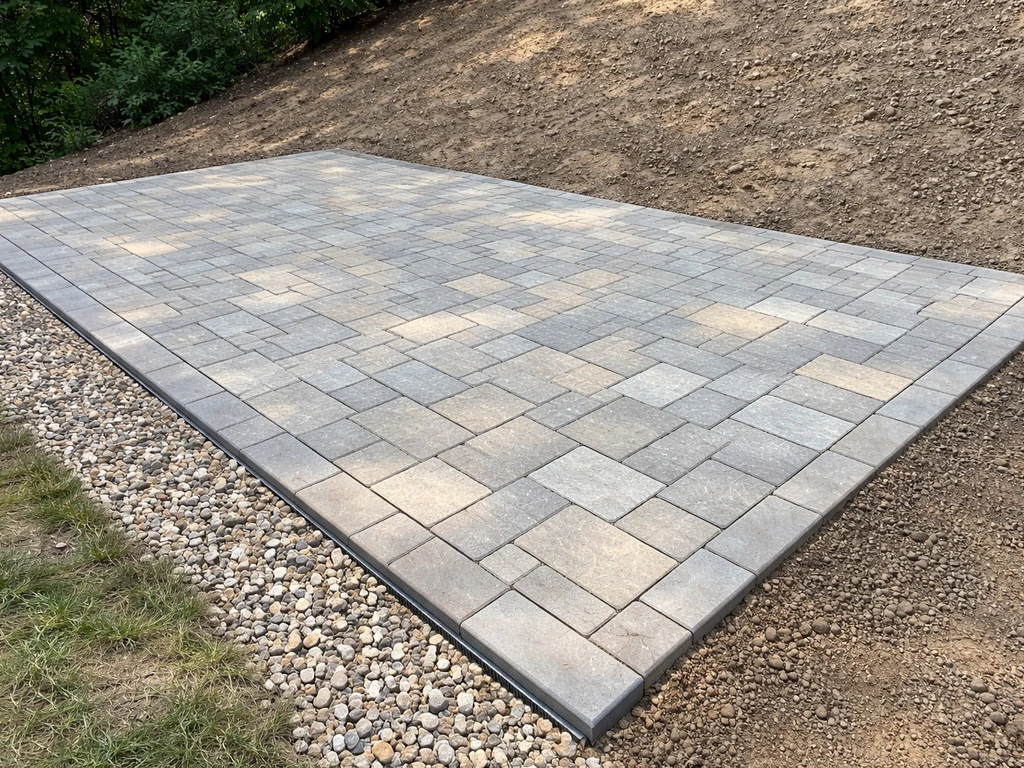
Yes, you can absolutely build a paver patio on a slope, and it's one of the more satisfying DIY projects you can tackle in a weekend (or two). The key is controlling two things: elevation and drainage. You need to cut the ground into a level or gently graded pad, build a compacted base that won't shift downhill, lock every edge with proper restraints, and maintain a deliberate 1% to 2% slope away from your home so water drains off the surface rather than pooling under it. If you get those fundamentals right, the rest follows naturally.
How to Build a Paver Patio on a Slope: Step-by-Step DIY

Felix Rowe
7 Jun 2026
Step 1: Assess Your Slope and Plan Drainage Before You Touch a Shovel
The single biggest mistake people make on sloped patio projects is starting the layout before they understand what the ground is actually doing. Spend 30 minutes measuring first and you'll save yourself days of rework.
Drive two stakes into the ground: one at the highest point of your planned patio and one at the lowest. Tie a string between them and use a line level (a small bubble level that clips to the string) to make the string perfectly horizontal. Then measure the vertical distance from the string down to the ground at the low-point stake. Divide that vertical drop by the horizontal distance between the stakes and multiply by 100 to get your slope percentage. For example, if your string is 6 inches above the ground over a 10-foot run, your slope is 6%, which is steep enough to need a retaining edge or terracing approach.
Once you know your existing grade, you can decide on your drainage target. The sweet spot for a paver patio surface is a 1% to 2% grade sloping away from the house. That works out to about 1/8 inch per foot at the low end, or 1/4 inch per foot at the high end. The Home Depot's installation guidance uses roughly 1 inch of drop every 8 feet as a practical target, which sits right in that 1% range. You want enough pitch to shed water quickly but not so much that furniture slides or the surface feels tilted underfoot.
If your yard drops steeply behind the patio, plan a drainage outlet now: a channel drain along the downhill edge, a dry creek bed, or a gravel-filled French drain running perpendicular to the patio. Ignoring this step is the main reason sloped patios wash out or heave after the first rainy season. If your slope exceeds about 3% across the patio area, plan on a retaining wall or raised-edge system on the downhill side to create a level pad.
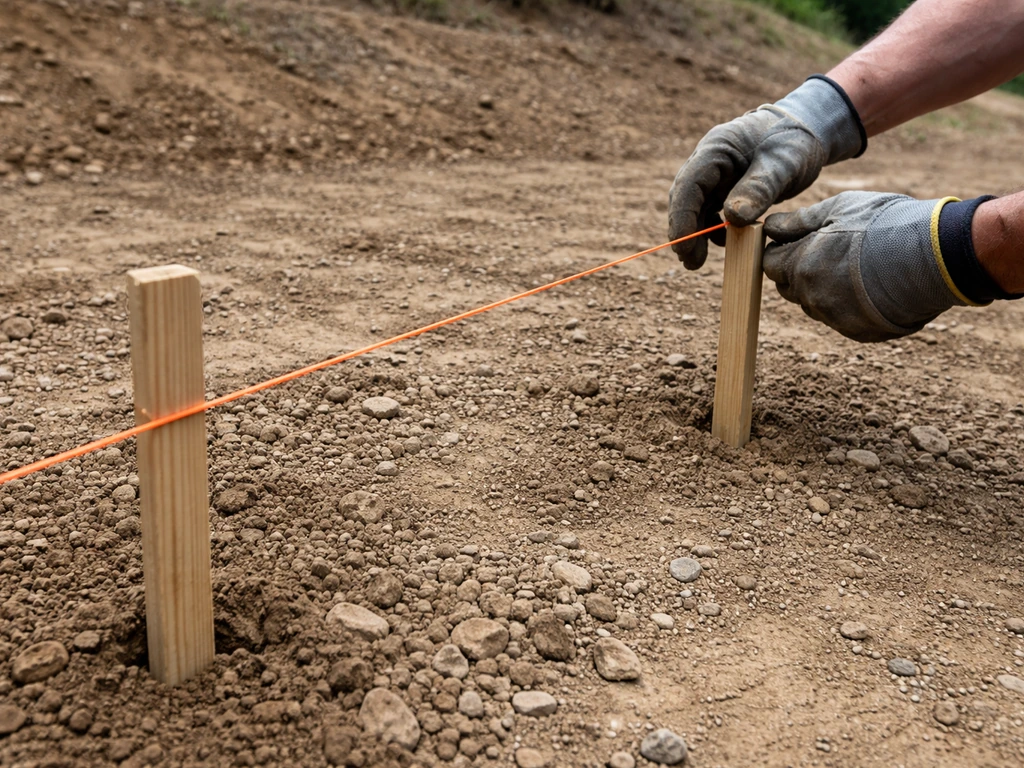
Step 2: Layout, Measuring, and Marking Lines on Sloped Ground
Laying out a rectangle on flat ground is straightforward. On a slope, strings sag, stakes shift, and what looks square from one corner isn't from another. Batter boards solve this problem. They're simple L-shaped frames made from 2x4 lumber that you set about 12 inches outside each corner of the planned patio area, far enough back that they won't be disturbed during excavation.
Set your batter boards so the crosspiece is at the planned finished-paver elevation. Run mason's string between opposite batter boards to create your perimeter lines, and use a line level or a laser level to confirm each string is level. Check for square by measuring diagonals: if both diagonal measurements match, you're square. This string grid becomes your reference for every elevation decision during the entire build. Mark the ground directly below the strings with marking paint or a chalk line before you start digging.
If you're building a patio that intentionally slopes away from the house (say, 1/4 inch per foot over a 12-foot patio), offset the string on the downhill side by 3 inches lower than the house-side string. That intentional drop is baked into the layout from the start, not guessed at later when you're laying pavers. Keep those strings up throughout the entire project as your elevation reference.
Step 3: Excavate and Build a Base That Won't Slide or Sink
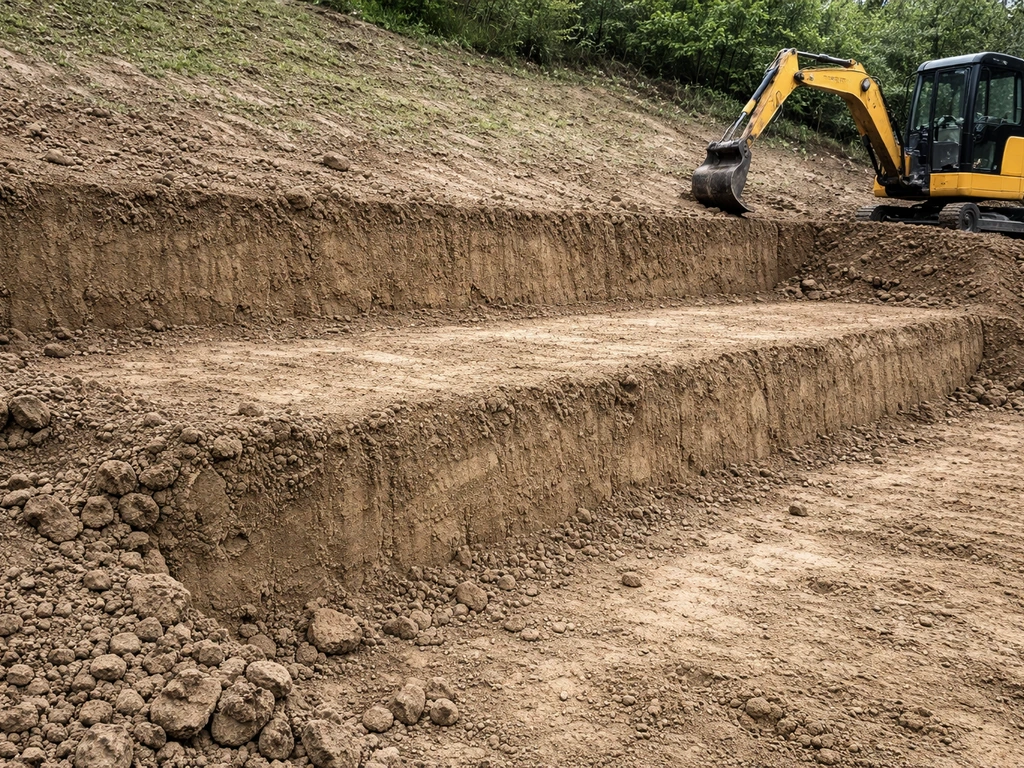
This is the most physically demanding part of the project, and it's where sloped ground adds real complexity. On flat ground you excavate to a consistent depth. On a slope, you're cutting into the high side and building up the low side, which means the excavation depth varies across the pad.
How deep to dig
Measure down from your string lines to determine how much material to remove or add at each point. Your finished stack-up from bottom to top is typically: compacted subgrade, 4 to 6 inches of compacted gravel base (use more in cold climates or clay soils), 1 inch of bedding sand, and then your pavers. So you're excavating to roughly 6 to 8 inches below your finished paver elevation at the house side, then adjusting that depth as you move across the slope. Excavate into the hillside on the high end, not just at the house edge.
Geotextile fabric and base layers
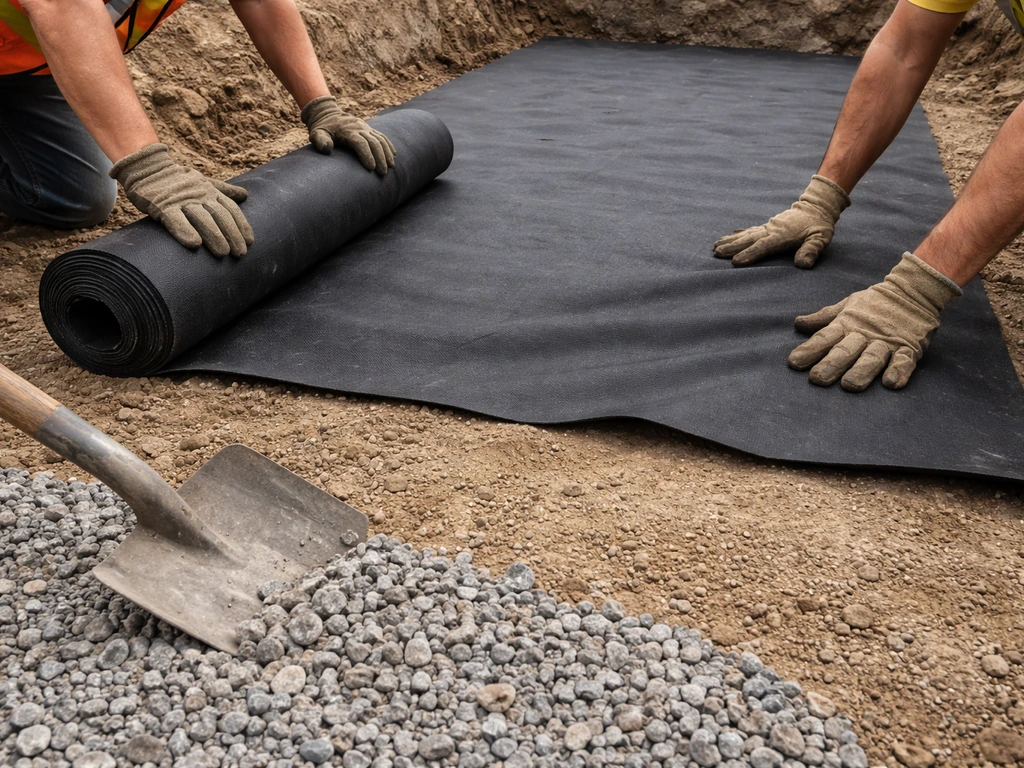
Once you've reached subgrade, compact the native soil with a plate compactor. If you have clay soil (slow to drain, sticky when wet), lay a geotextile landscape fabric over the subgrade before adding base material. In clay soil applications, US Fabrics (citing ICPI) recommends installing geotextile fabric under pavers to allow water passage while stabilizing the system US Fabrics (citing ICPI) recommends installing geotextile fabric under pavers in clay soil. The fabric separates the clay from your gravel base so fine particles don't migrate upward and contaminate the base over time, which would undermine stability. This is an especially important step on slopes where water movement through the soil is more aggressive.
Add your compactable gravel base (crushed stone, Class II base, or 3/4-inch minus aggregate depending on your region) in 2 to 3 inch lifts, compacting each lift with a plate compactor before adding the next. The ICPI standard calls for at least 95% Proctor density for pedestrian patio applications. You can't eyeball this in the field, but the practical rule is: compact each layer until the plate compactor stops moving the material around. On a slope, make passes in different directions to avoid pushing material downhill.
Screed your bedding sand to a consistent 1-inch depth across the entire pad. Use two pipes or screed rails laid parallel at the correct elevation (measured down from your strings) as guides. The ICPI recommends a nominal 1-inch bedding layer because thinner layers don't provide enough cushion for paver interlock, and thicker layers are more prone to shifting under load. On a slope, screeding horizontally across the pad is easier than trying to follow the grade with each rod pass.
Step 4: Edging and Restraints to Keep Everything from Sliding Downhill
Edge restraints aren't optional on a slope. They are load-bearing components of your patio system. Without them, the lateral pressure from the slope, water movement, and freeze-thaw cycling will push pavers apart, migrate sand out of joints, and eventually cause the whole surface to creep downhill. The Western Hardscape Association is clear on this: edge restraints around the entire perimeter are essential to prevent horizontal movement and bedding sand loss.
Choosing the right restraint system
For most residential patios, flexible plastic edge restraint (like Snap Edge or similar commercial products) with 10-inch steel spikes driven every 12 inches is the standard approach. On the downhill edge of a sloped patio, step up to a heavier-duty aluminum or steel restraint and increase spike frequency to every 8 inches. If your slope is significant enough that you're terracing (creating a flat pad in front of a hillside), you'll need a proper segmental retaining wall (SRW) on the uphill edge built with segmental wall blocks. That wall needs drainage: a gravel-filled drainage column behind it and weep holes or drain pipe at the base to prevent hydrostatic pressure from building up behind the wall. Saturated soil dramatically increases lateral earth pressure, which is one of the primary causes of retaining wall failure.
Install edge restraints before you start laying pavers on all sides where the patio meets open ground. On the house side, the foundation serves as your natural restraint. Set restraints tight against the outside edge of your gravel base and spike them into the subgrade, not just the base material.
Step 5: Setting Pavers on a Slope
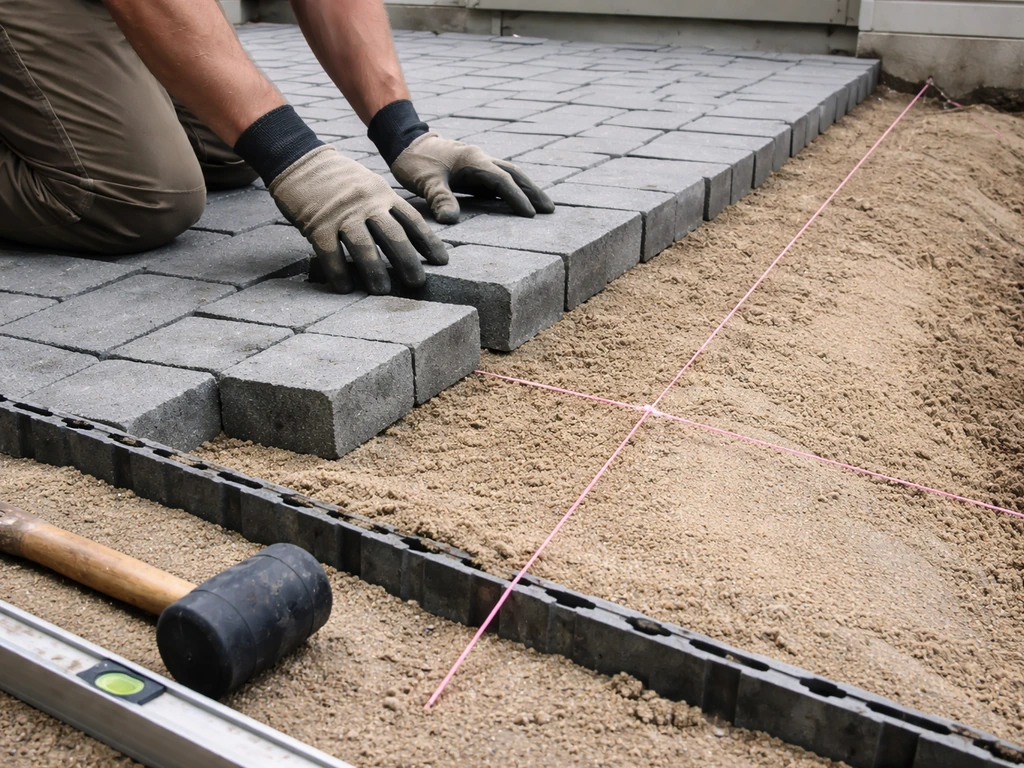
With your base compacted, bedding sand screeded, and edge restraints in place, you're ready to lay pavers. Start at the corner closest to the house (your high point) and work outward toward the low side. This way you're always placing pavers against an established edge rather than pushing against a free face on the downhill side.
Keeping pavers level across a sloped surface
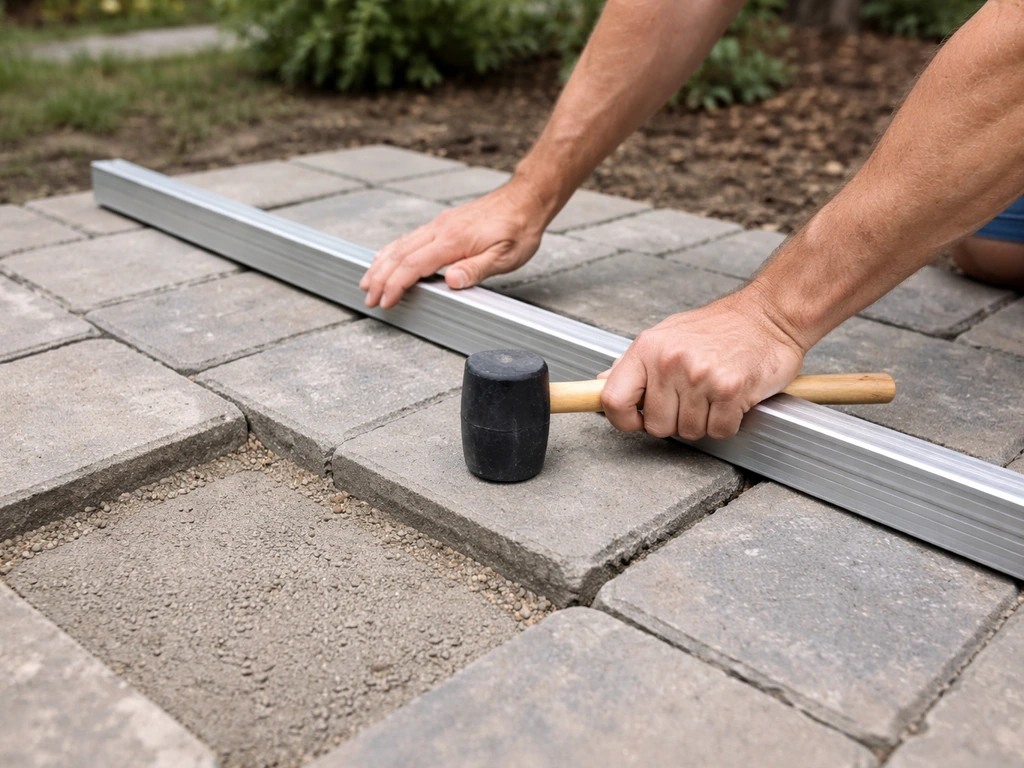
Use your string lines constantly. As you set each paver, check it against the adjacent string to confirm it's at the right elevation. On a gently sloped patio (1% to 2% drainage grade), you'll set the pavers with that slight intentional pitch built into the screeded sand bed. Follow these steps to level your patio pavers and keep the surface stable from year to year level patio pavers. Each individual paver should be level side-to-side (no rocking), with the elevation difference between rows creating the surface slope, not individual pavers tipping. A rubber mallet and a 4-foot level are your primary tools here. Set the paver, tap it into the sand, check with the level, adjust if needed.
If a paver rocks, pull it up, add or remove a small amount of bedding sand, and reset it. Never stack extra sand under just one corner to fix a rocking paver. That's a short-term fix that creates a long-term problem as the paver settles unevenly under load.
Slope transitions and managing joint lines
On a significant slope, joint lines can drift over several courses as small errors accumulate. Use a chalk line snapped every 4 to 6 feet to re-establish your grid and catch drift early. A consistent 1/8-inch joint between pavers is the target. If you're building across a grade change where the patio transitions from one level to another (like a step down), plan the step location at the beginning of a full paver row so you're not trying to split a transition mid-paver.
Step 6: Cutting Techniques and Coping Patterns for Irregular Grade
Cuts are unavoidable, especially along angled edges, curved borders, or step transitions on a sloped patio. The right tool depends on the number of cuts you need.
| Tool | Best For | Precision | Cost Range |
|---|---|---|---|
| Angle grinder with diamond blade | Small jobs, detail cuts, curves | Moderate | Tool: $50–$120 |
| Circular saw with diamond blade | Straight cuts on thinner pavers | Good for straight lines | Tool: $80–$200 |
| Wet saw (tile/paver saw) | High volume, precise straight cuts | Excellent | Rent: $60–$100/day |
| Paver splitter (guillotine) | Fast rough cuts, no power needed | Low to moderate | Rent: $40–$80/day |
For a sloped patio, you'll likely need the most cuts along the downhill and side edges where the patio meets the yard at grade. Plan your paver pattern so that cut pieces end up along the perimeter, not in the middle of the field. A running bond or herringbone pattern both handle slope well because neither relies on perfectly parallel long joint lines running the full length of the patio.
If your patio ends at a step or a retaining wall, use coping pavers (pavers with one bullnosed edge) along that transition. They provide a clean finished edge and reduce the tripping hazard at grade changes. Mark each cut with a pencil or chalk before cutting, and always wear eye protection and a dust mask. Dry-cut concrete dust is silica and it's genuinely hazardous.
Slope-Specific Troubleshooting
Even with careful prep, a few problems come up on sloped installs more often than flat ones. Here's how to handle them.
- Rocking pavers after install: Almost always caused by inconsistent bedding sand depth. Pull the paver, re-screed the sand in that zone, and reset. Don't try to fix rocking by pounding harder with the mallet.
- Joint lines drifting out of square: Snap a chalk line every few feet to re-establish your grid. A 1/16-inch error per paver becomes an inch of drift over 16 rows.
- Water pooling in the center: Your bedding sand grade wasn't maintained during screeding. Low spots collect water. If this happens after installation, you may need to lift pavers in the low zone, add sand, and re-screed.
- Sand washing out of joints: This is a drainage problem, not a sand problem. Check that your downhill edge has a clear outlet for water. Once drainage is corrected, refill joints with polymeric sand.
- Pavers creeping downhill over time: Your edge restraints aren't adequately anchored. Lift the downhill edge restraint, re-spike with longer or more frequent spikes, and re-seat the border pavers.
Step 7: Finishing Up: Leveling Checks, Polymeric Sand, Sealing, and Maintenance
You're in the home stretch. Before you compact and fill joints, do one final check with a 4-foot level and your strings. Walk the entire surface looking for high or low pavers. Fix them now while it's easy, because once polymeric sand is activated, making corrections means chiseling out hardened joints.
Compacting and filling joints
Run your plate compactor over the entire paved surface to seat all the pavers into the bedding sand. Use a rubber pad or piece of carpet under the compactor plate to avoid scuffing paver faces. After the first compactor pass, sweep dry polymeric sand across the surface and use a push broom to work it into the joints. Important: the pavers must be completely dry when you apply polymeric sand. Sweeping it over damp pavers causes haze on the surface that's very difficult to remove. Make multiple passes with the broom until joints are full to within about 1/8 inch of the surface.
Run the plate compactor again to drive sand deeper into the joints, then top off with another light sweep of polymeric sand. Once joints are full, blow or brush any excess sand off the paver faces, then activate the polymeric sand with a gentle shower setting on your hose. Saturate the joints thoroughly, then let it dry completely (usually 24 hours). Belgard and other major manufacturers recommend two water applications to ensure even activation through the full joint depth.
Sealing the surface
Sealing is optional but strongly recommended for sloped patios because water movement across the surface is more aggressive. Wait at least 90 days after installation before sealing to allow pavers to fully cure and any efflorescence to work its way out. Clean the surface thoroughly, let it dry completely, and apply a paver sealer with a pump sprayer or roller in two thin coats rather than one thick coat. A wet-look or satin sealer will enhance color and make future cleaning easier. Avoid sealing in direct sun or when rain is expected within 24 hours.
Ongoing maintenance
Joint sand is the most important maintenance element in any paver system, and on a sloped patio it needs more attention because gravity and water actively work to remove it. Inspect joints each spring and fall. If you see gaps, weeds taking hold, or sand that's washed low in the joints, clean the joints to full depth with a stiff brush or joint-cleaning tool, add fresh polymeric sand, compact lightly, and reactivate with water. When polymeric sand is installed correctly, it helps resist washout and can reduce weed growth and ant intrusion by keeping joint material in place reactivate with water. Re-seal every 3 to 5 years depending on sun exposure and traffic. This simple routine keeps your sloped patio stable for decades.
A Quick Comparison: Sloped Patio Approaches
Depending on how steep your slope is, you have a few different construction approaches available. Here's how they stack up:
| Slope Severity | Approach | Complexity | When to Use |
|---|---|---|---|
| Gentle (1%–3%) | Graded base with designed drainage pitch | Low to moderate | Most residential patios; surface drains naturally |
| Moderate (3%–8%) | Cut-and-fill with heavy edge restraint on downhill side | Moderate | Yard slopes visibly but isn't a steep hillside |
| Steep (8%+) | Terraced levels with segmental retaining wall | High | Hillside lots; requires proper wall drainage design |
| Multi-level | Two or more flat pads connected by steps | High | Large slopes; creates functional outdoor rooms |
For most homeowners reading this, a gentle to moderate slope is the scenario. A well-graded base with strong edge restraints on the downhill side handles it cleanly. If you're looking at a steep hillside or want to connect multiple elevation levels, a multi-level patio with proper retaining walls becomes the right move, but that's a significantly more involved project.
When to Call a Pro
This project is very DIY-able at gentle to moderate slopes. But there are a few situations where bringing in a professional is the smart call: if your slope exceeds 8% to 10% and you need a structural retaining wall taller than 2 feet; if you have expansive clay soil that shifts seasonally; or if there are existing drainage issues (basement water intrusion, erosion channels) that the patio needs to route around. Getting a retaining wall wrong on a steep slope is a safety issue, not just an aesthetic one. Everything else in this guide, from measuring grade to setting polymeric sand, is well within reach of a motivated DIYer with basic tools and a free weekend.
FAQ
Do I need to make the entire patio surface slope, or is it enough that the edges are restrained?
You need the whole surface to have a controlled pitch away from the house, usually around 1% to 2%. Edge restraints alone stop lateral movement, but they do not prevent pooling. Without the surface grade, water can collect on the flat high spots and accelerate joint sand loss.
What should I do if I discover the slope is steeper than I planned (for example, more than 3% across the patio)?
Re-plan before you excavate. If the site is steep enough to threaten stability, you may need terracing or a raised edge system on the downhill side, not just thicker base. A practical step is to run your layout strings again and calculate slope across the full patio footprint, not just the front edge.
How do I handle a slope if my patio footprint crosses from one soil type to another (like clay near the house and sand downhill)?
Treat it as a drainage and subgrade separation issue. Use geotextile where fine soil could migrate into the base, and consider consistent base depth across the transition so you do not create a weak, thin spot where the pavers will settle. If the difference is extreme, a pro assessment can be worth it.
Can I use compacted fill instead of gravel base on the low side where I’m “building up” ground?
Avoid random fill. The base needs to be a well-graded, compactable aggregate that reaches the required compaction. Use the same type of compactable gravel across the entire pad so the downhill buildup does not become a soft layer that later pumps or heaves.
Do I need geotextile fabric on all slopes, or only on clay?
It’s most critical when you have soils prone to migration, especially clay or silty subgrades that hold water. On sandy, free-draining soils you may not need it, but using fabric can still help separate subgrade from base and reduce long-term contamination. The decision depends on soil texture and local conditions.
What if my strings are level but the yard looks “off square” once I start digging, why does this happen?
Strings can be level while the reference grid is slightly skewed if the batter boards were placed or measured inconsistently. Re-check squareness using diagonal measurements before excavation becomes irreversible. Once you start cutting into the high side, small layout errors compound quickly, especially on longer patios.
Should I set screed rails following the slope, or can I screed level across the pad?
Screeding horizontally to achieve a consistent bedding layer thickness is usually easier and helps keep pavers properly supported. The surface pitch is then created by how the bedding layer elevation changes across the pad, controlled by your string-referenced measurements. The key is that the bedding ends up at the correct elevation everywhere, not just “level-ish” in appearance.
What’s the safest way to place polymeric sand on a sloped patio without making a mess or haze?
Apply polymeric sand when the pavers are completely dry, then sweep it in thoroughly with multiple passes until joints are nearly full. Avoid washing sand down the slope while activating it; use a controlled, gentle shower to wet joints evenly. If you already see haze, it can be difficult to correct, so test activation on a small area if you’re unsure.
How many times should I run the compactor before I fill joints, and where do mistakes usually happen?
Typically you compact after the base is set and screeded (before jointing), then compact again after spreading polymeric sand to seat joints. Common mistakes are over-compacting earlier (disturbing bedding sand) or compacting with sand already activated. Keep compactor strokes light and consistent, especially on a slope, to avoid pushing material downhill.
What should I do if I see gaps between pavers or sand has washed out after the first rain?
Treat it as a joint system problem, not a “top up sand” problem. Re-clean joints to full depth, add fresh polymeric sand rated for paver joints, compact lightly, and re-activate with water as directed. If washing is recurring, the root cause is often inadequate surface pitch, insufficient edge restraint, or a drainage outlet that was skipped.
Is sealing worth it on a slope, and what’s the main limitation?
Sealing helps because water movement across a pitched surface is more aggressive, and it can make staining and cleaning easier. The limitation is timing and prep, you should wait at least about 90 days before sealing so moisture and efflorescence can finish working out, and apply in thin coats with a full dry-off period. Also avoid sealing when rain is expected soon after application.
How often should I inspect and replenish joints on a sloped patio compared to a flat one?
Plan for more frequent checks because gravity and runoff move joint sand. A practical cadence is inspecting each spring and fall. If you live in a freeze-thaw climate or have heavy rainfall, you may need an extra summer check after the rainy season to catch early washouts.
Can I make a sloped patio DIY if I want a structural retaining wall, or is that a boundary where I should hire out?
If you need a retaining wall taller than about 2 feet, or the site slope is in the 8% to 10% range or higher, it’s safer to hire. Structural retaining walls involve hydrostatic pressure, drainage design (weep holes or drain pipe), and block engineering, and errors can fail years later. For smaller raised edges or terrace block borders, DIY is more feasible if you follow the system requirements.
Next Articles
How to Level Patio Pavers: DIY Steps for Flat, Stable Results
DIY steps to level patio pavers, fix uneven or sunken areas, prep base and bedding, reset, compact, and add joint sand.
How to Use Quikrete Patio Paver Jointing Sand: Guide & Tips
How to use Quikrete Patio Paver Jointing Sand: step-by-step application, tools, timing, coverage, and care.

How to Use Patio Paver Sand: Step by Step DIY Guide
Step-by-step guide to apply patio paver sand correctly: prep base, set pavers, fill joints, compact, and troubleshoot is