You can build solid, attractive paver patio steps yourself in a weekend or two. The key is nailing three things before you ever set a paver: correct rise and run measurements, a compacted gravel base that won't shift, and a consistent bedding sand layer that keeps every tread at exactly the same height. Get those right and the rest follows naturally.
DIY Paver Patio Steps: Plan, Build, and Finish Safely

Felix Rowe
15 Jun 2026
Choosing the right patio step design and layout
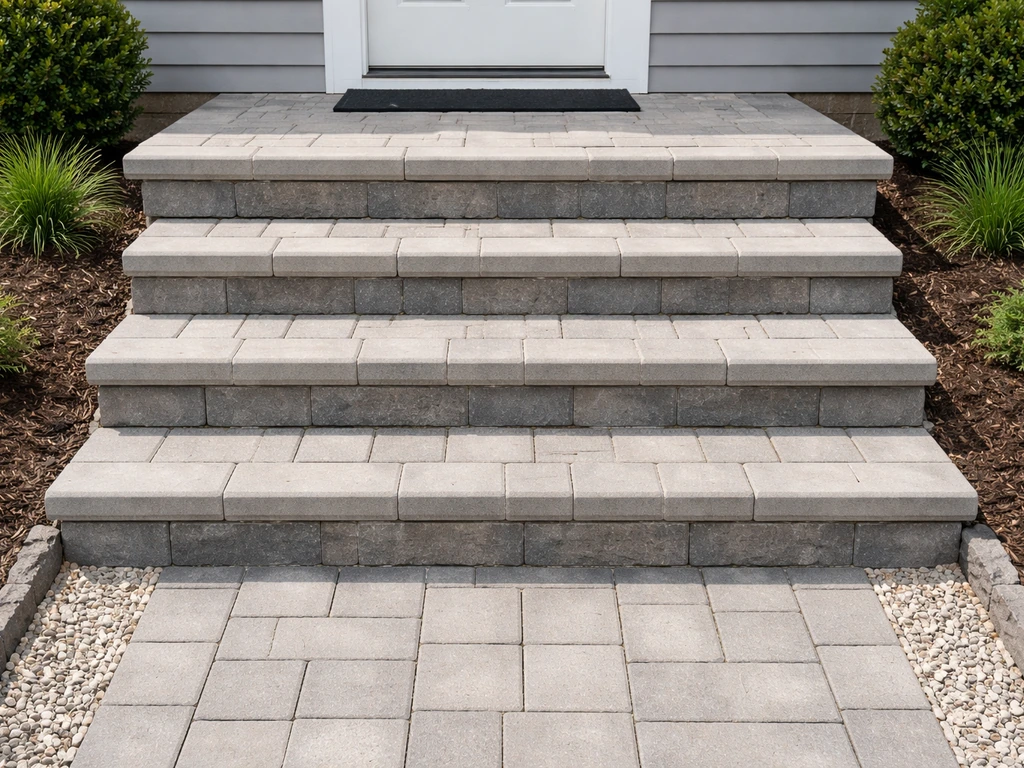
Before you buy a single paver, settle on a design that matches your actual site. The most common option for a patio transition is a straight single-flight run of steps leading from grade up to the patio surface. If your total rise is more than about 24 inches, consider breaking it into two flights with a level landing pad between them. Landings reduce stride strain, give you a natural rest point, and make the whole structure feel safer. A U-turn or switchback layout works well on narrow sites where a long straight run won't fit.
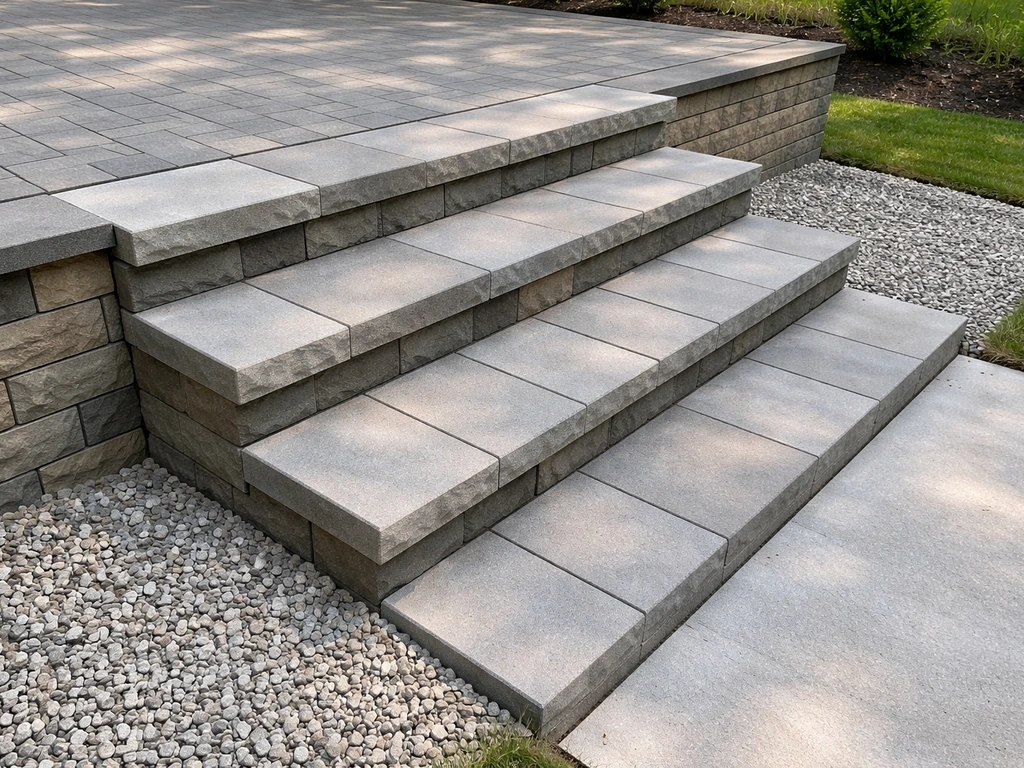
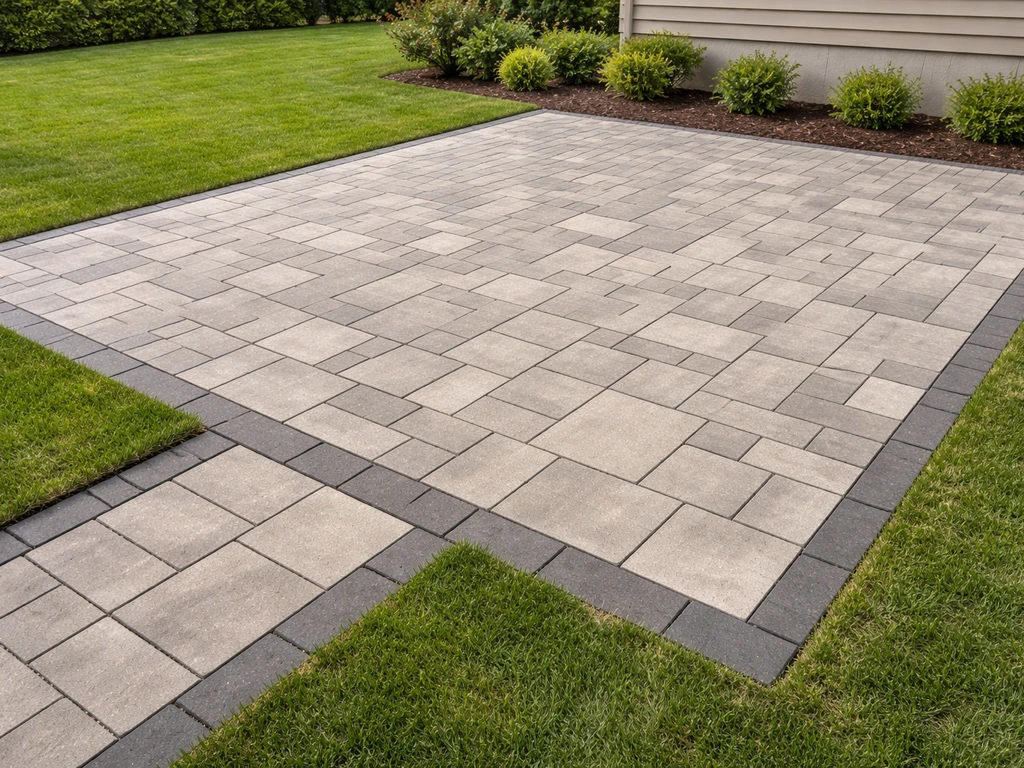
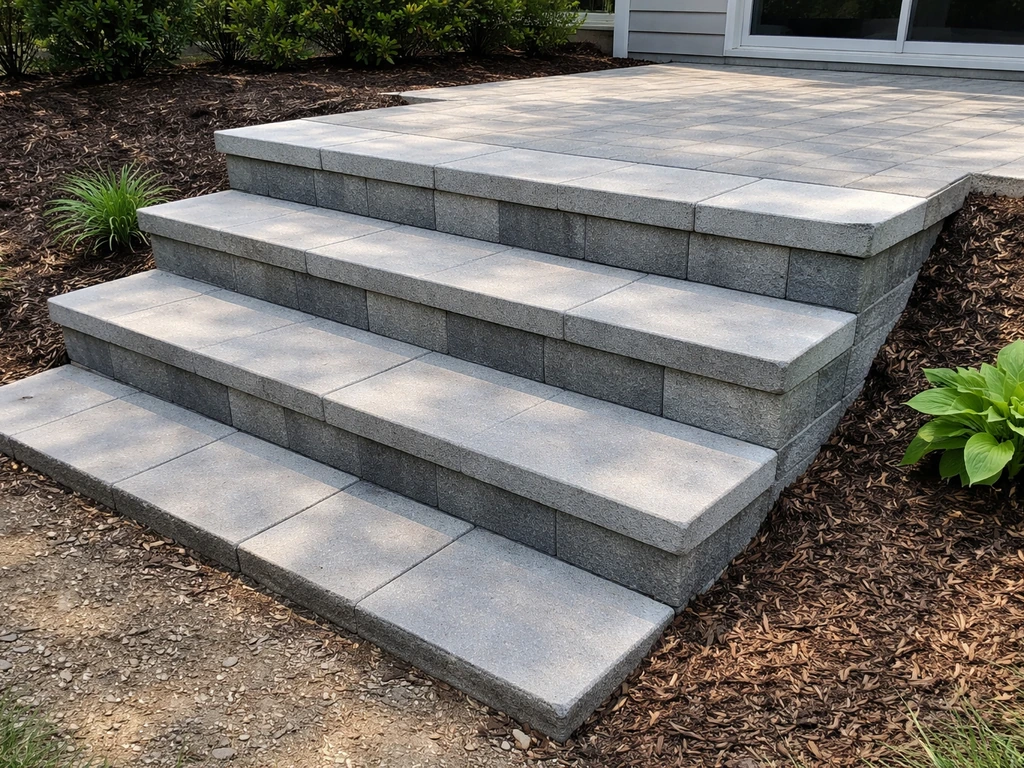
For the steps themselves, you have two main structural approaches. The first is a stacked-paver system where full pavers form both the riser face and the tread surface, with each step built on top of the previous one like a staircase of paver layers. The second is a poured concrete or CMU block core with pavers laid only on the tread and riser face as a veneer. The stacked-paver approach is more DIY-friendly because it uses the same materials and tools as the patio itself. The block-core method is better for very tall step runs or when you want a thinner paver profile.
Width matters too. Steps that feel generous and welcoming are typically at least 4 feet wide, and 5 to 6 feet is better for a main patio entry. Narrower than 3 feet starts to feel cramped and makes it harder to carry things in and out. Plan the width to align with your paver dimensions so you minimize cuts.
If you want inspiration for patterns, cap styles, and material combinations before committing to a layout, the patio paver steps ideas topic on this site covers those options in detail.
Materials and tools for DIY paver patio steps
Here is what you need to gather before starting. Having everything on site before you dig saves a lot of back-and-forth trips.
Materials list
- Concrete pavers for treads (and risers if using a stacked system): choose a paver at least 2.375 inches thick for structural treads
- Crushed stone/road-base gravel (compactable aggregate) for the base: plan for at least 6 inches of compacted depth, more on unstable or clay soils
- Coarse bedding sand (ASTM No. 9 or similar high-performance bedding sand): 1-inch screeded depth
- Geotextile filter fabric: placed on compacted subsoil before the gravel base
- Polymeric jointing sand: for joint widths between 1/8 inch and 1/2 inch; products like Techniseal EZSand work well for step joints
- Plastic or aluminum edge restraints with spikes: to lock perimeter pavers and prevent lateral spreading
- Paver adhesive/construction adhesive: for bonding the front edge of tread pavers or cap pavers to riser faces to prevent the tread from sliding forward
- Concrete block or solid retaining wall block (optional): for building up the riser core on taller step runs before capping with pavers
Tools list
- Plate compactor (rent one — essential for base compaction and for setting pavers after jointing sand)
- Sod cutter or spade for excavation
- Wheelbarrow and shovel
- Screed rails and a straight 2x4 for screeding bedding sand
- 4-foot level and a long straightedge or string line
- Rubber mallet
- Tape measure and chalk line
- Angle grinder with a diamond blade or a wet-cut paver saw (rent for cleaner cuts)
- Safety glasses, ear protection, and dust mask for cutting
- Broom and leaf blower for polymeric sand application
- Garden hose with a gentle spray nozzle for activating polymeric sand
Planning steps: measurements, rise/run, and base elevations
This is the most important phase. Do not skip the math here, every settling and tripping problem I have ever seen in DIY paver steps traces back to someone eyeballing the measurements instead of calculating them properly.
Calculating total rise
Measure the total vertical distance from the ground level at the base of your steps to the finished patio surface level. This is your total rise. Use a level and a tape measure, or set a string line at patio height and measure down to grade. Be precise, a half-inch error here will throw off every riser in the flight.
Riser height and tread depth
Under IRC residential stair guidelines, the maximum riser height is 7-3/4 inches and the minimum tread depth is 10 inches. For outdoor paver steps, most people find a 6-inch riser with a 12-inch tread depth comfortable and easy to walk. A quick check using Blondel's formula (2 x riser height + tread depth = 24 to 26 inches) confirms comfort: 2 x 6 + 12 = 24, which lands right in the sweet spot.
To find the number of steps: divide total rise by your desired riser height, then round to the nearest whole number. Then divide total rise by that number to get your exact uniform riser height. For example, if total rise is 19 inches and you want roughly 6-inch risers: 19 ÷ 6 = 3.17, so round to 3 steps. Exact riser = 19 ÷ 3 = 6.33 inches per step. That is within code and comfortable.
Laying out the horizontal run
Multiply the number of treads (always one fewer than the number of risers) by your tread depth to get your total horizontal run. In the example above: 2 treads x 12 inches = 24 inches of horizontal run from the base of the first riser to the patio edge. Mark this on the ground with stakes and string before you excavate. This tells you exactly how much of your yard you are disturbing.
Base elevation targets
Work backward from the finished patio surface. Your top tread must land flush with or 1/8 inch below the patio surface to avoid a lip that catches toes. Each step below that is one riser height lower. Mark the target elevation for the bottom of each paver layer on your stakes so you have a reference while building.
Also decide on drainage slope now, not later. Tread surfaces should be level side to side and slope no more than 1/4 inch per foot front to back for drainage. Do not tilt individual treads to create this slope, instead, build it into your base grade. The tread paver itself stays flat while the base underneath handles the pitch.
Site prep and base construction for safe, level steps
A paver step that shifts or settles almost always has a bad base. This section is where you spend most of your time, and it is worth every minute.
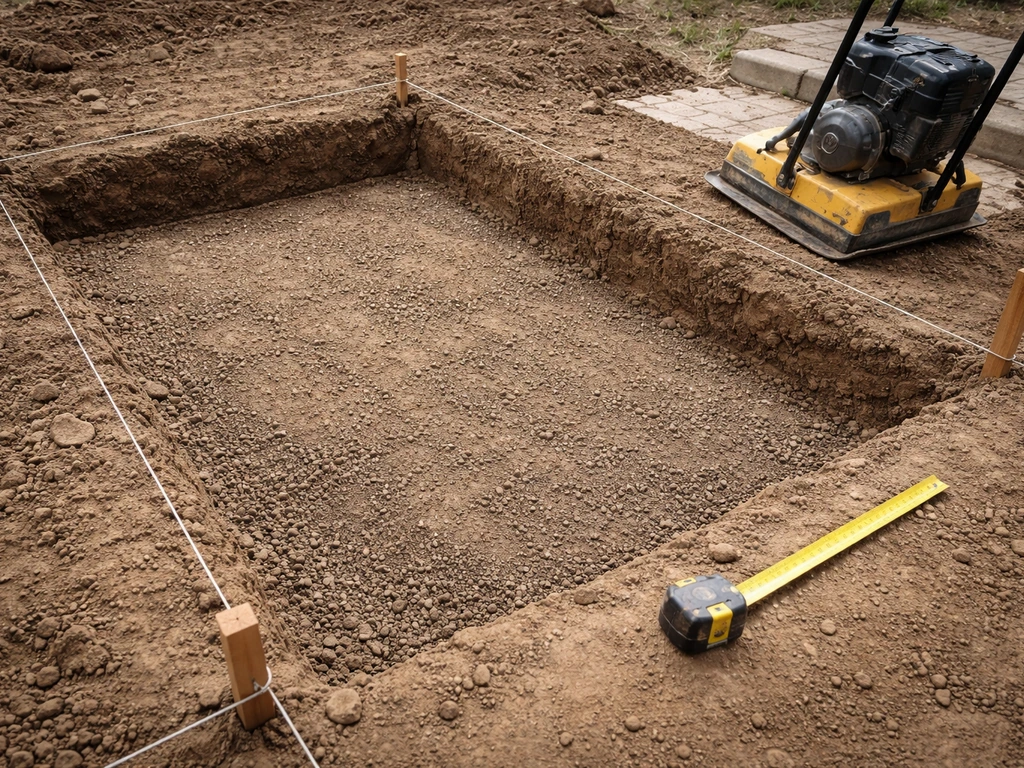
Excavation
Excavate the entire footprint of your step run plus 6 inches on all sides for edge restraints. Depth depends on your climate and soil: in freeze-thaw areas, dig at least 8 to 12 inches below finished grade to get below frost depth. In mild climates, 6 to 8 inches is usually enough. Remove all organic material, roots, and soft spots. If you hit clay or poorly draining soil, plan to add an extra 2 to 3 inches of gravel and make sure your geotextile fully separates the soil from the aggregate.
Compacting the subgrade
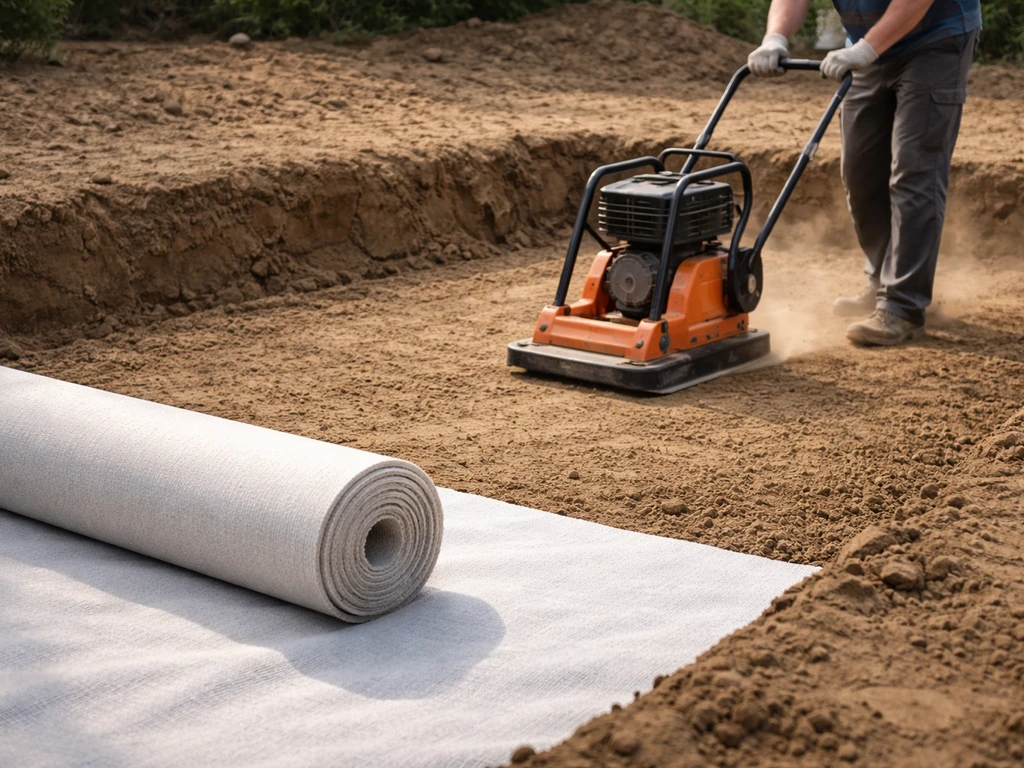
Once excavated, compact the native soil with a plate compactor before you do anything else. This is a step a lot of DIYers skip, and it is a mistake. Loose subsoil will compress under load after you are done, pulling your base down unevenly. Make at least two passes with the compactor.
Laying geotextile fabric
After compacting the subgrade, roll out geotextile filter fabric across the entire excavated area, including up the sides. This fabric separates the soil from your gravel base, preventing fine particles from migrating up into the aggregate over time. Overlap seams by at least 12 inches. On clay soils especially, do not skip this step.
Building the gravel base
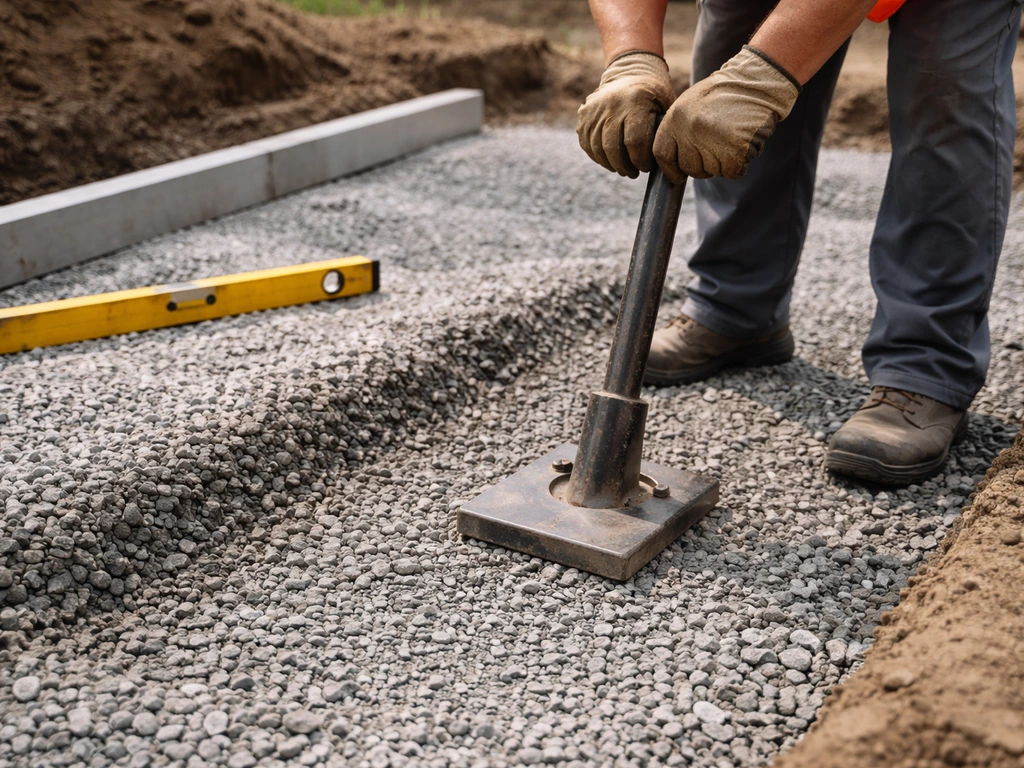
Add crushed stone in lifts of no more than 3 to 4 inches at a time, compacting each lift before adding the next. Use a compactable aggregate like road base or crusher run. For the step footprint, you are building up a stepped base structure that mirrors your final tread heights, minus the bedding sand depth and paver thickness. Compact thoroughly, the base should feel like solid ground when you are done, not spongy. On a standard 6-inch base, plan for at least two compacted lifts.
At each step level, the top of the compacted gravel should be exactly 2-1/8 inches below your target finished tread height (1 inch for bedding sand plus the paver thickness, which is typically 2.375 inches for standard pavers, but verify yours). Getting this elevation right for each step level is critical, mark it clearly on your stakes.
Installing and setting the pavers (including risers and treads)
With your base built and elevations confirmed, you are ready to start placing pavers. Work from the bottom step up. Do not start at the top and work down, you need each lower step's riser face in place before setting the tread above it.
Screeding the bedding sand
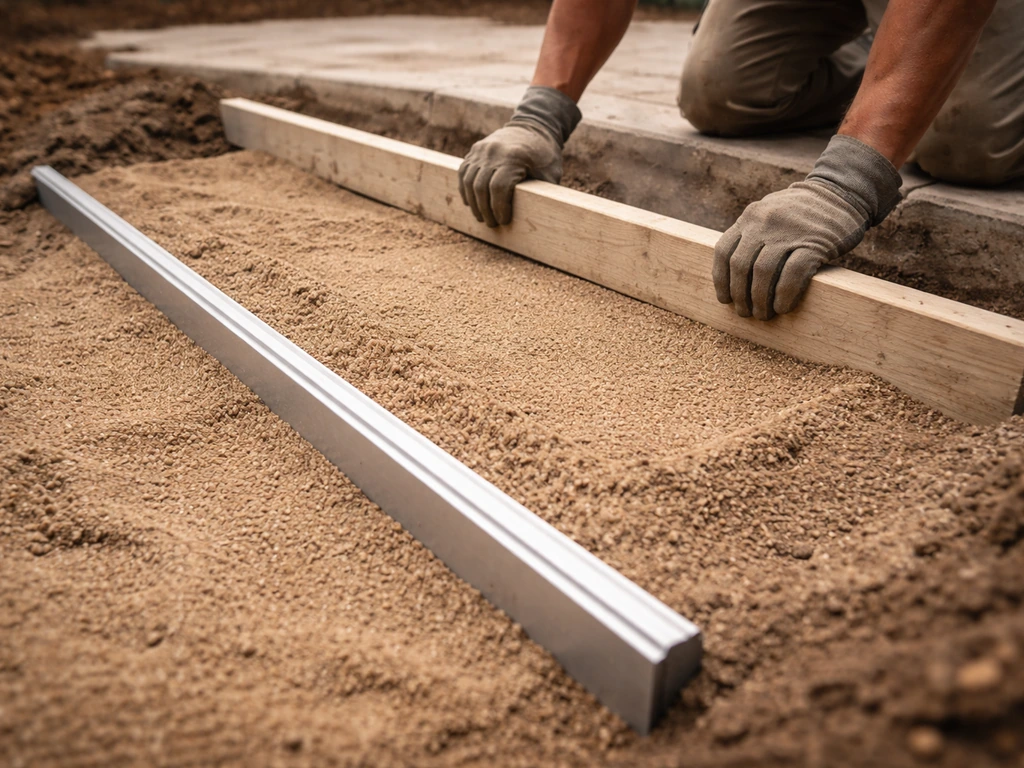
Spread coarse bedding sand at each step level and screed it to a consistent 1-inch depth. Use screed rails set at the target height and drag a straight 2x4 across them. Do not use masonry sand or fine sand, coarse angular sand (or high-performance bedding/HPB) compacts better and resists displacement under foot traffic. After screeding, do not walk on the sand layer before setting pavers. Even footprints can throw off your paver level.
Setting riser pavers
For a stacked-paver system, place your riser pavers first at each step. These form the vertical face of each step. Set them tight to the front of the compacted base shelf, level them left to right, and check that their height matches your target riser dimension. Use a rubber mallet to tap them into the bedding sand. For additional stability, apply a bead of construction adhesive along the base where riser pavers contact the gravel/base layer.
Setting tread pavers
Lay tread pavers on the screeded sand behind each riser. Work left to right and check level frequently in both directions. Pavers should settle approximately 3/8 inch into the bedding sand as you set and tap them, this is normal and expected. The front edge of each tread paver should overhang the riser face by about 1 to 1-1/2 inches (a nosing), which improves safety and looks finished. Do not exceed 1-1/2 inches of nosing projection if you want to stay within accessible stair geometry guidelines. ADA 2010 Standards for stairs (Section 504) reference stair geometry elements like allowable nosing projection and tread/leading-edge requirements for accessible stairs.
After placing each tread course, check the tread surface with a level. It should be flat left to right. The slight front-to-back drainage slope (1/4 inch per foot) comes from the base elevation, not from tilting the pavers. If a paver rocks, pull it, adjust the sand underneath, and reset it. Do not shim with pebbles or scraps, fix the sand bed.
Applying adhesive to tread front edges
Once each tread course is set and level, apply construction adhesive along the underside of the tread's front edge where it rests on the riser face. This bonding step is what keeps tread pavers from slowly creeping forward over years of foot traffic. It is cheap insurance and takes about five minutes per step.
Installing edge restraints
Once all pavers are set, install plastic or aluminum edge restraints along the sides of the step run. Drive the spikes through the restraint flange into the gravel base at 12-inch intervals. Without edge restraints, the outermost pavers on each tread will gradually migrate sideways, opening gaps and creating a tripping hazard. This is one of the most overlooked steps in DIY builds.
Cutting, edging, and finishing details (caps, joints, slope)
Clean cuts and tight jointing are what separate a professional-looking result from a project that looks DIY in the worst way. Take your time here.
Cutting pavers to fit
Measure each cut individually, never assume two openings are exactly the same size. Mark cuts with a chalk line or pencil. Use a wet-cut diamond blade saw for clean, accurate cuts; an angle grinder with a diamond blade works for simpler straight cuts. Always wear safety glasses, ear protection, and a dust mask. Score and snap works for simple cuts but leaves a rougher edge.
Cap pavers and bullnose edges
If your paver manufacturer offers bullnose or cap pavers with a finished rounded front edge, use them for the tread nosing. They look intentional and eliminate the raw-cut edge that tends to chip over time. Bond cap pavers with construction adhesive in addition to setting them in sand.
Jointing sand application
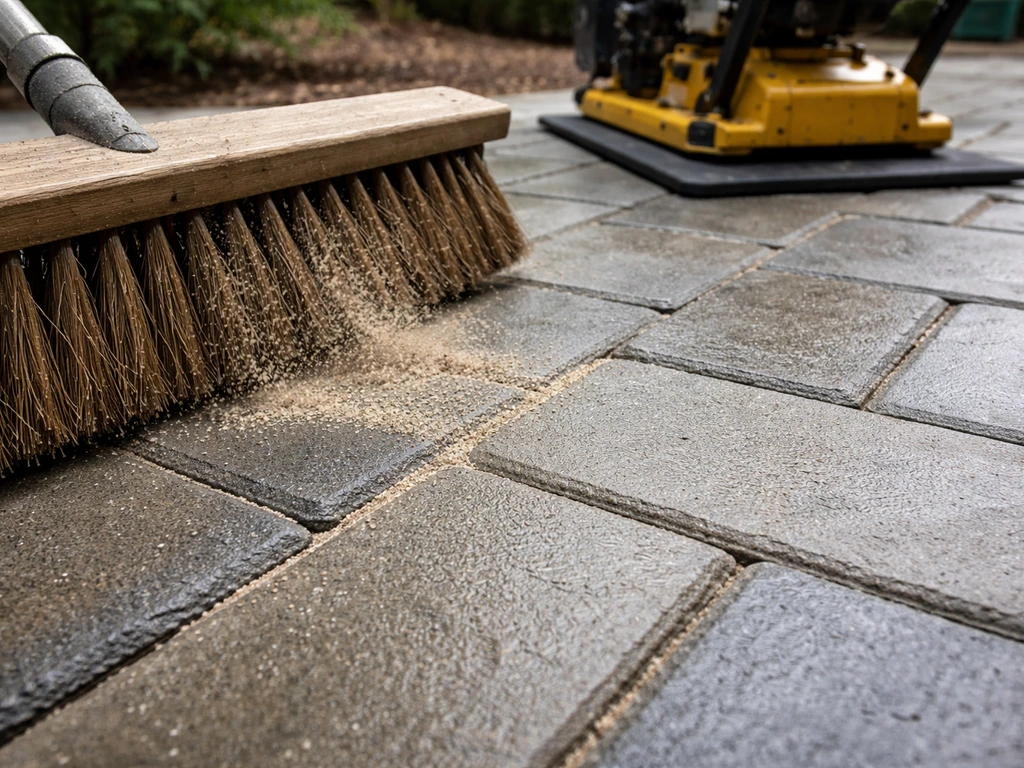
Once all pavers and edge restraints are installed, sweep polymeric jointing sand across the entire surface, working it into joints with a push broom. Make sure joint widths are between 1/8 inch and 1/2 inch, joints wider than 1/2 inch will not retain polymeric sand well and become weed highways. The sand level should sit at least 1/8 inch (3 mm) below the top of the pavers, not flush with the surface.
After sweeping in the sand, run a plate compactor over the tread surfaces (use a rubber pad or carpet scrap under the compactor plate to protect the paver faces). This seats the pavers fully and drives sand deeper into the joints. Sweep again to refill any joints that settled, then compact once more. When joints look full, gently activate the polymeric sand with water following the manufacturer's instructions exactly, watering too much or too little will both cause problems. When activating polymeric joint sand, follow the manufacturer’s watering instructions exactly, since the water or wetting regimen is critical for joint lock gently activate the polymeric sand with water following the manufacturer's instructions exactly. Let it cure per the product spec before using the steps.
Checking slope and drainage
Before calling the job done, pour a bucket of water on each tread. Water should sheet off the front edge within a few seconds, not pool anywhere. If water sits, you likely have a low spot in the bedding sand. Mark it, remove the affected pavers, add a small amount of sand, re-screed, and reset. Fix drainage issues now, they only get worse with weather cycles.
Sealing, maintenance, and troubleshooting common DIY issues
When and how to seal
Wait at least 30 days after installation before sealing. That waiting period lets any efflorescence (the white chalky mineral bloom that appears on new concrete pavers) fully develop and be removed, so you do not trap it under a sealer. Clean the steps thoroughly, let them dry completely, and apply a paver sealer rated for outdoor use. Sealing is not mandatory, but it protects joint sand, enhances color, and makes the surface easier to clean. Reapply every 3 to 5 years depending on traffic and sun exposure.
Routine maintenance
- Inspect joints every spring and fall; refill any depleted joints with polymeric sand before weeds get established
- Sweep steps regularly to prevent debris buildup in joints, which breaks down jointing sand faster
- Power wash cautiously — use a wide-angle tip and keep pressure low; strong concentrated spray can erode the aggregate surface of concrete pavers, especially on edges and nosings
- After power washing, joints often need to be topped off with fresh polymeric sand and re-activated
Troubleshooting settling and movement
If a tread paver develops a low spot or rocks within the first season, the most common cause is inadequate base compaction under that specific spot. The fix is straightforward: pull the paver, assess the sand and base below, add or remove material to bring the base to the correct elevation, re-screed the bedding sand, and reset the paver. Do not just add extra sand on top of a spongy base, fix the cause, not the symptom.
If entire steps are shifting laterally (moving sideways), check your edge restraints. Missing, broken, or improperly spiked restraints are almost always the culprit. Pull back the affected section, reinstall proper restraints, and refill joints with fresh polymeric sand.
Troubleshooting gaps and weed growth
Gaps between pavers and weed growth in joints almost always mean the original jointing sand has been lost (washed out or depleted over time). The fix is to remove any weeds, blow out the old sand with a leaf blower, and rejoint with fresh polymeric sand. This process is sometimes called rejointing or rehab jointing. Going forward, keeping joints filled is the single most important maintenance habit for paver steps.
Uneven ground and site-specific challenges
If your ground slopes laterally across the step footprint (side to side), you will need to step your base gravel in the cross-direction as well, or excavate deeper on the high side to create a flat working platform. String lines and a level are your best friends here. On very uneven sites, a concrete block core for the step structure (with paver veneer on top and front) is often more practical than trying to stack pavers on a complex irregular base. That is also the point where a one-hour consultation with a hardscape contractor can save you days of frustration.
If you want to go deeper on any specific phase of this project, the how to build patio steps from pavers guide covers the structural build in detail, while the installing paver patio steps topic walks through the placement and setting sequence step by step. For the broader patio context that these steps connect to, the paver patio step by step and paver patio instructions guides cover the full patio installation from start to finish. Once you have the steps laid out, use this same guidance to complete the surrounding patio area with the right paver patio installation steps paver patio step by step. Use this step-by-step guidance to build a paver patio that supports safe, level step treads paver patio step by step.
| Problem | Likely Cause | Fix |
|---|---|---|
| Tread paver rocks or sinks | Under-compacted base or thin sand bed | Pull paver, re-compact base, re-screed sand to 1 inch, reset |
| Steps shifting sideways | Missing or loose edge restraints | Reinstall and spike edge restraints; refill joints |
| Water pooling on tread | Low spot in bedding sand | Remove paver, adjust sand, reset and check slope |
| Weeds in joints | Depleted polymeric sand | Remove weeds, blow out old sand, rejoint with fresh polymeric sand |
| Gaps opening between pavers | Joint sand loss over time | Refill with polymeric sand; reactivate with water |
| White chalky film on pavers | Efflorescence (new concrete) | Wait 30 days, clean with efflorescence remover, then seal |
FAQ
Can I build DIY paver patio steps with a single flight if my rise is less than 24 inches?
If your total rise is under 24 inches, you can often keep a single flight, but confirm comfort by pairing the rise per step with a tread depth (for example, 6-inch risers plus 12-inch treads). If your measurement lands awkwardly, consider adjusting the riser height slightly rather than changing tread depth, because uniform treads are what prevent tripping.
What if my yard has a slope, can DIY paver patio steps still work?
Yes, but keep in mind that pavers must stay flat, the drainage slope must be built into the base grade. Before you set any pavers, check the cross-direction and front-to-back slope using string lines, and only change the gravel base if water pooling is possible.
Can I use joint sand instead of bedding sand for DIY paver patio steps?
Do not use polymeric joint sand as a substitute for bedding sand. Bedding sand needs to be coarse and screeded to a uniform 1-inch depth so risers and treads sit at the correct elevations. Joint sand only fills gaps between pavers after the pavers are fully seated.
How much tread overhang (nosing) should I use on diy paver patio steps?
Most people want the nosing to look intentional, but too much overhang can cause toe catching and can push the step geometry out of your comfortable “sweet spot.” Keep the tread front projection at about 1 to 1-1/2 inches, and use cap or bullnose pavers if you want a finished edge without relying on cuts.
How do I decide where the top tread should land relative to the finished patio?
If the projected top tread ends up below the patio surface, you may create an exposed edge that collects debris and increases trip risk. If it ends up above, the raised lip can snag feet, especially in wet conditions. A good target is flush or slightly recessed (about 1/8 inch) so water can sheet off.
What bedding sand type is best for DIY paver patio steps, and what should I avoid?
Choose coarse angular bedding sand, then verify it compacts and locks under your screed. Avoid fine masonry sand because it displaces more easily, which can lead to rocking treads. If you can’t confirm the product type on delivery, pause and confirm before you spread any sand on the base.
Do I have to seal paver patio steps after installing them?
Yes, DIY paver patio steps can be sealed, but wait at least 30 days and only after the steps are fully cleaned and dry. Sealing too early can trap efflorescence under the coating, leading to a hazy appearance and worse long-term performance.
How do I know I watered polymeric joint sand correctly on my DIY paver patio steps?
For the polymeric joint sand, you should water only to the point the manufacturer describes, enough to activate the product but not enough to wash it out. If you overwater, you can create voids and uneven joint filling. After watering, let the joints cure fully before heavy foot traffic.
Should I set the top treads first or start from the bottom when building DIY paver patio steps?
Start with risers and work upward, but within each tread course, keep checking left-to-right level. Lower steps need to be set first because the riser height controls the bedding sand height for the tread above. Starting at the top makes it harder to keep risers consistent.
Can I add a landing pad between flights for DIY paver patio steps?
You can, and on narrow or uneven sites, a landing is often more practical than forcing a long straight run. If you split the rise into two flights, maintain consistent tread geometry on each flight, and build the landing so the treads on either side connect without creating a hump or dip.
What should I do if one DIY paver patio step starts rocking or sinking?
If a tread rocks within the first season, do not just pack more sand on top. Pull the paver, identify whether the base under that spot is below target elevation or spongy, correct the base height, then re-screed bedding sand to the correct thickness before resetting the paver.
Why do DIY paver patio steps shift sideways, and how do I fix it?
For lateral movement, check that edge restraints are present on both sides and that spikes are installed at the recommended spacing. If movement already opened joints, you usually need to reset the restraint section, then remove and replace polymeric joint sand so gaps are properly filled again.
What causes weeds to grow between pavers on DIY patio steps, and how do I stop it?
If weeds appear in joints, it usually means joint sand was lost due to washout, depletion, or insufficient joint filling during installation. Remove weeds, clear out old sand (often with a leaf blower), then re-fill joints with fresh polymeric sand and follow the watering and curing steps exactly.
When is a block-core approach better than stacked pavers for patio step projects?
On very uneven sites, stacking pavers over an irregular base can lead to inconsistent elevations. A block-core structure (with paver veneer on top and front) can be more forgiving because you can create a more stable, controllable substrate before installing the visible pavers.
Next Articles
Paver Patio Instructions: Step-by-Step Installation Guide
Step-by-step paver patio instructions for DIYers: planning, excavation, base, pavers, edging, joint sand, sealing, and f
Installing Paver Patio Steps: DIY Step-by-Step Guide
DIY guide to installing paver patio steps, from planning and drainage to setting, leveling, cutting, and sealing.
How to Build Patio Steps from Pavers: DIY Guide
Step-by-step DIY guide to build patio steps from pavers, from measuring and base prep to cutting, leveling, and sealing.