Building a paver patio yourself is completely doable in a weekend or two, and the result can last decades if you get the base right. The core process goes like this: plan your layout, excavate 8 to 10 inches deep, compact the subgrade, lay 6 inches of compacted gravel base, screed a 1-inch layer of bedding sand, set your pavers in your chosen pattern, lock the edges, sweep in polymeric sand, and seal after 90 days. After you’ve planned and graded the base system, the next step is learning how to make patio pavers by setting the paver pattern, leveling each unit, and cutting around edges and obstacles. Once you know how to plan and execute the full base system, you can move on to the paver patio surface with confidence compact the subgrade. Most DIY failures come from skipping depth on the base or skimping on compaction, not from anything complicated about laying the pavers themselves.
How to Create a Paver Patio: Step-by-Step DIY Guide

Planning and Layout for Your Paver Patio
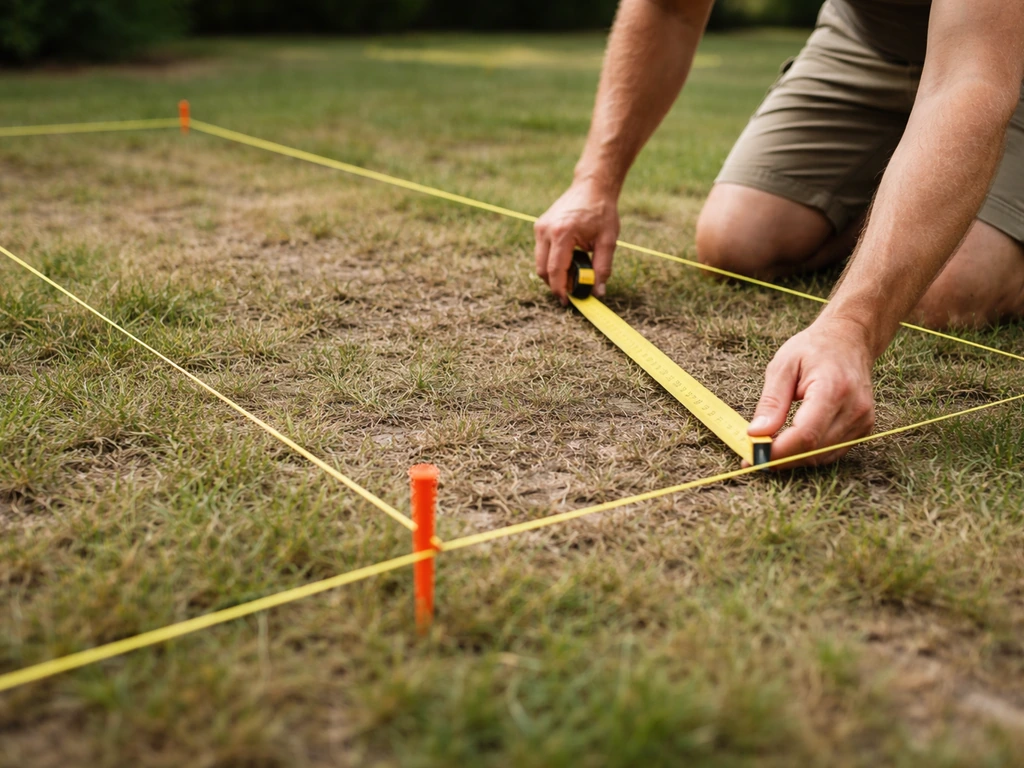
Start by staking out the area with string lines and measuring it carefully. Sketch it on paper first, including any features like a fire pit zone, steps, or planters. Calculate square footage, then add 10% for cuts and waste. A typical 12x16-foot patio is a manageable first project, but even a small space needs the same full base system as a large one, so don't cut corners because the area is small. For extra confidence with the overall base build, see how to lay a paver patio foundation so you keep the right depth, slope, and compaction.
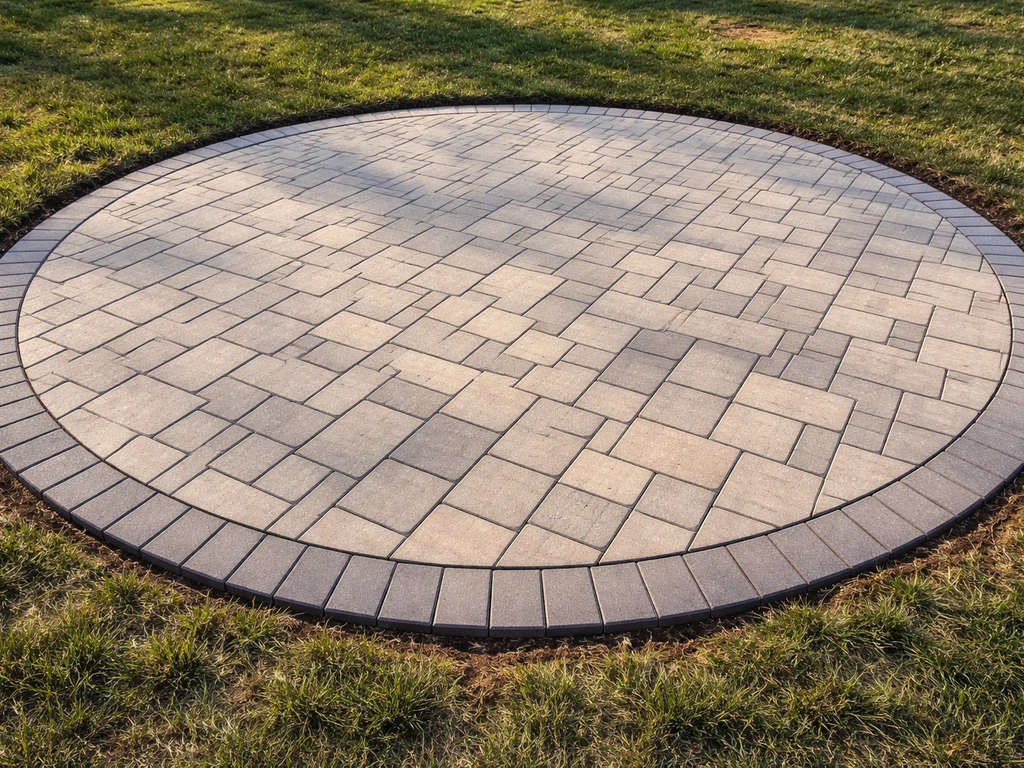
Choose your paver type early because it affects thickness and, therefore, excavation depth. Standard concrete pavers are usually 2 3/8 inches thick. Natural stone and tumbled pavers vary more. For a basic DIY project, consistent-thickness concrete pavers are the easiest to work with. Pick a pattern next: running bond (brick style) is the easiest to lay and cut, herringbone locks together better and is stronger under load, and basket weave is a classic look with simple cuts. If you want a round element or a more complex layout, plan those cut lines now before you order materials. If you’re aiming for a round patio using rectangular pavers, map the curves early and plan your cut lines so the pattern stays consistent how to make a round patio with rectangular pavers.
Drainage is a planning issue, not an afterthought. Your finished patio needs to slope away from the house at roughly 1/8 to 1/4 inch per foot, or about 1 inch for every 8 feet of paving. That slope has to be built into your excavation and base, not jury-rigged at the end. Mark the high point (usually along the house) and the low point, and keep that grade in mind as you dig and compact.
Also decide on your edge treatment now. Plastic edge restraints are the most common DIY choice. Modified concrete edges are more permanent and work well for heavy-use areas. Your material order should include restraints for the entire perimeter, including any curves.
Site Preparation and Grading Basics
Clear the area completely. Remove sod, plants, and any roots down to clean soil. If you're wondering about laying pavers directly over grass, don't. Organic material breaks down, leaving voids that cause settling. The soil has to come out. For installations over an existing concrete slab, the process is different (more on that in the variations section below), but for a standard ground-up install, you need bare, native subgrade.
Once the area is cleared, check for uneven ground and low spots that could hold water under your base. Fill low spots with compactable material and tamp them down before you do your full excavation grade. Use a level and a long straight board, or a laser level if you have one, to confirm your slope is correct across the entire area. The goal is a consistently sloped, firm surface before a single piece of gravel goes in.
If your soil is soft, clay-heavy, or drains poorly, plan to add base depth. Standard base specs assume reasonably firm, well-draining soil. Weak soil or areas with ground freeze cycles should get extra base material, and a geotextile filter fabric laid directly on the subgrade before the gravel goes in. The fabric prevents soil from migrating up into your base over time, which is one of the most common causes of long-term patio failure.
Building the Base: Excavation, Compaction, and Base Layers
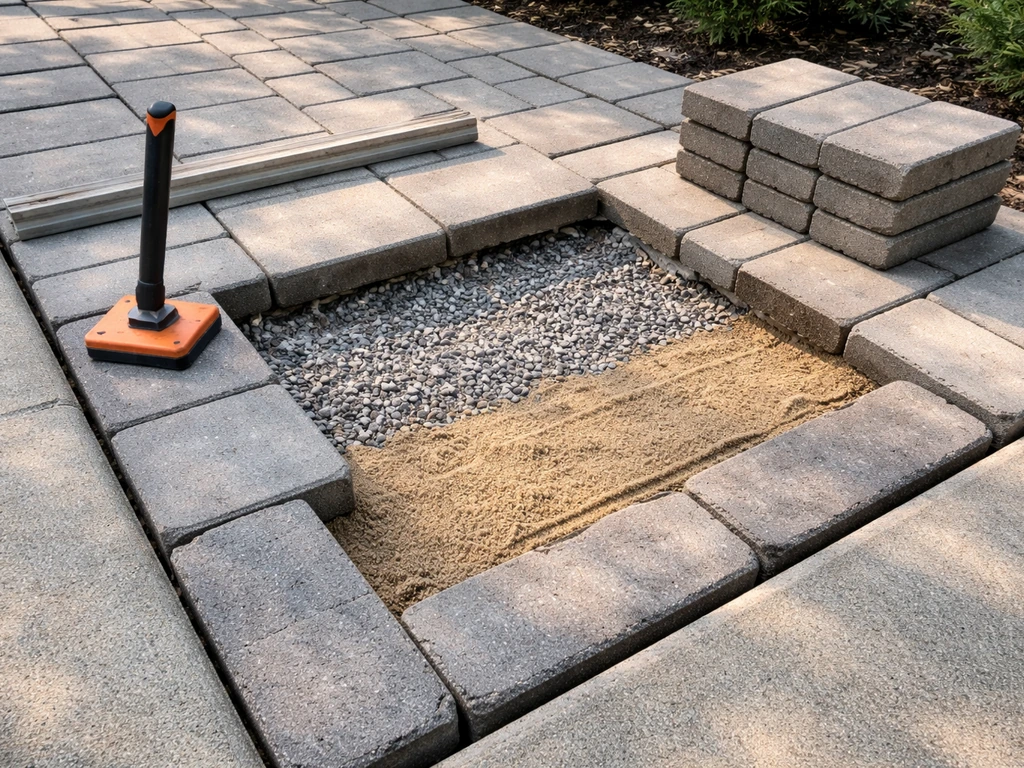
This section is where patio projects succeed or fail. Excavate to a depth that accounts for your base layers plus paver thickness. For a standard setup: 6 inches of compacted gravel base, 1 inch of bedding sand, and roughly 2 3/8 inches of paver thickness. Once your base is compacted to spec, you can move on to building the patio surface with paver base panels and the right bedding and joint sand. That's about 9 to 10 inches of total excavation depth from your finished surface grade. Mark that depth on your string lines and dig to it consistently. If you want a step-by-step approach for the thickness, slope, and compaction details, use this guide on how to make a paver patio base as your main walkthrough.
Compact the native subgrade with a plate compactor before anything else goes in. Then, if you're using geotextile fabric, lay it now across the entire excavated area, overlapping seams by at least 12 inches. The fabric goes on the subgrade, under the gravel.
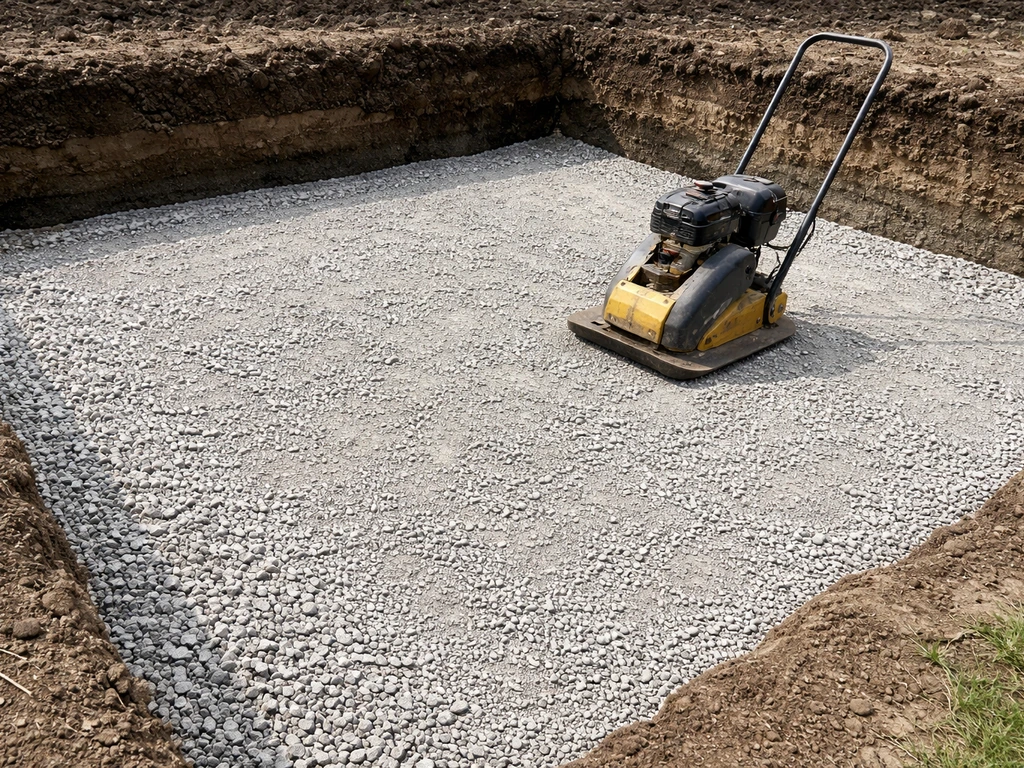
Add your base gravel (locally approved road base or crushed stone, sometimes called 3/4-inch minus or Class II base) in 2 to 4 inch lifts, compacting each lift before adding the next. Never dump all 6 inches in and compact once, it won't reach proper density at the bottom. Compact to firm, stable resistance. Belgard specifies 98% Standard Proctor density, which in practical terms means the surface doesn't shift or depress when you walk on it and the plate compactor isn't sinking in. The total compacted base should be 6 inches for a standard residential patio.
With the gravel base compacted and your slope verified, you're ready for the bedding sand layer. Use coarse, washed concrete sand, not play sand or fine-grained sand. Spread it to exactly 1 inch deep, no more. Use 1-inch outside-diameter screed pipes as guides: lay them parallel across the surface, pour sand between them, and drag a straight 2x4 across the pipes to create a perfectly level, consistent 1-inch layer. Once screeded, do not walk on or compact the bedding sand. It's meant to stay loose so you can set pavers into it and make small adjustments.
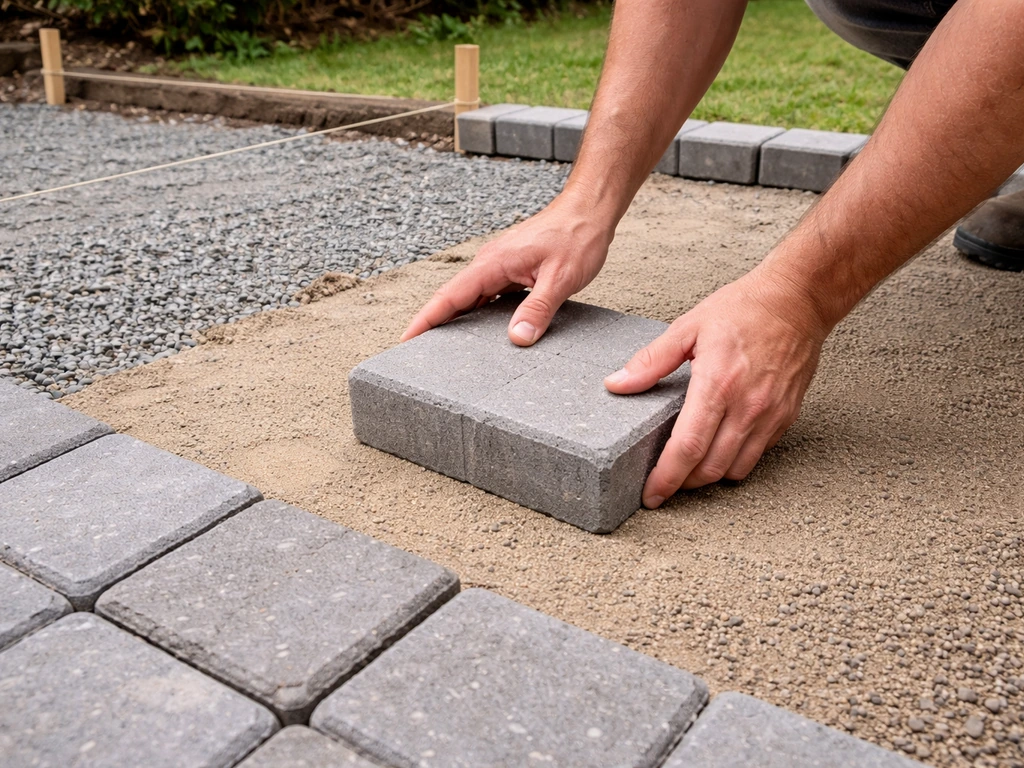
Setting Pavers: Patterns, Leveling, and Cutting
Start laying pavers from a corner or a straight edge, working outward. For a running bond pattern, offset each row by half a paver. For herringbone, establish your 45-degree angle from the start and maintain it. Set each paver down gently, don't slide it into place or you'll push sand up into the joints. Press it level with the adjacent pavers. Use a rubber mallet to tap any high spots down gently. Acceptable lippage (the height difference between adjacent pavers) should be no more than 1/8 inch.
Check your surface frequently with a level or string line. Catching a problem after 5 pavers is easy. Catching it after 50 means pulling up a lot of work. If a paver is high, lift it out and scrape a little sand away. If it's low, add a small amount of sand under it. Maintain consistent joint spacing (about 1/8 inch between pavers) as you go.
Cuts are unavoidable at the edges and around obstacles. A rented diamond-blade wet saw gives the cleanest cuts on concrete pavers and is worth every dollar for a project of any real size. An angle grinder with a diamond blade works for a handful of cuts. A rented chisel splitter (paver guillotine) is faster but less precise. Mark your cut line with chalk or a pencil, cut slowly, and wear eye protection. For curves, make a cardboard template first, then transfer the shape to the paver.
Edges, Joint Filling, and Finishing
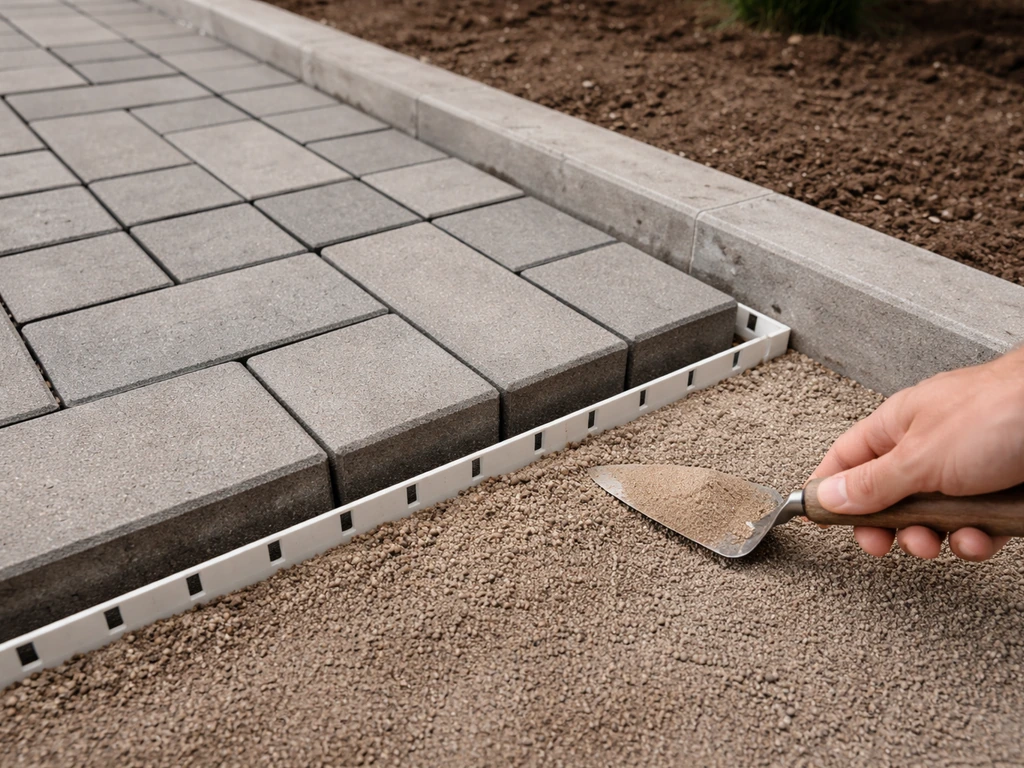
Installing edge restraints
Edge restraints go in before you fill the joints. Set plastic edging against the outside edge of your perimeter pavers, with the top of the restraint sitting about 1/2 inch below the top of the pavers. Spike it into the compacted gravel base with the manufacturer-provided spikes, spaced every 12 inches on straight runs and every 6 inches on curves. Without solid edge restraints, your pavers will slowly migrate outward over time, opening gaps and causing the whole surface to destabilize.
Sweeping in joint sand
Once all pavers and edge restraints are in place, it's time to fill the joints. blank" rel="noopener noreferrer">Polymeric sand is the best choice for most DIY patios. It locks together when wet, resists weeds, and prevents ant intrusion. Pour dry polymeric sand over the surface and sweep it into the joints with a push broom, working in multiple directions. Belgard’s installation guidance explains that polymeric sand firms up when dry to help resist movement from shifting soil. Fill joints to within about 1/8 inch (3 mm) of the paver surface, not flush to the top. Blow off all excess sand from paver surfaces with a leaf blower before the next step, this is critical for preventing surface haze.
Run a plate compactor over the entire surface (put a rubber pad or piece of carpet under the compactor plate to protect the pavers). This settles the sand deeper into the joints. Sweep in a second round of sand if needed to top off any joints that settled. Then blow off the surface again thoroughly. Finally, mist the patio with water using a garden hose, following the specific manufacturer wetting instructions for the polymeric sand brand you're using. Overwetting can wash sand out of joints; underwetting means it won't activate properly.
Sealing the patio
Sealing is optional but recommended for concrete pavers. It enhances color, protects the surface from staining, and helps the polymeric sand stay put. The important rule: wait at least 90 days after polymeric sand installation before applying sealer. The sand needs time to fully cure. When you're ready, clean the surface thoroughly, let it dry completely, and apply a paver sealer with a roller or pump sprayer in thin, even coats. Two thin coats are better than one thick one. Re-seal every 3 to 5 years depending on traffic and weather exposure.
Common DIY Problems and How to Fix Them
| Problem | Cause | Fix |
|---|---|---|
| Settling or sunken pavers | Insufficient base depth or compaction | Pull up affected pavers, add and compact more base material, re-screed sand, reset pavers |
| Pavers shifting outward | Missing or improperly installed edge restraints | Pull perimeter row, install or re-spike edge restraints against base, reset pavers and refill joints |
| Poor drainage / water pooling | Slope not built into base or pavers installed flat | Re-grade base layer to achieve 1/8–1/4 in. per foot slope away from house |
| White haze on paver surface | Polymeric sand not swept fully off before wetting | Use efflorescence cleaner per product instructions; avoid the problem next time by blowing clean before wetting |
| Weeds growing through joints | Regular sand used instead of polymeric, or joints not filled fully | Remove weeds, sweep out old sand, replace with polymeric sand and activate properly |
| Uneven lippage between pavers | Inconsistent bedding sand depth or unlevel base | Lift individual pavers, adjust sand under each one, re-set and check with a level |
The single most common mistake is excavating too shallow. If the math says you need 9 inches of depth and you dig 6, that missing depth comes back as settling pavers within a year or two. Check your depth at multiple points across the excavation with a tape measure before you add any base material.
Variations Worth Knowing About
Installing pavers over an existing concrete slab
If you have a solid, crack-free concrete slab, you can install pavers on top of it using a thin mortar bed or a specialized paver adhesive. The existing slab must slope correctly for drainage and be structurally sound. Crack-heavy or heaving slabs are not good candidates. This approach skips excavation but requires careful attention to the added height and how it meets doors, steps, and surrounding grade.
Raised patio designs
A raised patio involves building up retaining walls (usually with segmental retaining wall blocks) to create a level platform on sloped ground, then filling and compacting the interior before installing the paver surface. The wall design and drainage behind the wall are critical. For any wall taller than about 24 inches, most areas require an engineered design. Raised patios take more materials and time but are one of the best solutions for sloped yards.
Adding a fire pit area
A fire pit zone within your patio is mostly a design and material choice. Plan a dedicated area (typically a circle 10 to 12 feet in diameter) and consider using a different paver color or pattern to define it visually. Use pavers and base materials rated for heat exposure near the pit itself. A non-combustible gravel border directly around a portable fire pit is a smart safety buffer. For a built-in fire pit ring, lay out the block ring before you finalize the surrounding paver cuts.
Working on uneven or sloped ground
Uneven ground doesn't mean you can't have a flat patio. It means more excavation work on the high side and possibly retaining on the low side. The base layer is what creates your flat, sloped surface. Spending extra time getting the base grade exactly right on uneven ground is always worth it. Trying to compensate with variable sand depths is a shortcut that leads to long-term settling.
Tools and Realistic Time Expectations
For a typical 200-square-foot patio, plan on two full weekends for one or two people. The first weekend covers excavation, base preparation, and compaction. The second covers screeding, paver installation, cutting, and finishing. Renting a plate compactor is non-negotiable, hand tamping a paver base simply doesn't get adequate compaction. A wet saw or angle grinder for cuts, screed pipes, a rubber mallet, a long level, and a string line and stakes round out what you need.
- Plate compactor (rent): essential for base and joint compaction
- Diamond-blade wet saw (rent): clean paver cuts with minimal waste
- Screed pipes (1 in. OD): guides for consistent 1-inch sand bed
- 4-foot level and string line: checking grade throughout the project
- Rubber mallet: seating pavers without cracking them
- Push broom and leaf blower: joint sand application and surface cleanup
- Tape measure, stakes, and chalk line: layout and marking
Order materials after you've confirmed your square footage and base depth. Get pavers, gravel base, bedding sand, polymeric sand, edge restraints, and spikes all at once if possible so the project doesn't stall mid-build. A small surplus of pavers (10% extra) is good insurance for cuts and future repairs. Store leftover pavers from the same production batch so any replacements match in color and texture.
FAQ
Can I install pavers directly on an existing concrete slab instead of excavating?
Yes, but only if you plan the “transition height” from day one. If you install over a slab with a thin mortar bed or paver adhesive, the finished patio surface will be higher than before, so you need to check door clearances, step heights, and how the patio meets existing landscaping. Also verify the slab slopes away from the building, and avoid this method on slabs that show heaving, widespread cracking, or movement.
What should I do if some pavers rock or feel uneven after installation?
If you see rocking pavers after you’ve compacted and swept sand in, it usually means one spot of base is low, or compaction was missed at that point. Fix it by lifting the affected pavers, removing sand down to the gravel, re-leveling with compactable base material, then re-screeding bedding sand (do not reuse packed bedding sand). Only redo polymeric sand and re-wet after the joints are rebuilt.
How much water is too much when activating polymeric sand?
Do not rely on wetting as a substitute for correct density. Polymer sand activation needs an even, controlled amount of water after you’ve already compacted the surface once and cleared all excess sand from the tops. If you overwet, the sand can wash out and you may need to re-sweep in fresh polymeric sand and repeat the correct wetting process.
What joint spacing should I maintain for polymeric sand to work properly?
Choose joint width that matches your paver format and pattern consistency. For most concrete pavers, keeping joints around 1/8 inch works well with polymeric sand, and the main failure mode is uneven joint gaps that prevent sand from filling properly. As you set pavers, keep spacing consistent using spacers or a repeatable visual guide, especially along borders and tight cut areas.
Can I build a paver patio in multiple weekend sessions without ruining the base?
Yes, in most cases you can install a patio in phases, but avoid stopping after laying pavers without completing the critical layers and edges. If you must pause, leave the pavers in place only briefly, keep bedding sand undisturbed, and secure edging so the surface does not shift. The most common partial-build mistake is leaving an exposed base or unsettled base grade that becomes uneven before the next session.
What if my finished patio holds water in a low area?
If water ponds on the surface after completion, the slope built into the base is off, or the base is locally low because of poor compaction or an unaddressed low spot. The fix is not to add more sand on top, since bedding sand can migrate. Correct the drainage by lifting pavers in the affected area, regrading and compacting the gravel base, re-screeding bedding sand to a consistent 1-inch thickness, then reinstalling and rebuilding joints.
How important are edge restraints, and can I install them later?
Edge restraints should be continuous around the perimeter, including at curves and around any penetrations. If you skip sections or install them loosely, pavers can spread outward, which opens joints and makes the surface feel loose over time. For best results, set the restraint height so the top sits roughly below the paver tops (about 1/2 inch down as a general target), and drive spikes into the compacted gravel base at the recommended spacing.
When should I use geotextile filter fabric under a paver patio?
Use geotextile fabric when soil is soft, drains poorly, or you have freeze-thaw cycling, because it limits upward migration of fine soil into the gravel. Don’t skip fabric just for “easy” yards, especially if you’ve had washouts or muddy areas. If you already placed gravel, adding fabric later means lifting and removing material to place it correctly beneath the gravel and with overlapped seams.
Can I mix paver patterns (for example, a herringbone border with a running bond field) on the same patio?
If you want a different look, change the pattern through a planned layout rather than “mixing as you go.” For example, keep a consistent starting reference line and design cut lines early for any feature zones, like borders or a round element, so the offsets and angles stay true. Random pattern changes often create irregular joint widths and noticeable height transitions at boundaries.
Step-by-step DIY guide to build a round patio with rectangular pavers: layout, prep, cutting, grading, edging, and troub
How to use Quikrete Patio Paver Jointing Sand: step-by-step application, tools, timing, coverage, and care.

Step-by-step guide to apply patio paver sand correctly: prep base, set pavers, fill joints, compact, and troubleshoot is