You can absolutely build a round patio with rectangular or square pavers, it just takes a bit more planning than a straight-edged layout. The key is working from a precise center point, cutting the border pavers to follow the arc, and using a flexible edge restraint to hold that curve in place.
How to Make a Round Patio With Rectangular Pavers

Felix Rowe
28 Apr 2026
Most of the build is identical to any standard paver patio: excavate, <a data-article-id="64FA992A-4D2C-4089-BB39-B4011FAD6D4B">compact a gravel base, lay bedding sand, set pavers, and lock everything with polymeric sand. compact a gravel base. If you also want a straight-edged version, see our guide on how to build a pavers patio for the general workflow that applies to patios of any shape.
Once your base is solid and your drainage slope is set, the steps for how to build a pavers patio stay consistent from laying pavers to locking everything in with polymeric sand. If you want a complete, detailed walkthrough, follow our step-by-step guidance on how to create a paver patio from start to finish build a pavers patio. For the full, step-by-step patio build process (from excavating to jointing), see our guide on how to make a pavers patio.
The round shape mostly affects how you lay out the circle, how you cut the perimeter pieces, and how you handle the radiating joint lines. Get those three things right and you end up with a clean, durable circle that looks intentional from day one.
Planning and Measurements for a Round Patio
Start by deciding the finished diameter you want. A comfortable patio for a table and four chairs typically needs at least a 12-foot diameter, and most residential round patios fall between 12 and 20 feet. Once you have a diameter in mind, calculate the square footage using the formula: radius × radius × 3.14 (pi). For a 14-foot-diameter patio, the radius is 7 feet, so 7 × 7 × 3.14 = about 154 square feet. Add 10 percent for waste and cuts, curved borders eat through pavers faster than straight ones.
You also need to work out your finished elevations before you touch a shovel. The patio surface must slope away from your house at a minimum of 1/4 inch per foot to drain properly. On a 14-foot patio, that means the far edge sits at least 3.5 inches lower than the edge nearest the house. Sketch this out on paper and mark the high and low elevation points, those numbers drive every stake and string line you set during layout. For drainage across a circle, think of it as a very gentle ramp tilted in one direction rather than a bowl shape.
Next, convert your finished diameter into your excavation diameter. ICPI’s technical guidance specifies a minimum compacted base thickness of 4 inches (100 mm) for sidewalks, patios, and pedestrian areas [minimum of 4 inches of compacted gravel base](https://www. icpi. org/techspecs/index.
cfm? id=42&tech=01). The standard build-up is roughly 4 inches of compacted gravel base, plus 1 inch of bedding sand, plus the paver thickness (typically 2. If you’re specifically aiming for a patio with a proper paver base, focus on building up compacted gravel and bedding sand to the right depth and slope before you set any pavers.
375 to 3. 125 inches for standard concrete pavers). That means you're excavating a minimum of 7 to 8 inches below your finished paver surface. Dig the circle about 6 inches wider than your finished patio diameter all the way around to give yourself room for edge restraints and compaction.
Layout Methods to Create a Precise Circle
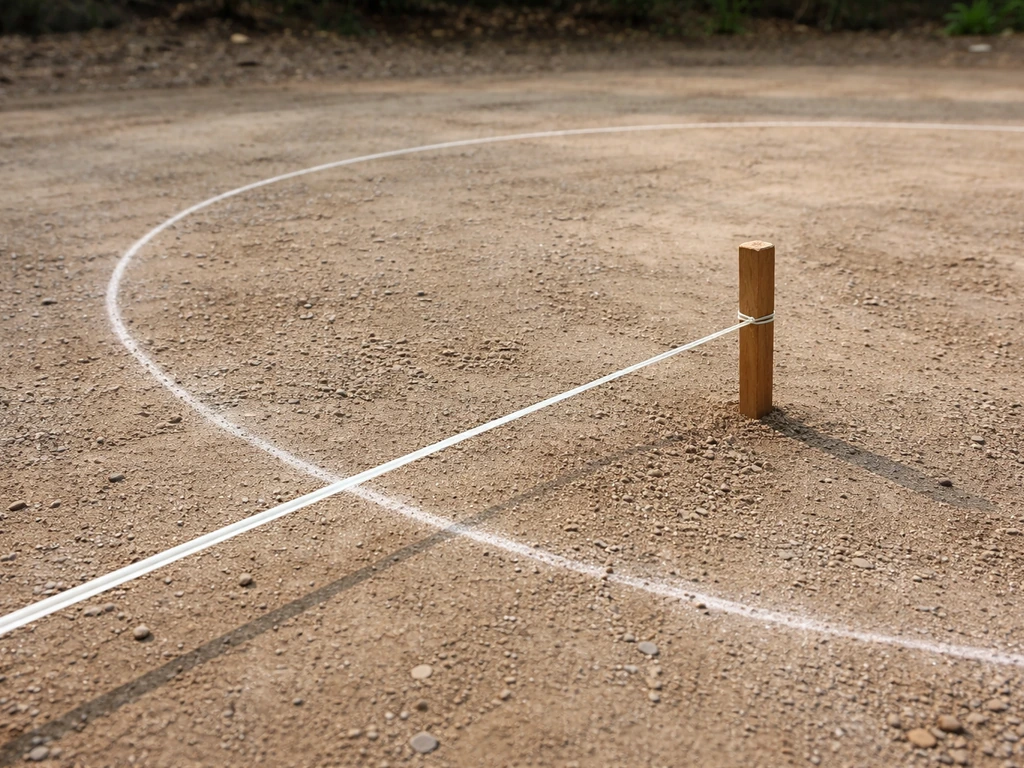
The simplest and most reliable method is a center-stake and string layout. Drive a stake exactly where you want the center of the patio. Tie a string to that stake equal in length to your desired radius, half the diameter. Keep the string pulled taut and walk the full perimeter, marking the ground with marking spray paint every few inches. You'll get a clean, accurate circle in about 10 minutes. This is the same technique used by professional hardscape crews and it works just as well with a 50-foot chalk line as it does with a measuring tape.
For better accuracy on larger circles, use a radius tape or a stiff measuring tape rather than a floppy string, which can stretch or sag. Walk the perimeter slowly, keeping the tape at exactly the radius length each time you press the spray can. Once the paint line is down, verify the circle by measuring the diameter from at least four different directions, they should all match within about half an inch. If one measurement is off, your center stake has shifted or your radius string slipped. Fix it now rather than after excavation.
Leave the center stake in place throughout the entire project. You'll reference it repeatedly during dry-lay and cutting to confirm you're holding the right radius as courses go down. A quick string check at the edge of each course takes seconds and catches drift before it compounds.
Preparing the Site and Building a Stable Base
Excavate the full circle (plus that 6-inch margin) to the required depth, at least 7 inches below your finished paver surface, slightly more if your native soil is clay or has poor drainage. Remove all organic material including roots and topsoil. A round excavation is easiest to dig if you score the circle line with a spade first, then work inward. The bottom of the excavation should already be graded with your 1/4-inch-per-foot slope built in so every layer above it follows suit.
Add compactable gravel (3/4-inch crushed stone works well) in two 2-inch lifts, compacting each layer with a plate compactor before adding the next. Running the plate compactor in overlapping passes and working from the outside of the circle inward helps avoid creating high spots at the center. The finished gravel base should be firm, stable, and sloped correctly. Checking with a long level and a tape measure at this stage saves a lot of frustration later.
Once the gravel is compacted and graded, spread 1 inch of coarse bedding sand (concrete sand, not play sand) over the entire area. Screed it flat and sloped using a 2x4 or a dedicated screed board. Do not compact the sand, it needs to stay loose enough for the pavers to be pressed into it and adjusted. If you want a full step-by-step guide, this is the point in how to build a paved patio where you move from base preparation to setting the pavers. This layer is where you make your final fine-tuning of the slope. After screeding, avoid walking on the sand bed; use kneeling boards when you start setting pavers.
Installing Edge Restraints Before You Set a Single Paver
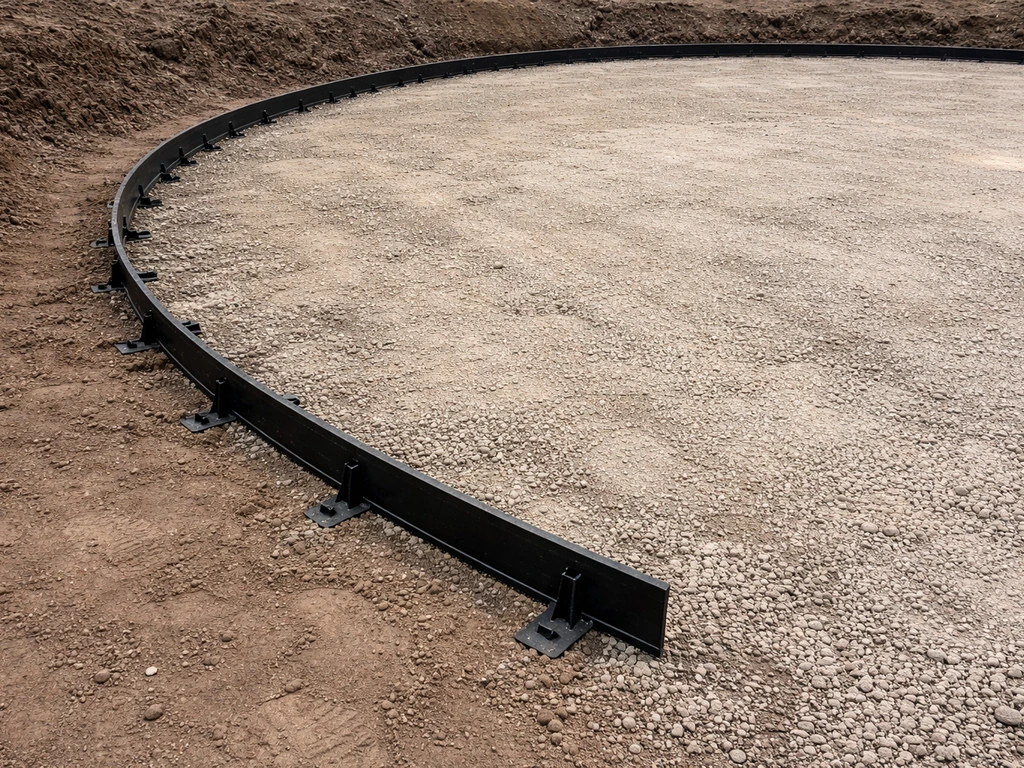
For a curved patio, flexible plastic or aluminum edge restraint is essential. Rigid straight edging will not follow the arc cleanly. Flexible paver edging (sold in rolls or sections) can be bent to match your spray-painted circle and spiked into the gravel base every 12 inches. Install the restraint along the outer circle line before you set any pavers, it defines the finished boundary and keeps the pavers from migrating outward during and after compaction. If you want a full step-by-step, follow our guide on how to make patio pavers for the same basics from base prep to finishing. Make sure the top of the restraint will sit just below the finished paver surface so it won't be visible.
Choosing a Layout Approach for Rectangular or Square Pavers
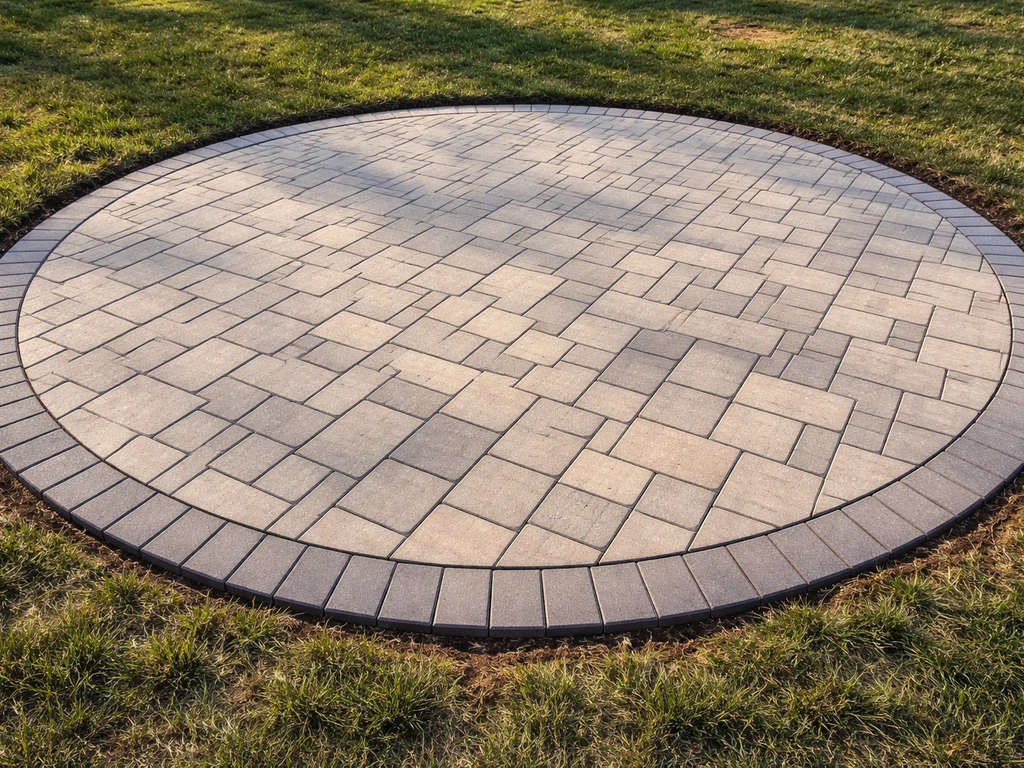
The most popular approach for a round patio with rectangular or square pavers is a running-bond or herringbone pattern in the interior, with a dedicated border ring at the perimeter. The interior follows a standard grid layout as if the patio were square, and the curved edge is formed by cutting the outermost course to follow the arc. This keeps joint lines clean and consistent in the main field, and concentrates your cuts at the border where they're expected.
A second approach is a radial layout, where pavers fan outward from the center point like spokes of a wheel. This looks stunning but creates trapezoidal gaps between pavers as you move outward, which means either tapered cuts on every single paver or increasingly wide joints at the outer edge. It's achievable but significantly more labor-intensive and is better suited to square pavers than rectangular ones. For most DIYers, the grid-interior-with-curved-border method produces a great result with manageable effort.
If you're using square pavers, the layout math is slightly simpler because you're working with uniform dimensions in both directions. Rectangular pavers need a decision about orientation: running the long axis toward the center (like spokes) or running them parallel to one axis of the grid. Parallel-to-grid is easier to install and gives a more traditional patio look. Decide before you do your dry-lay run.
| Layout Approach | Best For | Cut Complexity | Visual Result |
|---|---|---|---|
| Grid interior + curved border | Rectangular or square pavers | Cuts only at perimeter | Clean, classic patio look |
| Radial (fan from center) | Square pavers | Cuts on every paver | Dramatic, decorative |
| Concentric rings | Specialty round paver kits | Minimal cutting | Very circular, formal |
Cutting Strategy and Installing the Curved Border

A diamond-blade wet saw (also called a paver saw or masonry saw) is the right tool here. A guillotine splitter can cut straight lines quickly but gives you no control over a curved arc cut, skip it for the border work. Angle grinders with diamond blades work for occasional cuts but are slower and harder to control accurately. Rent a wet saw if you don't own one; the rental cost is worth it for the cleaner cuts and the reduced chance of cracking pavers.
Before you cut anything, do a full dry-lay of the interior field pavers first. Set the entire interior (all the pavers that won't be cut) in place without any adhesive or sand compaction. This lets you confirm your joint spacing, check that the pattern works from the center outward, and identify where the arc actually falls on each border paver. Use a pencil or chalk to mark each border paver in place, then lift them one at a time and cut to the marked line.
To mark border pavers accurately, re-string from your center stake to the perimeter and use that radius string as a guide. Hold the string taut at the radius length, mark where it crosses each paver face, and connect those dots to get your cut line. For a tight radius (under 8 feet), you may need to make two or three smaller cuts instead of one long arcing cut to follow the curve closely without cracking the paver. Cut in small batches of 5 to 6 pavers at a time, dry-fit after each batch before moving on, catching a misaligned cut early costs you one paver, not a dozen.
Keep joints between border pavers consistent, aim for 1/8 to 3/16 inch gaps. On a convex outer arc, the gaps will naturally want to widen slightly toward the outside of each paver; counter this by nudging pavers slightly during placement and using spacers where needed. If a gap opens up noticeably, that paver needs a slight angle adjustment or a trim cut, not a wider joint filled with sand.
Setting Pavers, Compacting, and Leveling
Set pavers by pressing them firmly into the bedding sand with a slight rocking motion, not by dropping them flat, dropping displaces the sand unevenly and creates high spots. Work from one side of the circle to the other, keeping a kneeling board behind you so you never step directly on screeded sand or freshly set pavers. Check for lippage (one paver sitting higher than its neighbor) frequently with a straightedge. The tolerance should be no more than 1/8 inch between adjacent pavers.
Once all pavers are set and your border cuts are in place, run a plate compactor over the entire surface to seat the pavers into the sand bed. Make two or three overlapping passes. Use a rubber pad attachment on the compactor plate when working over pavers with textured surfaces to avoid scratching. After compaction, check the surface slope again with a level to confirm your drainage grade is still intact. Minor low spots can be addressed by carefully lifting that paver, adding a small amount of sand, and re-seating.
Edge Finishing, Jointing, and Final Compaction
After all pavers are compacted and level, fill the joints with polymeric sand. Pour a generous amount over the surface and sweep it diagonally across the joint lines using a stiff-bristled broom. Work the sand into the joints by sweeping in multiple directions, joints on a circular patio run in many angles, so sweeping from one direction won't reach them all. Continue adding and sweeping until joints are filled to about 1/8 inch below the top of the paver surface or 1/8 inch below the chamfer edge. Do not overfill.
Once joints look full, run the plate compactor over the surface one final time to vibrate the sand down into the joints. Then add a second light layer of polymeric sand, sweep again to fill any gaps that opened up during compaction, and blow off the excess with a leaf blower set to low. You want zero residue of polymeric sand sitting on the paver faces before activation. Activate by misting the surface gently with water, don't flood it. Follow the specific manufacturer instructions for your brand, including the warning not to apply if rain is expected within 24 to 48 hours.
Sealing, Curing, and Keeping the Patio Looking Good
Wait at least 30 to 90 days before applying any sealer to new pavers. Most manufacturers and contractors recommend this waiting period to allow the polymeric sand to fully cure, to let any initial efflorescence (white mineral deposits) work its way out, and to allow the base to fully settle. Sealing too early can trap moisture and efflorescence beneath the sealer, causing cloudy or peeling finishes. If you see white haze appearing on the surface in the weeks after installation, that's normal efflorescence, let it weather naturally or use a diluted efflorescence cleaner before sealing.
When you're ready to seal, clean the surface thoroughly and let it dry completely (at least 48 hours of dry weather). Apply a penetrating paver sealer with a roller or sprayer in thin, even coats. Two thin coats beat one thick one. Sealing every 2 to 3 years maintains the color and helps repel staining, but it's not mandatory, unsealed pavers still perform well structurally.
For routine maintenance, re-sweep polymeric sand into joints each spring if gaps appear, and pull any weeds promptly before they push pavers up. Keep an eye on the drainage slope, if water starts pooling at the center of the circle, a portion of the base may have settled and a section of pavers will need to be lifted, the base re-graded, and the pavers re-set. This is easier than it sounds and is a common repair even on well-built patios after several years.
Troubleshooting the Most Common Round Patio Problems
Wavy perimeter: This almost always means the radius string wasn't checked often enough during border installation, or border pavers shifted slightly before edge restraint spikes were fully set. Fix by pulling the affected border pavers, re-checking your center-stake radius string, and re-cutting to the correct arc. Installing a few extra edge restraint spikes closer together on the curve (every 8 inches instead of 12) prevents future drift.
Inconsistent joint widths at the border: This happens when cut pavers aren't trimmed to exactly follow the arc, leaving some joints wider than others. The fix is cutting a slight angle trim on the paver faces so adjacent cut edges are parallel, not splayed. If the gap is minor, fill it with polymeric sand; if it's more than 3/8 inch, the paver should be recut.
Lippage: One paver sitting noticeably higher than its neighbor usually means that paver landed on a high spot in the bedding sand or was set without pressing fully in. Lift the paver, scrape away a thin sliver of sand, and re-set. Check with a straightedge across 3 or 4 pavers at a time, not just adjacent pairs, to catch gradual slope drift across the field.
Water pooling at the center: The drainage slope wasn't maintained through all the base layers. This is the most common long-term issue on round patios. If it's minor, you may be able to add polymeric sand to low joint areas to redirect small amounts of water. If it's significant, sections will need to be lifted and the base re-graded. It's worth getting the slope right during construction, re-checking with a 4-foot level after every step of base prep takes a few minutes and saves hours of repair.
Your Next Steps Right Now
- Measure your desired diameter and calculate square footage (radius × radius × 3.14) — add 10 to 15 percent for waste.
- Sketch the patio on graph paper with your drainage slope marked: 1/4 inch drop per foot, away from the house.
- Drive a center stake in your yard and do a radius string test to see how the circle fits your space before committing.
- Order materials: pavers, compactable gravel (4 inches deep over the full excavated circle), coarse bedding sand (1 inch), flexible edge restraint, and polymeric sand.
- Do a full dry-lay of the interior field before any cuts — mark all border pavers in place, then cut in batches of 5 to 6.
- Install edge restraint and compact the base in two lifts before laying any paver — don't skip the second compaction pass after pavers are set.
- Apply polymeric sand only during a 24 to 48-hour dry weather window, fill joints to 1/8 inch below the paver surface, and wait 30 to 90 days before sealing.
The round shape is genuinely achievable for a capable DIYer, the foundation work, material math, and finishing steps are all covered in the same paver installation principles that apply to any patio project. If you want a complete step-by-step walkthrough, review this guide on how to create a paver patio before you start your layout. The extra effort is almost entirely in the border cuts and the initial circle layout. Get those two things locked in early, and the rest of the build is straightforward.
FAQ
What’s the best paver size and thickness to use for a round patio?
Choose a thickness that matches your planned excavation depth (typically around 3 inches total including bedding), and prefer pavers that are consistent in size and straight-edged on the faces. Slight size variation shows more on curved borders, so buy from one batch, check for uniform dimensions during dry-lay, and keep extra pavers from the same batch for future border replacement.
Can I build the circle using only rectangular pavers without a separate border ring?
You can, but it usually creates a messy perimeter because every cut edge must land on the same arc with tight joint control. A dedicated border ring concentrates all curved-edge cutting in one zone, and it also gives you a clean “finish line” for edge restraint and for verifying the slope at the perimeter.
How many pavers should I cut at once for the curved border?
Cut in small batches of about 5 to 6 pavers, dry-fit, then adjust before cutting the next group. This matters because the arc often shifts slightly as your interior pattern sets (especially if you re-check slope or tweak joint spacing), and early mistakes cost fewer pavers than cutting the entire ring at once.
Should rectangular pavers be laid with the long side toward the center or parallel to a straight grid line?
For most DIYers, parallel-to-grid looks more traditional and is easier to keep consistent while cutting only the border. If you place the long side toward the center (spoke orientation), you may end up with more visible joint angle changes and more difficult trapezoidal gap management as you move outward.
How do I prevent the border from migrating outward after edging is installed?
Install the flexible edge restraint along the arc before setting any pavers, then spike it thoroughly and do not compact the patio until the border pavers are locked in. If you notice a curve lifting, stop and re-seat the border pavers before compaction, because polymeric sand filling after the fact cannot correct a moved perimeter.
What joint width is safest on a round patio with many cut edges?
Keep gaps consistent, typically around 1/8 to 3/16 inch. Avoid using wider joints as a shortcut because polymeric sand will shrink and leave voids in wide or inconsistent cuts, which can lead to weed growth and localized shifting over time.
How should I re-check the circle after I start excavating or after I add the base?
Re-check the diameter and center reference before you add gravel, and again after the base is compacted and graded. If you only verify at layout time, any disturbance from digging or compaction can change the arc enough that border cuts no longer match, leading to gaps that require recutting.
Is it okay if the patio center ends up slightly higher than intended?
Small deviations can sometimes be corrected by lifting individual pavers and adding or removing bedding sand, but if the slope error is broader (common on round patios), repairs become repetitive and time-consuming. If water pooling appears later, plan on re-lifting a section, re-graded base, and re-setting rather than trying to fix it one paver at a time.
Can I use dry polymeric sand and skip the wet activation step?
No. Polymerically locking joints require activation by a controlled water mist, not flooding. If you do not activate properly, joints may wash out during rain or remain loose, especially along the curved border where joint angles vary.
How do I avoid haze or residue on the paver faces after installation?
Overfill is the main cause. Sweep polymeric sand only until joints are filled to about 1/8 inch below the surface (or near the chamfer), then remove any powder residue immediately with a leaf blower on low. Before activation, the faces should be clean and free of sand buildup.
When is the right time to seal, and what if efflorescence appears?
Wait at least 30 to 90 days, then seal only after the surface is dry and has stopped showing new white haze. If efflorescence is still developing, wait longer or use an efflorescence cleaner before sealing so you do not trap moisture and minerals under the coating.
Do I need to re-sweep polymeric sand into joints every year?
In many climates, yes, at least as a check after the first winter. Light rain and freeze-thaw cycles can open joints slightly, so re-sweep only if gaps appear, and pull weeds early because root growth can lift pavers even when the patio looks stable.
What’s the best repair approach if water pools after a year or two?
If pooling persists at the center, assume settlement or slope loss in the base. Lift the affected paver area, remove and re-grade the base with the correct 1/4 inch per foot slope, re-compact, and re-set pavers. Small “patch” additions of sand in joints usually do not restore the overall drainage plane.
Next Articles
How to Use Quikrete Patio Paver Jointing Sand: Guide & Tips
How to use Quikrete Patio Paver Jointing Sand: step-by-step application, tools, timing, coverage, and care.

How to Use Patio Paver Sand: Step by Step DIY Guide
Step-by-step guide to apply patio paver sand correctly: prep base, set pavers, fill joints, compact, and troubleshoot is

How to Install Patio Pavers in Sand: Step-by-Step
DIY step-by-step how to install patio pavers in sand, from excavation and base prep to leveling, cutting, joint sand and