
Standing water on patio pavers almost always comes down to one of four things: not enough slope, clogged joints, a failing base, or water arriving from somewhere it shouldn't. Most cases are fixable by a capable DIYer without pulling up every paver, as long as you correctly identify the cause first. This guide walks you through diagnosing the problem, choosing the right fix (starting with the least invasive option), and completing each repair with real step-by-step instructions, honest time estimates, and the tools and materials you'll actually need.
How to Drain Water from Patio Pavers: Fixes, Drains & Rebase

Felix Rowe
6 Aug 2026
What this guide covers and who it's for
This article is written for homeowners who already have a paver patio that pools or drains slowly, and want to fix it themselves. Whether your patio sits over compacted soil, a gravel base, or an existing concrete slab, the diagnostic and repair process follows the same core logic. You'll find guidance here for common variations too, including raised patios, sloped designs, and patios near downspouts or fire pits. By the end you'll know exactly what's causing your drainage problem, which solution matches it, and how to execute that fix safely on a weekend.
Why water pools on paver patios: the usual suspects
There are more causes than most people expect, and the right fix depends entirely on which one you're dealing with. Applying the wrong solution, say, adding a French drain to a patio that just needs a slope correction, wastes money and time. Here are the main culprits:
- Insufficient slope: Industry guidance (ICPI/CMHA) calls for 1/8 to 1/4 inch of fall per foot (roughly 1%–2%) away from your house and toward a drain outlet. Many DIY patios are installed just a hair too flat, or settle flat over time.
- Blocked or compacted joint material: Sand joints that have washed out, silted up, or been compacted by traffic block the small gaps pavers rely on to shed water quickly.
- Clogged or poorly graded base: A bedding layer or base that has been contaminated with fines, or was never properly sloped during installation, can act almost like a bathtub, holding water beneath the surface.
- Missing or failed edge restraints: When edges shift outward, pavers migrate with them, creating low spots and breaking the intended surface plane.
- Concentrated discharge from downspouts or gutters: A single downspout dumping directly onto a patio corner can overwhelm any drainage design. This is extremely common and often overlooked.
- High groundwater or poor subgrade infiltration: In clay-heavy soils, water that infiltrates through the base simply has nowhere to go. It perches just below the surface and keeps the whole system saturated.
- Localized settlement: A base that wasn't compacted uniformly, or was laid over soft spots, will develop low areas that collect water even if the original slope was correct.
How to diagnose the real cause
Before you spend a dollar on materials, spend 30 minutes on a proper inspection. The cause of standing water is almost always visible or measurable if you know what to look for. Follow these steps in order, and note your findings as you go.
Step 1: Measure your existing slope
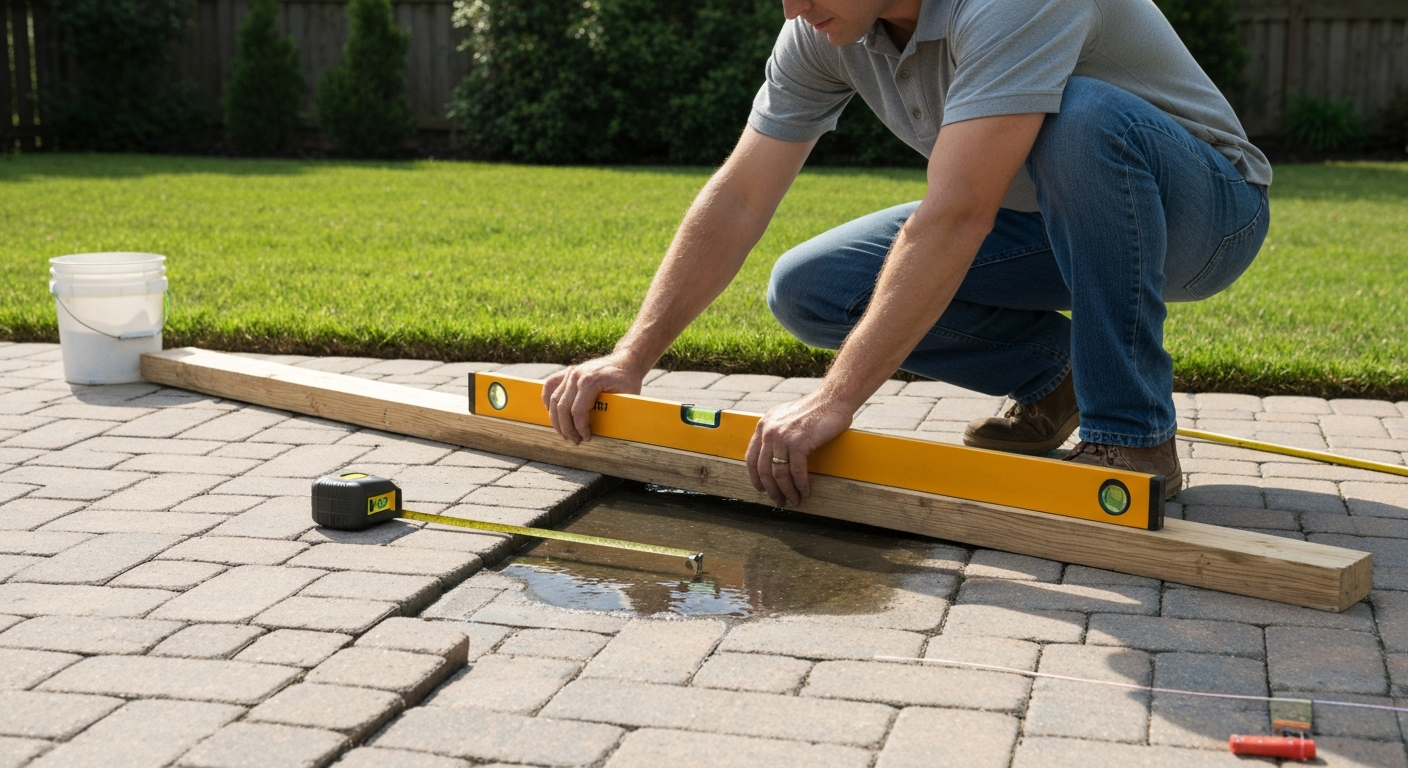
You need to know whether your patio has any useful fall at all. The simplest method: lay a straight 4- to 10-foot board across the affected area, set a 4-foot level on top of it, and measure the gap between the end of the level and the board surface when the bubble is centered. Divide that gap (in inches) by the board length (in feet) to get in/ft of fall. Anything less than 1/8 in/ft (1%) is essentially flat. Alternatively, a laser or rotary level set to slope mode gives you a fast, accurate reading over longer runs. Target: 3/16 to 1/4 in/ft (1.5%–2%) for a residential patio.
Step 2: Run a ponding test on the problem area
Pour a measured volume of water (a 5-gallon bucket works well) directly onto the low spot and watch the clock. If it drains away within a few minutes, you're dealing with a surface slope problem and the fix stays above ground. If it sits for hours, water is not infiltrating through the base, which means you have a subsurface issue: clogged joints, an impermeable bedding layer, high groundwater, or very poor soil permeability. Note the location carefully because this distinction drives every decision that follows.
Step 3: Check the joints and bedding layer
Lift one or two pavers near the low spot. If you need to remove and dispose of many pavers, see a short guide on how to dispose of patio pavers. If you need step-by-step instructions for lifting multiple units safely, see our guide on how to remove patio pavers. If the bedding sand below is muddy, silted, or saturated, that layer is acting as a barrier. Inspect the joint material between pavers: silted-up, moss-filled, or completely absent joints restrict surface drainage significantly. While the paver is up, press your finger into the bedding sand. It should be firm and granular, not soupy or compacted into a clay-like mass.
Step 4: Perform a basic percolation test (for patios over soil)
If you suspect the native soil can't accept water, dig a 12-inch-deep test hole next to the patio (not under it), fill it with water, let it drain completely, then refill and measure the drop every 30 minutes for 4 hours. Fast-draining sandy soils will empty in under an hour. Clay-heavy soils may barely move. If the water doesn't drop at all in 4 hours, no amount of surface slope improvement will fully solve ponding during heavy rain, and a subsurface drain is going to be part of the solution.
Step 5: Check external water sources
Walk around the patio during or right after rain. Look for: downspouts discharging onto or adjacent to the patio, lawn areas that slope toward rather than away from the patio, and neighboring hardscape (driveways, walkways) that funnels sheet flow onto your surface. These sources can overwhelm a perfectly designed patio. Also check whether the surrounding yard grade has changed, for example from new planting beds or soil settling near the house.
Decision flow: find your fix before you buy anything
Use the findings from your inspection to match your situation to the right repair. The goal is always the least invasive permanent fix. Work through this in order: if an earlier, simpler fix fully explains and solves the problem, stop there.
- Slope is less than 1% AND water disappears within minutes of ponding: The fix is regrading the surface or re-bedding affected pavers to restore slope. No new drain hardware required.
- Slope looks adequate but water still ponds briefly: Inspect and clear joints first. Restoring permeable joint material is often a one-afternoon fix that solves moderate ponding on well-built patios.
- Water sits for hours and perc test shows moderate soil infiltration (drains slowly but does drain): Improve subsurface drainage by adding a French drain or underdrain at the perimeter or low edge. You may also need to re-bed low-spot pavers.
- Water sits for hours and perc test shows near-zero infiltration (heavy clay): You need a positive outlet. Install a channel drain or catch basin connected to a pipe that carries water to daylight (a swale, storm sewer connection, or dry well in better-draining soil farther away). Regrading the surface to feed that drain is required.
- External sources (downspouts, yard slope) are directing extra water onto the patio: Redirect those sources first, then reassess. Sometimes this alone solves the problem.
- Multiple low spots across the whole patio with a failed base: A full rebase is the correct fix. This is the most invasive option, but patching a collapsing base rarely holds long-term.
Quick temporary fixes and when they make sense
Temporary fixes buy you time but don't solve the underlying cause. Use them when you can't complete permanent repairs immediately, or when you need to get through a rainy season before tackling a bigger project.
- Sweep polymeric sand or coarse concrete sand into joints: Takes about an hour for a typical 200 sq ft patio. Reduces surface ponding caused by empty joints, but does nothing if the bedding or base is the real problem.
- Add a thin layer of pea gravel or decomposed granite to a low spot: Works only as a visual band-aid. It fills the depression temporarily but doesn't address slope or base failure.
- Temporary flexible downspout extension or splash block: Redirects concentrated downspout discharge away from the patio surface. Free to under $30 and takes 10 minutes. Highly effective as a stop-gap.
- Submersible pump with a discharge hose: For an acute event (a heavy storm left several inches of standing water), drop a submersible sump pump in the low area and run the discharge hose to a nearby lawn or drain. Not a long-term solution, but it gets water off the surface quickly.
Tools, materials, and realistic time estimates
Here's an honest breakdown of what each repair option actually requires in tools, materials, and time. If your repair requires cutting pavers to fit curved edges, see how to cut patio pavers in a circle for techniques and the right tools. These are realistic estimates for a competent DIYer working alone, not best-case scenarios.
| Repair option | Key tools | Key materials | Realistic time (DIY) |
|---|---|---|---|
| Joint clearing and refilling | Pressure washer or stiff brush, jointing sand applicator, plate compactor (rental) | Polymeric sand or ASTM No. 8/9 chip stone (for permeable joints) | 2–4 hours for 200 sq ft |
| Regrade/re-bed low-spot pavers | Pry bar or flat bar, rubber mallet, screed rails, level, laser level or string line | ASTM C33 bedding sand, edge restraint spikes | Half day to full day for a localized low spot |
| French drain at patio perimeter | Trenching spade or rented trencher, pipe cutter, level, tape measure | 4 in. perforated pipe, #57 washed stone, non-woven geotextile (AASHTO M288) | 1–2 days for a simple perimeter drain |
| Channel drain installation | Angle grinder or circular saw with diamond blade, level, shovel, drill | NDS Slim or equivalent channel body, grate, 3–4 in. outlet pipe, concrete mix | Half day to full day |
| Catch basin installation | Spade, level, pipe wrench, drill for knockout | 9–12 in. plastic catch basin, grate (A15 pedestrian rated), 4 in. outlet pipe | Half day |
| Full rebase | Plate compactor (rental), excavation tools, screed rails, laser level, masonry saw for cuts | Compactable gravel base (4 in. min), ASTM C33 bedding sand, edge restraints | Full weekend or 2–3 days |
Site prep and safety before you start
Even a modest drainage repair involves digging, potentially near buried utilities, and handling concrete, stone, and compaction equipment. None of this is dangerous if you take a few minutes to prepare properly.
Check for buried utilities
Any time you're digging more than a few inches, call 811 (in the US) before you start. This is free, legally required in most states, and can save your life. Give them 2–3 business days to mark gas, electric, water, and communication lines. In most cases a residential patio is far from these lines, but downspout drain connections and French drains can run right alongside buried pipes.
Permits
For most patio drainage repairs, no permit is required. The exception is if you're connecting to a municipal storm sewer, making significant changes to grading that could affect neighboring properties, or in an area with local impervious surface regulations. When in doubt, a 5-minute call to your local building department clarifies this quickly and for free.
PPE and work area
- Safety glasses: mandatory any time you're using a plate compactor, cutting pavers, or pressure washing.
- Work gloves: pavers have sharp edges, and geotextile fabric cuts hands easily.
- Knee pads: you will spend a lot of time on your knees on hard aggregate.
- Dust mask (N95 or better): cutting pavers generates fine silica dust. Wet-cutting reduces this significantly.
- Steel-toed boots: plate compactors are heavy and move.
- Work area protection: if your repair is near a lawn, lay plywood sheets to protect grass under material piles. Bedding sand and crushed stone kill turf quickly if left sitting.
Regrading and restoring slope: the most common permanent fix
If your diagnosis points to insufficient slope, this is your repair. It's the most common cause of paver drainage problems and, fortunately, very manageable as a DIY project. If you end up with surplus units after lifting or regrading, see our guide on what to do with extra patio pavers (ideas for storing, repurposing, or selling leftover pavers). The approach varies slightly depending on what your patio sits over.
When to choose regrading
Choose regrading when your slope measurement is below 1% (1/8 in/ft), when you have a localized low spot that developed from base settlement, or when your ponding test shows water disappears in minutes (meaning it's a surface flow problem, not a subsurface permeability problem). If the issue covers more than about a third of the patio surface, you're likely looking at a full rebase rather than a targeted repair.
Regrading over a soil or gravel base: step by step
- Mark the repair boundary: Use spray paint or chalk to outline the section you'll lift. Include at least two rows of pavers beyond the visible low spot.
- Remove the pavers: Use a flat bar to pry up the first paver, then use your hands for the rest once you have a starting gap. Stack them nearby on plywood in the order you'll relay them (this simplifies reinstallation). For guidance on careful removal technique, the process for removing pavers without damage is worth reviewing before you start.
- Assess the bedding and base: Scrape out the existing bedding sand with a flat shovel. Check whether the base (compacted gravel) is settled or contaminated. If the base surface is sound and just slightly low, you only need to adjust the bedding depth. If the base has soft spots, depressions, or silted-up aggregate, remove 1–2 inches of it and recompact.
- Set your target grade: Using a laser level or string line, establish your target slope of 1/4 in/ft (2%) away from your house toward the drainage outlet. Stake screed rails at the correct elevation on each end of your repair zone.
- Add and screed bedding sand: Spread ASTM C33 concrete sand to a loose depth of about 1.5 in. (it will compact to roughly 1 in.). Drag a screed board across the rails to create a uniform surface at your target slope. Do not compact the bedding sand before laying pavers.
- Relay the pavers: Set them back in their original pattern, working from one edge toward the other. Use a rubber mallet to seat each paver fully without disturbing the screeded sand beneath.
- Compact and set: Run a plate compactor over the reinstalled section (use a rubber pad over the pavers to protect their surface). Make two passes.
- Fill joints: Sweep your joint material (polymeric sand or, for permeable joints, ASTM No. 8/9 chip stone) across the surface, fill the joints, and compact again. For polymeric sand, mist lightly and let it cure per manufacturer instructions.
- Match the surrounding grade: Walk the edge where your repair meets the existing patio. There should be no step or ridge. If needed, add a small bead of polymeric sand across the transition and compact it down.
Regrading over a concrete substrate
If your pavers sit over an existing concrete slab, regrading the bedding layer is your main tool because you can't regrade the concrete itself without a grinder. Lift the pavers as above. If you need to cut or drill pavers for anchors, drains, or grates, see how to drill into patio pavers for recommended tools, drill bits, and step‑by‑step technique. If you need to trim pavers to fit around drains or edges, see a brief how to cut patio pavers with a chisel. If you need to trim pavers at edges, see a short guide on how to cut patio paver for safe, accurate cuts (internal ref: 2410fe19-ee31-417e-98c4-c4831071c8cb). Inspect the concrete surface: if it has its own low spots or negative slope, you have two choices. First, apply a thin layer of sand-set leveling mortar (a dry pack mix) screeded to the correct slope, then relay over that. Second, if the concrete slope is severely wrong (draining toward the house), you may need to add a channel drain across the low edge, which we cover in the section below. Targeting 2% fall in your bedding layer over a concrete base is achievable and will usually solve moderate ponding completely.
Timing and matching to surrounding drainage outlets
Before you finalize your target slope, trace where the water will actually go once it leaves the patio. Slope toward a lawn area, a planted bed with good soil infiltration, a swale, or a channel/catch drain. Avoid sloping toward a fence, a neighbor's property, or a foundation. If there's no clear outlet, you need to create one (see the French drain and channel drain sections). Don't start a regrading project until you have a confirmed receiving point for the water, or you'll simply move the problem a few feet.
Installing a French drain or perimeter underdrain
A French drain intercepts subsurface water before it saturates your patio base. It belongs at the uphill edge of the patio (to intercept water flowing toward it from the yard) or at the low edge (to pull water out from under the base). Use 4-inch perforated pipe as standard for residential patios. Trench depth depends on your application: for a perimeter intercept drain, 12–18 inches deep is typical, deep enough to sit at or below the base layer.
Line the trench with a non-woven geotextile fabric meeting AASHTO M288 (brands like Mirafi 140N are commonly available at landscaping suppliers). Add 6 inches of ASTM #57 washed angular stone below the pipe, lay the pipe with perforations facing down, wrap the fabric around the stone and pipe bundle, and backfill with more #57 stone to within 2–3 inches of the surface. Slope the pipe at least 0.5%, ideally 1%, toward your outlet. Daylight the pipe into a swale, a dry well in better-draining soil, or a storm drain connection (check local codes). Install a cleanout riser where the pipe changes direction so you can flush it in future years.
Installing a channel drain across a patio
Channel drains (also called linear or trench drains) work well when sheet flow collects along a specific line, such as at the base of a sliding door threshold, across the bottom edge of a sloped patio, or at the point where a driveway meets a patio. Narrow residential systems like the NDS Slim Channel have internal widths around 2.25–2.75 inches and accommodate a 3–4 inch outlet pipe. Choose a grate open area that can handle peak sheet flow from your contributing patio area.
- Mark the channel location: It should sit at the natural low line or immediately upslope of where water consistently collects.
- Remove pavers along the channel line: Use a flat bar. You may need to cut partial pavers on each side to accommodate the channel body width. Cutting pavers accurately with a diamond blade or chisel is a skill worth practicing on a spare before cutting installed ones.
- Excavate the trench: Dig to a depth that allows the channel body to sit so its grate surface is flush with the surrounding paver surface (or just slightly below, about 1/8 inch, to draw flow).
- Run the outlet pipe: Connect the channel's end or bottom outlet to a 3–4 inch pipe sloped at least 1% to your drainage outlet.
- Set the channel body in concrete: Mix a small batch of concrete, set the channel body into it, and use a level to confirm it's straight and at the correct elevation. Allow to cure 24 hours before loading.
- Cut and relay border pavers: Fit pavers snugly against the channel sides. Edge restraint on each side of the channel body keeps pavers from migrating into the gap over time.
- Install the grate: Choose an A15-rated pedestrian grate for foot-traffic patios. Snap or screw it in per manufacturer instructions.
Installing a catch basin
A catch basin works best for a single concentrated low point, such as a depression in the center or corner of a patio, or at the end of a channel drain run. Residential plastic catch basins typically come in 9–12 inch nominal sizes with 3–6 inch outlet knockouts. Set the grate approximately 1 inch below the surrounding paver surface to draw sheet flow reliably. The built-in sump (usually 6–12 inches on residential plastic units) catches sediment before it enters your outlet pipe, so plan to clean it out every year or two.
Installation follows the same logic as a channel drain: remove and set aside pavers, excavate, run the outlet pipe to daylight sloped at 1% minimum, set the basin in a concrete collar, confirm grate elevation, and relay pavers to the basin edge. Use an A15 pedestrian-rated grate. Size your outlet pipe so it can carry the peak flow from the contributing area. For a typical residential patio under about 500 square feet, a 4-inch outlet pipe is almost always adequate.
Converting to permeable joints
If your base drains well (confirmed by the percolation test) but surface ponding is the issue, switching from polymeric sand to an open joint material can make a meaningful difference. Permeable interlocking pavement (PICP) uses washed, single-sized chip stone in the joints, typically ASTM No. 8, No. 9, or No. 89 gradation. These joints stay open, allowing rainfall to infiltrate directly through the paver surface rather than relying on sheet flow to a drain edge.
To convert: pressure wash or carefully sweep out existing joint material, sweep in the chip stone to fill joints flush, and compact lightly with a plate compactor (rubber pad on). The catch is that this only works if your bedding and base are also open-graded (clean stone, not sand). If your bedding layer is ASTM C33 sand, the infiltrated water will pond on top of it anyway. Permeable joints paired with a sand bed are a partial improvement at best. For the full benefit, the bedding should also be chip stone, which requires lifting and re-bedding pavers. That's close to a full rebase project, so weigh that carefully.
Maintaining your drainage solution
The repair you make today will only stay effective with a little annual attention. Most drainage failures on repaired patios come from neglected maintenance, not from a bad initial fix.
- Inspect and refill joints every spring: Wind, rain, and freeze-thaw cycles erode joint material each year. Ten minutes with a bag of jointing sand prevents years of progressive drainage decline.
- Clear channel and catch basin grates after every major storm: Leaves and debris block grates fast. A clogged grate turns a working drain into a useless one.
- Flush French drain cleanout risers once a year: Run a garden hose into the cleanout riser and flush toward the outlet to clear sediment before it accumulates.
- Re-check slope every 3–5 years: Base settlement is gradual. Catching a developing low spot when it's a quarter-inch problem is much easier than when it becomes a two-inch problem.
- Keep downspout extensions in place: It's tempting to remove a splash block or extension when mowing. Replacing them takes 30 seconds and prevents a significant recurring water source.
- Trim overhanging plants: Moss and algae growth in joints is accelerated by shade and organic debris. Keeping the patio surface clear and sunny extends joint life considerably.
When to call a professional
Most patio drainage repairs are solidly within DIY reach, but there are situations where professional help is the smarter call. If your percolation test shows zero infiltration over a large area, you may need a drainage engineer to design a system that meets local code and handles the volume correctly. If your patio drains toward your foundation and you suspect water intrusion into the structure, that's a foundation drainage issue, not just a patio issue, and a contractor familiar with waterproofing should assess it. If connecting to a municipal storm sewer is the only viable outlet, most municipalities require a licensed plumber or contractor for that connection. And if the base has failed across the entire patio, renting a plate compactor and calling a friend for the weekend is still DIY, but getting a quote first is worth it to compare against your time investment.
FAQ
What are the most common causes of standing water on patio pavers?
Common causes: insufficient slope away from the house (target 1%–2% or 1/8"–1/4" per ft), clogged or compacted joints/bedding that prevent surface infiltration, improperly prepared or contaminated base (impermeable layer or settlement low spots), missing/failed edge restraints allowing lateral migration, concentrated roof/downspout discharge onto the patio, and high groundwater or poor native soil infiltration.
How do I diagnose whether the problem is surface slope, blocked joints, or a subsurface issue?
Start with a simple ponding test: isolate the low spot and fill it with a measured volume of water. If it drains in minutes, it’s a surface slope issue. If it persists for hours or days, suspect clogged joints, impermeable bedding/base, or poor subgrade infiltration. Follow up with a slope check (string level, 4–10 ft board + level, or digital inclinometer) and a small percolation test (12" hole: saturate, refill, measure drawdown rate). Slow drawdown indicates subsurface problems or high water table.
What’s the least-invasive temporary fix while I decide on a permanent solution?
Temporary fixes: sweep and pressure‑wash joints, remove vegetation, add and compact joint sand (not polymeric if you want permeability), regrade surrounding turf to direct flow away, and place a temporary channel drain/grate or surface drain mat at the discharge line. These buy time but won’t solve subsurface base failures or persistent high groundwater.
When should I choose regrading/re-slope vs. installing a drain vs. full rebase?
Decision flow: if slope <1% and the base is otherwise sound — regrading or adding slope (least invasive). If local concentrated flow or patio is flat but base drains to subgrade (percolation OK) — add channel drain(s) or a catch basin. If water ponding persists despite surface fixes, percolation is poor, or base is contaminated/settled — do a full rebase (remove pavers, rebuild aggregate base, re-bed). If groundwater is high use underdrains or connect drains to an outlet.
What tools and materials will I need for the common repair options and typical time/cost estimates?
Tools: string line/line level or digital inclinometer, 4–10 ft straight board + level, shovel, pry bar/paver lifter, rubber mallet, circular saw with diamond blade or paver splitter, chisel & masonry hammer, wheelbarrow, plate compactor, tamper, measuring tape, utility knife, saw for PVC/HDPE pipe. Materials: edge restraint, ASTM #57/#8 washed stone, bedding sand (if sand-set), non‑woven geotextile, perforated pipe (4" standard), channel drain/catch basin kits, PVC couplers, clean drain rock, replacement pavers, grate. Time/cost: small regrade or joint cleanup — a day; installing a surface channel drain — 1 day; adding a French drain under patio — 1–3 days; full rebase of a typical 12x12 patio — 2–4 days for a capable DIYer. Cost ranges widely: $50–$500 for simple fixes, $300–$2,000 for drains and parts, $1,000–$5,000+ for full rebase depending on size and materials.
Step-by-step: how to regrade a patio to add slope without removing all pavers
1) Check and mark required slope: 1/8"–1/4" per ft away from structure. 2) Loosen pavers in place around the work area using a paver lifter or pry bar; remove a strip (2–3 rows) where you’ll adjust edge/transition. 3) Add/trim base material (screened gravel/aggregate) to build new slope; compact with a plate compactor. 4) Recut/trim edge pavers to fit new level. 5) Re-bedd any disturbed pavers on 1" bedding sand and compact; refill joints with joint sand. 6) Verify slope with level over the run. Typical time: a few hours to a day for a modest area.
Next Articles
How to Dispose of Patio Pavers: Step-by-Step Guide for DIY Homeowners
How to dispose of patio pavers: DIY removal, cutting, recycling options, costs, safety, and reuse ideas.
What to Do With Extra Patio Pavers: DIY Reuse Ideas
Quick DIY ideas to reuse extra patio pavers, from extensions and paths to repairs, storage, matching, and disposal.
How to Remove Patio Pavers: DIY Step-by-Step Guide
Step-by-step how to remove patio pavers safely, clear bedding sand and base, fix edging, prep for relaying or disposal.