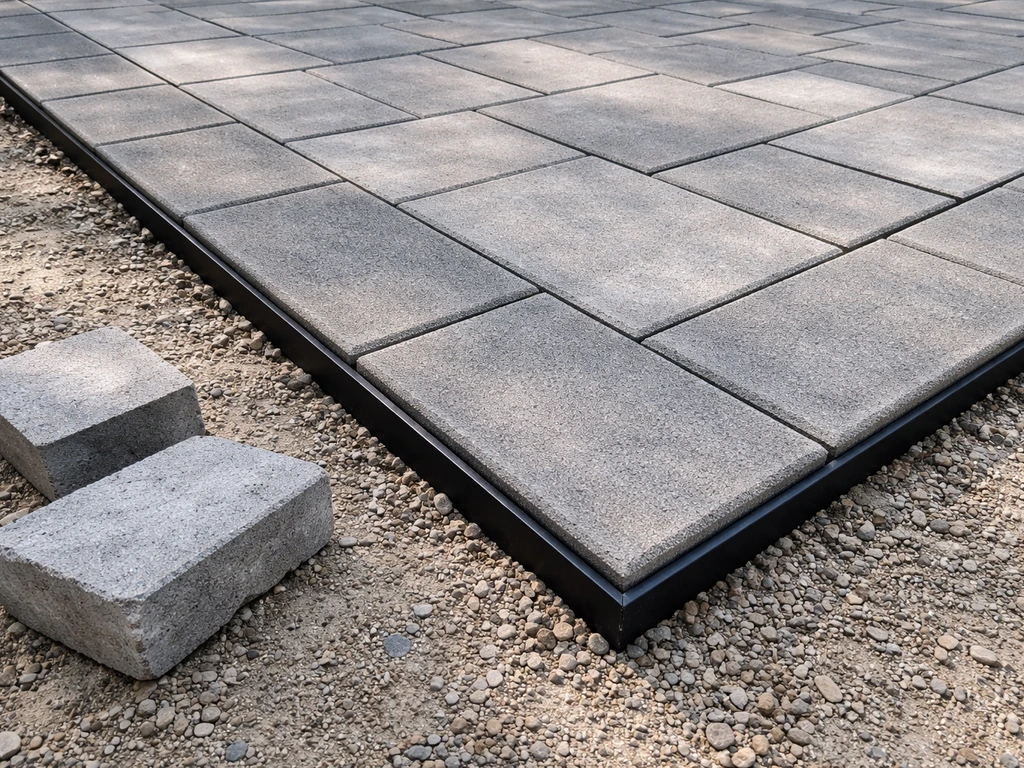
To edge patio pavers properly, you need a solid compacted base that extends a few inches past your last paver, a rigid edge restraint spiked into that base every 8 inches or so, and pavers set tightly against it before jointing sand locks everything in place. If you're wondering how to frame a paver patio, start with the edge restraint setup and the base that supports it. Done right, the edge keeps every paver from drifting outward over years of rain, freeze-thaw cycles, and foot traffic. Skip any one of those steps and you'll be resetting shifted pavers within a season or two.
How to Edge Patio Pavers: DIY Guide for Crisp Borders

Felix Rowe
24 May 2026
Decide on your patio edge style and layout
Before you dig anything, figure out what kind of edge you want visually and structurally. Your options break down into four main approaches: a hidden plastic edge restraint flush with the ground, a metal landscape edging strip, a border course of pavers set in a contrasting pattern or color, or a poured concrete edge curb. Each works differently depending on your situation.
| Edge Type | Best For | Visible? | Durability | DIY Difficulty |
|---|---|---|---|---|
| Plastic edge restraint | Most standard installs, grass borders | No (hidden) | High if spiked correctly | Easy |
| Metal landscape edging | Clean modern look, curved borders | Slightly | Very high | Easy to moderate |
| Border course (soldier/sailor pavers) | Decorative finish, framed look | Yes (feature) | Excellent | Moderate |
| Poured concrete curb | Raised patios, heavy-use areas | Yes | Excellent | Hard (mixing/forming) |
For most DIY installs, plastic edge restraints paired with a decorative border course of pavers is the best of both worlds: you get a clean visual frame and a mechanical restraint doing the structural work underneath. If you're building a raised patio or working on a slope, you'll need to think about edging differently since grade changes affect how restraints perform. Raised and sloped installs are worth treating as their own planning exercise before you start digging.
Lay out your edge line with spray paint or string before anything else. Walk around it. Look at it from the house. A wavy line drawn in paint is much cheaper to fix than a wavy line of set pavers. For curves, use a garden hose to find a natural arc that looks right, then mark it.
Prepare the base and site for clean edges
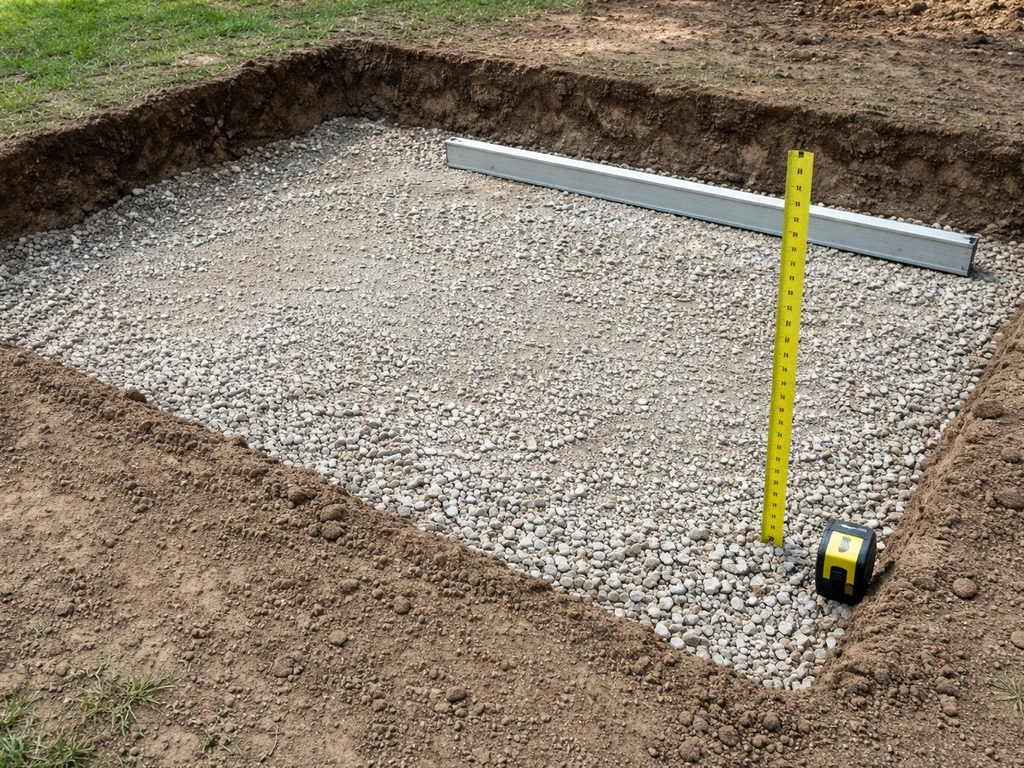
The base is where edging projects succeed or fail. If your compacted aggregate base doesn't extend several inches beyond your last paver, your edge restraint spikes have nothing solid to grip and the whole perimeter will eventually shift. This is the most common reason DIY patio edges fail.
Your excavation depth needs to account for the full stack: paver thickness, plus 1 inch of bedding sand, plus your compacted base (typically 4 to 6 inches for pedestrian patios, more for vehicular use). Add that up before you dig, and then excavate an extra 6 to 8 inches beyond your finished patio footprint on all sides so the base material runs past where the restraint will sit.
- Mark your excavation boundary 8 inches wider than the finished patio edge on all sides.
- Excavate to your full calculated depth, removing all grass, roots, and soft soil.
- Grade the sub-base with a slight slope away from structures (about 1/8 inch per foot) for drainage.
- Add compacted aggregate base material (crushed stone, Class II base, or road base) in 3-inch lifts, compacting each lift with a plate compactor before adding the next.
- Check that the final compacted base is firm, flat, and consistent. Step on it. It should not shift or give.
- Screed a 1-inch layer of coarse bedding sand over the compacted base in your patio area only, not over the zone where restraints will be installed.
One thing people get wrong: they screed the bedding sand all the way to the edge and then try to spike restraints into it. Sand is not a suitable anchor point. Your restraints must be spiked into the compacted aggregate base, which is why that base needs to extend past your paver field. Keep the sand layer contained to the area where the paver units will actually sit.
If you're working on uneven ground or a minor slope, do your grading work now. Build up low spots with compacted fill before you ever touch bedding sand. Trying to compensate for grade problems in the sand layer is tempting but it causes uneven settling later. The sand bed should be as consistent in thickness as possible, ideally right around 1 inch.
Install edging materials: plastic restraints, metal, concrete, or border bricks
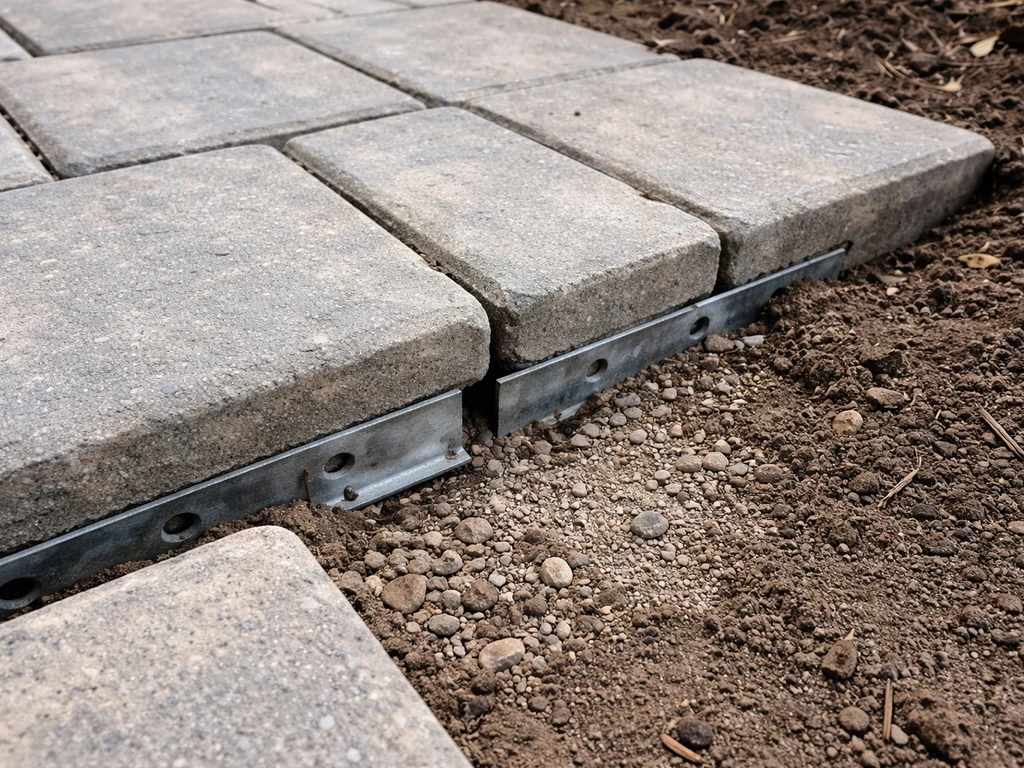
Plastic edge restraints (the most common choice)
Plastic edge restraints are the workhorse of residential paver installs. They flex for curves, come in long sections, and when installed correctly they're extremely effective. The key rule: the top of the restraint should sit about 1/2 inch below the top surface of your pavers so it's hidden once everything is set.
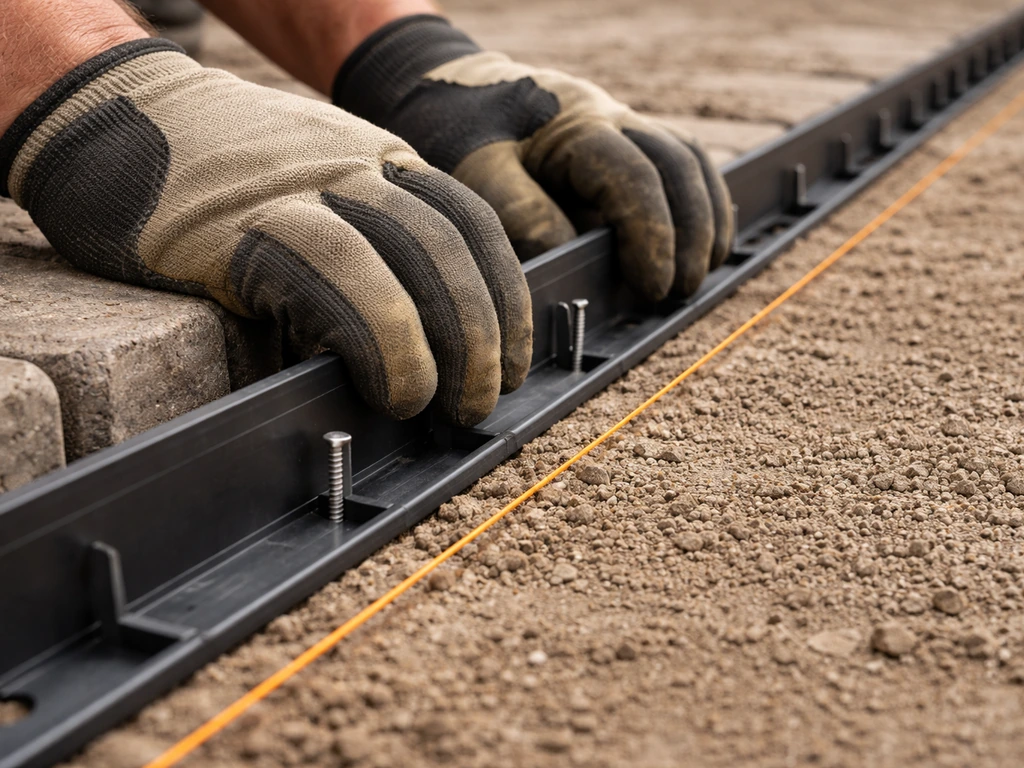
- Lay your pavers first (or use a dry-lay to mark position), then butt the restraint tightly against the outside face of your edge pavers.
- Hold the restraint in position and drive non-galvanized spikes through the spike holes at roughly 8-inch intervals. Angle the spikes slightly as you drive them for better grab.
- Use a hammer or maul to drive spikes fully into the compacted aggregate base, not into sand or soil alone.
- For curves, score the back flange of the restraint every few inches to help it conform without buckling.
- After spiking, backfill compacted aggregate behind the restraint and tamp it into a wedge shape. Some installers use a masonry trowel to pack material into a roughly 30-degree wedge behind the restraint for extra support.
- Check alignment with a string line or straightedge and adjust before the backfill sets.
Metal landscape edging
Steel or aluminum edging works well for clean lines and lasts for decades. It's anchored with ground stakes driven into the soil outside the base perimeter. Position it so the top edge is just below or flush with the paver surface. For paver installs specifically, metal edging works best when you're also using a border course of pavers as the visual edge, with the metal edging acting as additional containment on the outside.
Concrete or brick border course
A soldier course (pavers standing on their long edge, perpendicular to the border) or a contrasting flat border course is both a decorative and structural choice. These border pavers are typically set in a concrete footing or packed aggregate and serve as the edge restraint themselves. When you plan how to border a paver patio, the border pavers you choose can act as both the visual frame and a structural restraint. If you go this route, set the border course first, let it cure or compact, and lay the field pavers into it. This is a great look for a formal framed patio and pairs naturally with other design features like a compass rose or decorative inset pattern. If you want to add a compass rose, plan where it will sit before you set the surrounding pavers so the border and restraint still hold everything tight.
Poured concrete curb
A formed concrete curb is the most permanent edge restraint and the most involved to install. You form and pour it after your base is ready, let it cure for at least 24 hours, and then set your pavers against the cured face. It's most appropriate for raised patio edges, steps, or areas with heavy use or vehicular traffic. For standard ground-level patios, it's usually overkill.
Set and lock the pavers to the edge
Once your restraints are in place, you're setting pavers from one edge toward the other, keeping them tight to the border as you go. Start at your most visible corner or edge and work inward. Use a string line stretched across the restraint to maintain your alignment row by row.
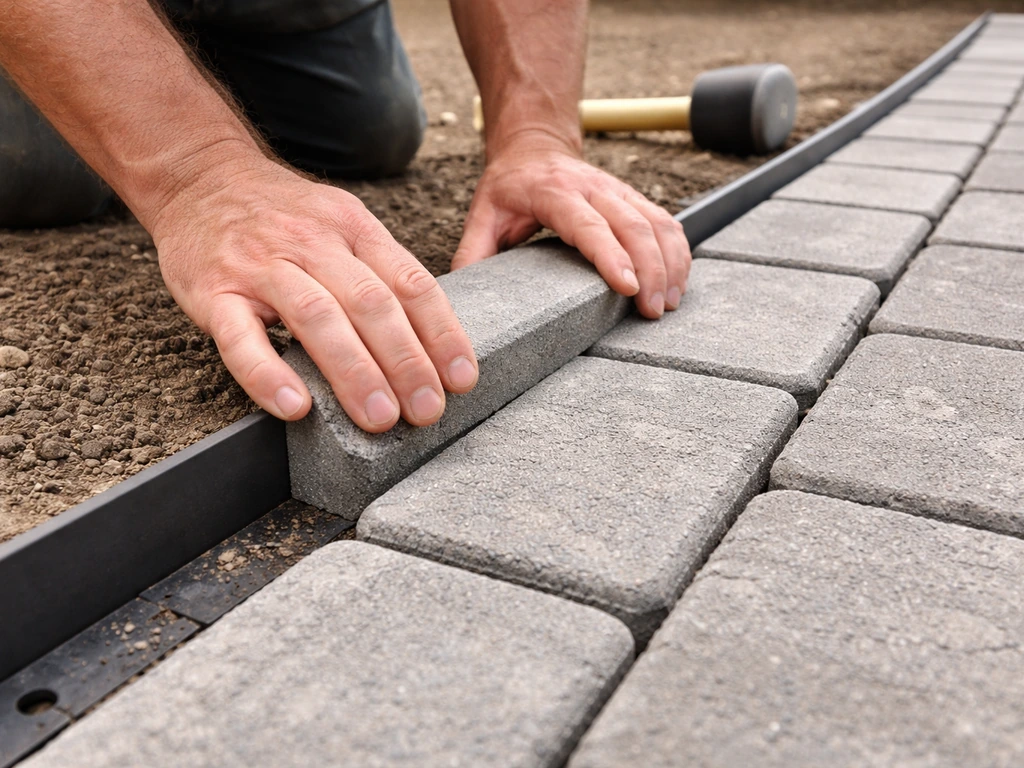
- Set your first row of pavers tight against the edge restraint with consistent spacing (most pavers have small spacer lugs built in, typically 1/8 to 3/16 inch joint width).
- Use a rubber mallet to seat each paver firmly into the bedding sand. Don't grind or wiggle them, just seat them with a few firm taps.
- Check level frequently with a 4-foot level or straight board across several pavers. Any high or low spots are easier to fix now than after the row is done.
- Work across the patio, maintaining your string line. Step back every few rows to check for wavy lines.
- When you reach a cut line at the far edge, mark cut pavers in place by laying them over the last full paver and marking with a pencil.
- Cut pavers using an angle grinder with a diamond blade for straight cuts, or a wet saw for cleaner cuts and curves. Wear eye protection and hearing protection.
- For inside corners or tight curves, a chisel and hammer can work for small adjustments, but a wet saw produces much cleaner results.
- Set cut pavers into position and check they're level with adjacent full pavers before continuing.
For sloped installs, work uphill from your lowest edge restraint. Gravity will want to push pavers downhill as you set them, so keep checking spacing and alignment. Consider setting a temporary screed guide rail along the slope to maintain consistent bedding sand depth as you work up the grade.
If you're working around a grass border and notice the outer edge of your restraint is slightly above the lawn grade, that's actually fine. You want the restraint and paver edge sitting just above grass level so mowers can run along it without scalping the pavers. This is also where thinking about how to landscape around the patio perimeter can make the whole install look more finished once the project is done. When you landscape around the patio perimeter, focus on edging, plant placement, and proper drainage to keep pavers looking neat for years.
Finish details: leveling, compaction, jointing sand, and cleanup
Once all the pavers are set and your cuts are in, do a final visual check across the whole surface before you compact. Now is the last easy chance to adjust anything.
- Run a 4-foot level or straightedge across the patio surface in multiple directions to find any high or low pavers. Lift them, add or remove a small amount of bedding sand, and reset.
- Do a first pass with a plate compactor over the entire paved surface. Use a rubber pad or carpet scraps under the compactor plate to avoid scuffing the paver faces. This seats the pavers into the bedding sand and begins interlocking the base.
- Spread polymeric sand liberally over the entire paver surface and sweep it into the joints with a push broom. Work in multiple directions to fill joints completely.
- Check that joint sand is at least 1/8 inch below the top of the pavers (or below the chamfer on chamfered pavers). Do not fill joints flush to the top surface.
- Do a second compactor pass to vibrate the sand deeper into the joints. Add more sand and sweep again if joints look underfilled after this pass.
- Blow or brush off all excess sand from the paver faces before wetting. Sand left on the surface when you mist it will haze.
- Mist the surface with water according to the polymeric sand manufacturer's instructions, typically a gentle spray until the surface is saturated but not flooded. Check for any water pooling in joints and address it before the sand activates.
- Keep foot traffic off for at least 24 hours while the polymeric sand cures.
Resist the temptation to over-wet. Polymeric sand needs moisture to activate, but flooding it washes the binder out of the joints and turns it into a mess. A gentle misting pass is all it takes. Techniseal’s EZSand technical data sheet specifies sweeping polymeric sand into the paver joints and keeping the sand level at least 1/8 inch (3 mm) below the top of the pavers or at the bottom of the chamfer blank" rel="noopener noreferrer">polymeric sand level at least 1/8 inch (3 mm) below the top of the pavers. Also, do not use a pressure washer to clean up after installation until the polymeric sand has fully cured, typically at least 48 to 72 hours. Do not pressure wash or hose at full intensity before joint sand or grout has fully set, because water and pressure can affect the joints and may require a joint sand top-up afterward blank" rel="noopener noreferrer">do not use a pressure washer to clean up after installation until the polymeric sand has fully cured. Aggressive pressure during cleanup is one of the most common ways installers wreck newly finished joints.
Troubleshooting common edge problems
Gaps opening up between pavers and the edge
Gaps usually mean the edge restraint moved or was never tight enough. Check whether the restraint spikes are still seated in compacted base or whether they've backed out into soft material. If the spikes are loose, pull the restraint, re-compact the base in that area, reposition the restraint, and re-spike. Then reset the pavers tight against it and re-apply joint sand. Gaps won't close themselves and will let weeds and ants move in quickly.
Wavy or uneven edge lines
A wavy border usually happened during installation when the restraint wasn't snapped tight against a string line, or when it shifted before the backfill was compacted. If the wave is minor, sometimes you can live with it. If it bugs you or creates joint spacing problems, the fix is to pull the affected section of restraint, reset it against a fresh string line, spike it, and then reset the pavers. It's tedious but straightforward.
Pavers heaving or sitting unevenly
Heaving is almost always a base or drainage issue. Frost pushes up poorly drained or thin base layers, and pavers pop up with it. If you have one or two problem pavers, lift them, check the bedding sand depth (it should be consistent, right around 1 inch), re-screed that area, and reset. If large sections are heaving, you may have a drainage problem in the sub-base that needs to be addressed before resetting makes any lasting difference. Patching from the surface doesn't fix heaving. You have to lift the pavers and deal with what's underneath.
Joint sand or border washing out
Washout is most common on sloped installs and along lawn edges where runoff concentrates. If you used regular sand instead of polymeric sand, washout is expected and you'll need to top up joints annually. If polymeric sand is washing out, it likely wasn't activated properly (insufficient water, watered too aggressively, or foot traffic too soon) or rain hit it before it cured. Re-fill the joints with fresh polymeric sand and re-activate according to the manufacturer's instructions. Make sure your patio's drainage slope is directing water away from the joints, not channeling it through them.
Edge restraint pulling away from the patio
If you can see your plastic restraint separating from the paver edge, soil was used as backfill instead of compacted aggregate. Soil compresses, shrinks when dry, and shifts when wet, so it never holds the restraint in place long-term. The fix is to excavate behind the restraint, backfill with compacted crushed stone, and pack it into that wedge shape against the restraint face. Do not rely on soil alone to hold any restraint, no matter how firm it feels at the time of installation.
Maintenance and seasonal checks to keep edges crisp
Good edges need a once or twice-yearly check to catch small problems before they become expensive ones. Spring and fall are the natural times to do this, especially if you're in a freeze-thaw climate.
- Walk the perimeter every spring and look for pavers that have shifted outward, risen above the surface, or show new gaps at the edge.
- Check joint sand depth along the edges and in high-traffic zones. Top up with polymeric sand if joints are visibly low or hollow-sounding underfoot.
- Look at the restraint itself. If any section has visibly separated from the paver face or if spikes are backing out of the base, address it before the freeze-thaw season.
- Clear debris (leaves, mulch, soil) from the patio edge regularly. Organic material retains moisture and accelerates both joint sand washout and base softening beneath the restraint.
- If you pressure wash the patio, use a fan tip rather than a pencil tip, keep the wand moving, and keep pressure below 1500 PSI near joints. Inspect joint sand after washing and top up if needed. Wait until the sand has been in place at least a year before any pressure washing.
- After any significant soil movement event (heavy rain, drought, or a particularly cold winter) do a full perimeter walk and level check.
- Reapply paver sealer every 3 to 5 years according to your product's instructions. Sealer helps stabilize joint sand and slows the surface weathering that makes edges look ragged over time.
The honest truth about paver edging is that the work you do upfront with the base, restraint placement, and proper backfill determines 90 percent of how the edge performs over years. The finishing details with sand and cleanup matter for appearance and short-term joint stability, but they can't save a poorly anchored restraint. Get the base right, spike into it properly, and your patio edge will look crisp and hold its line through years of use and weather. That's the whole game. If you're wondering how to fix paver patio edging that has started to drift, start by checking the base and restraint placement first.
FAQ
How do I confirm my edge restraint height is right before I set pavers?
If you are using plastic edge restraints, keep the restraint top roughly 1/2 inch below the eventual paver surface, then lock the pavers tight against it before jointing sand. If the restraint ends up too high, the pavers can bow or you get uneven joint widths, and if it ends up too low you can end up with joints that collect debris and fail faster.
Can I fix a too-short base after the pavers are already laid?
Yes, but only after you have compacted base underneath. If you realize the base does not extend far enough past the edge, you will usually need to remove the paver field and reset the restraint so its spikes bite into compacted aggregate. Topping up bedding sand or adding more sand at the edge will not recreate the mechanical anchor the restraint needs.
What backfill should I use behind paver edging, and what should I avoid?
Use compacted crushed stone or similar aggregate for the side wedge behind most restraints, not native soil. Soil can shrink when dry and pump when wet, which lets the restraint creep away from the paver edge even if the tops look straight during installation.
How much water do I use when activating polymeric sand, and what if rain hits?
For polymeric sand, do not rely on a single heavy wetting. Apply the amount of water that matches the product label, then water gently enough to activate the binder without washing it out. If rain hits before curing, you may need to re-activate with fresh polymeric sand depending on how much was displaced.
When should I compact, and how aggressively can I compact near the edge?
Do not compact immediately after spreading sand. First, set all pavers and do your final alignment check. After joint sand is in place, compact carefully and in small passes, and avoid overworking the joints. Over-compaction can create joint washboard and make later edging adjustments harder.
How can I tell whether my problem is restraint movement versus a cutting or spacing issue?
Edge drifting is often detected by checking a few reference points, like whether the outermost joint line stays consistent across long runs. If gaps open repeatedly in the same area, inspect whether restraint spikes backed out into soft material or whether the restraint was not snapped tight to a straight line during installation.
What is the best way to fix a wavy patio edge, patch-by-patch or redo the whole section?
If you have a minor wave, you can sometimes correct it by pulling and resetting only the affected restraint section, then re-aligning with a straight string line before re-spiking. If the wave is widespread, it is usually a sign that backfill was not compacted against the restraint face or that the base height varies, and localized correction may not hold.
How should I change the edging plan for a sloped patio to reduce washout?
On slopes, work uphill, and keep a consistent bedding sand thickness by using a temporary screed guide rail if needed. Also ensure your drainage slope directs water away from the joints rather than toward the edge line, since concentrated runoff along an edge is a common cause of washout.
My patio edge sits next to grass, how high should it be relative to the lawn?
If you want an edge that can handle mowing and foot traffic, set the restraint and paver edge slightly above the surrounding grass grade so mower wheels can pass without scalping. The key is to keep the top of the restraint hidden relative to paver height, while still leaving enough clearance for landscaping equipment.
If I use a paver border course as the restraint, does it perform differently than plastic or metal edging?
Yes, you can use a contrasting border course or a soldier course, but treat it as both a visual frame and containment. If you choose pavers-as-restraint, install the border course first, then set the field pavers tight against it, and ensure the border is set in a concrete footing or packed aggregate so it does not settle independently.
What are the most common mistakes that cause uneven edge cuts or inconsistent spacing?
For crisp cuts, measure and dry-fit edge pieces, then set your border or restraint line first so you can cut against a stable, straight reference. If your cuts are inconsistent, check alignment of the restraint before you blame the saw, because a slightly shifted restraint makes every subsequent cut look wrong.
How often should I inspect patio edging, and what signs mean I should fix it immediately?
Plan for routine checks once or twice per year, especially in freeze-thaw climates. Look for early signs like micro-gaps, slight rocking of edge pavers, or joint sand loss. Early fixes are mostly tightening, resetting, and re-jointing, but repeated failure usually signals a base or drainage defect underneath.
Next Articles
How to Use Quikrete Patio Paver Jointing Sand: Guide & Tips
How to use Quikrete Patio Paver Jointing Sand: step-by-step application, tools, timing, coverage, and care.

How to Use Patio Paver Sand: Step by Step DIY Guide
Step-by-step guide to apply patio paver sand correctly: prep base, set pavers, fill joints, compact, and troubleshoot is

How to Install Patio Pavers in Sand: Step-by-Step
DIY step-by-step how to install patio pavers in sand, from excavation and base prep to leveling, cutting, joint sand and