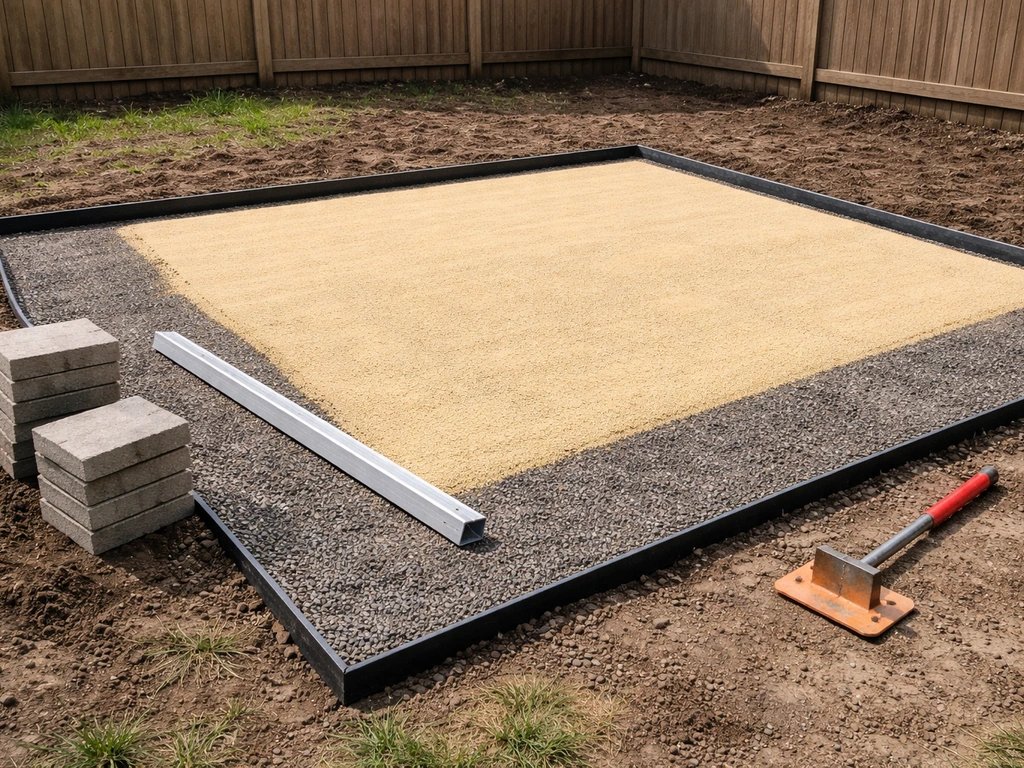
A paver patio foundation has three layers: a compacted gravel base (4–6 inches deep for pedestrian patios, more in freeze-thaw climates), a 1-inch leveling sand bed, and edge restraints spiked into the gravel base along the perimeter. Get those three things right and your pavers will stay flat and tight for decades. Once the foundation is solid, you can move on to choosing and installing the pavers with the right layout and slope so your patio looks and performs the way you planned how to create a paver patio. Skip or rush any one of them and you'll be pulling pavers back up within a few seasons.
How to Lay a Paver Patio Foundation: DIY Step-by-Step

Felix Rowe
3 Jul 2026
Decide the layout, drainage, and base depth before you dig
Before a shovel hits the ground, you need two numbers locked in: how deep to dig and which direction the water runs. Getting these wrong upstream costs you the whole project.
For drainage, the standard slope is 1/8 inch per foot, meaning a 10-foot-wide patio should drop 1.25 inches from the house side to the yard side. That's enough to shed water without feeling noticeably tilted underfoot. If you're on a slope already, you may need to account for more grade change or even plan a raised section. Note the low point of your yard before you design the patio shape, because you never want water pooling toward a foundation wall. For a round patio with rectangular pavers, you will also want to plan the layout so the pavers follow the curve cleanly.
For base depth, the ICPI guidance is straightforward: in freeze-thaw climates with well-drained soils, you need a minimum compacted base of 4 inches. In non-freeze-thaw climates with well-drained soils, go at least 6 inches. Add 1 inch for the sand bed on top of that, plus the thickness of your pavers (typically 2.375 inches for standard concrete pavers). So your total excavation depth in a freeze-thaw area is typically around 7–8 inches below finished grade. In poor soils like heavy clay, plan to go deeper and add a geotextile fabric layer.
| Scenario | Compacted Base Depth | Total Excavation (approx.) |
|---|---|---|
| Freeze-thaw, well-drained soil | 4 in. minimum | 7–8 in. |
| Non-freeze-thaw, well-drained soil | 6 in. minimum | 9–10 in. |
| Clay or poor-draining soil (any climate) | 6–8 in. + geotextile | 10–13 in. |
| Vehicular/driveway use | 8–12 in. | 12–16 in. |
Also decide now whether you'll use a geotextile landscape fabric between the subgrade and the gravel base. If your soil is mostly clay or has poor drainage, lay it. It separates the fine soil particles from your aggregate base, preventing them from migrating upward over time and destabilizing the whole thing. On sandy or loamy soil you can usually skip it, but it never hurts.
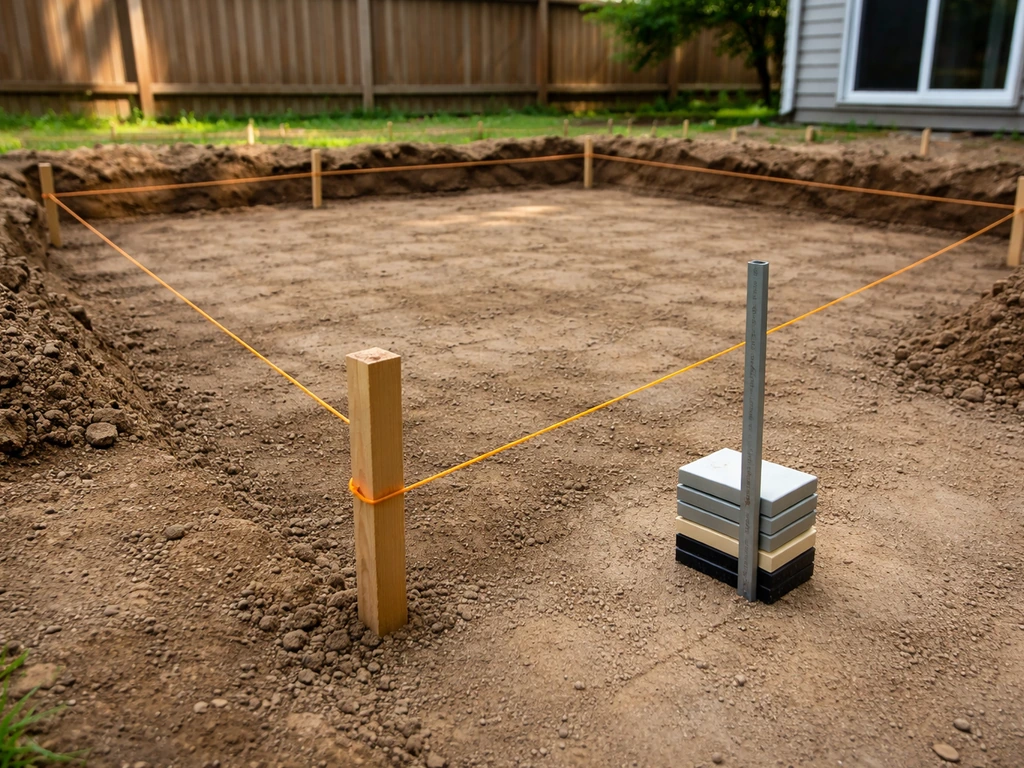
Before you finalize the layout, mark the full footprint with stakes and string. Extend your planned excavation at least 6 inches beyond the finished paver edge on all sides. That extra margin is where your edge restraints will sit, and they need solid compacted base material to spike into.
Site prep: remove grass and soil, fix uneven areas, and mark grades
This is the least glamorous part of the job and also the part most DIYers underestimate. Clearing and grading properly takes real time, especially if your yard has roots, old concrete, or significant slope changes.
What you'll need
- Marking paint or marking flags
- Stakes and mason's line (string line)
- Line level or laser level
- Flat spade and round shovel
- Wheelbarrow
- Plate compactor (rent this, don't buy for a one-time project)
- Tamper for tight spots
- Tape measure
- Geotextile fabric if needed
Start by setting your string lines at the finished patio height, incorporating the 1/8-inch-per-foot slope away from the house. These strings become your reference throughout the whole project, so take time to get them accurate. A line level clipped to the string works fine, but a laser level saves real time on anything larger than about 100 square feet.
Remove all sod and topsoil down to your target excavation depth. Topsoil is organic and compressible, which means it will shift under load no matter how hard you compact it. It all has to go. For an average 12x16 patio excavated 8 inches deep, you're moving roughly 4–5 cubic yards of material, which fills a standard pickup truck bed about twice. Plan your haul-away method before you start digging.
Once you're at depth, walk the excavated area and look for soft spots, especially in corners or near old tree roots. If you find a soft area, dig it out a few extra inches and fill it with compacted gravel rather than leaving loose native soil. Uneven subgrade is the number one cause of paver settlement later, and a low spot filled with gravel compacts far better than a low spot left as-is.
If you're dealing with a sloped yard or uneven ground, you have two options: cut and fill (remove soil from the high side and add compacted base material on the low side) or build a raised section. Raised patios involve more structural work and are a bigger project. Most standard patios are better served by cutting to a consistent depth relative to finished grade and letting the slope handle drainage naturally.
Build the subbase and base layers with the right materials and thickness
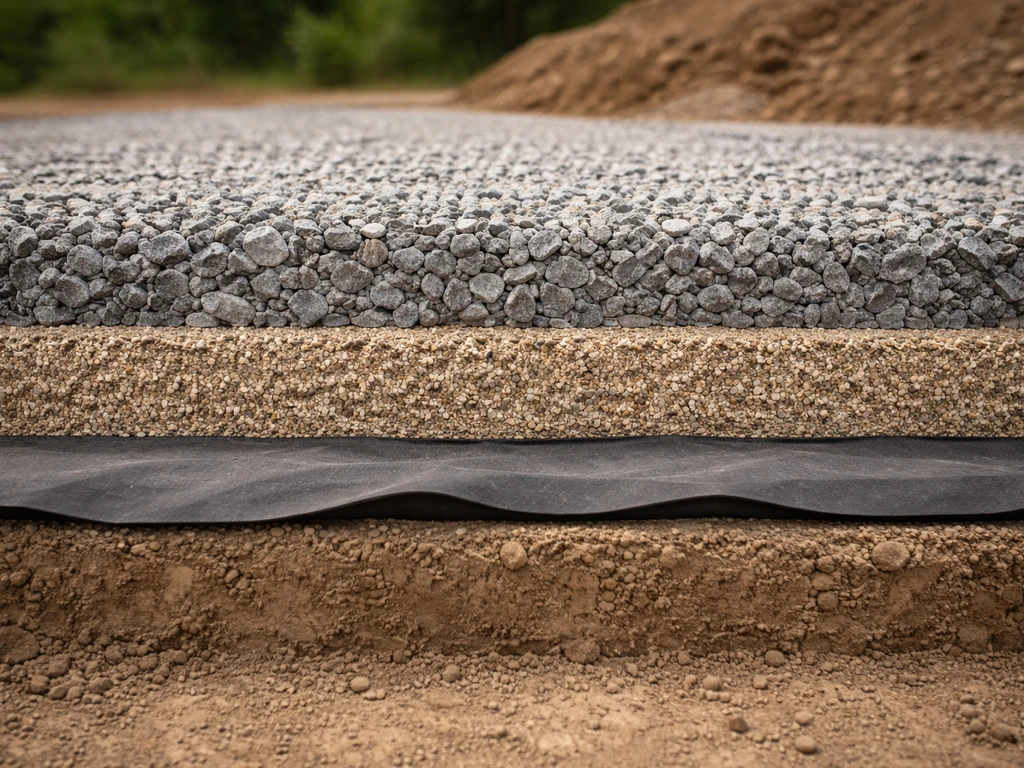
The gravel base is doing most of the structural work here. It distributes load, drains water, and resists frost heave. Choosing the right material matters as much as the depth. If you want to dial in your plan, use this guidance to understand how to make a paver patio base the right way.
Use crushed stone, not pea gravel or bank run
The right material for a paver base is compactable crushed stone aggregate, typically labeled as Class II base, road base, crusher run, or dense-graded aggregate (DGA) at your local supplier. It has angular edges and a mix of particle sizes from about 3/4 inch down to fine dust, which locks together tightly under compaction. Pea gravel and rounded river rock do not compact well because the round particles just roll past each other. Bank run sand has too many fines and holds moisture. Stick with angular, well-graded crushed stone.
If your soil is heavy clay, unroll your geotextile fabric over the prepared subgrade before adding any gravel, overlapping seams by at least 12 inches. This keeps the clay fines from migrating into your base over time and softening it. On good sandy or loamy soil, you can lay base aggregate directly on the subgrade.
Add gravel in lifts, not all at once
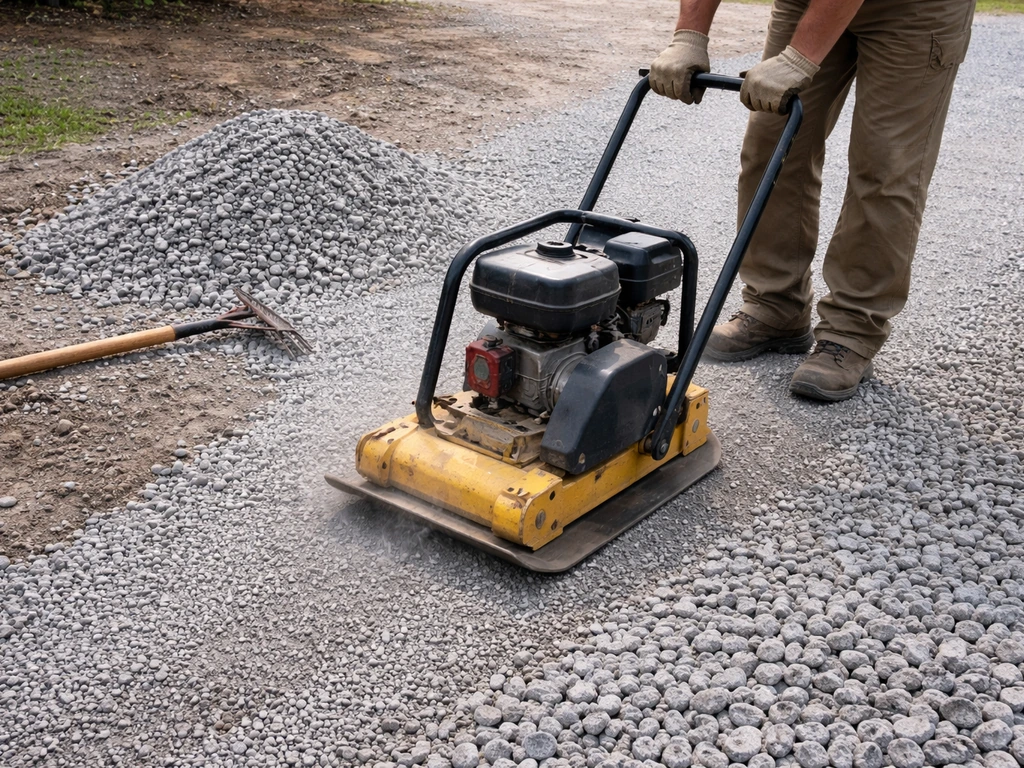
Don't dump all your gravel in at once. Add it in 3–4 inch lifts (layers) and compact each lift before adding the next. A plate compactor can only effectively compact about 3–4 inches at a time. If you dump 8 inches in and try to compact it all in one pass, the bottom half stays loose. Compact each lift with at least three overlapping passes of the plate compactor, and check that the surface feels firm and doesn't shift under foot pressure before adding the next lift.
Compaction and leveling: getting a flat, stable foundation
Compaction is where most DIY patio bases fail. It looks done when it isn't. Here's how to do it right.
Rent a plate compactor, not a jumping jack (tamper). A plate compactor is the right tool for aggregate base material. Make overlapping passes in a grid pattern, first in one direction and then perpendicular. For tight spots along the edges or corners where the plate compactor can't reach, use a hand tamper. It takes more effort but those corners matter just as much as the middle.
The compacted base surface should not deviate more than plus or minus 1/2 inch over a 10-foot straightedge. That's your flatness target. After your final compaction pass, drag a long straightedge or level across the surface and look for high or low spots. Scrape down any high points and fill low spots with a small amount of fresh aggregate, then compact again. Don't try to correct big deviations with bedding sand later. The sand layer is for fine-tuning, not for fixing a bad base.
As you're leveling, keep checking your slope. Use a tape measure from your string lines to the base surface at multiple points across the patio to verify the 1/8-inch-per-foot grade is consistent. It's very easy to compact out your slope without realizing it, especially on the low end where material tends to pile up slightly.
A note on moisture: aggregate compacts best when it's slightly damp. If it's bone dry and dusty, lightly dampen it with a hose before compacting. If it's soaking wet after rain, wait a day. Compacting waterlogged aggregate can actually push fines around instead of locking material in place.
Install edging and prepare for leveling sand
Edge restraints are what keeps your entire patio from slowly spreading outward over time. Pavers push against each other and want to migrate. Without solid edging, your joints open up, sand washes out, and pavers start to shift. This step is non-negotiable.
Use plastic paver edge restraint (also called snap edge or bender board) or aluminum channel edging, both of which are designed to be staked into the compacted base. The restraint needs to be spiked directly into the compacted aggregate base, not into the bedding sand. According to ICPI guidance on edge restraints, the spikes must anchor into firm base material to do their job. CMHA’s Pavement TEC-002 summary likewise emphasizes inspecting edge restraint areas so the base surface can resist bedding sand migration, using geotextile where needed to prevent loss ICPI guidance on edge restraints. If your base doesn't extend at least 6 inches beyond the paver edge, you won't have solid material to spike into.
Before setting the edging, scrape back any bedding sand you may have placed temporarily so the restraint sits flat on the compacted base surface. Drive the 10–12 inch spikes through the restraint holes and into the base at least every 12 inches, and every 6 inches on curves. On straight runs, spiking every 12 inches is usually sufficient. Pull on the restraint after spiking to make sure it doesn't move. If it wiggles, add more spikes.
With edging in place, you're ready for the bedding sand layer. Spread coarse concrete sand (not mason sand or polymeric sand) over the compacted base to a depth of about 1 inch. Use two lengths of 1-inch diameter conduit or PVC pipe as screed rails: lay them parallel across the base, spaced about 6 feet apart, then pull a straight 2x4 across the pipes to screed the sand flat. The pipes set the depth automatically because the screed rides on top of them. Pull the pipes out after screeding each section and fill the gaps with sand by hand, then lightly smooth with the screed board.
Do not compact the bedding sand after screeding. It needs to stay loose so pavers can be tapped into it and set to final grade. Once you screed a section, avoid walking on it until you're placing pavers. Footprints in fresh sand create low spots that are hard to correct under a paver.
Quality checks and troubleshooting when the base isn't right
Before you lay a single paver, do a final inspection of the foundation. For the full step-by-step process, review our guide on how to make patio pavers from start to finish. Catching problems now is fast. Catching them after pavers are down means pulling everything apart.
Common problems and how to fix them
| Problem | What it looks like | Fix |
|---|---|---|
| Soft spots in the base | Base gives or shifts when you walk on it | Excavate 4–6 in. deeper, fill with fresh aggregate, compact in lifts |
| Wrong slope/grade | String line check shows less than 1/8 in./ft drop or water flows toward house | Add or remove base material to restore grade, re-compact |
| Base not flat (over 1/2 in. deviation in 10 ft) | Straightedge rocks or shows a gap underneath | Scrape high spots, fill low spots with aggregate, re-compact |
| Edge restraints moving or loose | Spikes pull out easily, restraint flexes | Add more spikes, ensure base extends 6 in. past paver edge |
| Bedding sand washing or blowing away | Sand displaced before pavers are laid | Lay geotextile at base/sand interface in problematic areas; work in smaller sections |
| Gravel base too thin | Total depth measurement comes up short | Add another lift of aggregate and re-compact before screeding sand |
A soft spot is the most serious problem and also the most common. If you find one after compaction, don't try to cover it with extra sand. Dig it out, add fresh aggregate, and compact properly. A soft spot under a paver will settle unevenly under foot traffic and create a tripping hazard within a season or two.
If your slope is off, fix it before screeding sand. Adding base material to raise a low area and re-compacting is straightforward. Cutting a high area is also easy at this stage. Once sand is screeded and pavers are set, fixing slope means pulling up an entire section, which is a much larger job.
On very tight spaces, like narrow pathways alongside a house or awkward corners, a full plate compactor may not fit. Use a hand tamper in those areas and spend extra time on each pass. It takes longer but the result is the same if you put in the effort. Don't leave any section of the base uncompacted just because access was awkward.
Ready-to-set checklist before your first paver goes down
You've done the hard work. Before you start placing pavers, run through this checklist to confirm the foundation is genuinely ready. These are the things that separate a patio that lasts from one that needs redoing. If you want the full step-by-step, this is the type of prep you’ll follow when learning how to build a paved patio foundation is genuinely ready.
- Excavation depth is correct and consistent across the entire footprint (measured from your string lines at multiple points)
- Gravel base is compacted in lifts with no soft spots anywhere, including corners and edges
- Base surface doesn't deviate more than 1/2 inch over a 10-foot straightedge in any direction
- Grade slopes away from the house at 1/8 inch per foot consistently, verified at multiple cross-sections
- Geotextile fabric was laid under the base if soil was clay or poorly drained
- Base extends at least 6 inches beyond the intended paver edge on all sides
- Edge restraints are fully installed and spiked into the compacted base, not into sand
- Bedding sand is screeded to 1 inch depth using pipe screed rails and has not been walked on
- Sand surface follows the same drainage slope as the base underneath it
- All tools are out of the way and you have your paver starting corner marked
If every item on that list checks out, your foundation is solid and you're ready to start setting pavers. If any item is questionable, address it now. The foundation is the part of this project that nobody sees once it's done, but it determines whether everything above it works or fails.
A few specific situations worth flagging before you move to paver installation: if you're working on a sloped yard and had to do significant fill on the low side, give the base an extra compaction pass and wait a day before screeding if possible. Fresh fill compacts better with a little time. If you're building around a fire pit or raised feature, the base around those elements needs the same depth and compaction as the rest of the patio. And if your subsoil turned out to be significantly worse than expected (very soft, high clay content, or poor drainage even after grading), it's worth adding an extra inch or two of base material beyond the minimum rather than hoping the standard depth holds up.
From here, the next stage is paver placement itself, which involves setting a starting edge, laying your pattern, cutting border pieces, and doing final compaction and joint sanding. If you want a complete walkthrough, follow this with the steps for how to build a pavers patio through installation and finishing paver placement. The foundation work you just completed is the hardest and most critical part of the whole job. Once the base is right, everything else follows a clean, satisfying rhythm.
FAQ
Can I use pea gravel, river rock, or smooth stone for the gravel base?
No. Those materials do not interlock well under compaction, so they tend to shift and allow settlement. Use angular, well-graded crushed stone (often called Class II base or DGA) so the particles lock together when compacted.
Do I really need geotextile fabric if my soil is not clay?
If your subgrade is sandy or loamy and drains well, you can often skip it. However, it becomes a good idea when you have any uncertainty about drainage, a history of washouts, or mixed soils (for example, clay pockets). The fabric helps keep fine subgrade particles from pumping up into the base over time.
What’s the difference between compacting the gravel base and not compacting the bedding sand?
The base must be compacted in lifts to lock the structure in place. The bedding sand must stay loose after screeding because pavers need to be tapped into it to reach final height. Compacting the sand hardens it and reduces the ability to fine-tune the pavers.
How can I tell if my plate compactor is working the base correctly?
After compacting a lift, the surface should feel firm and not shift when you apply normal foot pressure. If you see a “spongy” surface, rutting, or you notice the surface rebounds after you step on it, you likely under-compacted or used too thick a lift.
Can I correct a bad slope after I screed the sand?
It’s technically possible, but practical only for small adjustments. Once sand is screeded and pavers are installed, fixing grade usually means removing pavers and that sand layer, then redoing the base or re-screeding. It is much easier to cut or add base material before screeding.
How much over-excavation beyond the finished patio edge do I need for the edging restraints?
Plan to dig at least 6 inches beyond the finished paver edge on all sides so the edging can be spiked into solid compacted aggregate. Short edging “overhangs” into bedding sand or air, which lets the restraints loosen and the patio spread.
Should I compact right up to the edge restraints, or leave a little un-compacted area?
Do not leave un-compacted zones. Compaction equipment reaches edges differently, so use a hand tamper in tight corners and along perimeter areas. Weak edge compaction is a common cause of border pavers settling first.
What should I do if I find a soft spot after compacting the base?
Dig it out to remove the compromised material, replace with fresh compacted aggregate, and compact again. Avoid covering soft spots with extra sand, because sand cannot provide the structural support needed to prevent uneven settlement.
If my patio is near a foundation wall, how do I prevent water from pooling?
Make sure the patio drains away from the structure and never toward it. Confirm the drainage low point in your yard before you finalize patio shape, and verify the installed slope with multiple tape-measure checks from the string lines across the entire footprint.
Is a slope of 1/8 inch per foot always enough for drainage?
It works for many standard patios because it sheds water without feeling noticeably tilted. If your yard already funnels water toward the house or you have poor drainage conditions, you may need to adjust the layout, add grade changes in sections, or increase base depth in problem areas to maintain performance.
What depth should I excavate if I use thicker pavers than “typical” concrete pavers?
Base excavation depth should account for your paver thickness plus the sand bed height, and then the required compacted gravel base depth for your climate and soil. If your pavers are thicker than the typical value, increase the excavation accordingly so finished height and slope targets still match your string lines.
How do I handle tight spaces where a plate compactor does not fit?
Use a hand tamper for those areas and spend the time to get full compaction. The key is that the base in every section must be firm and stable, including corners and edges, not just the center where the plate compactor can reach.
Do I need to wait to screed and lay pavers after compacting?
If you added base material due to cut-and-fill, waiting a short period (when practical) can help the fresh aggregate settle and stabilize before you screed. Also avoid screeding when the base is wet from rain, since waterlogged material can move fines and make it harder to hold the correct grade.
What’s the flattness requirement, and how should I measure it?
Aim for no more than about plus or minus 1/2 inch deviation over a 10-foot straightedge. Measure after final compaction, then correct high points by scraping and correct low points by adding and re-compacting aggregate before you add bedding sand.
Should I compact the bedding sand after screeding to reduce settling?
No. Bedding sand is meant to remain loose. Compacting it prevents proper adjustment when setting pavers, which can lock in height inconsistencies and make it harder to achieve a smooth, tight surface.
If my soil is very poor (soft or high clay), is adding extra geotextile enough?
Usually not. Very soft or high-clay subgrade often requires deeper and properly compacted base, and sometimes additional detailing. Consider increasing base depth beyond minimums and ensure drainage is adequate, because geotextile alone cannot replace structural support.
Next Articles
How to Build a Paved Patio: Concrete or Pavers DIY
DIY guide to build a paved patio with concrete or pavers: planning, base prep, drainage, steps, tools, and maintenance t
How to Build a Pavers Patio: Step-by-Step DIY Guide
Step-by-step DIY how to build a pavers patio: planning, base prep, laying, cutting, patio steps, finishing, and troubles
How to Make Patio Pavers: Build a Paver Patio Step by Step
Step-by-step DIY for building a patio paver surface: plan, slope, excavate, base, pavers, joints, sealing, and troublesh