You can absolutely build a curved paver patio yourself. If you want the full step-by-step plan for a straight or curved backyard layout, see how to build a concrete paver patio for the complete workflow build a curved paver patio. The key is to work in a specific order: plan the arc on paper first, mark it accurately on the ground, install a properly compacted gravel base, set your curved border pavers first, fill inward with your chosen pattern, cut the border pieces to fit the arc, then lock everything in with edge restraints, polymeric sand, and sealer. Every step matters, but none of them are beyond a motivated homeowner with the right tools.
How to Make a Curved Paver Patio: DIY Steps and Cutting Tips

Felix Rowe
1 Jul 2026
Planning a curved paver patio layout
Before you touch a shovel, sketch the curve on paper. A gentle arc with a large radius (think 10 feet or more) is far easier to work with than a tight S-curve. Tight curves require more cuts, smaller paver pieces, and more patience. For a first project, a simple single arc on one or two sides of an otherwise straight patio is the sweet spot. Once you have the basic layout, you can start planning the patio details and overall look, including how to decorate a paver patio with features like lighting, plants, and outdoor furniture.
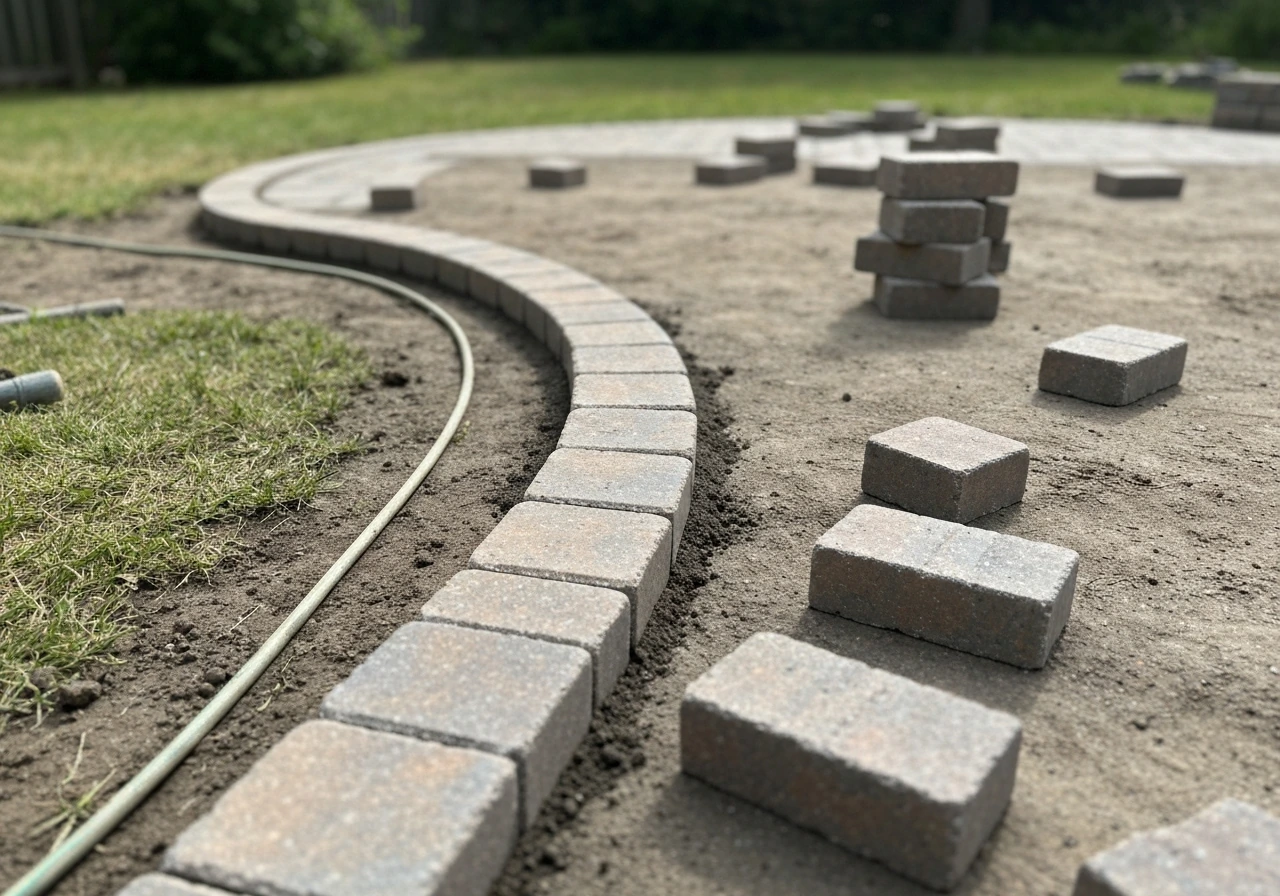
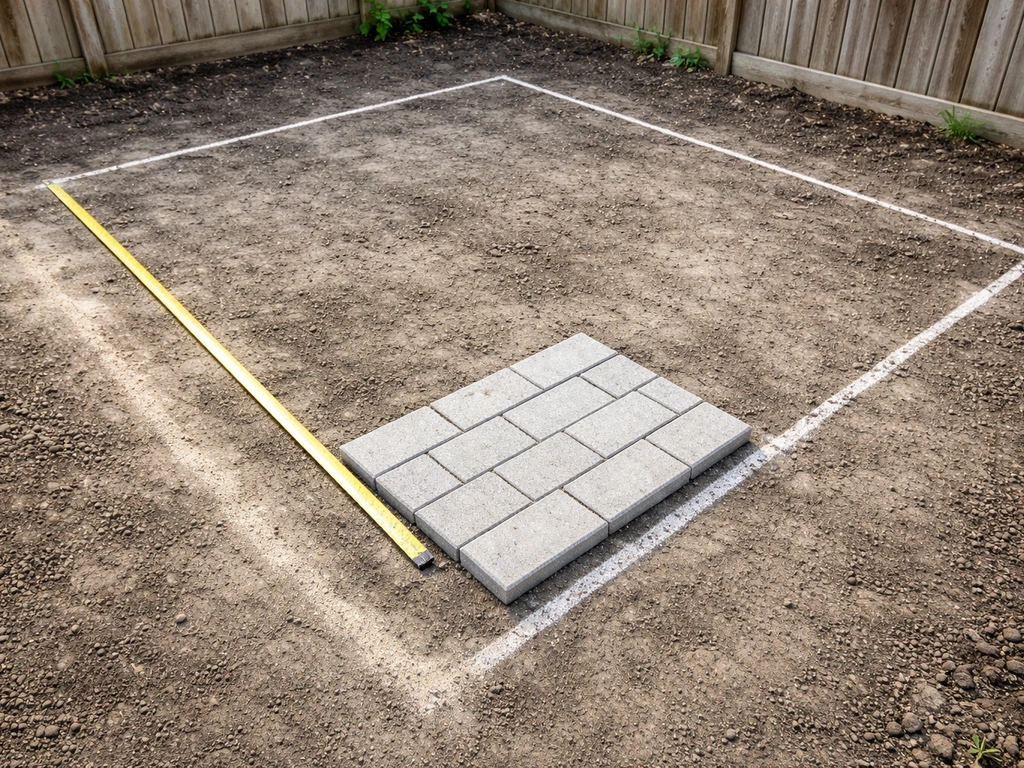
Once you have a rough sketch, translate it to your yard using a garden hose or rope. Lay the hose along the ground in the curve shape you want and step back to look at it from a distance. Adjust it until you like what you see. This is your design phase, and it costs nothing to move a hose around. Take a photo once you're happy with the shape so you have a reference.
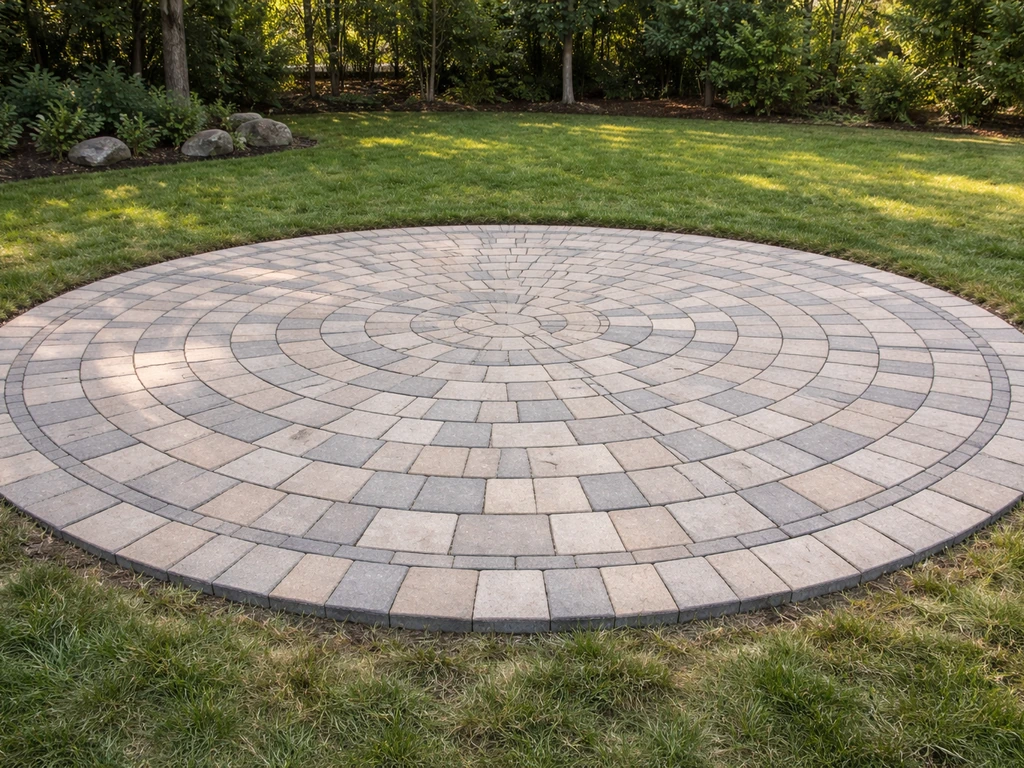
Now think about size. Figure out roughly how many square feet the patio will cover and add 10 percent for waste from cuts. Curved edges generate more cut waste than straight edges, so that buffer matters. Also consider how the curve connects to your house, any existing walkways, steps, or lawn area. If you're planning a round or fully circular layout, that's a slightly different project covered elsewhere on this site. This guide focuses on patios with one or more curved edges rather than a fully round shape.
Choose your paver size before you finalize the curve radius. Smaller pavers (4x8 inches or 6x6 inches) follow curves more naturally and require fewer aggressive cuts than larger 12x12 or 16x16 slabs. If you're committed to larger format pavers, plan a gentler arc to keep gaps and cuts manageable.
Preparing the base and setting grades for curves
The base is where curved patios fail or succeed. A poorly compacted base leads to settlement, and when the ground shifts under a curve, you end up with visible dips and humps that ruin the line of the arc. Don't rush this part.
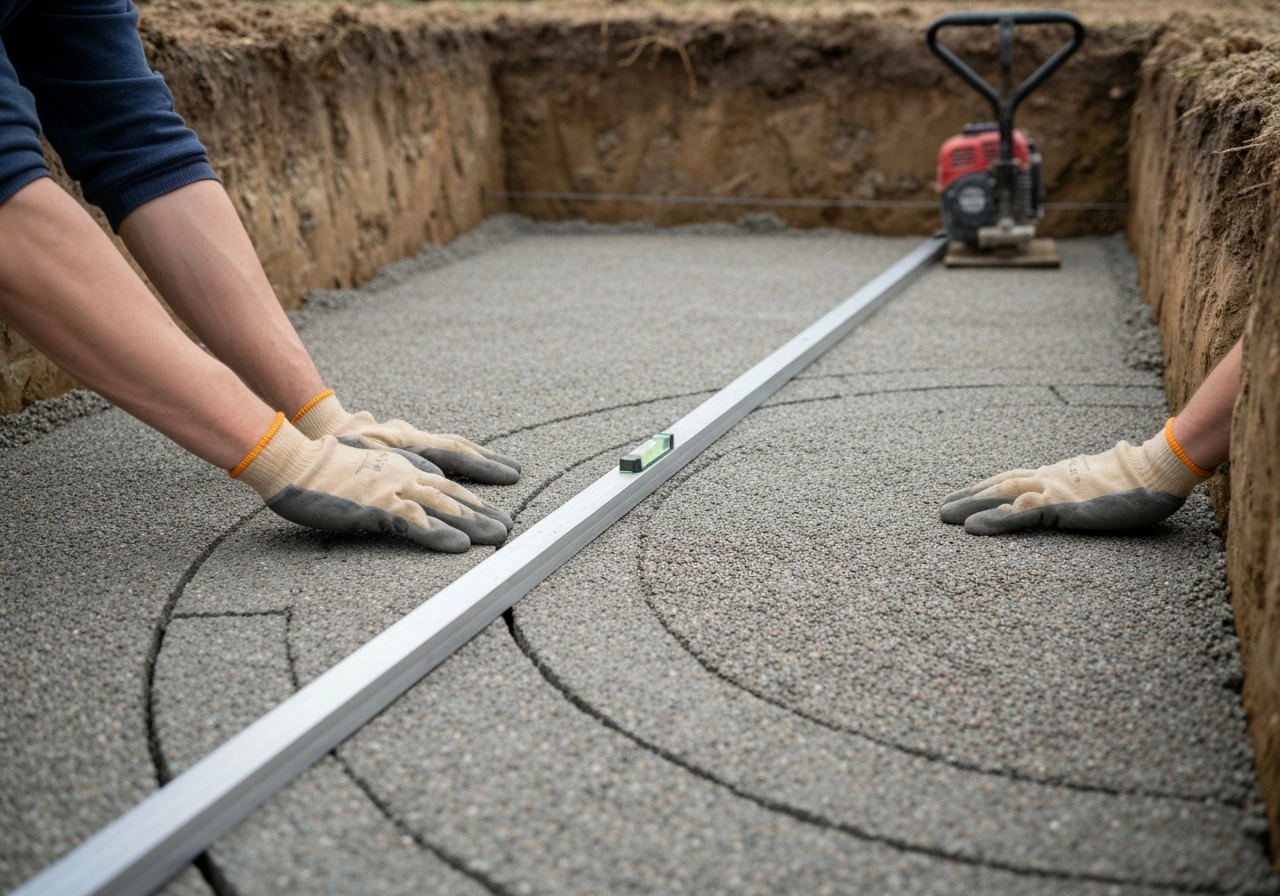
Excavate to the full depth of your base plus your bedding sand (usually 1 inch) plus paver thickness. For a residential pedestrian patio, you're looking at a 4 to 6 inch compacted gravel base. If your soil drains poorly, has a lot of clay, or the patio will occasionally support vehicle weight, bump that up to 6 to 8 inches. Poor-draining soils benefit from a layer of geotextile fabric between the native soil and the gravel base to prevent migration.
Compact your gravel base in lifts, meaning you don't dump all 6 inches in at once and run a plate compactor over it once. Add 2 to 4 inches at a time, compact thoroughly, then add the next lift. This is the single most important thing you can do to prevent future settling. A rented plate compactor handles this fine for a patio-sized project.
Grade is critical, especially along the curve. You need a slope of at least 1 inch per 8 feet away from any structures to shed water. Use a long level and a tape measure to check the slope as you compact each lift. The final surface elevation of your compacted base should be within plus or minus one-quarter inch of your target grade across the entire area. Getting that right before you lay bedding sand saves you from chasing low spots later.
After your base is compacted and graded, add 1 inch of coarse bedding sand and screed it flat using straight 2x4 boards as guides. Do not compact the bedding sand. It stays loose so pavers can be set into it and adjusted.
Marking the curve and choosing a paver pattern that follows the arc
Transfer your hose layout to the prepared base using marking paint or powdered chalk. To mark a clean, consistent arc, use a stake-and-string compass method: drive a stake at the center point of your circle (even if the patio only uses part of that arc), tie a string to the stake at the exact radius length you want, and walk the string around while marking the ground. This gives you a geometrically true arc instead of a freehand wobble.
For irregular curves that aren't part of a true circle, use a garden hose as your guide and trace along its inside edge with marking paint in short, overlapping passes. Step back and check the line from several angles before you commit.
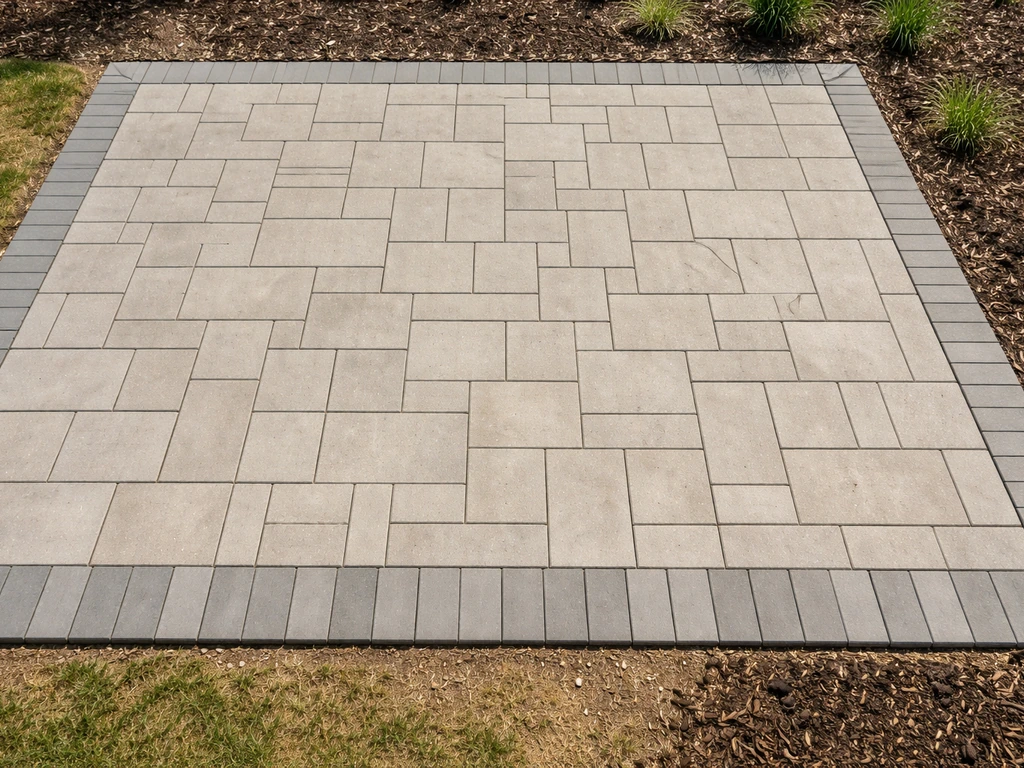
Pattern choice matters a lot on curved patios. Running bond (brick-style offset rows) works well because rows of pavers can fan slightly to follow a curve. Herringbone is more complex but creates a dynamic look and still works if you're willing to do more cuts. Basketweave and large-format random patterns tend to fight curves and create awkward gaps, so avoid those unless your curve is very gentle.
The most effective approach for a curved edge is to install a single dedicated border row that follows the arc, then fill the interior field with your chosen pattern working inward from that border. The border pieces are the ones that get custom-cut to the arc shape. Interior field pavers stay whole or need only minimal trimming.
Cutting curved patio pavers
This is the part that intimidates most DIYers, but with the right tool and a simple marking method it becomes straightforward. You're not freehand sculpting here. Each border paver gets its own individual cut line marked on it, and then you cut to that line. That's it.
The best tools for curved cuts
| Tool | Best for | Cut quality | Dust/mess | Cost to access |
|---|---|---|---|---|
| Wet saw (masonry saw) | Any curve radius, cleanest results | Excellent | Low (water suppresses dust) | Rent for $50–$80/day |
| Angle grinder with diamond blade | Tight curves, quick adjustments, on-site trimming | Good with care | High (dry cut) | Own or rent; blade $20–$40 |
| Circular saw with diamond blade | Straight portion of curved pieces | Good for straight portions | High | Own or rent |
| Chisel and hammer | Rough splits only, not recommended for finished edges | Poor | Low | Already own |
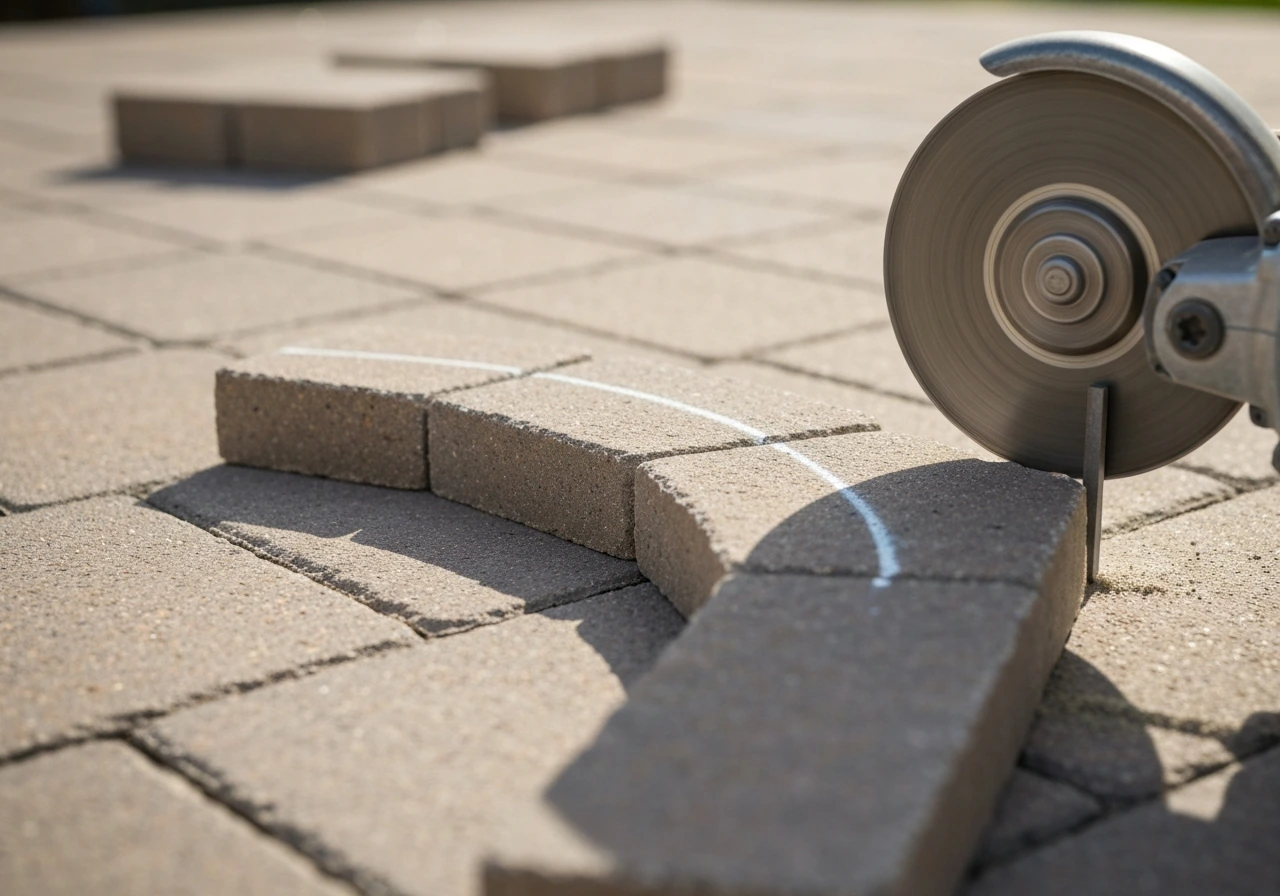
A wet saw is the right tool for the border pavers that define your arc. Use water while cutting curved edge pavers to reduce dust, keep the blade cool, and get a much more controlled cut than you would dry. Lay the paver flat on the wet saw table, align your cut line with the blade, and make the cut in a smooth, steady pass. Don't rush it.
An angle grinder with a continuous-rim diamond blade is the best tool for very tight curves or for trimming a paver that's already installed and needs a small adjustment. Make multiple shallow passes rather than one deep cut, and always wear eye protection, a dust mask, and hearing protection.
How to measure and mark each curved cut
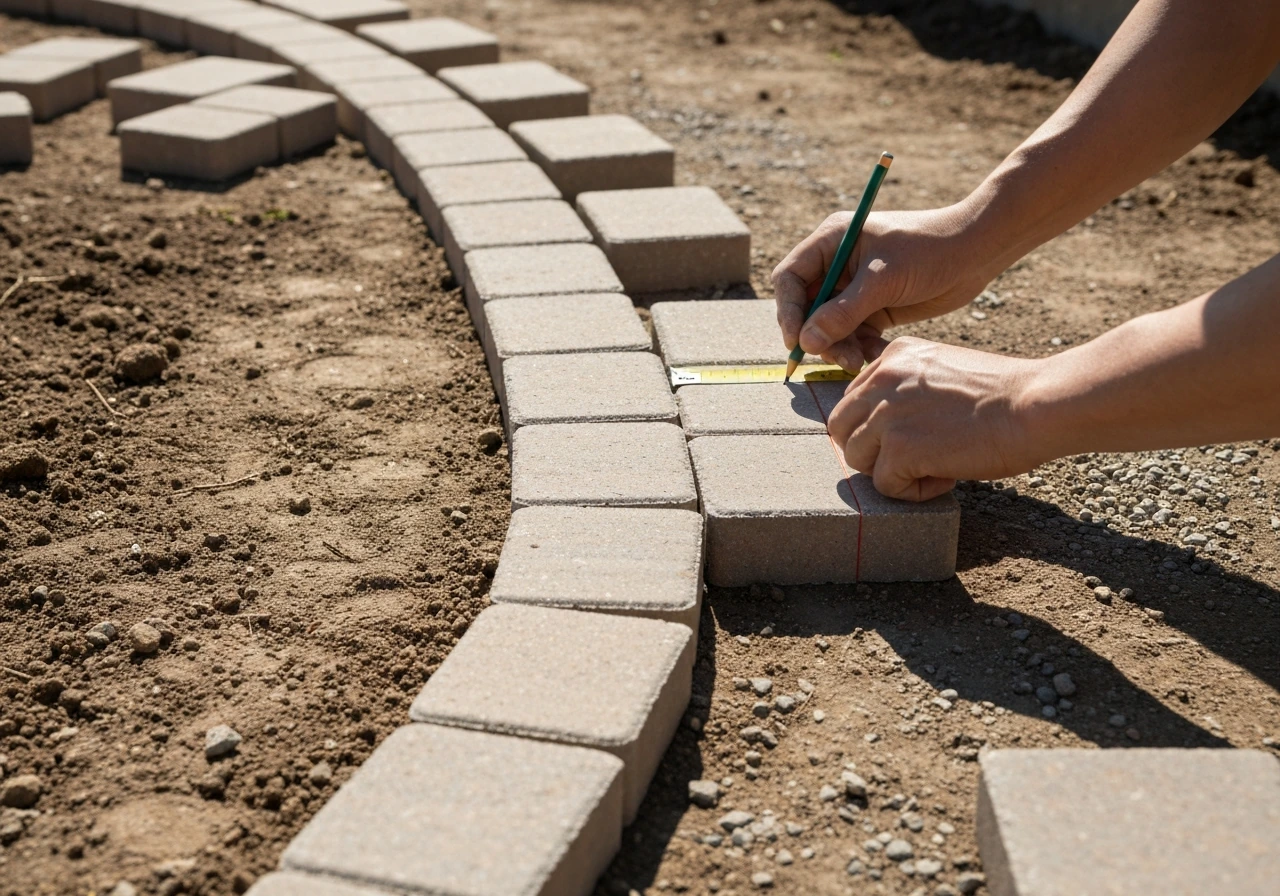
- Dry-lay the border pavers loosely along the arc line before cutting anything. Space them evenly and let them fan naturally around the curve.
- Place each paver in its approximate final position and use a pencil or scribe to trace the arc line directly onto the face of the paver. Use the painted ground line as your reference.
- Remove the paver, connect your scribed marks into a smooth curve using a flexible ruler or the edge of another paver as a batten.
- Cut to the line on the wet saw, keeping the blade on the waste side of the line.
- Place the cut paver back in position to check the fit before moving to the next one.
For gentle arcs with a large radius, the cut line on each paver will be only slightly curved or nearly straight. For tight curves, each paver may need a dramatically angled cut. In both cases, the mark-and-cut-one-at-a-time method keeps you accurate because you're responding to the actual conditions on the ground rather than guessing from a drawing.
To avoid chipping: never force the saw. Let the blade do the work. For very thin cut-off pieces (less than about half an inch), the piece will likely crack or chip regardless of how careful you are. Adjust the paver position slightly so the cut yields a piece wide enough to hold together. Any piece less than about one-third the size of the full paver is too small and fragile for a finished edge.
Installing the curved border and keeping tight lines and spacing
Install your curved border row first, before filling in the field. This is the opposite of what some people do instinctively (start from the house and work outward), but on a curved patio the border defines everything. Set all the border pavers along the arc, check their alignment and spacing, then work inward. This way the interior rows have a clean, established edge to terminate against.
Use plastic paver spacers or uniform pieces of scrap plywood cut to your desired joint width (typically 1/8 to 3/16 of an inch for concrete pavers) to maintain consistent spacing as you go. On a curve, joints will naturally fan slightly wider on the outside of the arc and slightly tighter on the inside. This is normal and expected. If the joints on the outside of the arc are getting wider than about 3/8 of an inch, the curve is too tight for the paver size you're using and you need to make angled cuts on the pavers to fan them more evenly.
Check for level constantly. Use a long level or a straightedge bridging across several pavers to make sure no single paver is sitting high or low. Tap high pavers down with a rubber mallet. Pull low pavers up and add a small amount of bedding sand beneath them, then re-seat. Get each section right before moving forward because going back to fix settled pavers after they're surrounded is frustrating.
As you work inward from the border, keep a reference string line running parallel to the border every 4 to 6 rows to make sure your interior rows aren't drifting. Pattern distortion on curved patios usually starts in the middle rows, where pavers get installed quickly without checking alignment. A few minutes with a string line saves a lot of adjustment later.
Troubleshooting as you go
- Uneven ground under the curve: Pull up affected pavers, add or remove bedding sand locally, re-screed that section with a hand float, and re-lay. Don't try to shim pavers with sand added after they're set.
- Joint gaps opening unevenly: The arc radius is probably too tight for the paver size. Make slight angle cuts on both sides of the fanning pavers to even out the joint width.
- Border pavers drifting off the arc line: Stake a flexible bender board or a piece of 1/4-inch hardboard along the arc line and use it as a physical guide while setting border pavers.
- A paver won't sit flat against its neighbor: Check for a small chip or burr on the edge from cutting. Lightly dress the edge with the angle grinder to remove the obstruction.
Finishing: edge restraints, jointing sand, sealing, and maintenance

Once all pavers are set and you've done a final level check across the whole surface, install your edge restraints before anything else. Edge restraints are not optional. ICPI Tech Spec 3 (Edge Restraints), hosted by CMHA, explains why edge restraints are necessary to hold interlocking concrete pavers tightly together and help prevent spreading, along with restraint requirements and details Edge restraints are not optional.. Without them, pavers will migrate outward over time under foot traffic and frost, the joints will open up, and the curve shape you worked so hard to create will slowly deform. Use a rigid plastic or aluminum paver edge restraint spiked into the compacted base at intervals of no more than 12 inches (closer on curves). The restraint sits tight against the outside face of your border pavers at the curved edge and around the full perimeter.
With restraints in place, spread polymeric sand over the entire surface and sweep it into the joints using a stiff push broom. Work it in until joints are filled to about 1/8 inch below the paver surface. Then run a plate compactor over the entire patio (put a rubber pad or plywood sheet under it to protect paver faces) to vibrate the sand down into the joints. Sweep in more sand, compact again, and repeat until joints stay full after compaction.
Activation is critical with polymeric sand. Use a garden hose on a shower or gentle spray setting, not a jet. Wet the entire surface thoroughly, wait a few seconds, then go over the same section again with another pass of water. The goal is to saturate the joints without washing sand out. Never sweep polymeric sand onto damp pavers, and don't apply it in near-freezing temperatures. Once activated, leave the patio undisturbed for at least 24 hours. Most products recommend 24 to 48 hours depending on temperature and humidity.
For sealing, wait 28 to 90 days after installation before applying sealer. Some manufacturers (including Techniseal) currently recommend 60 to 90 days to allow the pavers to fully cure and any efflorescence to work its way out. HG Paver Seal specifies a minimum of 28 days after polymeric sand installation. Either way, clean the surface thoroughly before sealing and make sure the pavers are completely dry. Apply sealer with a roller or low-pressure sprayer, keeping a wet edge so you don't get lap marks. Avoid pooling in joints.
For ongoing maintenance, sweep the patio regularly to keep debris from staining and degrading the joints. Re-apply sealer every 2 to 3 years depending on sun exposure and traffic. If you notice joint sand washing out or weeds starting in the joints, sweep in fresh polymeric sand and re-activate. Catching that early is much easier than re-doing it after weeds have established roots between the pavers.
A curved paver patio takes more planning and cutting time than a straight-edged one, but the finished result looks dramatically more custom and polished. If you're also thinking about how to design the overall layout before you build, or want to explore a fully round patio shape as an alternative, both of those topics are worth reviewing before you finalize your plans. The base prep and finishing steps described here apply equally across all paver patio styles, so this investment in learning the process pays off no matter what shape you build.
FAQ
How tight can my curve be before pavers start to look wrong?
A practical rule is to watch joint width as you install. If the outside of the arc is opening up past about 3/8 inch, the curve is too tight for your paver size and jointing approach. In that case, you either need to cut angled border pavers to fan the joints more evenly, or switch to smaller pavers that naturally follow the arc.
Should I cut pavers for the border first, or install then measure for cuts?
For curved edges, pre-cut planning works best, but you should still mark each border paver individually on your actual layout. Install the border row first, confirm alignment and spacing, then cut the next border pieces using their own cut lines. This avoids cumulative errors that happen when you rely only on paper measurements.
What joint width should I use on a curved paver patio?
For typical concrete pavers, aim for about 1/8 to 3/16 inch joints. Use spacers or consistent scrap guides to keep the joints uniform. On curves the joint widths will naturally vary slightly between the inside and outside of the arc, but large swings are a sign the curve radius is too tight.
Do I need geotextile under the gravel base for all yards?
No, but it helps when your native soil has poor drainage or a lot of fine clay. The main purpose is to reduce migration of soil into the gravel base. If your ground is sandy and stable, you may be fine without it, but if you expect water movement or fine particles, geotextile can improve long-term stability.
How do I keep the base from getting dips or humps along the curve?
Grade and compact in small lifts and verify elevation across the entire curve, not just the centerline. Use a long level or straightedge that bridges multiple pavers. If you skip lift-by-lift compaction or don’t check grade as you go, the curved edge will reflect any base unevenness after the pavers settle.
Can I use polymeric sand on a patio with landscaping beds nearby?
Yes, but keep polymeric sand out of flower beds and avoid creating channels that let sand run away. Edge restraints and careful spreading are important so sand stays in the joints where it locks. If you have plants close to the perimeter, consider shielding the border during sanding so you do not seed polymeric sand into bed soil.
What if my polymeric sand washes out after activation?
First, confirm you activated with gentle spray (shower setting) and not a jet, and that the joints were sufficiently saturated without being churned. If sand still washes out, you can top up with fresh polymeric sand, sweep it into joints, then activate again using gentle watering. Catching it early before weeds establish is much easier than removing established growth later.
When should I apply sealer on a curved patio?
Wait until the pavers are fully cured and dry. Many sealants require a minimum of about 28 days, while some manufacturer guidance goes closer to 60 to 90 days after polymeric sand, depending on conditions. Applying too early can trap moisture and worsen haze or uneven appearance, especially on surfaces that hold water in joint lines.
Do I need edge restraints only on the curved side?
No, restraints are recommended around the full perimeter. Curved edges are especially prone to outward movement because the geometry concentrates forces on the arc. If you only restrain the curve but leave straight sides unrestrained, the pavers can still creep, distorting the overall shape over time.
How can I tell if my curve is distorting while I’m installing?
Use a reference line and check at multiple intervals. Keep a string line running parallel to the border every few rows to prevent drift, and periodically step back to compare the arc visually. The most common distortion happens in the middle rows where speed increases, so build in routine checks before you are surrounded by finished pavers.
What’s the best way to avoid chipping on small cut pieces?
Plan your layout so border cuts do not produce extremely narrow fragments. Very thin cut-off pieces under about half an inch are likely to chip or crack, even with careful cutting. Also avoid pieces smaller than roughly one-third of the full paver size, because they tend to be fragile at the finished edge.
Can I pressure-wash a polymeric sand patio after it cures?
Avoid pressure washing unless the product instructions explicitly allow it. High pressure can break sand bridges in the joints, forcing you to re-sand and reactivate. For routine cleaning, stick to sweeping and gentle rinsing, and deal with weeds by targeted joint treatment rather than blasting the joints.
Next Articles
How to Build a Round Paver Patio Step by Step DIY
Step-by-step guide to build a circular paver patio, from planning radius and prepping soil to cutting curved pavers and
How to Design a Paver Patio Layout Step by Step
Step-by-step guide to plan, lay out, slope, and set pavers for a durable patio layout, including cuts, drainage, and fin
How to Build a Concrete Paver Patio Step by Step
Step-by-step DIY guide to build a concrete paver patio: layout, base on soil or slab, drainage, pavers, edging, leveling