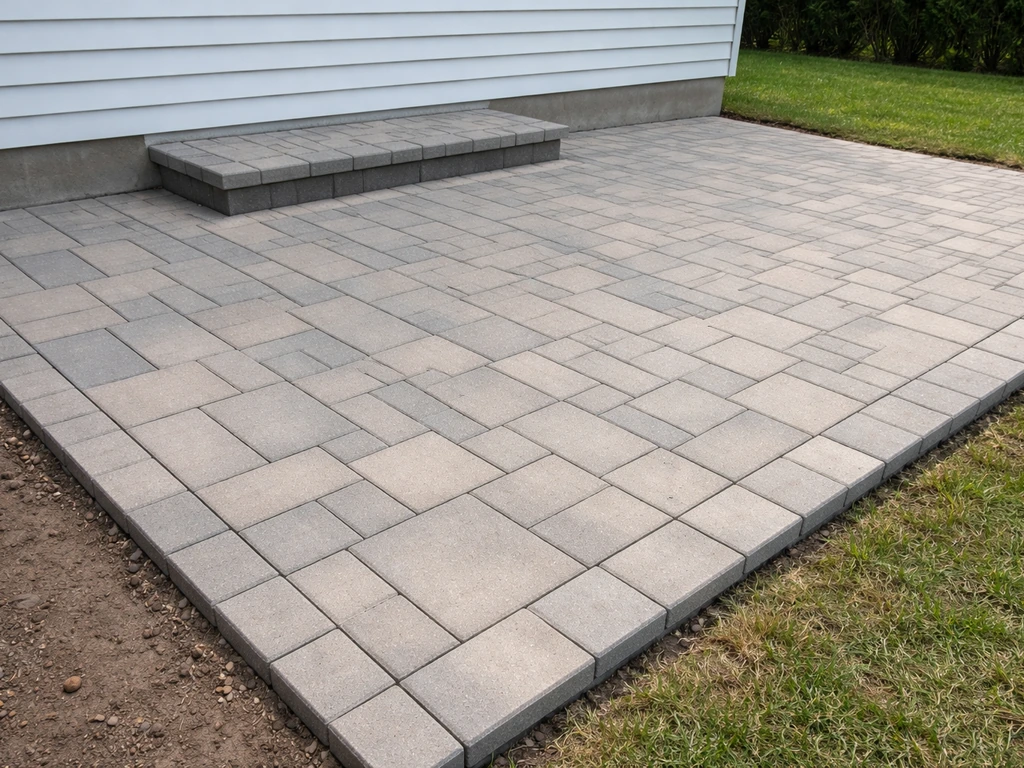
Building a concrete paver patio is a completely doable DIY project, and the key to getting it right is the base. Lay a solid compacted gravel base (4 to 6 inches deep for residential use), add a 1-inch bedding layer of sand or fine chip stone, set your pavers with blank" rel="noopener noreferrer">1/16 to 3/16-inch joints, lock them in with polymeric sand, and you'll have a patio that stays level and drains properly for years. Unilock’s paver-base guidance similarly describes compacting a gravel base on subgrade and then adding a bedding course of fine chip stone or small-graded material, with a 1-inch example thickness for the bedding layer blank" rel="noopener noreferrer">a 1-inch bedding layer of sand or fine chip stone. The whole project for a 200-square-foot patio typically takes a weekend of hard work, sometimes two if you're dealing with tough soil or an irregular shape.
How to Build a Concrete Paver Patio Step by Step

Project planning and material takeoff
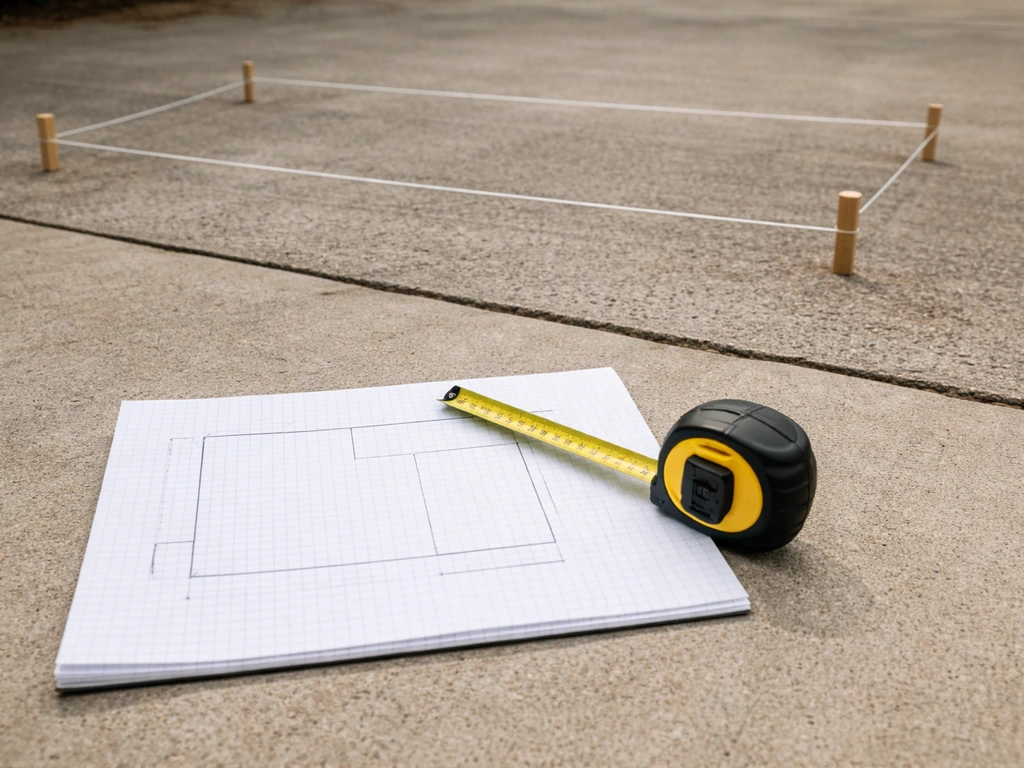
Before you buy a single paver, sketch your patio on paper and nail down the dimensions. This is where you avoid expensive overbuys and frustrating shortfalls mid-project. Measure your space, choose your pattern (running bond, herringbone, and basket weave are all popular choices for concrete pavers), and then calculate materials based on that layout.
For a basic material takeoff on a 200-square-foot patio, here's what you're working with. Pavers: order about 10% extra over your square footage to account for cuts and breakage. Gravel base: you'll need roughly 1 cubic yard of compactable gravel per 80 square feet at a 4-inch depth. Bedding sand: one ton of coarse sand covers approximately 100 square feet at 1 inch thick. Polymeric sand: a 40-pound pail covers roughly 30 to 45 square feet depending on paver size and joint width, so plan accordingly. Plastic edging: measure the full perimeter in linear feet, adding 10% for corners.
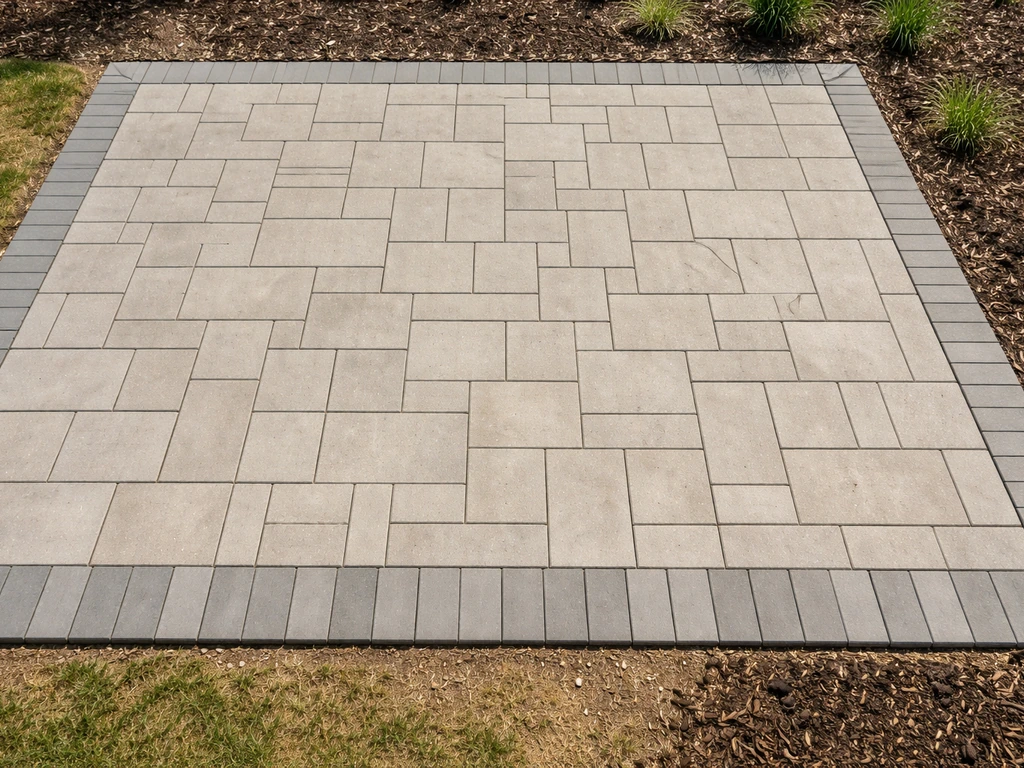
Patio shape and design deserve real thought before breaking ground. If you want the whole process to come together, start with a clear plan for how to design paver patio before you order materials. A simple rectangle is the easiest to execute, but if you're considering something more ambitious, like a round or curved layout, those are handled differently from a straight rectangular grid. When you plan a round paver patio, the layout and border cutting details matter even more, because the curve changes how the pavers fit together a round or curved layout. The pattern you choose also affects how many cuts you'll need, which directly impacts your time and tool budget.
| Pattern | Waste/Cuts | Difficulty | Best For |
|---|---|---|---|
| Running Bond | Low (5–10%) | Easy | Rectangular patios, beginners |
| Basket Weave | Low (5–10%) | Easy | Traditional look, square pavers |
| Herringbone (45°) | High (15–20%) | Moderate | High-traffic areas, durability |
| Herringbone (90°) | Moderate (10–15%) | Moderate | Cleaner lines, easier cuts |
| Random/Ashlar | Moderate (10–15%) | Moderate–Hard | Natural stone aesthetic |
Call 811 before you dig. This is not optional. It's a free service that marks underground utility lines, and it can prevent a serious injury or an expensive repair. Do it at least three business days before you plan to start excavating. If you are trying to avoid excavation, use the no-dig approach instead of starting excavation from scratch how to build a paver patio without digging.
Tools, supplies, and prep checklist
You don't need a contractor's full equipment list, but a few key tools make the difference between a patio that looks professional and one that shifts and sags in two years. A plate compactor is the big one. You can rent it from any home center for around $60 to $90 per day, and it's non-negotiable for getting your base to the 95% compaction density you need. Don't try to tamp by hand for an area larger than a few square feet.
- Plate compactor (rent, don't skip it)
- Wet saw or angle grinder with diamond blade for cuts
- Rubber mallet
- Screed board (a straight 2x4 works fine)
- 1-inch OD metal pipes or conduit (for screeding guides)
- Level and string lines
- Tape measure and chalk line
- Landscape fabric
- Sod cutter or flat spade for excavation
- Wheelbarrow
- Push broom for spreading jointing sand
- Garden hose with fine-mist nozzle for polymeric sand activation
- Safety glasses, gloves, knee pads
- Compactable gravel (also called Class II base, road base, or crusher run)
- Coarse bedding sand (conforms to ASTM C936)
- Concrete pavers (quantity plus 10% overage)
- Polymeric jointing sand
- Plastic paver edging with spikes
- Landscape stakes and string
Site preparation and base building
This is where most DIY patios succeed or fail. Get the base right and your patio will stay level and solid for a decade or more. Rush through it or cut corners on compaction and you'll be re-leveling pavers within a couple of years.
Laying over grass or soil
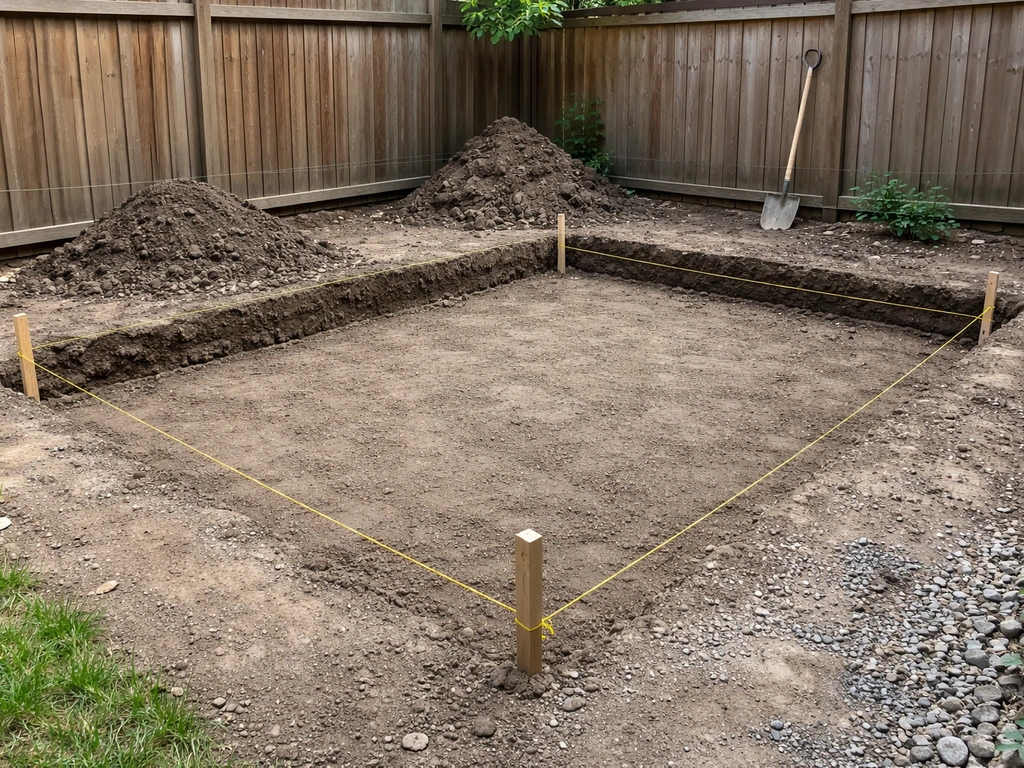
- Mark your patio outline with stakes and string, then add 6 inches on each side to give yourself room to work.
- Excavate the area to a depth of about 7 to 9 inches below your desired finished patio surface. This accounts for 4 to 6 inches of compacted gravel base, 1 inch of bedding layer, and the thickness of your pavers (typically 2 3/8 to 3 1/8 inches).
- Remove all sod, roots, and organic material. Organic matter decomposes and causes settling, so be thorough.
- Slope your excavation away from the house at a 1 to 2 percent grade, which works out to about 1/8 inch per foot. This is your drainage slope and it needs to be built into every layer from the subgrade up.
- Compact the native soil with your plate compactor. Make multiple passes in different directions until the surface is firm and doesn't give underfoot.
- Lay landscape fabric over the compacted subgrade. This separates the base from the soil and blocks weed growth without restricting drainage.
- Add compactable gravel in 2- to 3-inch lifts, compacting each lift thoroughly before adding the next. Target a total compacted depth of 4 inches for light residential use, 6 inches if your soil is soft or clay-heavy.
- Check your finished gravel base with a 10-foot straightedge. You want no more than 3/8-inch variation across that span. If you see high spots, compact more. If you see low spots, add a little material and re-compact. Never try to fix depressions with extra bedding sand later.
Dealing with uneven or problematic ground
If your yard has significant slope or soft spots, don't try to fight the terrain by piling on more sand. Instead, adjust your excavation depth in different areas so the gravel base compensates for the grade change, and compact each section fully. Soft, wet spots are a sign of poor drainage below. Dig those out an extra 4 to 6 inches, fill with clean crushed stone, and compact before continuing. If you have a large slope to deal with, a raised patio design with retaining edges may be the smarter approach than trying to build a level surface on a sharply graded yard.
Setting the bedding layer
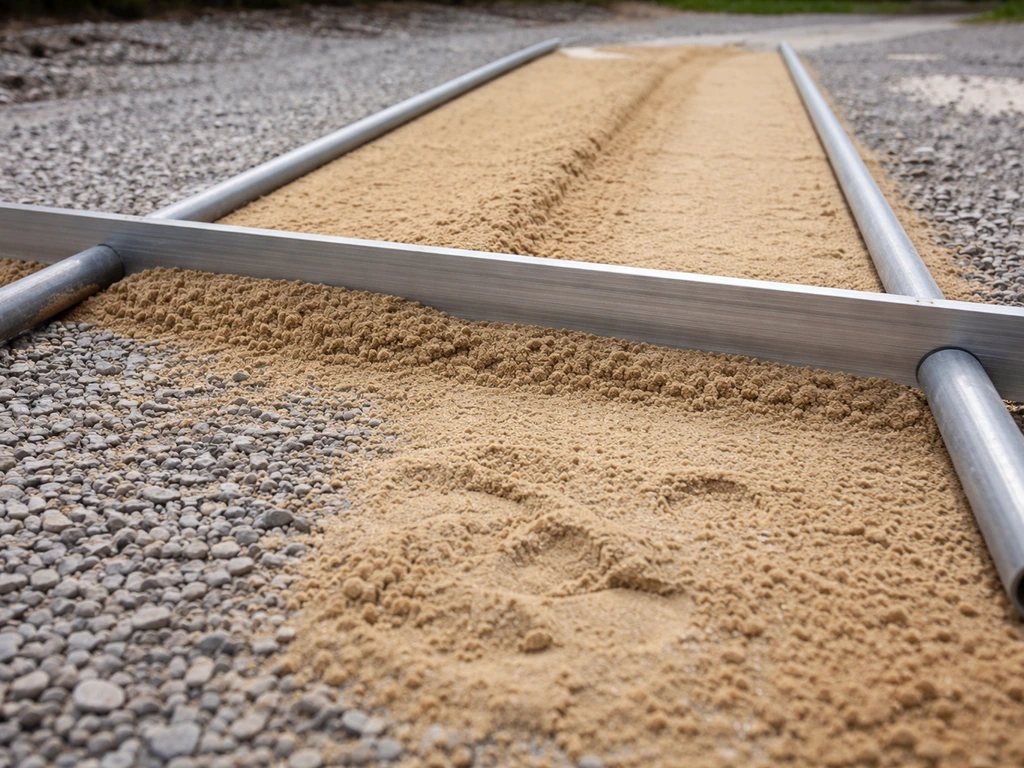
Once your gravel base is compacted and flat, it's time for the bedding layer. Place your 1-inch OD pipes or conduit on the compacted base, spaced about 4 to 6 feet apart and running parallel to your screed direction. Set them so the top of the pipe is exactly 1 inch above the base surface. This is your screed guide. Spread coarse bedding sand (ASTM C936 semi-coarse) between the pipes and drag your screed board across them to create a perfectly even, 1-inch-deep surface. The maximum bedding layer thickness is 1 inch unless otherwise engineered, so don't try to compensate for a rough base by adding more sand. After screeding, carefully remove the pipes and fill the channels by hand, lightly smoothing without compacting. Do not walk on the screeded sand before laying pavers.
Installing concrete pavers: layout, leveling, cutting, and edging
Start laying pavers from a straight, visible edge, like the side closest to your house or an existing wall. Work outward and across, never standing on your screeded bedding sand. Use a piece of plywood or a few pavers as a kneeling board to spread your weight. Set each paver firmly with hand pressure and a light tap of the rubber mallet, keeping your joints consistent at 1/16 to 3/16 of an inch. Check your layout every few rows with a string line and a level to make sure nothing is drifting. Small adjustments early are easy; big corrections late are a pain.
Cutting pavers
Save your cuts for last. Lay all the full pavers first, then go back and measure and cut the border pieces. A wet saw with a diamond blade gives the cleanest, most accurate cuts and keeps dust down. An angle grinder with a diamond blade works for simpler straight cuts if you don't want to rent a wet saw. Always wear safety glasses and gloves when cutting. Mark your cut line with chalk or a marker, score the line first on both sides, then cut through in one steady pass.
Installing edging
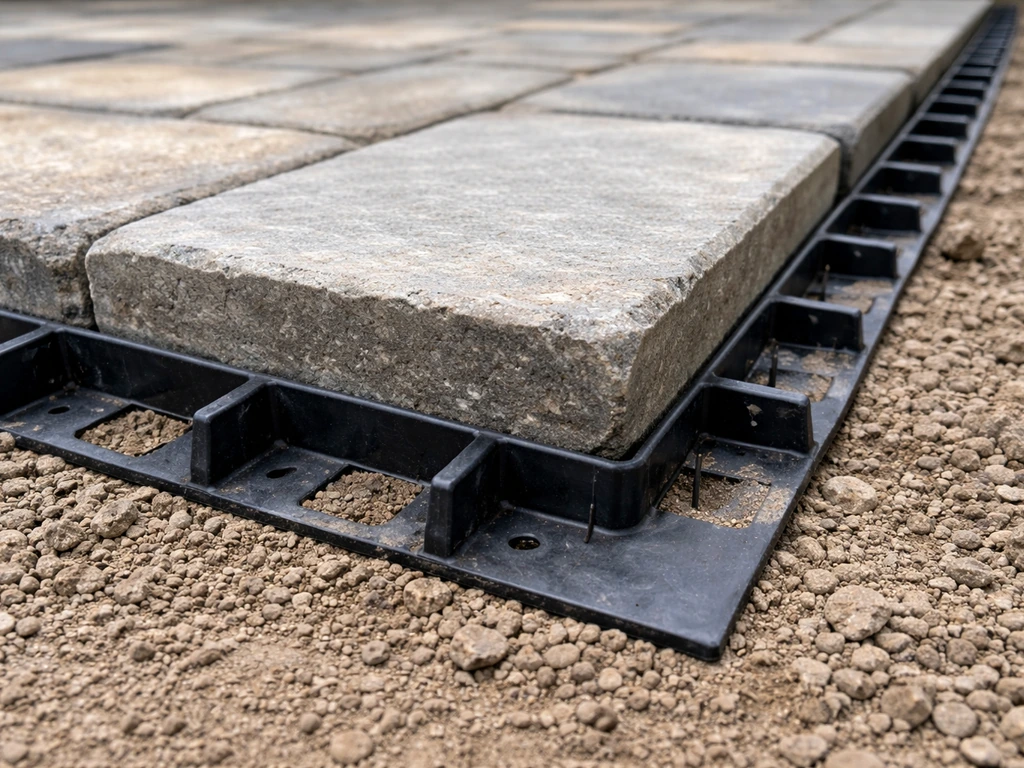
Plastic paver edging goes in after all pavers (including cuts) are placed. This is important because the edging locks everything in place and prevents the pavers from spreading outward over time. Set the edging tight against the outside edge of the last row of pavers and drive the spikes every 12 inches through the edging and into the gravel base. On curves, use flexible edging and score the back flange so it bends cleanly. Don't skip the edging or substitute it with just compacted soil. Without it, the whole field will gradually migrate outward and joints will open up.
Building on existing concrete: prep, leveling, drainage, and spacing
Laying concrete pavers over an existing concrete slab is a legitimate approach and often the right one if you have a solid, intact slab you want to upgrade. It saves a lot of excavation and base work, but it comes with its own rules you need to follow carefully.
Assess the existing slab first
Walk the entire slab and look for cracks wider than 1/4 inch, heaving sections, or spots that feel hollow underfoot. Minor hairline cracks are fine. Significant structural cracking or movement means the slab isn't stable enough to serve as a base, and you may need to remove it or address the underlying problem before proceeding. The slab also needs to slope away from the house at 1 to 2 percent for proper drainage. If it drains toward your foundation, you'll need to rethink the plan or build a drainage solution into the new surface.
Two methods for laying pavers on concrete
The sand-set method is the most DIY-friendly approach. Lay landscape fabric over the clean, dry concrete to keep sand from migrating through any cracks, then add your 1-inch bedding sand layer and screed it flat just like the on-grade process. This method allows some flexibility and drainage through the joints. The mortar-set method bonds pavers directly to the slab with a thin-set mortar bed, which gives a more rigid result but requires more skill to get level and is harder to repair if a paver cracks later. For most homeowners doing their first project, the sand-set approach over landscape fabric is the more forgiving choice.
A critical note on jointing sand over concrete
If you're laying pavers over a concrete slab, do not use standard polymeric sand in the joints. Some polymeric sand products explicitly warn against use over concrete slabs because moisture can become trapped between the slab and the polymeric layer, causing issues. Use a jointing sand appropriate for the application and check the product label specifically for slab-over-concrete compatibility before buying. When in doubt, contact the manufacturer directly.
Also keep in mind that adding pavers on top of an existing slab raises your finished surface height by at least 3 to 4 inches. Factor that in when thinking about door thresholds, step heights, and how the new surface meets existing landscaping or walkways.
Jointing, finishing, and curing
Filling the joints
Once all pavers are set and edging is installed, run the plate compactor over the entire surface (use a rubber pad or carpet protector under the plate to avoid scratching the pavers). This seats every paver firmly into the bedding layer and locks the field together. Then sweep polymeric sand across the surface, pushing it into the joints with a push broom. Make multiple passes in different directions until the joints are filled to within 1/8 inch of the top of the paver surface. If your pavers have a beveled edge, fill to the bottom of the bevel. Run the compactor over the surface again to help work the sand deep into the joints, then sweep more sand in to top off any that settled. Repeat until the joints stay consistently filled.
Before activating the polymeric sand, blow or sweep off every bit of sand from the paver surface. Even a little polymeric sand left on top will leave a haze when it cures. Then check your forecast: do not activate polymeric sand if pavers are damp or wet, rain is expected within 24 hours, or temperatures are below 32°F. When conditions are right, mist the entire surface with a fine-spray hose nozzle until the sand is thoroughly wet but not flooded. Let it cure undisturbed for at least 24 hours.
Sealing your patio
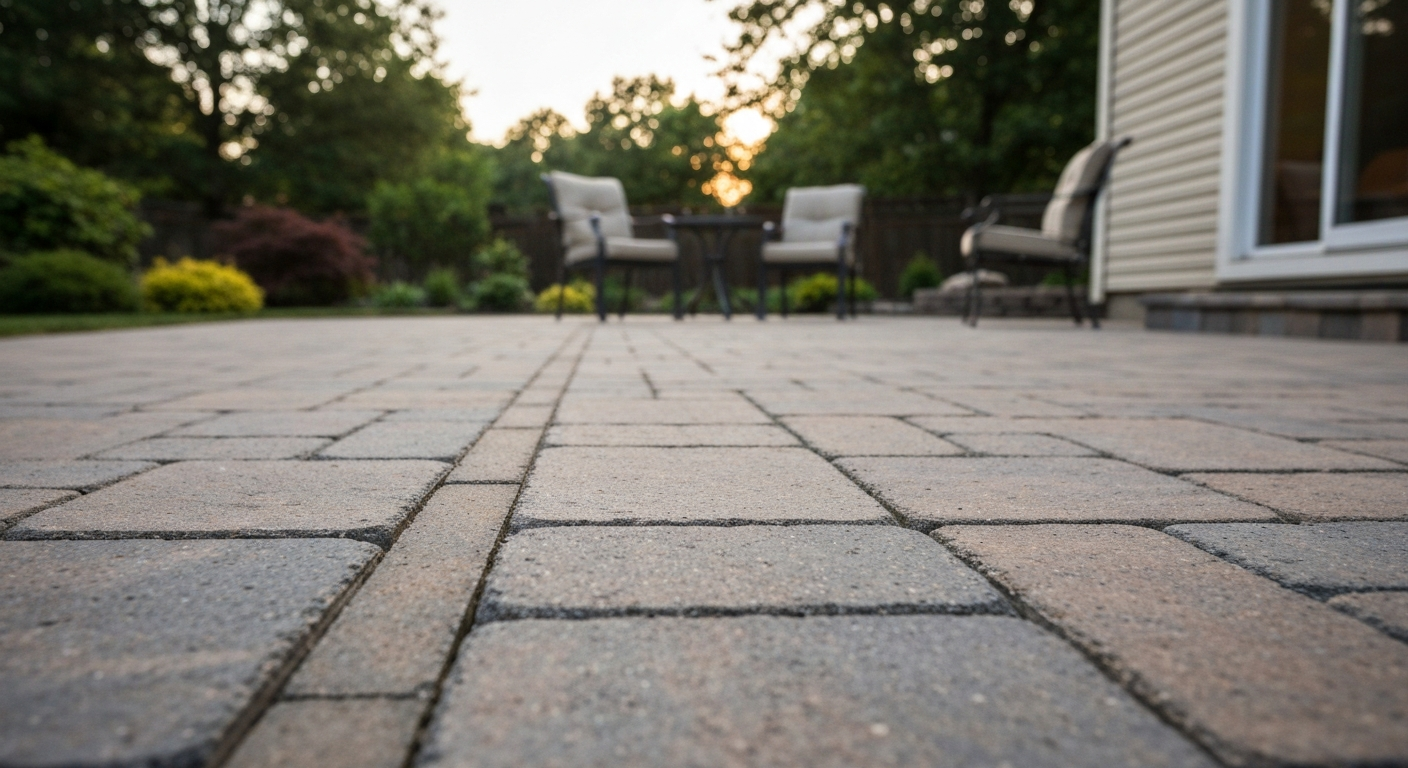
Sealing is optional but recommended for protecting color and making the surface easier to clean. Once your paver patio is cured and ready, you can focus on decorating ideas like outdoor rugs, lighting, and planters to personalize the space Sealing is optional but recommended for protecting color and making the surface easier to clean.. The timing depends on the sealer type. For film-forming sealers, wait at least 30 days after installation so any efflorescence (the white mineral bloom that commonly appears on new concrete pavers) can surface and be removed before you lock it under a coating. For non-film-forming penetrating sealers, some products allow sealing after just one week. Always follow the specific product instructions. Apply sealer on a dry surface on a mild day, work in small sections, and use a roller or pump sprayer per the manufacturer's direction. Two thin coats beat one thick coat every time.
What to expect in the first few weeks
Efflorescence is normal and not a defect. It usually appears within the first few weeks as white or gray streaks on the surface. Most of it weathers away on its own, but you can remove stubborn patches with a mild efflorescence cleaner before sealing. Your patio may also show some minor joint sand settling after the first heavy rain. Top off the joints with more polymeric sand as needed and re-mist to activate.
Troubleshooting and long-term maintenance
Common problems and how to fix them
| Problem | Likely Cause | Fix |
|---|---|---|
| Pavers sinking or rocking | Insufficient base compaction or thin bedding layer | Pull up affected pavers, add and re-compact base material, re-screed bedding, reset pavers |
| Weeds growing through joints | Joints not filled, old jointing sand washed out | Remove weeds, sweep in fresh polymeric sand, re-activate |
| Joints washing out after rain | Polymeric sand not fully activated, or wrong product used | Reapply and activate properly in dry conditions |
| Standing water on surface | Inadequate slope or blocked drainage at edges | Check and correct slope; clear any debris from edges and drainage paths |
| Pavers spreading/gaps opening at edge | Missing or failed edging | Install or replace plastic paver edging with new spikes |
| White haze on pavers after sealing | Sealer applied over efflorescence or damp surface | Strip sealer, clean surface, re-seal when fully dry |
| Cracked pavers | Heavy point load, poor sub-base, or freeze-thaw in saturated base | Replace individual pavers; improve drainage if recurring |
Keeping your patio looking great long-term
Concrete paver patios are genuinely low-maintenance, but a little attention each season goes a long way. Check your joints every spring and top off any areas where the sand has settled or washed. Keeping joints filled is the single most important maintenance task because depleted joints let the bedding layer below erode, which leads to shifting and sinking. Re-seal every 3 to 5 years depending on your climate and traffic. When cleaning, use a regular garden hose or a low-pressure setting on a pressure washer. High-force pressure washing can erode the paver surface and expose the aggregate underneath, which you can't reverse.
For winter climates, use sand or paver-safe ice melt instead of standard rock salt. Chloride-based de-icers damage concrete pavers over time. Avoid metal shovels that can scratch or chip the surface, and use a plastic blade instead.
When to call a pro
Most homeowners can handle a standard ground-level rectangular patio without professional help. Consider calling in a contractor if your site has significant drainage problems that require an engineered solution, if you need to break up and remove an existing concrete slab, if the patio is over 500 square feet and you're unsure about equipment, or if you're building something with complex curves, elevated sections, or integrated features like a built-in fire pit. Those projects are doable with experience, but they add real complexity and margin for error.
If you're drawn to a more sculptural layout, exploring round or curved patio designs is a natural next step once you're comfortable with the fundamentals covered here. The base-building process is the same but the layout and cutting work changes significantly. The design phase also deserves its own focused attention before you ever break ground, since good patio design accounts for traffic flow, sun exposure, and how the space connects to the rest of your yard.
FAQ
Do concrete paver patios need a geotextile fabric under the gravel base, or is gravel alone enough?
A geotextile is usually worth it if your subgrade is clayey, silty, or likely to pump water, because it reduces mixing of fine soil into the gravel. If your soil is already well-draining and stable (for example, clean sand), gravel-only can work, but fabric still helps with long-term separation. Use overlapping seams (no gaps) and keep fabric below the compacted base, not between bedding sand and pavers.
How do I set the patio height correctly relative to doors, garage thresholds, and steps?
Start by measuring the finished elevation you want at the doorway or step, then subtract the full build-up: base thickness (gravel plus any adjustment), bedding thickness (about 1 inch), paver thickness, and any required joint spacing. Also confirm drainage away from the house, so you do not end up cutting the patio flat but creating low spots against the foundation. Plan for at least a small threshold ramping so opening clearances and weather stripping are not affected.
What’s the best way to handle patio slopes without turning the whole surface uneven?
You generally want a gentle, consistent fall away from the house (often around 1 to 2 percent). Instead of adding more sand to “level” low areas, adjust excavation depth so the gravel base follows the correct grade. After compaction, use your screed guides to keep the bedding surface level relative to itself, then verify you still maintain the overall drainage slope with a long level or string line.
How tight should I keep the paver joints, and what if my pavers don’t fit with the exact spacing?
Stay within the planned joint width range, because joint consistency affects how much polymeric sand can lock the field. If you are short on joint space, avoid “forcing” the layout by squeezing lines closer, instead re-check your layout dimensions and adjust the border cuts so interior pavers can sit within the designed spacing. If joints are too wide in spots, you can end up with weak interlock and increased shifting.
Can I install pavers in the rain, or should I wait for dry weather?
It’s a bad idea to proceed through the bedding and jointing steps when the ground or bedding sand is wet, because you can lose the screeded flatness and prevent proper compaction. You can often lay pavers on a dry day, but wait to activate polymeric sand until conditions are dry and you have a window without rain (and temperatures above freezing). If rain is expected, cover materials and pause before joint activation.
Why do some patios “rock” or feel hollow after installation, even when the base looked solid?
Hollow feel usually indicates an area that was not compacted evenly, a soft spot that was not removed and re-built, or bedding sand that was not consistent in depth. The fix is not to add more sand on top, instead lift affected pavers, correct the base, then re-screed the bedding to the target thickness. Rocking can also happen if pavers were set over debris or if you walked on screeded sand before placing pavers.
Do I need to compact after laying the pavers, and how do I avoid damaging the surface?
Yes, running a plate compactor over the installed pavers helps seat them into the bedding layer and improves interlock. Use a protective pad (or carpet protector intended for paver use) to prevent scuffing and avoid concentrating force on one spot. Do not over-compact in one area, and keep the pace steady so joints and edges remain stable.
How do I keep polymeric sand from staining or leaving haze on the paver faces?
Two key steps prevent most issues: sweep the faces completely before misting, and control the amount of water when activating. If polymeric sand gets on top and then gets activated, it can cure into a visible film. Also avoid applying when pavers are damp, and mist with a fine-spray nozzle until the joints are wet, not flooded, then let it cure undisturbed.
How long should I wait before using the patio or moving furniture onto it?
Plan for a cure period after activating polymeric sand, typically at least 24 hours before allowing normal foot traffic, longer for heavy loads depending on product instructions and weather. Avoid dragging heavy items directly across the surface, instead place them with care or use protective boards. If you sealed the pavers, wait the full recommended curing time for the sealer system before heavy cleaning or exposure to standing water.
What’s the correct way to maintain joints after a freeze-thaw winter?
In cold climates, check joints shortly after the first thaw and again in spring. If joints have depleted from water movement or thermal cycling, top off with the same jointing product intended for your patio type and re-activate only under dry conditions. Avoid rock salt, use paver-safe de-icers, and remove snow with plastic blades to reduce chipping and abrasion that can widen joints.
DIY steps to install patio pavers without digging: prep, level, edge restraint, lay, cut, joint sand, compact and mainta
How to use Quikrete Patio Paver Jointing Sand: step-by-step application, tools, timing, coverage, and care.

Step-by-step guide to apply patio paver sand correctly: prep base, set pavers, fill joints, compact, and troubleshoot is