
For most concrete and brick pavers, aim for joints of 2–5 mm (roughly 1/16–3/16 in.). Natural stone and large-format pavers do well at 6–10 mm (1/4–3/8 in.), and permeable pavers need 5–10 mm joints filled with clean crushed stone, not sand. Get that range right from the start and your patio will stay locked together, drain cleanly, resist weeds, and look sharp years from now. Get it wrong, especially if joints run wider than 10 mm, and you lose the lateral restraint that keeps individual pavers from rotating and settling.
How to Space Patio Pavers: Joint Widths & Finishing Tips

Felix Rowe
13 Aug 2026
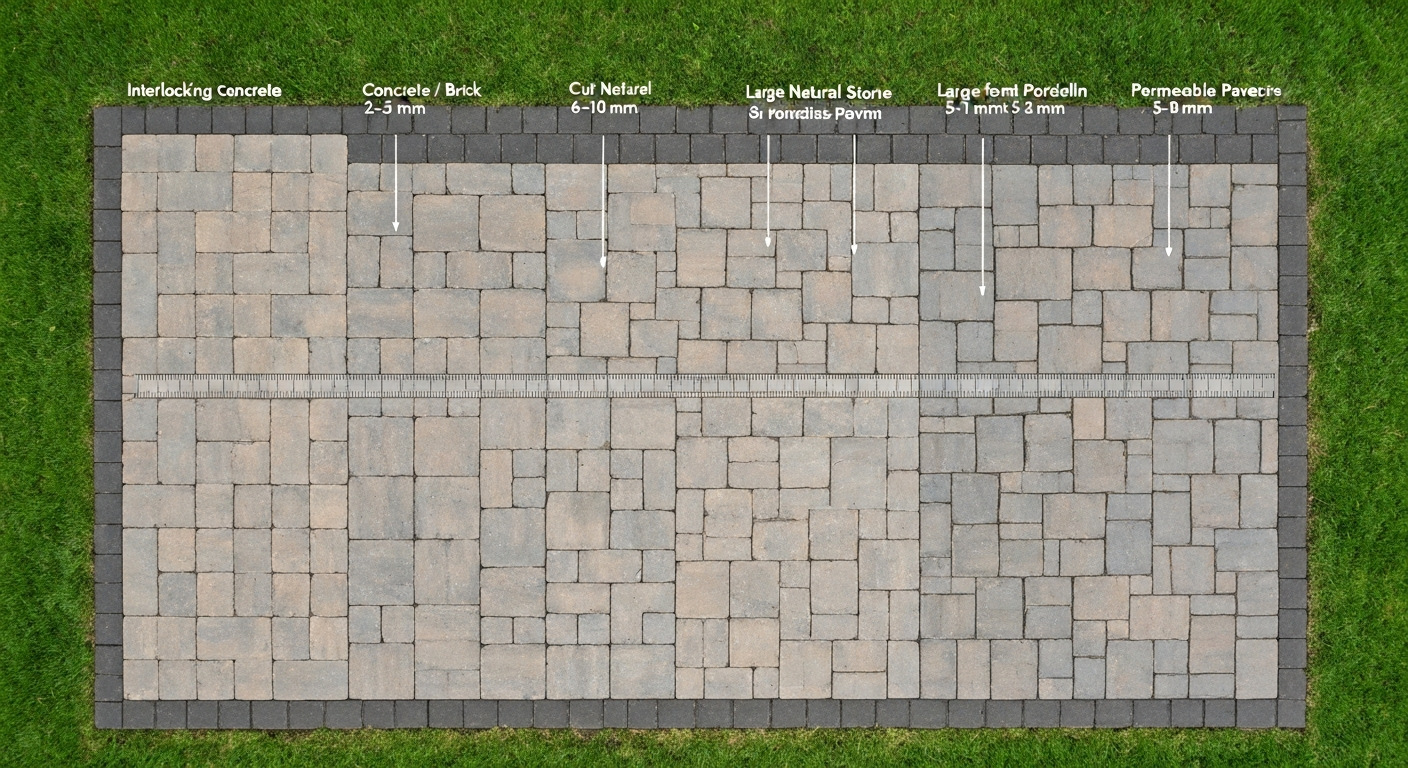
Why spacing matters more than most DIYers realize
Paver spacing is not just about how the finished patio looks. The joint width you choose controls four things at once: structural stability, drainage, weed resistance, and appearance. On the stability side, interlocking concrete and brick pavers derive their load-bearing ability from the friction and mechanical interlock between neighboring units. A narrow, consistent joint filled with compacted joint material locks pavers together so foot traffic spreads load across the whole field. Once joints creep wider than about 6–10 mm, that interlock weakens and individual pavers start rotating and sinking under load, the ICPI (Interlocking Concrete Pavement Institute) specifically flags excessive joint width as a distress mechanism.
Drainage runs through the joints. A well-filled joint lets water infiltrate or channel away without ponding on the surface. Too wide and unfilled, joints become channels that undercut the bedding sand. Too narrow and packed solid with polymeric sand right to the surface, you can trap water under freeze-thaw cycles. Weeds love any joint wider than 6 mm that holds organic debris. Consistent spacing, filled properly, removes the seed bed. And from a purely visual standpoint, even 2 mm variation in joint width across a large patio is visible to the eye, especially in running-bond or herringbone patterns. Keeping spacing tight and consistent is the single biggest thing separating a professional-looking result from one that looks DIY in the worst sense.
Joint-width quick reference: ranges and limits at a glance
| Paver Type | Recommended Joint Width | Joint Fill Material | Notes / Limits |
|---|---|---|---|
| Interlocking concrete (standard) | 2–5 mm (1/16–3/16 in.) | Polymeric sand or ASTM C144 jointing sand | Joints >6–10 mm signal lost interlock; ICPI distress threshold |
| Brick pavers | 2–5 mm (1/16–3/16 in.) | Polymeric sand or ASTM C144 jointing sand | Match mortar joint aesthetic if desired; keep consistent |
| Natural flagstone (irregular) | 6–15 mm (1/4–5/8 in.) | Polymeric sand, dry mortar, or stone dust | Irregular edges mean wider variation; plan for it |
| Natural stone (cut/sawn) | 6–10 mm (1/4–3/8 in.) | Polymeric sand or grout | Sawn edges allow tighter control than irregular |
| Large-format porcelain | 4–6 mm (3/16–1/4 in.) min. | Polymeric sand or cementitious grout | Min. 4 mm per manufacturer; honor slab control joints — no joint under a paver |
| Permeable / PICP | 5–10 mm (3/16–3/8 in.) | Clean angular No. 8 or No. 9 crushed stone | No polymeric sand — must stay permeable |
| Raised/mortared patio | 6–10 mm (1/4–3/8 in.) | Mortar or cementitious jointing product | Use tile spacers; mortar joints need curing time before use |
| Condition / Limit | Requirement |
|---|---|
| Min. ambient temp for polymeric sand | 50°F (10°C) during application and 48 hrs after |
| Rain protection after polymeric sand activation | 24 hrs minimum (longer below 60°F / 15°C) |
| Polymeric sand: typical narrow-joint range | 1/8–3/8 in. (3–9 mm) — check your product TDS |
| Polymeric sand: wide-joint formulations | 3/4–1-1/4 in. (19–32 mm) — use a wide-joint product |
| Min. joint fill depth (polymeric sand) | Fill to ~1/8 in. (3 mm) below paver chamfer — not flush |
| Max joint width before interlock loss (concrete/brick) | >6–10 mm (1/4–3/8 in.) — risk zone for rotation and settlement |
| Sealing: wait after polymeric sand cure | At least 30 days (check sealer and polymeric sand manufacturer) |
Joint-width guide by paver type and pattern
Concrete and brick pavers
Standard interlocking concrete pavers (the 4x8, 6x6, and similar rectangular units you find at most home centers) are designed and manufactured to work with joints of 2–5 mm. Many have small nubs molded into the sides that automatically set a roughly 2 mm joint, do not fight them. Brick pavers are similar. At these widths, ASTM C144 jointing sand or polymeric sand fills the joint completely, locks in place after compaction, and creates the frictional interlock the whole system depends on. If you are using polymeric sand, check the product's technical data sheet for the allowable joint width range; products like FlexLock Ultra specify 1/8–3/8 in. (3–9 mm) for narrow formulations.
Natural stone
Cut or sawn natural stone (bluestone, travertine, slate) with clean edges can hold a 6–10 mm joint reliably. Irregular flagstone has naturally uneven edges so joints will vary, plan for an average of 8–15 mm and use a joint fill that can accommodate that variation, like dry-mix mortar or a wide-joint polymeric sand. The key is not achieving uniformity across every joint but keeping the average consistent so the pattern reads as intentional.
Large-format porcelain pavers
Porcelain is unforgiving. Installation guides for exterior porcelain pavers consistently call for a minimum joint of 3/16–1/4 in. Mirage's porcelain pavers installation guide recommends a minimum joint width of 3/16 in. (4 mm) and warns that control/contraction joints must be honored and not left under individual pavers to avoid reflective cracking Mirage's porcelain pavers installation guide recommends a minimum joint width of 3/16 in. (4 mm) and warns that control/contraction joints must be honored and not left under individual pavers to avoid reflective cracking.. (4–6 mm) and insist on spacers for every joint. The reason is thermal expansion: large porcelain slabs move measurably with temperature swings, and any joint tighter than 4 mm risks edge contact and chipping. Equally important is the control joint rule, an existing concrete control joint (expansion joint) in a slab you are laying over must align with a paver joint, never run under a single paver. Ignoring this causes reflective cracking straight through the porcelain.
Permeable pavers (PICP)
Permeable interlocking concrete pavers need wider joints in the 5–10 mm range, and those joints must be filled with clean, angular No. 8 or No. 9 crushed stone (sized to pass the narrowest joint). Do not use polymeric sand in permeable installations, it seals the joint and destroys permeability. The open-graded aggregate allows water to pass straight through to the permeable base below.
How laying pattern affects spacing
Herringbone (especially 45-degree herringbone) is the strongest pattern mechanically and is the industry recommendation for any area that will see vehicular loads. It also hides minor joint inconsistencies because the eye follows the diagonal lines rather than any single joint. Running bond and stacked patterns make inconsistent spacing far more obvious because the eye tracks long, continuous lines. Basketweave falls in between. Whatever pattern you choose, the target joint width stays the same (2–5 mm for concrete/brick), but patterns with longer uninterrupted joint runs demand tighter discipline in maintaining that width consistently.
How your base method changes the spacing equation
The joint width you choose at the surface is only half the story. What is underneath determines whether those joints stay consistent over time. Here is how common base approaches interact with spacing.
Bedding sand over compacted aggregate (the standard method)
ICPI's industry baseline calls for a compacted aggregate base of 4 inches for pedestrian patios (6 inches for light vehicular) topped with exactly 1 inch of screeded ASTM C33 bedding sand. RemodelCalculators / compilation referencing ICPI base/bedding depths and industry practice summarizes the standard: 4 in. compacted aggregate for pedestrian patios, 6 in. for light vehicular areas, plus 1 in. of bedding sand as the recommended structural baseline. The bedding sand is not a structural layer, it is a precision leveling medium. Keep it at 1 inch; thicker beds are unstable and will cause pavers to settle unevenly, which then opens joints in some spots while closing them in others. This is the most reliable base for maintaining consistent spacing long-term, and it is what the step-by-step section below is built around.
Laying over existing concrete
If you are setting pavers on an existing concrete slab, you lose the ability to compact a granular base. Your options are a thin (1/2–1 in.) mortar setting bed, a polymer-modified adhesive, or a pedestal system for raised patios. For any of these, joint spacing is controlled entirely by spacers and layout work before the adhesive cures. Honor every existing control joint in the slab by aligning a paver joint directly above it. If the slab has heaved or cracked significantly, laying pavers over it will replicate those problems, consider removing it instead.
Over grass or uneven ground
Laying directly over grass or soft soil is the most common DIY shortcut and the most common source of call-backs and repairs. Organic material compresses, freezes, and shifts, and it does so unevenly. Within a season or two, joints that started at 3 mm will vary from 1 mm to 15 mm across the same patio. If you are dealing with uneven ground, the fix happens in the base, not the joint width, excavate fully, compact the subgrade, install the proper base depth, then screed your bedding sand.
Sloped installations
A slope of 1/8–1/4 in. per foot (roughly 1–2%) is standard for drainage. On steeper slopes (above 5%), bedding sand tends to migrate downhill under foot traffic, which gradually opens joints at the high end and closes them at the low end. On slopes above 3–4%, consider a mortar bed or a compacted, slightly larger aggregate for bedding (like stone dust/stone screenings) which is more stable than sand. Edge restraints at the low end of every slope are non-negotiable.
Raised patios
Raised patio structures built with paver retaining wall blocks or on pedestals introduce an additional variable: the structural wall or pedestal system needs to be perfectly level before any surface spacing work begins. Pedestal systems actually make spacing very controllable because the pedestals have built-in joint tabs that hold spacing as you go. Mortar-set raised slabs follow the same rules as concrete slab overlays.
Preparing the site and base for consistent spacing
Consistent joints at the surface start with a flat, stable base. If the base is wavy, your paver field will be wavy, and you will instinctively compensate by adjusting how deep you press each paver, which creates variation in joint width. Take the time here and the rest of the project is much easier.
- Mark the perimeter and establish slope: use stakes and string lines to define the patio outline and set a grade of 1/8–1/4 in. per foot sloping away from the house. This is your reference for everything that follows.
- Excavate to depth: for a pedestrian patio, dig to accommodate 4 in. of compacted base aggregate, 1 in. of bedding sand, and the paver thickness. A typical 2 3/8 in. concrete paver requires about 7 3/8 in. of total excavation below finished grade.
- Compact the subgrade: run a plate compactor over the exposed soil until it does not give. Do not skip this step — even firm-looking soil will compress further once wet.
- Install edge restraints before the base goes in: snap plastic paver edging or spike metal edging along the perimeter string lines. Edge restraints keep the outer pavers from migrating outward and are the primary defense against widening joints at the edges.
- Add and compact base aggregate in 2 in. lifts: spread and compact in layers, not all at once. Each 2 in. lift gets two or more compactor passes until it is solid. Total compacted depth for pedestrian use: 4 in. minimum.
- Screed 1 in. of bedding sand: set two 1 in. diameter pipes or conduit as screed rails, fill between with ASTM C33 sand, and pull a straight 2x4 across the rails to create a perfectly level, 1 in. deep sand bed. Remove the rails, fill the channels with sand, and smooth gently.
- Do not walk on the screeded sand: keep traffic off it until pavers are being laid. Any footprint creates a low spot that will affect joint consistency.
Measuring, marking and planning your grid
Before you set the first paver, take 30 minutes to plan the grid. This investment pays back in fewer cuts, fewer gaps, and joints that line up the way you intended.
Dry-lay a test row first
Lay one row of pavers, without pressing them into the sand, along each reference edge, including your chosen joint spacers. Measure the total width and length of the field those rows project. This tells you exactly how much cut will be needed at the far edges and whether you can shift the starting point to avoid very narrow slivers (anything less than a half-paver at the edge looks bad and is structurally weak). Adjust your starting point on the sand before a single paver is fully set.
Establish reference lines
- Drive stakes at all four corners of the patio layout.
- Run chalk lines (or taut string lines) from stake to stake to define the perimeter exactly.
- Add interior guide lines perpendicular to each other every 4–6 feet across the field — these become your alignment check lines as you lay.
- For herringbone at 45 degrees, snap a diagonal chalk line at 45 degrees from a reference corner first. All pavers key off this line.
- Mark the starting point (usually a corner or the most visible edge) with a paver or chalk dot so you do not lose it once you begin.
Use a story pole or spacing template
A story pole is a length of wood marked with the repeating paver-plus-joint dimension. For a 4 in. paver with a 3 mm (1/8 in.) joint, mark every 4 1/8 in. along a straight piece of lumber. Lay the story pole along your reference line periodically as you work to confirm the cumulative joint spacing has not drifted. Drift tends to be gradual and invisible paver-by-paver, but a story pole catches it every few units.
Keeping gaps consistent while you lay: the tools that actually help
Having a plan and a flat base gets you 80% there. These tools and habits cover the remaining 20% while you are in the rhythm of laying pavers.
Plastic paver spacers
Plastic cross-shaped spacers (the same type used for interior tile work) are inexpensive and eliminate guesswork entirely. For 2 mm joints use 2 mm spacers; for 3 mm use 3 mm spacers. Place them at each corner junction as you lay each paver. Remove them before polymeric sand goes in, leaving plastic in the joint prevents proper fill and creates voids. For standard interlocking concrete pavers that have manufacturer nubs molded on the sides, the nubs act as built-in spacers so plastic crosses are optional but still useful for irregular edges or cut pavers.
String lines and screed guides
Keep a string line running parallel to your current working row, about 4–6 rows ahead of where you are laying. As you set each paver, eyeball it against the string line rather than the paver next to it, this prevents the gradual drift that occurs when you use only adjacent pavers as references (one slightly off paver multiplies the error into all subsequent rows).
Straightedges and winding sticks
After every 3–4 rows, lay a long straightedge (a 6 ft. aluminum level or a 8 ft. 2x4) diagonally across the field you have already set. Any paver sitting high or low will cause the straightedge to rock, tap high pavers down with a rubber mallet or pull and re-set low ones. Do not skip these checks; catching alignment problems early means fixing one or two pavers, not rebuilding a section.
Chalk or paper templates for corners and curves
For curved edges or feature areas like fire pit rings, make a cardboard or plywood template of the arc before you start. Trace it onto the sand with chalk, then lay pavers to that line. Trying to eyeball a curve paver-by-paver reliably produces a lumpy arc and inconsistent joints on the outer edge.
Step-by-step paver-laying workflow with spacing controls
This sequence is built around a sand-set installation over compacted aggregate base, the most common DIY scenario. For a full step-by-step guide on how to make a patio with pavers and sand, see our detailed walkthrough. For full step-by-step instructions on installing patio pavers in a sand bed, see our guide on how to install patio pavers in sand. Each step includes a spacing checkpoint so problems surface before they are buried under the next row.
Phase 1: Base and bedding (before pavers go down)
- Confirm base depth: probe the compacted aggregate base at five or more locations. It should be firm, flat, and at the correct depth for your paver thickness plus 1 in. bedding sand.
- Screed bedding sand: set screed pipes at 1 in. depth, fill with ASTM C33 concrete sand, pull a notched screed board or straight 2x4 along the pipes. Remove pipes, fill channels, smooth gently. Do not compact the bedding sand — it needs to remain workable for minor leveling.
- Snap your working reference lines across the screeded sand using a chalk line. These are your joint alignment guides.
Phase 2: Setting pavers
- Start at a fixed reference corner or the most visible straight edge. Set the first paver squarely on the corner where two chalk lines intersect.
- Place spacers at each corner of the first paver before setting the next one.
- Set each paver with a firm, vertical downward press — do not slide it into place across the bedding sand, which displaces sand and creates an uneven bed. Set it straight down.
- After every 4 rows, lay your straightedge diagonally across the field. Tap any high units down; pull and re-set any low units.
- Every 6–8 rows, check the cumulative joint spacing with your story pole along both the length and width of the field.
- At the perimeter, measure the gap remaining to the edge restraint and calculate cut width for border pavers. Always cut the border pavers after the field is laid, not before.
- Checkpoint: before any compaction, crouch down and sight along the joints in multiple directions. Any waves or misaligned joints are much easier to fix now.
Phase 3: Cutting border pavers
Measure and cut border and edge pavers with an angle grinder fitted with a diamond blade (fast, portable, accurate for straight cuts) or a paver splitter (clean breaks on concrete units). For porcelain, use only a wet-cutting diamond blade, dry cutting porcelain causes cracking and releases hazardous silica dust. Always wear safety glasses, a dust mask rated N95 or P100, and hearing protection. Cut pavers should never be less than half the original unit width; smaller slivers have no structural contribution and tend to work loose.
Phase 4: Initial compaction
- Sweep a thin layer of jointing sand (ASTM C144) over the entire paved surface to partly fill joints.
- Make at least two passes with a plate compactor (minimum 4,000–6,000 lbf centrifugal force). Use a rubber or polymer pad under the plate to protect paver faces, especially for textured or porcelain units.
- Work from the edges toward the center in overlapping passes. The pavers will settle slightly — this is normal and correct.
- After compaction, check flatness with your straightedge. The surface should feel solid and show no rocking pavers.
Phase 5: Joint filling and finishing
This phase is where joint width directly meets joint fill. For step-by-step guidance on how to use patio paver sand, see our how to use patio paver sand guide. If you are using regular jointing sand, sweep multiple passes of ASTM C144 sand into the joints, compact again, repeat until joints are filled to about 1/8 in. For a step-by-step guide on how to put sand between patio pavers, see the linked how-to resource. below the paver chamfer (that small beveled top edge). If you are using polymeric sand, the process is similar but the stakes are higher, the details below matter a lot.
Applying polymeric sand correctly
Polymeric jointing sand contains a binder that activates with water and cures into a firm, weed-resistant, semi-flexible joint. It is one of the best finishing choices for residential patios, but it is also the step where the most DIY mistakes happen. Work through these steps carefully, and check your specific product's technical data sheet before you start, Quikrete, Techniseal, Alliance Gator, King, and FlexLock all have slightly different curing windows and activation procedures. For step-by-step instructions on mixing, filling, and activating Quikrete patio paver jointing sand, see how to use Quikrete Patio Paver Jointing Sand. For step-by-step instructions on how to apply polymeric sand to patio pavers, consult our detailed guide on the topic.
- Check conditions: ambient temperature must be above 50°F (10°C) and expected to stay there for at least 48 hours. No rain for at least 24 hours after activation. Do not apply on wet pavers.
- Make sure joints are dry and open: blow out any standing water or debris from joints with a leaf blower before spreading sand.
- Spread and sweep polymeric sand: pour onto the dry surface and sweep diagonally across paver joints so sand falls fully into the gaps. Fill to the manufacturer's specified depth (typically 1/8 in. / 3 mm below the chamfer — not flush to the surface and not proud of it).
- Compact: run the plate compactor (with protective pad) over the surface to seat the sand into joints. This step is required, not optional — it consolidates the sand and ensures full depth fill.
- Blow off excess: use a leaf blower on low to remove every grain of polymeric sand from paver surfaces. Any residue left on the face of pavers will haze when activated with water and may permanently stain.
- Activate with water: mist the entire surface in multiple light passes — do not flood it. You are wetting the sand in the joints, not washing it out. Two to three misting passes with a garden hose, waiting a few minutes between each, is the standard approach.
- Keep traffic off and protect from rain for the full cure window (24 hours minimum, longer in cool weather).
- Wait at least 30 days before applying a sealer over polymeric-sand-filled joints.
Special scenarios: fire pits, steps, and features
Fire pit rings built into a patio use pavers laid in a circular or fan pattern. Joint widths will vary along the arc, wider on the outside of the curve, narrower on the inside. This is expected and acceptable. Target an average joint of 6–10 mm and fill with a wide-joint polymeric sand or dry mortar. Keep the innermost pavers of a fire pit surround at least 12–18 in. from the fire bowl and use heat-rated materials (concrete pavers tolerate heat better than many natural stones). For patio steps, maintain the same joint width as the field pavers for a consistent look, and ensure each tread is sloped forward 1/8 in. per foot for drainage. Mortar-set steps need 24–48 hours of cure time before any foot traffic.
Tools and materials checklist
| Item | Purpose | Notes |
|---|---|---|
| Plate compactor | Compacting base and seating pavers | Min. 4,000–6,000 lbf / 18–26 kN; rent if not buying |
| Rubber/polymer compactor pad | Protecting paver faces during compaction | Essential for textured and porcelain pavers |
| Angle grinder + diamond blade | Cutting pavers to fit edges | Wet blade for porcelain; dust mask required |
| Paver splitter / masonry chisel | Splitting concrete/brick pavers | Faster than grinder for straight cuts on concrete |
| Level (4 ft. or 6 ft.) | Checking surface flatness | Also use as straightedge for joint alignment |
| Story pole (homemade) | Checking cumulative joint spacing | Mark paver + joint increment on a scrap board |
| Plastic paver spacers (2–4 mm) | Holding consistent joints while laying | Cheap; remove before polymeric sand |
| Chalk line | Snapping layout and alignment lines | Blue chalk is easier to see on sand |
| String line + stakes | Grade and perimeter reference | Bricklayer's line blocks hold taut lines easily |
| Screed pipes (1 in. OD conduit) | Setting bedding sand depth | Two lengths, set parallel at 1 in. depth |
| Notched screed board (2x4) | Leveling bedding sand | Notch each end to ride on screed pipes |
| Rubber mallet | Seating individual pavers | Tap down; do not strike with a steel hammer |
| Leaf blower | Clearing excess polymeric sand from surfaces | Essential before activating polymeric sand |
| Garden hose with misting nozzle | Activating polymeric sand | Mist setting, not full pressure |
| ASTM C33 bedding sand | 1 in. bedding layer | Do not substitute mason sand or stone dust |
| ASTM C144 jointing sand / polymeric sand | Joint fill | Choose product rated for your joint width |
| Compacted aggregate base material | Structural base | Crushed stone or recycled concrete; 4 in. min. |
| Plastic paver edge restraints + spikes | Perimeter retention | Spike at 12 in. max spacing |
Realistic time expectations
A 200 sq. ft. patio is a solid first project. Expect excavation and base preparation to take a full day (or more if you are renting a compactor and doing multiple base lifts). Screeding and laying the paver field takes another full day for most DIYers working at a careful pace. Cutting borders, final compaction, and polymeric sand finishing add a half day. Total: plan for 2.5–3 days of actual work spread over a weekend plus one additional day. Working in direct summer heat slows everything down, so start early and take midday breaks.
Troubleshooting common problems
Sand washing out of joints
Regular jointing sand will slowly wash out in heavy rain, especially on slopes. The fix is to sweep new sand into the joints every season, or to switch to polymeric sand at the next maintenance window. If joints are losing sand rapidly, check that the patio slope is correct (water should run away from the house, not pool on the surface) and inspect for any cracked or raised pavers that are redirecting water into the joint.
Weeds growing in joints
Weeds in paver joints come from airborne seeds landing in joint material, not from below (a proper compacted base eliminates roots from below). The best long-term fix is polymeric sand, which provides a firm, dense joint that leaves very little seed bed. For existing weed problems, remove vegetation manually or with a heat weeder, let the joint dry completely, then refill with polymeric sand. Avoid herbicides that can stain or degrade polymeric binders.
Shifting and uneven pavers
Individual pavers that rock or have shifted out of plane almost always point to a base problem: inadequate base depth, insufficient compaction, or edge restraints that have migrated. Pull the affected pavers (a flat pry bar or dedicated paver puller tool works well), excavate to find and fix the base issue, re-screed the bedding sand in that area only, and reset the pavers. Do not add bedding sand on top of existing bedding sand without removing the old material, stacking sand layers creates an unstable shear plane.
Frost heave
In freeze-thaw climates, frost heave is the most common cause of paver movement over time. The preventive measure is proper base depth (deep enough to get below the frost line, or at minimum the full 4 in. compacted aggregate per ICPI recommendations with excellent drainage so moisture does not collect in the base). Once heave has occurred, the repair is the same as for shifting pavers: pull, re-base, reset. A patio that heaves repeatedly in the same spot likely has a drainage problem, water is pooling in the base during winter. Improving perimeter drainage or adding a subsurface drainage layer is the real fix.
Joints that have drifted wider over time
If you find joints creeping wider than 6–10 mm across a section of the patio, check the edge restraints first. A spike that has pulled out allows the whole field to expand slightly outward, progressively widening every joint. Re-spike the edge restraint, pull the pavers in the affected area back toward the restraint using a rubber mallet and a straightedge block, refill joints with sand, and compact. If the patio has large-scale movement, all the edge restraints may need replacing with a heavier-duty product.
Safety notes worth taking seriously
- Silica dust from cutting concrete, brick, or stone pavers is a serious respiratory hazard. Always wear a P100 or N95 dust mask during cutting, even for short cuts outdoors.
- Wet-cut whenever possible to suppress dust at the source. Porcelain must always be wet-cut.
- Hearing protection is needed when running an angle grinder or plate compactor for extended periods.
- Back strain is the most common DIY injury on paver projects. Bend at the knees when setting pavers, and use a kneeling pad. Concrete pavers at 4x8 weigh around 4–5 lbs each; large-format pavers can exceed 50 lbs per unit.
- Gloves protect against cuts from paver edges and from skin irritation from cement-based joint materials.
- Mark all utility line locations (call 811 before you dig) before any excavation, no matter how shallow it seems.
Sealing: the optional step that extends your work
Sealing is not required for a structurally sound paver installation, but it does protect the joint material, enhance color, and make the surface easier to clean. If you used polymeric sand, wait a minimum of 30 days before applying any sealer, the polymeric binder needs to fully cure first. Apply sealer in dry conditions, above 50°F, and follow the manufacturer's coverage rate precisely. Over-applying sealer leads to a milky, peeling film. Most residential patios benefit from resealing every 3–5 years depending on traffic and sun exposure.
Connecting spacing to the bigger installation picture
Joint width is one decision within a larger installation system. How you choose to fill those joints, whether with basic jointing sand swept and compacted dry, or with polymeric sand properly activated with water, has as much impact on long-term performance as the width itself. The steps for sweeping sand into joints, compacting, and finishing tie directly into the broader workflow of installing pavers in sand. If you are working through the full installation process, the joint-filling and polymeric sand steps deserve the same careful attention as the spacing work covered here.
FAQ
What joint widths should I use for different patio pavers and patterns?
Recommended joint-width ranges (consistent spacing is crucial): - Concrete interlocking pavers (standard rectangular/brick): 2–5 mm (~1/16–3/16 in) for most patterns; 2–3 mm for tighter look. - Concrete pavers in herringbone (45°) or interlock patterns: 2–5 mm; herringbone tolerates the narrower end due to superior mechanical interlock. - Permeable interlocking pavers (PICP): 5–10 mm (0.2–0.4 in) filled with small angular stone (No. 8/9) to preserve infiltration. - Natural stone (flagstone irregular joints): 6–40 mm (1/4–1 5/8 in) depending on aesthetic; keep joint backer depth and joint material compatible. - Porcelain pavers (exterior): 4–6 mm (about 3/16–1/4 in) minimum; many manufacturers require ≥4 mm and often recommend 4–6 mm for mortar or sand-set porcelain. - Wide-joint decorative layouts (stone or large-format): 10–25 mm where grout or mortar is used. Note: avoid excessive joints (>6–10 mm) on interlocking concrete pavers unless the system is designed for wide joints (special product or polymeric formulation). Always follow the paver/manufacturer guidance if it conflicts with general ranges.
Why does joint width matter — what does spacing control?
Joint width affects structural interlock, drainage, weed resistance, load distribution and appearance. Narrow, consistent joints improve interlock and reduce rubbing/chipping but can restrict drainage. Wider joints help drainage and allow flexible joint materials (stone or grout) but may reduce lateral restraint and show pattern irregularity if inconsistent. Correct joint width combined with proper base, edge restraint and joint fill produces a stable, low-maintenance patio.
Step-by-step: how do I measure and mark to keep consistent gaps while laying pavers?
1) Plan and dry-lay a small mock-up to confirm pattern and spacing. 2) Snap chalk lines or use string lines to keep course alignment for straight patterns. 3) Use manufactured plastic spacers, wooden shims, or small PVC spacers sized to your target joint (available in common widths: 3 mm, 6 mm, 1/4 in, etc.). 4) For running-bond/stacked patterns: set spacers at each corner as you lay pavers; for herringbone, use template blocks or spacer jigs because geometry is trickier. 5) Keep a straightedge against the leading edge and check lines frequently; adjust before compacting. 6) Use a small square or template to check corner/joint consistency. 7) Remove excess bedding sand from joints as you progress to maintain consistent depth. 8) After setting a full area, perform initial compaction to seat pavers (which may slightly change spacing); re-check critical lines and edge alignment before final joint filling.
How do I space pavers when using different base methods (bedding sand, compacted aggregate, existing concrete, over grass/unlevel ground, raised or sloped patios)?
Bedding sand over compacted aggregate (typical on-grade): use 1 in. screeded bedding sand and target the joint widths above (2–5 mm for interlock). Compacted aggregate-only (dry-laid PICP): joints are wider (5–10 mm) and filled with No. 8/9 stone. Directly on existing concrete: use cementitious adhesive or mortar-set systems for porcelain/stone; you can maintain narrow joints but must honor control joints of the slab and ensure proper bond. Over grass/poor ground: remove sod, provide full base per ICPI (4 in. compacted aggregate for pedestrian patio) — do not lay pavers directly on turf. Raised patios on pedestals or sleepers: follow manufacturer spacing; porcelain on pedestals commonly uses 3–6 mm spacer clips and requires edge restraint. On slopes: maintain joints but ensure grade/drainage; use smaller joint widths for interlocking pavers for stability and add edge restraint at top/bottom; include drainage outlets. In all cases, match joint width and fill to base type—permeable bases use stone-filled joints; sand-set uses sand/polymeric sand.
What edge restraints are required and why?
Edge restraints (concrete curbing, plastic or metal edge restraints staked into compacted base, or poured concrete band) are essential to keep lateral restraint. Without them, pavers can spread, joints open, and patterns deform. For residential pedestrian patios, use plastic/metal restraints anchored into compacted base or a poured concrete perimeter. For vehicular loads or long edges, use poured concrete or cast-in-place curbing for maximum resistance. Ensure the restraint sits on the compacted base or bedding layer and is fastened per manufacturer instructions.
How do I finish joints — sweeping, compacting, and using polymeric sand or jointing materials?
1) Sweep clean, dry jointing material into joints until joints are fully filled to the specified depth (typically leaving about 1/8 in below chamfer for concrete pavers). 2) Use a plate compactor with a protective pad (rubber/paver mat) and make several passes to vibrate sand into the joints and seat pavers. 3) Sweep additional sand and compact again; repeat until joints are consolidated and sand no longer settles. 4) For polymeric sand: follow the manufacturer's TDS—fill dry, sweep clean off surfaces, then mist or spray in staged passes to activate binder. Protect from rain per TDS (often 24–48 hours) and maintain minimum ambient temperatures (commonly ≥50°F/10°C) during cure. 5) For PICP: fill with clean No. 8/9 angular stone and compact; do NOT use polymeric sand if permeability is required. 6) Avoid overfilling up to chamfers which leads to visible joint lumps; leave recommended clearance below the chamfer if specified by the paver manufacturer.
Next Articles
How to Use Quikrete Patio Paver Jointing Sand: Guide & Tips
How to use Quikrete Patio Paver Jointing Sand: step-by-step application, tools, timing, coverage, and care.
How to Use Patio Paver Sand: Step by Step DIY Guide
Step-by-step guide to apply patio paver sand correctly: prep base, set pavers, fill joints, compact, and troubleshoot is
How to Install Patio Pavers in Sand: Step-by-Step
DIY step-by-step how to install patio pavers in sand, from excavation and base prep to leveling, cutting, joint sand and