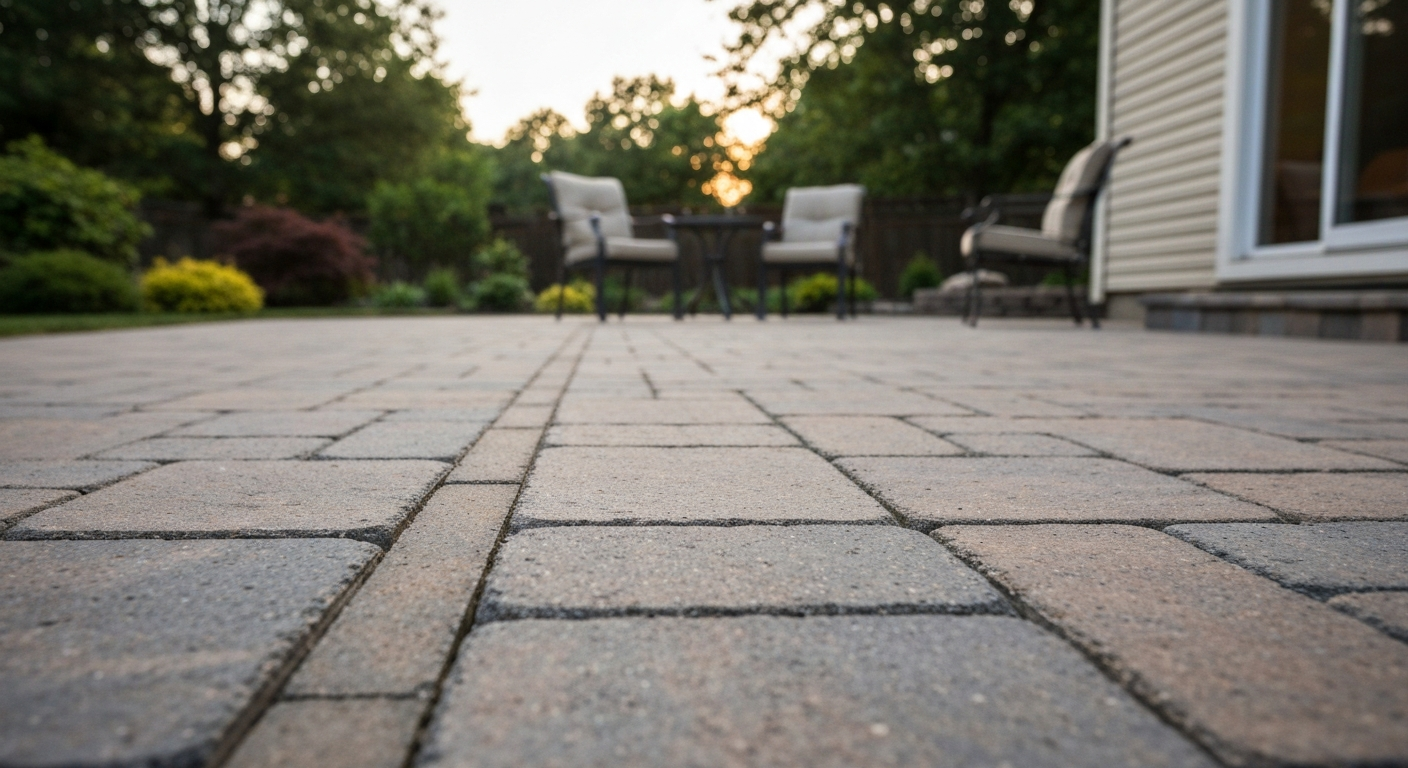
You can build a raised paver patio yourself in a weekend or two. The core sequence is: plan your layout and slope, excavate and grade the site, build your retaining border or edging structure to achieve the height you want, compact a gravel sub-base, screed a 1-inch bedding sand layer, lay and compact your pavers, then lock everything in with polymeric sand. Do each step right and you end up with a patio that drains well, stays level, and doesn't shift or rock under foot traffic. Skip or rush a step and you'll be re-leveling pavers next spring.
How to Build a Raised Patio with Pavers Step by Step

Felix Rowe
23 May 2026
Project Planning and Measuring Your Raised Paver Patio
Before you order a single paver, spend real time on planning. A raised patio is different from a flush ground-level surface because you're managing both height and water. Your two most important decisions happen right here: how much height you want to gain, and where the water goes.
For drainage, the rule is simple but non-negotiable: slope the finished surface away from your house at a minimum of 1/4 inch per foot (about 2%). For a 10-foot-deep patio, that's 2.5 inches of total drop from the house edge to the outer edge. If water can't sheet off the surface and away from your foundation, it finds its way under your pavers instead, and that causes settling, frost heave, and long-term movement. Identify the drainage direction first, then use it to set every grade line that follows.
For height, most raised patios gain 4 to 12 inches above the surrounding grade. Heights beyond 12 inches start behaving more like retaining walls and may require permits and engineered plans depending on your municipality. Check with your local building department before you dig. Even smaller raised patios near a home's foundation may fall under grading or drainage ordinances, so a quick call saves headaches later.
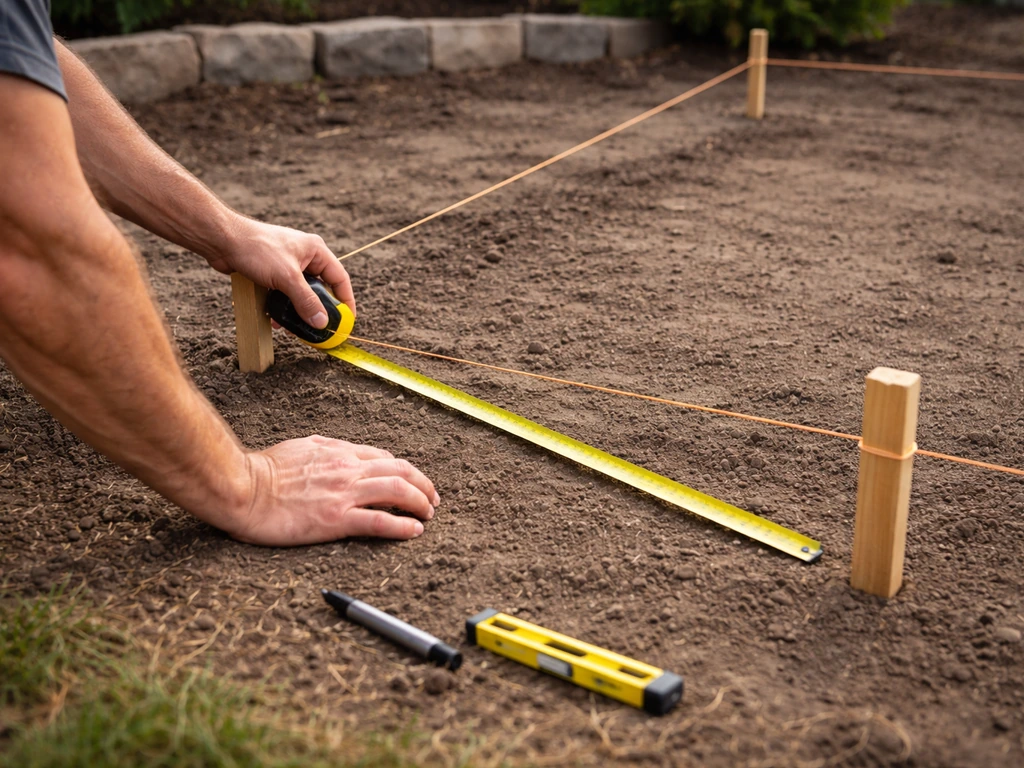
To measure and lay out the space, drive stakes at each corner of your planned patio and run string lines between them. Use batter boards set back from the corners so you can remove and reset strings easily during excavation. Check for square using the 3-4-5 triangle method: measure 3 feet along one string, 4 feet along the adjacent string, and confirm the diagonal is exactly 5 feet. Use a line level or a digital level on a long straightedge to verify your planned slope along the string lines. CMHA recommends using string lines or chalk lines with a straightedge such as a 2x4 to maintain straight joint lines and the predetermined slope when installing the base and pavers string lines and a long straightedge to verify your planned slope. Mark the slope into the string heights now rather than guessing later.
- Sketch your patio to scale on graph paper and note exact dimensions
- Mark the high point (typically nearest the house) and low point (drainage edge) on your sketch
- Calculate total drop: patio depth in feet multiplied by 0.25 inches
- Check local permits: raised surfaces near foundations or over a certain height may require approval
- Call 811 (or your country's equivalent) to locate underground utilities before any digging
Materials and Tools You'll Actually Need
A raised patio project uses more material than a flat ground-level install because you're filling a height gap and building a containment structure. Being accurate with your quantities before you order saves money and last-minute hardware store runs.
Materials list
- Pavers: calculate square footage plus 10% extra for cuts and waste
- Compactable gravel sub-base (crushed stone, typically 3/4-inch clean or crusher run): calculate based on your excavation depth minus 1 inch for sand and paver thickness
- Coarse bedding sand (concrete sand, not play sand): enough for a 1-inch layer under the full paver field
- Retaining wall blocks, thick landscape edging, or concrete border pavers to build the raised perimeter
- Geotextile fabric (landscape fabric): optional but recommended under the gravel base to separate it from the subgrade and prevent migration
- Drainage pipe or gravel drainage channel behind retaining borders where needed
- Polymeric sand for joints
- Paver sealer (optional, but recommended for colored or natural stone pavers)
- Rebar or wall pins if using segmental retaining wall blocks
Tools list
- Plate compactor (rent this — a vibrating plate compactor should exert at least 5,000 lbf for proper base compaction)
- Sod cutter or flat spade for excavation
- Wheelbarrow and shovel
- Long level and tape measure
- String lines, stakes, and line level
- Screed pipes (1-inch diameter) and a straight 2x4 for screeding bedding sand
- Rubber mallet
- Angle grinder or circular saw fitted with a diamond masonry blade for cutting pavers
- Safety glasses, gloves, and hearing protection
- Garden hose or tamper for polymeric sand activation
Realistic time expectation: a 200-square-foot raised patio with a modest 6-inch height gain typically takes two people about two full weekends. The first weekend covers excavation, base work, and border construction. The second weekend covers laying pavers and finishing. Solo builds take longer, and complex cuts or patterns add time.
Preparing the Site: Excavation, Grading, and Drainage
Good site prep is where DIY patios succeed or fail. The goal is a stable, graded subgrade that mirrors the slope you want on the finished surface. If you get this right, everything stacked on top of it stays put.
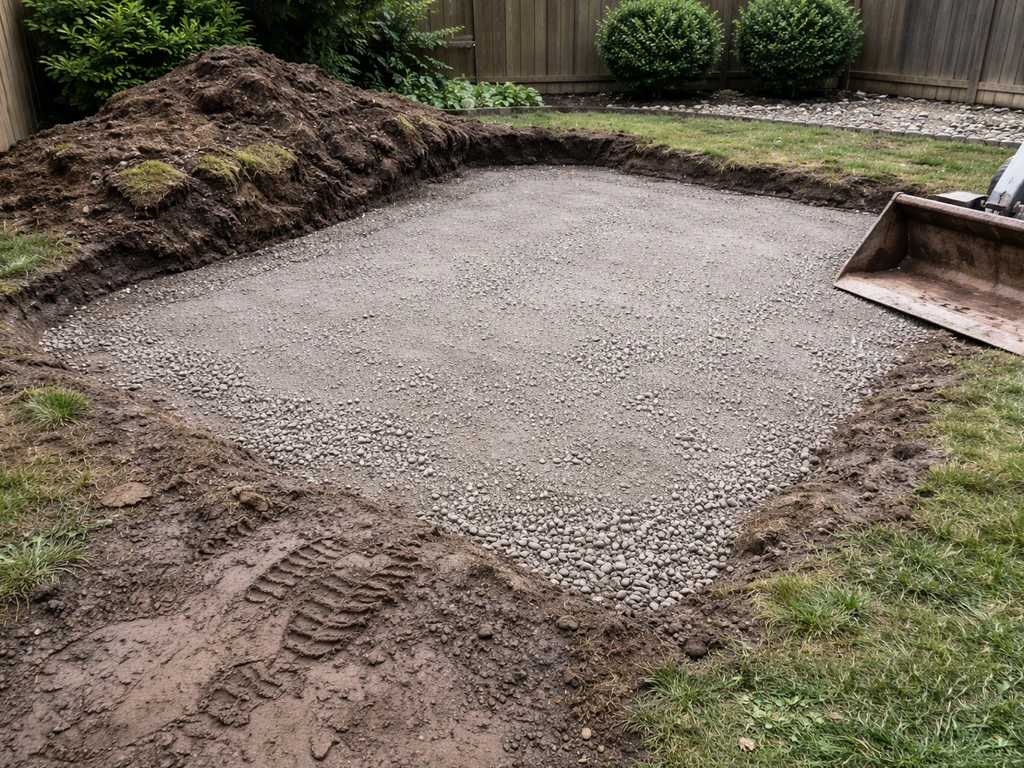
Start by removing sod and topsoil from the entire patio footprint. Topsoil is too soft and organic to build on, it compresses unevenly over time. Dig down to firm subsoil. For a raised patio where you're adding height, you may not need to excavate as deep as a flush-grade install, but you still need to remove all organic material and reach stable ground. A general target: excavate deep enough that your gravel sub-base, bedding sand, and pavers all stack up to your desired finished height, with the paver surface at the grade you planned.
Once you've excavated, compact the exposed subgrade with the plate compactor. Don't skip this pass, loose native soil under the gravel base is one of the most common causes of patio settling. Make two or three passes with the compactor, then check the slope of the subgrade with your level and string lines. The subgrade slope should match your target drainage slope (1/4 inch per foot away from the house). Fix any low spots by removing material rather than adding soil, which compacts poorly.
Drainage deserves special attention on a raised patio. Because you're building up above grade, water naturally wants to find the path of least resistance behind your retaining borders. Plan a drainage channel or perforated pipe along the back (house-side) edge of your patio to intercept water before it builds pressure behind the border structure. Fill the drainage zone with free-draining gravel rather than impermeable fill. This one detail prevents the majority of raised patio failures.
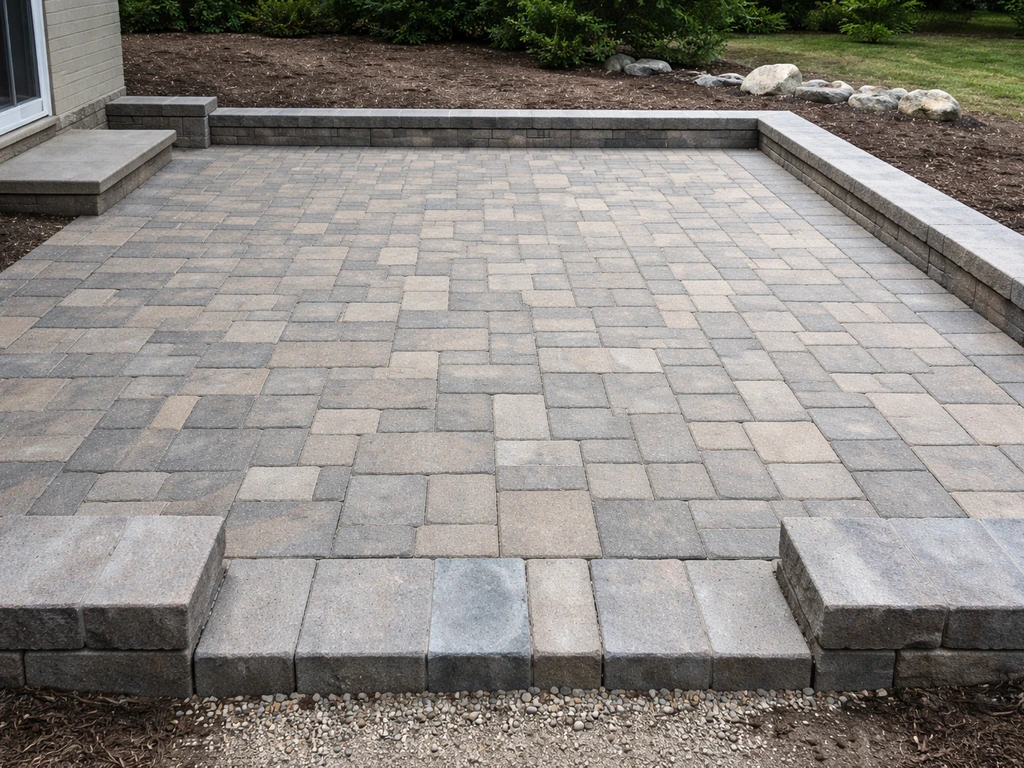
Building the Raised Structure and Edge Restraints
The raised structure is what gives your patio its height and keeps the base and pavers contained. For patios raised less than about 8 inches, heavy-duty plastic or aluminum edging spiked into the ground can work, but most raised patios look and perform better with a proper border of segmental retaining wall blocks, thick concrete border pavers, or mortared brick. If you’re set on brick pavers, focus on installing a sturdy brick edging or border that matches the height plan and supports the rest of the patio build. This section is also where your project overlaps with building a patio wall, which is worth reading up on if your height gain exceeds 8 to 10 inches. If your height gain is similar to a patio wall project, focus on the raised structure and edge restraints that keep everything stable building a patio wall.
For segmental retaining wall blocks, start with a level base course set in a small trench below grade. Dig down at least one inch for every foot of exposed wall height as a buried course, which provides stability. Use a level and rubber mallet to set each block level and at the correct height. Stagger the vertical joints between courses like brickwork (running bond). Backfill behind each course with free-draining gravel as you go up, not compactable fill, so water can move freely through the wall zone and not build up hydrostatic pressure against the blocks.
If you're using a concrete border paver or soldier course at the perimeter, set it first to establish the finished height, then build your gravel base up to meet it. Either way, the inside face of your border structure defines the finished elevation of your paver field. Measure and double-check this height against your string lines before you move on. An error here compounds through every step that follows.
Edge restraints on the interior (not the raised border, but any exposed edges of the paver field not bounded by the retaining structure) should be installed after the gravel base is compacted and before you screed the bedding sand. Set plastic or aluminum edging at the correct height so the top of the edging sits flush with the planned paver surface. Drive spikes every 12 inches. If the edging is too high or too low, pavers will heave or settle at the boundary.
Building the Sub-Base and Getting Compaction Right
The gravel sub-base is the backbone of a stable raised patio. Don't think of it as filler to gain height, think of it as the structural layer that distributes load, handles freeze-thaw cycles, and manages water. A weak sub-base means rocking pavers and uneven settling within a year or two.
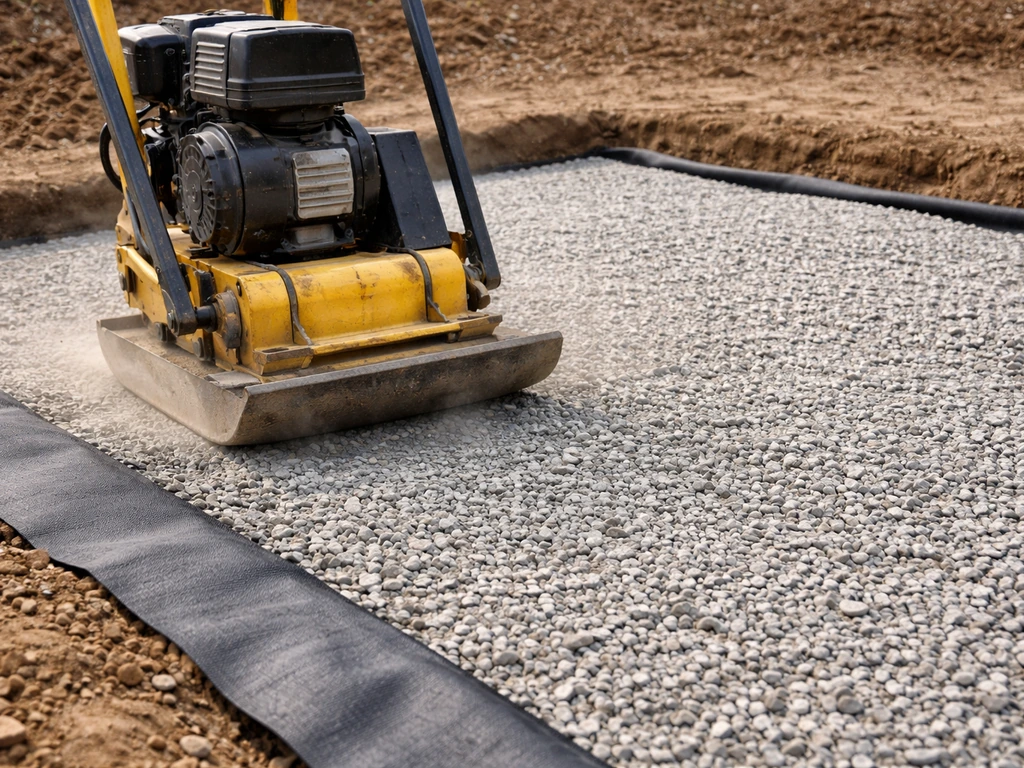
If you're using geotextile fabric, lay it now over the compacted subgrade, lapping it up the inside of your retaining border and trimming it to fit. It keeps the gravel base from migrating into the native soil below and extends the life of your base layer. It's optional but worth the modest cost.
Add crushed stone or crusher run in layers, no more than 4 inches deep per lift, and compact each lift thoroughly with the plate compactor before adding the next. This is critical. A 6-inch base dumped in all at once and compacted once won't compact properly through its full depth. Run the plate compactor in overlapping passes until the surface no longer shows visible displacement under the machine. On a well-compacted base, the compactor should feel like it's riding on solid rock.
Your final compacted gravel surface should sit exactly 1 inch below your planned finished paver height (accounting for the paver thickness). Use your string lines and a tape measure to verify this at multiple points across the patio. Adjust by adding or removing gravel material, never by changing your sand thickness. The bedding sand layer should be a consistent 1 inch everywhere. Varying sand depths lead to uneven settling.
Laying Pavers: Bedding, Leveling, Patterns, and Cutting
Once your base is compacted and your borders are set, you're ready for the satisfying part. But don't rush it, the screeding and laying steps still require patience to get right.
Screeding the bedding sand
Place two 1-inch diameter screed pipes parallel across the compacted base about 4 to 6 feet apart. Fill the space with coarse concrete sand and drag a straight 2x4 across the pipes to create a perfectly smooth 1-inch sand bed. Pull the pipes out carefully, fill the channels with sand, and smooth them gently. Once screeded, do not walk on the sand bed. Every footprint creates a low spot that shows up as a rocking paver later.
Laying and aligning pavers
Start at a straight, visible edge, typically the house side or the main border. Set pavers tight against each other, working outward in a pyramid or fan pattern depending on your chosen layout. Use chalk lines snapped across the paver field every few feet to keep joints straight. A slight drift in alignment compounds fast, checking your chalk lines every 6 to 8 rows prevents a lot of correction later. Set each paver by placing it flat and pushing it straight down into the sand, not sliding it into place, which disturbs the bed.
Common patterns for raised patios include running bond (most forgiving for beginners and good for rectangular spaces), herringbone (at 45 or 90 degrees, provides the best interlock and load distribution), and basketweave. If you're working with large format pavers, a simple grid or offset grid pattern works well and minimizes cuts. If you specifically want large pavers, you can plan around their size, weight, and joint layout so cutting and alignment stay manageable. For more on large paver layouts, that scenario has its own unique considerations worth exploring.
Cutting pavers to fit
Save all cuts for the perimeter. Measure and mark each cut individually rather than assuming the space is perfectly uniform. Use a diamond masonry blade on an angle grinder or circular saw for clean cuts on concrete or brick pavers. For natural stone, use a blade specifically rated for stone. Always wear safety glasses and gloves when cutting. Wet cutting (if your saw supports it) reduces dust significantly and is worth doing outdoors. Make one firm, steady pass rather than forcing the blade, and the cut will be clean.
Compacting the paver field
Once all pavers are laid, run the plate compactor over the entire surface to seat them into the bedding sand. Use a rubber pad or compaction mat between the machine and the pavers to prevent surface damage. Make two or three passes in different directions. The pavers will drop slightly as the sand consolidates, which is normal and expected. Check that the surface is flush with your borders and that no pavers rock. Any rocking paver should be pulled up, extra sand added beneath, and reset before you continue.
Finishing: Joint Sand, Sealing, and Troubleshooting
Filling joints with polymeric sand
Polymeric sand is the standard choice for raised patios because it hardens after activation and resists washout far better than regular sand. Pour it over the dry paver surface and sweep it diagonally across the joints with a push broom, working it down into every joint. Blow off the excess with a leaf blower on a low setting, you don't want sand sitting on the paver surface when you water it. Once joints are full and the surface is clean, activate the polymeric sand with a gentle mist of water. Follow the manufacturer's watering instructions exactly, as overwatering washes the binder out of joints and underwatering means it won't cure properly. Keep the area dry for at least 24 hours after activation. Don't let rain fall on freshly activated polymeric sand before it cures.
Sealing your pavers
Sealing is optional but recommended for colored concrete pavers and most natural stone. Wait at least 30 days after installing polymeric sand before applying a sealer, the sand needs time to fully cure. Apply sealer on a dry day when no rain is expected for 24 to 48 hours. Use a roller or pump sprayer and apply in thin, even coats rather than one heavy coat, which can trap moisture and cause clouding. A good sealer protects color, reduces staining, and adds some weed resistance to the joints.
Troubleshooting common problems
| Problem | Likely Cause | Fix |
|---|---|---|
| Rocking or uneven pavers | Inconsistent bedding sand depth or poorly compacted base | Pull the paver, add or remove sand, reset, and check level |
| Pavers shifting or spreading at the edges | Edge restraints set too high, too low, or not spiked often enough | Reset or add restraints; ensure spikes are every 12 inches |
| Water pooling on the surface | Slope is insufficient or was not maintained through the build | Check slope with a level; if base is at fault, affected area may need to be lifted and re-graded |
| Joints washing out | Regular sand used instead of polymeric, or polymeric activated incorrectly | Remove old sand, dry the surface, reapply polymeric sand correctly |
| Weeds growing in joints | Gaps in polymeric sand or incomplete curing | Pull weeds, top up joints with fresh polymeric sand, and activate properly |
| Retaining border blocks shifting outward | Inadequate buried base course or hydrostatic pressure from poor drainage | Add buried course depth and improve drainage behind the wall with free-draining gravel |
Ongoing maintenance
Inspect your raised patio each spring after the freeze-thaw season. Look for rocking pavers, gaps in the joints, and any lateral movement in the border structure. Catching small movement early means a 20-minute repair rather than a multi-day rebuild. Re-sweep polymeric sand into any joints that have thinned out. Reapply sealer every 2 to 3 years depending on traffic and sun exposure. A raised patio that's been built right and maintained consistently can easily last 25 years or more.
A Quick Pre-Build Checklist
Before you order materials and start digging, run through these checkpoints. Ticking all of these off before you start is the single biggest factor in a smooth, successful build.
- Permit check: confirm with your local building department whether your planned height and proximity to the foundation requires a permit
- Utility locate: call 811 and wait for clearance before excavating
- Drainage direction confirmed: know exactly where water will drain and how it exits the patio area
- Slope calculated: target finished surface slope of 1/4 inch per foot away from the house is built into your string line grades
- Material quantities calculated: pavers (plus 10%), gravel, sand, border blocks, and polymeric sand all ordered
- Plate compactor reserved: rental booked for each weekend phase
- Diamond blade on hand: matched to your paver material
- Weather window confirmed: no rain in the forecast for the polymeric sand activation day
A raised paver patio is genuinely achievable as a DIY project. If you're wondering how to build a small patio with pavers, start by planning your layout, drainage, and base depth before you order materials. It's more complex than a simple flat ground-level install, the height management, drainage planning, and border construction add real steps. But with a solid plan, the right tools, and patience at each stage, you'll end up with a finished patio that looks professional, drains properly, and holds up for decades. Take it one phase at a time and you'll find each step builds logically on the last.
FAQ
How do I calculate how much height and material depth I need for a raised patio with pavers?
Start from your planned finished paver elevation, then work downward: paver thickness plus a consistent 1-inch bedding sand layer, plus the compacted gravel base thickness you choose (in lifts that can be compacted). Your gravel surface must end up about 1 inch below the planned finished paver top so the math lines up at every point when you screed.
What happens if my patio slope is slightly off, like 1/8 inch per foot instead of 1/4?
Water will still move, but it may not sheet off as intended. Even a small reduction can increase the chance of water tracking toward and under the paver edges, especially if soil behind the border holds water. The fix is easiest before pavers go down, by correcting low spots in the compacted base rather than trying to adjust with sand.
Can I raise a patio near my house foundation if I want to keep it higher for drainage?
Be cautious, because raising near a foundation can conflict with local grading and drainage ordinances. A common failure mode is assuming the patio slope will handle everything, then discovering water is still forced toward the wall or into weep areas. Call your building department and verify any required setbacks and drainage discharge direction before you dig.
Do I need a perforated drain pipe behind the border, or is gravel alone enough?
Gravel can help, but a pipe is usually the better control mechanism when you want to intercept and carry water away from the border zone. A practical approach is to place free-draining gravel in a defined drainage layer along the house-side edge and, when the conditions call for it, add a perforated pipe laid at the same general drainage direction so water has a reliable exit path.
What’s the safest way to compact the base without creating dips or humps?
Use multiple overlapping passes, and compact in lift depths you can fully reach, rather than trying to compact a tall layer in one go. After compaction, re-check grade with string lines and a level. If you find low spots, remove material and re-compact, adding soil generally leads to uneven density that shows up as rocking pavers later.
Should I lay geotextile fabric under the gravel base for a raised patio?
It’s optional, but it helps when you have weak native soil or you want to reduce base migration. If you use it, lap it properly into the retaining border area and trim it neatly, because gaps or tears can allow fines to migrate into the base layer over time.
Can I install pavers higher than planned and just use thicker sand to make up the difference?
Avoid that. The sand layer is meant to be a uniform 1-inch bedding bed, thickness variation can cause uneven settling. If your border height is wrong or your base depth is off, correct the gravel base and re-screed to the correct geometry rather than changing sand depth.
How do I prevent rocking pavers after compaction?
First, ensure the base is fully compacted and that you screeded the sand evenly. When setting pavers, place them straight down into the sand without sliding. After you seat them with the compactor, pull up any rocking stones immediately, add sand beneath, and reset, because leaving even a few loose pavers leads to progressive movement.
Is it okay to walk on the screeded sand while I’m laying pavers?
No. Foot traffic creates footprints that become low spots, those show up as uneven lines once pavers are installed. Plan your workflow so you can stand on temporary boards or stay out of the sand bed until paver placement begins.
How do I keep paver joints straight on a raised patio?
Use chalk lines across the field every few feet, and check alignment after several rows, not just at the beginning. Small lateral drift compounds quickly when you’re working from a raised border, because any mismatch between the top of the border and your joint line tends to become visible within a short distance.
What blade should I use if I have different paver materials (concrete pavers, brick, natural stone)?
Match the blade rating to the material. Concrete or brick pavers typically use a diamond masonry blade on an angle grinder or saw, while natural stone should use a blade specifically rated for stone. Also consider wet cutting if your setup allows it, it reduces dust significantly for outdoor work.
Can I use regular sand instead of polymeric sand on a raised patio?
You can, but it’s more likely to wash out and shift joints, which leads to settling and weed growth over time. Polymerically jointed pavers are designed to lock after activation, so if drainage is critical and you want long-term stability, polymeric sand is the safer choice for most raised patio builds.
How much water should I use to activate polymeric sand?
Use a gentle mist and follow the specific activation instructions on the product label. Overwatering can wash out the binder, underwatering can prevent proper curing. A good practical guardrail is to water lightly, avoid pooling, and re-check timing based on the manufacturer’s guidance.
When can I seal a raised patio after installing polymeric sand?
Wait at least 30 days after polymeric sand installation before sealing, because the jointing sand needs time to fully cure. Apply sealer on a dry day and keep the area dry for 24 to 48 hours after application to reduce clouding and uneven curing.
What spring maintenance should I do if I notice movement or gaps?
Inspect for rocking pavers, joint gaps, and lateral shifts in the border. If joints have thinned, sweep polymeric sand into them. If you catch rocking early, the repair is usually localized, removing and resetting individual pavers is far faster than rebuilding sections after freeze-thaw movement worsens.
Next Articles
How to Use Quikrete Patio Paver Jointing Sand: Guide & Tips
How to use Quikrete Patio Paver Jointing Sand: step-by-step application, tools, timing, coverage, and care.

How to Use Patio Paver Sand: Step by Step DIY Guide
Step-by-step guide to apply patio paver sand correctly: prep base, set pavers, fill joints, compact, and troubleshoot is

How to Install Patio Pavers in Sand: Step-by-Step
DIY step-by-step how to install patio pavers in sand, from excavation and base prep to leveling, cutting, joint sand and